2020 NISSAN 370Z light
[x] Cancel search: lightPage 125 of 455
CLEARING THE PROGRAMMED IN-
FORMATION
The following procedure clears the pro-
grammed information from both buttons.
Individual buttons cannot be cleared.
However, individual buttons can be re-
programmed, see “Reprogramming a sin-
gle HomeLink® button” (P.2-57).
To clear all programming
1. Press and hold the two outerHomeLink® buttons until the indicator
light begins to flash in approximately
10 seconds. Do not hold for longer
than 20 seconds.
2. Release both buttons.
HomeLink® is now in the programming
mode and can be programmed at any
time beginning with “Programming
HomeLink®” - Step 1.
REPROGRAMMING A SINGLE
HomeLink® BUTTON
To reprogram a HomeLink® Universal
Transceiver button, complete the follow-
ing.
1. Press and hold the desired HomeLink® button. DO NOT release the button.
2. The indicator light will begin to flash after 20 seconds. Without releasing
the HomeLink® button, proceed with “Programming HomeLink®” - Step 1.
For questions or comments, contact
HomeLink® at: www.homelink.com or 1-
800-355-3515.
The HomeLink® Universal Transceiver
button has now been reprogrammed.
The new device can be activated by
pushing the HomeLink® button that was
just programmed. This procedure will not
affect any other programmed HomeLink®
buttons.
IF YOUR VEHICLE IS STOLEN
If your vehicle is stolen, you should
change the codes of any non-rolling code
device that has been programmed into
HomeLink®. Consult the Owner’s Manual
of each device or call the manufacturer or
retailer of those devices for additional
information.
When your vehicle is recovered, you will
need to reprogram the HomeLink® Uni-
versal Transceiver with your new trans-
mitter information.
FCC Notice:
For USA:
This device complies with Part 15 of the
FCC Rules. Operation is subject to the
following two conditions: (1) This device
may not cause harmful interference,
and (2) this device must accept any interference received, including inter-
ference that may cause undesired op-
eration.
NOTE:
Changes or modifications not expressly
approved by the party responsible for
compliance could void the user’s
authority to operate the equipment.
For Canada:
This device complies with Industry Ca-
nada licence-exempt RSS standard(s).
Operation is subject to the following
two conditions: (1) this device may not
cause interference, and (2) this device
must accept any interference, including
interference that may cause undesired
operation of the device.
Instruments and controls2-57
Page 132 of 455
3-6Pre-driving checks and adjustments
WARNING
.Radio waves could adversely af-
fect electric medical equipment.
Those who use a pacemaker
should contact the electric med-
ical equipment manufacturer for
the possible influences before
use.
. The Intelligent Key transmits
radio waves when the buttons
are pushed. The FAA advises that
the radio waves may affect air-
craft navigation and communica-
tion systems. Do not operate the
Intelligent Key while on an air-
plane. Make sure the buttons are
not operated unintentionally
when the unit is stored during a
flight.
The Intelligent Key system can operate all
the door and rear hatch/trunk lid locks
using the remote controller function or
pushing the request switch on the vehicle
without taking the key out from a pocket
or purse. The operating environment
and/or conditions may affect the Intelli-
gent Key system operation.
Be sure to read the following before using
the Intelligent Key system.
CAUTION
. Be sure to carry the Intelligent
Key with you when operating the
vehicle.
. Never leave the Intelligent Key in
the vehicle when you leave the
vehicle.
The Intelligent Key is always communi-
cating with the vehicle as it receives radio
waves. The Intelligent Key system trans-
mits weak radio waves. Environmental
conditions may interfere with the opera-
tion of the Intelligent Key system under
the following operating conditions.
. When operating near a location where
strong radio waves are transmitted,
such as a TV tower, power station and
broadcasting station.
. When in possession of wireless equip-
ment, such as a cellular telephone,
transceiver, and CB radio.
. When the Intelligent Key is in contact
with or covered by metallic materials.
. When any type of radio wave remote
control is used nearby.
. When the Intelligent Key is placed near
an electric appliance such as a perso-
nal computer. .
When the vehicle is parked near a
parking meter.
In such cases, correct the operating
conditions before using the Intelligent
Key function or use the mechanical key.
Although the life of the battery varies
depending on the operating conditions,
the battery’s life is approximately 2 years.
If the battery is discharged, replace it with
a new one.
When the Intelligent Key battery is almost
discharged, insert the Intelligent Key into
the Intelligent Key port to start the
engine. Replace the discharged battery
with a new one as soon as possible. For
more details, see “Push-button ignition
switch” (P.5-8).
Since the Intelligent Key is continuously
receiving radio waves, if the key is left
near equipment which transmits strong
radio waves, such as signals from a TV
and personal computer, the battery life
may become shorter.
For information regarding replacement of
a battery, see “Intelligent Key battery
replacement” (P.8-20).
As many as 4 Intelligent Keys can be
registered and used with one vehicle. For
information about the purchase and use
of additional Intelligent Keys, contact a
NISSAN dealer.
INTELLIGENT KEY SYSTEM
Page 139 of 455

WARNING
The Intelligent Key transmits radio
waves when the buttons are pushed.
The FAA advises that the radio waves
may affect aircraft navigation and
communication systems. Do not op-
erate the Intelligent Key while on an
airplane. Make sure the buttons are
not operated unintentionally when
the unit is stored during a flight.
It is possible to lock/unlock all doors, fuel-
filler door, activate the panic alarm and
open the windows by pushing the but-
tons on the Intelligent Key from outside
the vehicle.
Before locking the doors, make sure the
Intelligent Key is not left in the vehicle.
The LOCK/UNLOCK button on the Intelli-
gent Key can operate at a distance of
approximately 33 ft (10 m) from the
vehicle. (The effective distance depends
upon the conditions around the vehicle.)
As many as 4 Intelligent Keys can be used
with one vehicle. For information con-
cerning the purchase and use of addi-
tional Intelligent Keys, contact a NISSAN
dealer.
The lock and unlock buttons on the Intelligent Key will not operate when:
.
the distance between the Intelligent
Key and the vehicle is over 33 ft (10 m).
. the Intelligent Key battery is dis-
charged.
After locking with the remote keyless
entry function, pull the door handle to
make sure the doors are securely locked.
The LOCK/UNLOCK operating range var-
ies depending on the environment. To
securely operate the lock and unlock
buttons, approach the vehicle to about 3
ft (1 m) from the door.
SPA2252B
1. LOCK button2. UNLOCK button3. PANIC button
HOW TO USE REMOTE KEYLESS
ENTRY SYSTEM
When you lock or unlock the doors and
rear hatch/trunk lid, the hazard indicator
will flash and the horn (or the outside
chime) will sound as a confirmation. For
details, see “Setting hazard indicator and
horn mode” (P.3-14).
Pre-driving checks and adjustments3-13
REMOTE KEYLESS ENTRY SYSTEM
Page 140 of 455

3-14Pre-driving checks and adjustments
Locking doors, rear hatch/trunk lid
and fuel-filler door
1. Push the ignition switch to the OFFposition and make sure you carry the
Intelligent Key with you.*
2. Close all the doors and the rear hatch/ trunk lid.
3. Push the LOCK
buttonon the
Intelligent Key.
4. All the doors, the rear hatch/trunk lid and fuel-filler door will lock.
5. The hazard indicator flashes twice and the horn chirps once.
*: Doors and the rear hatch/trunk lid will
lock with the Intelligent Key while the
ignition switch is in the ACC or ON
position.
Unlocking doors, rear hatch/trunk
lid and fuel-filler door
1. Push the UNLOCKbuttonon
the Intelligent Key once.
2. The hazard indicator flashes once. The driver’s door and fuel-filler door will
unlock.
3. Push the UNLOCK
button on the
Intelligent Key again within 60 sec-
onds.
4. The hazard indicator flashes once again. All the doors and the rear hatch/trunk lid will unlock.
All doors and the rear hatch/trunk lid will
be locked automatically unless one of the
following operations is performed within 1
minute after pushing the UNLOCK
button on the Intelligent Key while the
doors are locked. If during this 1-minute
time period, the UNLOCK
button on
the Intelligent Key is pushed, all doors and
the rear hatch/trunk lid will be locked
automatically after another 1 minute.
. Opening any door
. Pushing the ignition switch
. Inserting the Intelligent Key into the
Intelligent Key port
Opening windows
The UNLOCKbutton operation also
allows you to open a window that is
equipped with the automatic open/close
function. (See “Power windows” (P.2-48).)
To open the window, push the UNLOCK
buttonon the Intelligent Key for
about 3 seconds after the door is un-
locked.
To stop opening, release the UNLOCK
button.
Window cannot be closed using the
Intelligent Key.
Using panic alarm
If you are near your vehicle and feel
threatened, you may activate the alarm
to call attention as follows:
1. Push the PANIC
buttonon the
Intelligent Key for more than 1 sec-
ond.
2. The theft warning alarm and head- lights will stay on for 25 seconds.
3. The panic alarm stops when:
.It has run for 25 seconds, or.Any of the buttons on the Intelligent Key are pushed. (Note: PANIC but-
ton should be pushed for more
than 1 second.)
Setting hazard indicator and horn
mode
This vehicle is set in hazard indicator and
horn mode when you first receive the
vehicle.
In hazard indicator and horn mode, when
the LOCK
buttonis pushed, the
hazard indicator flashes twice and the
horn chirps once. When the UNLOCK
buttonis pushed, the hazard indicator
flashes once.
If horns are not necessary, the system
can be switched to the hazard indicator
mode.
Page 142 of 455
3-16Pre-driving checks and adjustments
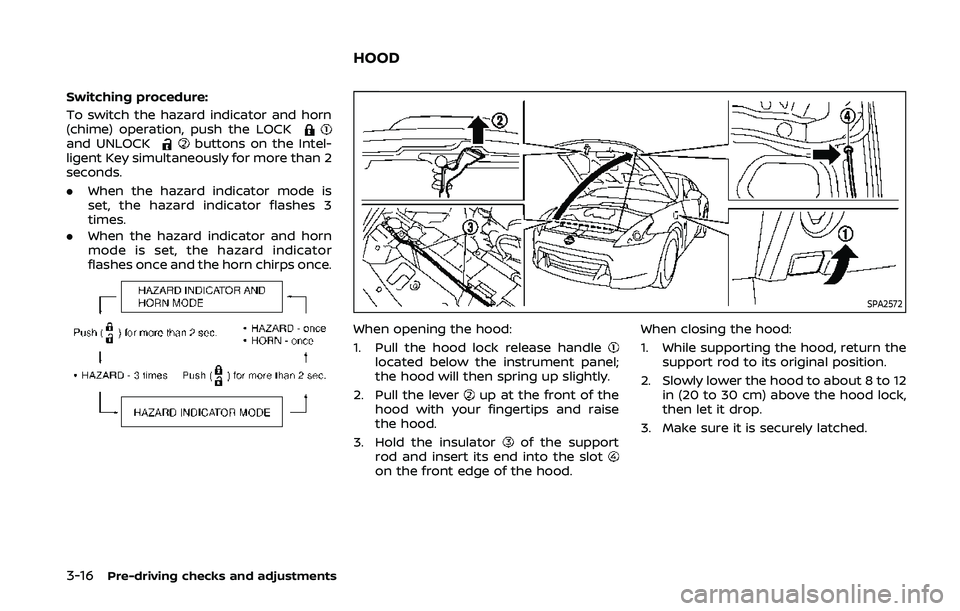
Switching procedure:
To switch the hazard indicator and horn
(chime) operation, push the LOCK
and UNLOCKbuttons on the Intel-
ligent Key simultaneously for more than 2
seconds.
. When the hazard indicator mode is
set, the hazard indicator flashes 3
times.
. When the hazard indicator and horn
mode is set, the hazard indicator
flashes once and the horn chirps once.
SPA2572
When opening the hood:
1. Pull the hood lock release handle
located below the instrument panel;
the hood will then spring up slightly.
2. Pull the lever
up at the front of the
hood with your fingertips and raise
the hood.
3. Hold the insulator
of the support
rod and insert its end into the slot
on the front edge of the hood. When closing the hood:
1. While supporting the hood, return the
support rod to its original position.
2. Slowly lower the hood to about 8 to 12 in (20 to 30 cm) above the hood lock,
then let it drop.
3. Make sure it is securely latched.
HOOD
Page 147 of 455
SPA2682
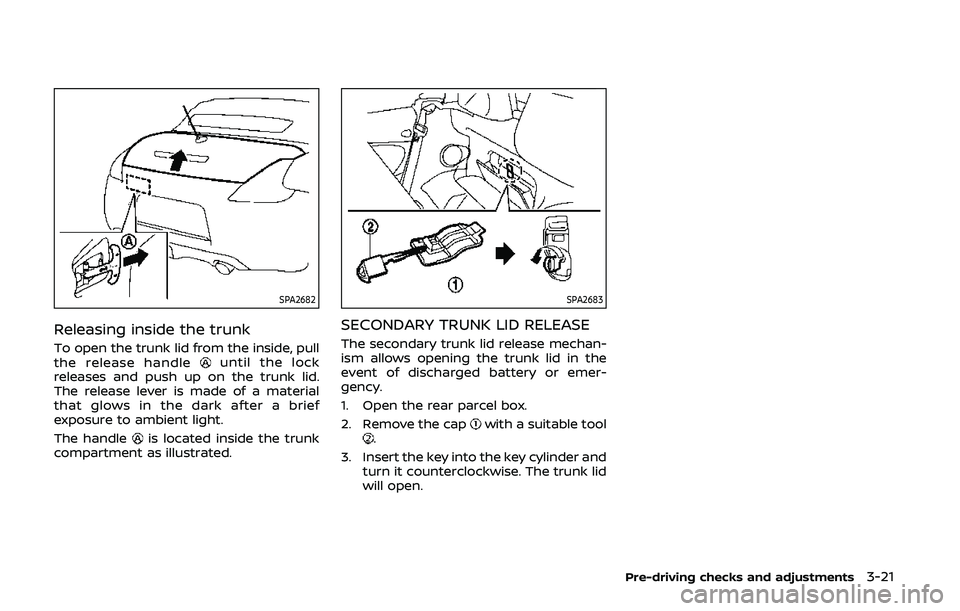
Releasing inside the trunk
To open the trunk lid from the inside, pull
the release handleuntil the lock
releases and push up on the trunk lid.
The release lever is made of a material
that glows in the dark after a brief
exposure to ambient light.
The handle
is located inside the trunk
compartment as illustrated.
SPA2683
SECONDARY TRUNK LID RELEASE
The secondary trunk lid release mechan-
ism allows opening the trunk lid in the
event of discharged battery or emer-
gency.
1. Open the rear parcel box.
2. Remove the cap
with a suitable tool.
3. Insert the key into the key cylinder and turn it counterclockwise. The trunk lid
will open.
Pre-driving checks and adjustments3-21
Page 148 of 455
3-22Pre-driving checks and adjustments
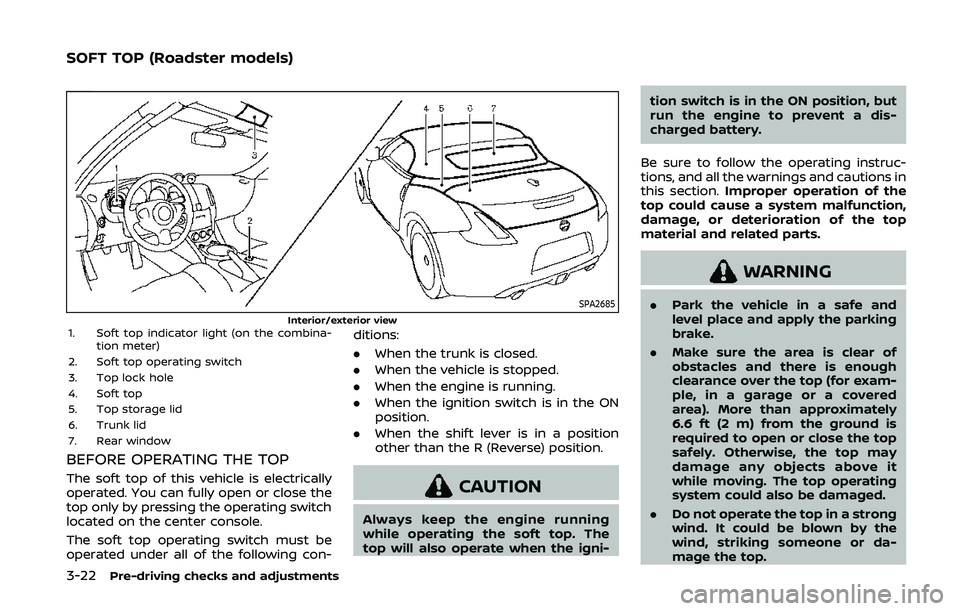
SPA2685Interior/exterior view1. Soft top indicator light (on the combina-tion meter)
2. Soft top operating switch
3. Top lock hole
4. Soft top
5. Top storage lid
6. Trunk lid
7. Rear window
BEFORE OPERATING THE TOP
The soft top of this vehicle is electrically
operated. You can fully open or close the
top only by pressing the operating switch
located on the center console.
The soft top operating switch must be
operated under all of the following con- ditions:
.
When the trunk is closed.
. When the vehicle is stopped.
. When the engine is running.
. When the ignition switch is in the ON
position.
. When the shift lever is in a position
other than the R (Reverse) position.CAUTION
Always keep the engine running
while operating the soft top. The
top will also operate when the igni- tion switch is in the ON position, but
run the engine to prevent a dis-
charged battery.
Be sure to follow the operating instruc-
tions, and all the warnings and cautions in
this section. Improper operation of the
top could cause a system malfunction,
damage, or deterioration of the top
material and related parts.
WARNING
. Park the vehicle in a safe and
level place and apply the parking
brake.
. Make sure the area is clear of
obstacles and there is enough
clearance over the top (for exam-
ple, in a garage or a covered
area). More than approximately
6.6 ft (2 m) from the ground is
required to open or close the top
safely. Otherwise, the top may
damage any objects above it
while moving. The top operating
system could also be damaged.
. Do not operate the top in a strong
wind. It could be blown by the
wind, striking someone or da-
mage the top.
SOFT TOP (Roadster models)
Page 151 of 455
SPA1691
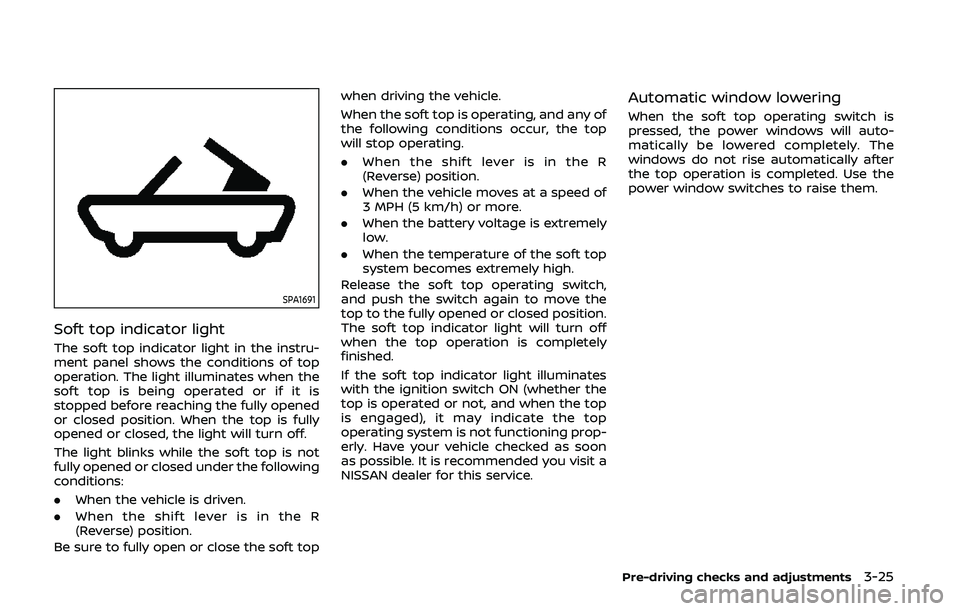
Soft top indicator light
The soft top indicator light in the instru-
ment panel shows the conditions of top
operation. The light illuminates when the
soft top is being operated or if it is
stopped before reaching the fully opened
or closed position. When the top is fully
opened or closed, the light will turn off.
The light blinks while the soft top is not
fully opened or closed under the following
conditions:
.When the vehicle is driven.
. When the shift lever is in the R
(Reverse) position.
Be sure to fully open or close the soft top when driving the vehicle.
When the soft top is operating, and any of
the following conditions occur, the top
will stop operating.
.
When the shift lever is in the R
(Reverse) position.
. When the vehicle moves at a speed of
3 MPH (5 km/h) or more.
. When the battery voltage is extremely
low.
. When the temperature of the soft top
system becomes extremely high.
Release the soft top operating switch,
and push the switch again to move the
top to the fully opened or closed position.
The soft top indicator light will turn off
when the top operation is completely
finished.
If the soft top indicator light illuminates
with the ignition switch ON (whether the
top is operated or not, and when the top
is engaged), it may indicate the top
operating system is not functioning prop-
erly. Have your vehicle checked as soon
as possible. It is recommended you visit a
NISSAN dealer for this service.
Automatic window lowering
When the soft top operating switch is
pressed, the power windows will auto-
matically be lowered completely. The
windows do not rise automatically after
the top operation is completed. Use the
power window switches to raise them.
Pre-driving checks and adjustments3-25