2020 NISSAN 370Z trunk
[x] Cancel search: trunkPage 150 of 455

3-24Pre-driving checks and adjustments
.Do not place anything in the top
storage area. The top will not fit
there properly, and this could
damage the top and/or the vehi-
cle body.
. Do not sit or place excessive
weight on the top and the sto-
rage lid, especially when the top
is being operated. The top may be
damaged.
. Do not drive the vehicle with the
top partially opened. Always
make sure the top is either fully
opened or closed before driving.
. Secure items so that they cannot
be blown from the vehicle while
driving with the top open.
. Do not operate the top manually
except for emergency cases.
Manual operation may damage
the top.
. Be sure to fully open or fully close
the top. Do not release the switch
half way through the roof open-
ing or closing process. If the top is
only partially opened, significant
damage to the top could occur.
Make sure the trunk lid is securely closed
before operating the top.
SPA2706
WHEN OPERATING THE TOP
WARNING
Keep hands and other parts of the
body away from moving parts such
as the top, storage lid, side flap
and power windows.
CAUTION
Keep all parts of the top linkage clear
of obstructions, or the top latch may
not be securely locked. NOTE:
.
In case of low battery or low tem-
perature, the top may temporarily
stop moving during the operation.
This functions to protect the top
control mechanism, and it is not a
malfunction.
. If the top is opened and closed
repeatedly in a short period of time
or the top operation is stopped while
opening or closing, the top opera-
tion may be automatically stopped
to protect the system. Wait for ap-
proximately 5 minutes before oper-
ating the top again.
Page 154 of 455

3-28Pre-driving checks and adjustments
TROUBLESHOOTING GUIDE
If the soft top stops halfway during operation or does not operate normally, follow the procedures shown in the following table. If the
procedures in the following table do not solve the symptom, have your vehicle inspected immediately. It is recommended to visit a
NISSAN dealer for this service.
SymptomBeepPossible cause Possible solution
The OPEN side of the soft top oper-
ating switch is pushed, but the soft
top does not operate. Sounds twice
The OPEN side of the soft top operating
switch is pushed while the soft top is fully
open, or the CLOSE side of the soft top
operating switch is pushed while the soft
top is fully closed. Push the CLOSE side of the soft top operating
switch when the soft top is fully open. Push
the OPEN side of the soft top operating switch
when the soft top is fully closed.
Sounds twice The shift lever is in the R (Reverse) position. Shift the shift lever to the P (Park) or N
(Neutral) position (automatic transmission
models only), or shift the shift lever to the N
(Neutral) position (manual transmission mod-
els only), and then operate the soft top.
Sounds twice The trunk lid is opened. Fully close the trunk lid.
Does not sound The battery voltage is low.
Start the engine again and operate the soft
top.
Does not sound The operation stops to protect the system. Wait for approximately 5 minutes.
The soft top stops halfway during
operation. Sounds twice
Objects are trapped in the moving structure
of the soft top. Check that an object is not trapped inside the
rear parcel shelf, side flap and soft top. After
the check, place the ignition switch in the OFF
position, start the engine again and then
operate the soft top.
Sounds twice The battery voltage is low. Start the engine again and operate the soft
top.
When the vehicle is being driven, the
beep sounds. Sounds con-
tinuously The soft top is partially opened. Immediately park the vehicle in a safe location
and fully open or fully close the soft top.
Page 155 of 455
IF THE TOP DOES NOT OPEN OR
CLOSE ELECTRICALLY
If you cannot operate the soft top with
the operating switch, first check whether
all the following operating conditions are
met.
.vehicle is stopped
. ignition switch is ON (Run the engine
when operating the top.)
. the trunk is closed
. the shift lever is in a position other
than the R (Reverse) position
If the top still does not move under the
above conditions or has any system
malfunction, it is recommended you visit
a NISSAN dealer as soon as possible.
When you must close the top by yourself,
in the event of emergency or when an
immediate dealer service is not available,
close the top manually according to the
procedures shown in this section.
When closing the soft top manually:
. Move the vehicle to a safe place, away
from traffic.
. Two people should perform this pro-
cedure, as some of the top parts are
extremely heavy.
The top cannot be opened manually.
WARNING
. Do not drive with the top partially
opened.
. If the top cannot be operated
properly, have your vehicle
checked as soon as possible. It is
recommended you visit a NISSAN
dealer for this service.
CAUTION
The storage lid is extremely heavy.
The storage lid should be manually
opened or closed by two people.
SPA2715
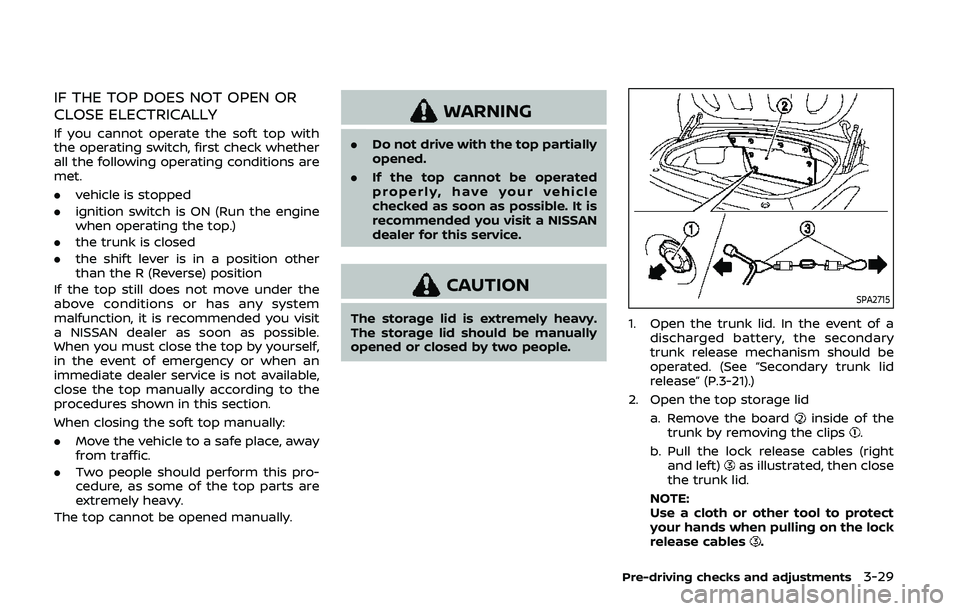
1. Open the trunk lid. In the event of a
discharged battery, the secondary
trunk release mechanism should be
operated. (See “Secondary trunk lid
release” (P.3-21).)
2. Open the top storage lid a. Remove the board
inside of the
trunk by removing the clips.
b. Pull the lock release cables (right and left)
as illustrated, then close
the trunk lid.
NOTE:
Use a cloth or other tool to protect
your hands when pulling on the lock
release cables
.
Pre-driving checks and adjustments3-29
Page 156 of 455
3-30Pre-driving checks and adjustments
SPA2686
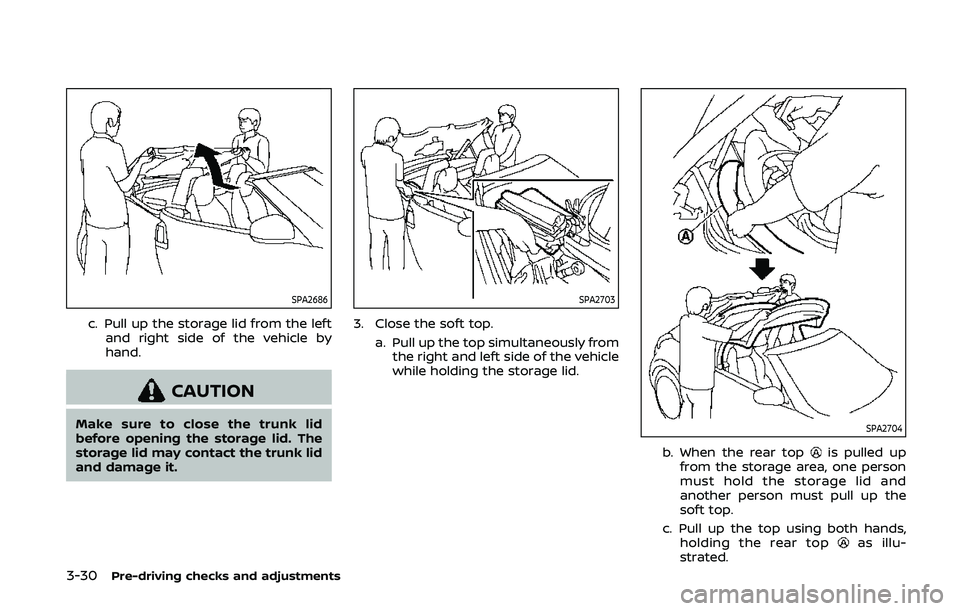
c. Pull up the storage lid from the leftand right side of the vehicle by
hand.
CAUTION
Make sure to close the trunk lid
before opening the storage lid. The
storage lid may contact the trunk lid
and damage it.
SPA2703
3. Close the soft top.
a. Pull up the top simultaneously fromthe right and left side of the vehicle
while holding the storage lid.
SPA2704
b. When the rear topis pulled up
from the storage area, one person
must hold the storage lid and
another person must pull up the
soft top.
c. Pull up the top using both hands, holding the rear top
as illu-
strated.
Page 158 of 455
3-32Pre-driving checks and adjustments
SPA2688
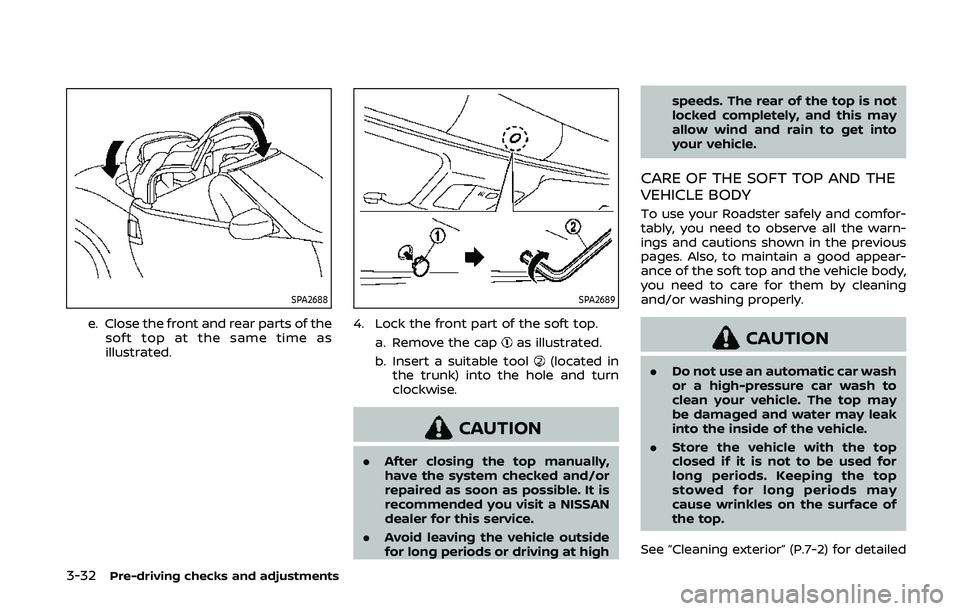
e. Close the front and rear parts of thesoft top at the same time as
illustrated.
SPA2689
4. Lock the front part of the soft top.
a. Remove the cap
as illustrated.
b. Insert a suitable tool
(located in
the trunk) into the hole and turn
clockwise.
CAUTION
. After closing the top manually,
have the system checked and/or
repaired as soon as possible. It is
recommended you visit a NISSAN
dealer for this service.
. Avoid leaving the vehicle outside
for long periods or driving at high speeds. The rear of the top is not
locked completely, and this may
allow wind and rain to get into
your vehicle.
CARE OF THE SOFT TOP AND THE
VEHICLE BODY
To use your Roadster safely and comfor-
tably, you need to observe all the warn-
ings and cautions shown in the previous
pages. Also, to maintain a good appear-
ance of the soft top and the vehicle body,
you need to care for them by cleaning
and/or washing properly.
CAUTION
.
Do not use an automatic car wash
or a high-pressure car wash to
clean your vehicle. The top may
be damaged and water may leak
into the inside of the vehicle.
. Store the vehicle with the top
closed if it is not to be used for
long periods. Keeping the top
stowed for long periods may
cause wrinkles on the surface of
the top.
See “Cleaning exterior” (P.7-2) for detailed
Page 159 of 455
instructions.
.A protective clear tape is applied to
the top storage lid painted surface
where the soft top contacts the sur-
face. When the top is fully closed, the
tape may transmit some light, visible
from the inside of the vehicle. This
does not affect the water and air
tightness of the seal.
. The inner surface of the trunk and top
storage lids may show a fibrous, or
marbled pattern. This is the normal
appearance of the material used in
these parts.
JVP0315X
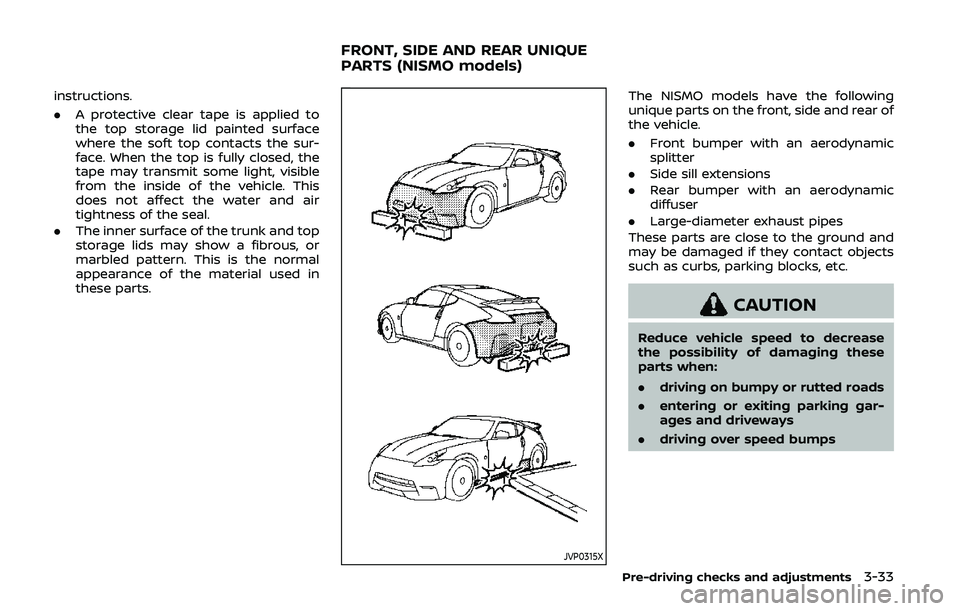
The NISMO models have the following
unique parts on the front, side and rear of
the vehicle.
.Front bumper with an aerodynamic
splitter
. Side sill extensions
. Rear bumper with an aerodynamic
diffuser
. Large-diameter exhaust pipes
These parts are close to the ground and
may be damaged if they contact objects
such as curbs, parking blocks, etc.
CAUTION
Reduce vehicle speed to decrease
the possibility of damaging these
parts when:
. driving on bumpy or rutted roads
. entering or exiting parking gar-
ages and driveways
. driving over speed bumps
Pre-driving checks and adjustments3-33
FRONT, SIDE AND REAR UNIQUE
PARTS (NISMO models)
Page 190 of 455
4-22Center display, heater, air conditioner, audio, phone and voice recognition systems
.When the ignition switch is placed in
the OFF position and then placed back
in the ON position.
Language select mode
To change the language of the warning
text displayed on the mirror display, push
and hold the *switch
for approxi-
mately 6 to 11 seconds when the shift
lever is in the R (Reverse) position. When
the language select screen is displayed,
push the *switch
repeatedly until the
preferred language is displayed.
If the switch is not pushed for approxi-
mately 5 seconds, the language select
mode will automatically return to the
normal mode.
REARVIEW MONITOR SYSTEM LIM-
ITATIONS
WARNING
Listed below are the system limita-
tions for RearView Monitor. Failure to
operate the vehicle in accordance
with these system limitations could
result in serious injury or death.
. The system cannot completely
eliminate blind spots and may
not show every object. .
Underneath the bumper and the
corner areas of the bumper can-
not be viewed on the RearView
Monitor because of its monitoring
range limitation. The system will
not show small objects below the
bumper, and may not show ob-
jects close to the bumper or on
the ground.
. Objects viewed in the RearView
Monitor differ from actual dis-
tance because a wide-angle lens
is used.
. Objects in the RearView Monitor
will appear visually opposite
compared to when viewed in the
rear view and outside mirrors.
. Use the displayed lines as a re-
ference. The lines are highly af-
fected by the number of
occupants, fuel level, vehicle po-
sition, road conditions and road
grade.
. Make sure that the trunk lid or
rear hatch is securely closed
when backing up.
. Do not put anything on the rear
view camera. The rear view cam-
era is installed above the license
plate. .
When washing the vehicle with
high-pressure water, be sure not
to spray it around the camera.
Otherwise, water may enter the
camera unit causing water con-
densation on the lens, a malfunc-
tion, fire or an electric shock.
. Do not strike the camera. It is a
precision instrument. Otherwise,
it may malfunction or cause da-
mage resulting in a fire or an
electric shock.
The following are operating limitations
and do not represent a system malfunc-
tion:
. When the temperature is extremely
high or low, the screen may not clearly
display objects.
. When strong light is directly coming
on the camera, objects may not be
displayed clearly.
. Vertical lines may be seen in objects
on the screen. This is due to strong
reflected light from the bumper.
. The screen may flicker under fluores-
cent light.
. The colors of objects on the RearView
Monitor may differ somewhat from
the actual color of objects.
Page 197 of 455
REARVIEW MONITOR SYSTEM LIM-
ITATIONS
WARNING
Listed below are the system limita-
tions for RearView Monitor. Failure to
operate the vehicle in accordance
with these system limitations could
result in serious injury or death.
.The system cannot completely
eliminate blind spots and may
not show every object.
. Underneath the bumper and the
corner areas of the bumper can-
not be viewed on the RearView
Monitor because of its monitoring
range limitation. The system will
not show small objects below the
bumper, and may not show ob-
jects close to the bumper or on
the ground.
. Objects viewed in the RearView
Monitor differ from actual dis-
tance because a wide-angle lens
is used.
. Objects in the RearView Monitor
will appear visually opposite
compared to when viewed in the
rear view and outside mirrors. .
Use the displayed lines as a re-
ference. The lines are highly af-
fected by the number of
occupants, fuel level, vehicle po-
sition, road conditions and road
grade.
. Make sure that the trunk lid or
rear hatch is securely closed
when backing up.
. Do not put anything on the rear
view camera. The rear view cam-
era is installed above the license
plate.
. When washing the vehicle with
high-pressure water, be sure not
to spray it around the camera.
Otherwise, water may enter the
camera unit causing water con-
densation on the lens, a malfunc-
tion, fire or an electric shock.
. Do not strike the camera. It is a
precision instrument. Otherwise,
it may malfunction or cause da-
mage resulting in a fire or an
electric shock.
The following are operating limitations
and do not represent a system malfunc-
tion:
. When the temperature is extremely
high or low, the screen may not clearly display objects.
. When strong light is directly coming
on the camera, objects may not be
displayed clearly.
. Vertical lines may be seen in objects
on the screen. This is due to strong
reflected light from the bumper.
. The screen may flicker under fluores-
cent light.
. The colors of objects on the RearView
Monitor may differ somewhat from
the actual color of objects.
. Objects on the monitor may not be
clear in a dark environment.
. If dirt, rain or snow accumulates on
the camera, the RearView Monitor
may not display objects clearly. Clean
the camera.
. Do not use wax on the camera win-
dow. Wipe off any wax with a clean
cloth dampened with mild detergent
diluted with water.
Center display, heater, air conditioner, audio, phone and voice recognition systems4-29