2020 NISSAN 370Z fog light
[x] Cancel search: fog lightPage 103 of 455

To defog/defrost the rear window glass
and outside mirrors, start the engine and
push the switch
on. The indicator lightwill come on. Push the switch again to
turn the defroster off.
It will automatically turn off in approxi-
mately 15 minutes.
CAUTION
. When cleaning the inner side of
the rear window, be careful not to
scratch or damage the rear win-
dow defroster.
. Do not use the rear window
defroster switch while the soft
top is being operated or fully
opened. The heat may damage
the top material and/or compo-
nents (for Roadster models).
XENON HEADLIGHTS
WARNING
HIGH VOLTAGE
. When xenon headlights are on,
they produce a high voltage. To
prevent an electric shock, never
attempt to modify or disassem-
ble. Always have your xenon
headlights replaced by a certified
service technician.
. Xenon headlights provide consid-
erably more light than conven-
tional headlights. If they are not
correctly aimed, they might tem-
porarily blind an oncoming driver
or the driver ahead of you and
cause a serious accident. If head-
lights are not aimed correctly, it is
recommended you immediately
take your vehicle to a NISSAN
dealer and have the headlights
adjusted correctly.
When the xenon headlight is initially
turned on, its brightness or color varies
slightly. However, the color and bright-
ness will soon stabilize. .
The life of xenon headlights will be
shortened by frequent on-off opera-
tion. It is generally desirable not to
turn off the headlights for short
intervals (for example, when the
vehicle stops at a traffic signal).
. If the xenon headlight bulb is close
to burning out, the brightness will
drastically decrease, the light will
start blinking, or the color of the
light will become reddish. If one or
more of the above signs appear, it is
recommended you visit a NISSAN
dealer.
Instruments and controls2-35
HEADLIGHT AND TURN SIGNAL SWITCH
Page 107 of 455

signal will automatically flash three times.
Choose the appropriate method to signal
a lane change based on road and traffic
conditions.
SIC4066
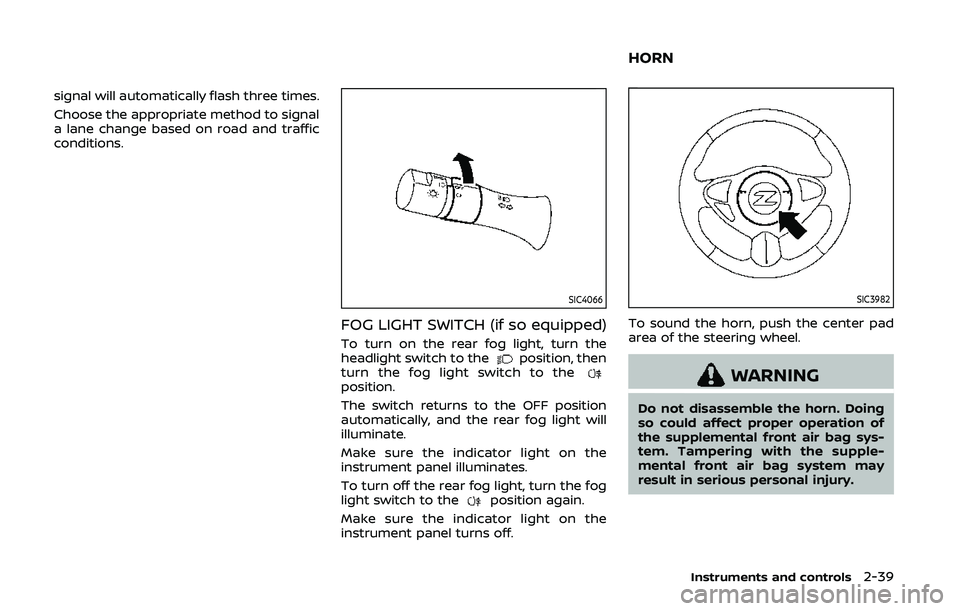
FOG LIGHT SWITCH (if so equipped)
To turn on the rear fog light, turn the
headlight switch to theposition, then
turn the fog light switch to the
position.
The switch returns to the OFF position
automatically, and the rear fog light will
illuminate.
Make sure the indicator light on the
instrument panel illuminates.
To turn off the rear fog light, turn the fog
light switch to the
position again.
Make sure the indicator light on the
instrument panel turns off.
SIC3982
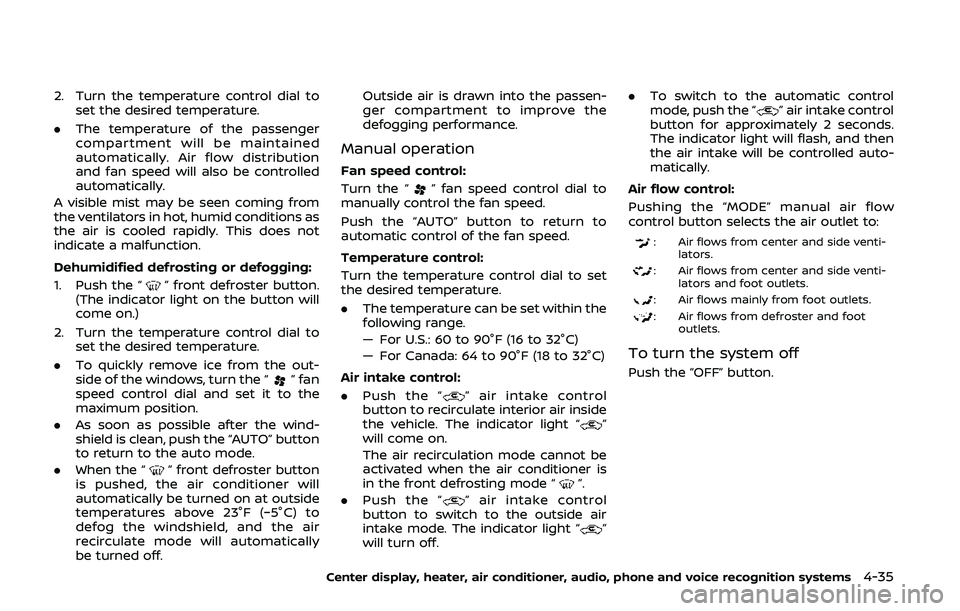
To sound the horn, push the center pad
area of the steering wheel.
WARNING
Do not disassemble the horn. Doing
so could affect proper operation of
the supplemental front air bag sys-
tem. Tampering with the supple-
mental front air bag system may
result in serious personal injury.
Instruments and controls2-39
HORN
Page 201 of 455

2. Turn the temperature control dial toset the desired temperature.
. The temperature of the passenger
compartment will be maintained
automatically. Air flow distribution
and fan speed are also controlled
automatically.
A visible mist may be seen coming from
the ventilators in hot, humid conditions as
the air is cooled rapidly. This does not
indicate a malfunction.
Dehumidified defrosting or defogging:
1. Turn the “
” fan speed control dial
to the desired position.
2. Turn the air flow control dial to the “
” position.
3. Turn the temperature control dial to set the desired temperature.
.To quickly remove ice from theoutside of the windows, turn the
“
” fan speed control dial to the
maximum position.
.As soon as possible after the wind- shield is clean, turn the air flow
control dial to the “AUTO” position
to return to the auto mode.
.When the air flow control dial isturned to the “”or“” position,
the air conditioner will automati-
cally be turned on at outside tem-
peratures above 23°F (−5°C) to defog the windshield, and the air
recirculation mode will automati-
cally be turned off.
Outside air is drawn into the pas-
senger compartment to improve
the defogging performance.
Manual operation
Fan speed control:
Turn the “
” fan speed control dial
clockwise (+) or counterclockwise (−) to
manually control the fan speed.
Turn the dial to the “AUTO” position to
return to automatic control of the fan
speed.
Temperature control:
Turn the temperature control dial to set
the desired temperature.
. The temperature can be set within the
following range.
— For U.S.: 60 to 90°F (16 to 32°C)
— For Canada: 64 to 90°F (18 to 32°C)
Air intake control:
. Push the “
” air intake control
button to recirculate interior air inside
the vehicle. The indicator light on the
“
” side will illuminate.
The air recirculation mode cannot be
activated when the air conditioner is
in the front defrosting mode “
”. .
Push the “
” air intake control
button to draw outside air into the
passenger compartment. The indica-
tor light on the “
” side will illumi-
nate.
. To switch to the automatic control
mode, push the “
” air intake
control button for approximately 2
seconds. The indicator lights (both air
recirculation and outside air circula-
tion sides) will flash twice, and then
the air intake will be controlled auto-
matically.
Air flow control:
Turning the air flow control dial selects
the air outlet to:
: Air flows from center and side venti- lators.
: Air flows from center and side venti-lators and foot outlets.
: Air flows mainly from foot outlets.
: Air flows from defroster and footoutlets.
: Air flows mainly from defroster out-lets.
Center display, heater, air conditioner, audio, phone and voice recognition systems4-33
Page 203 of 455

2. Turn the temperature control dial toset the desired temperature.
. The temperature of the passenger
compartment will be maintained
automatically. Air flow distribution
and fan speed will also be controlled
automatically.
A visible mist may be seen coming from
the ventilators in hot, humid conditions as
the air is cooled rapidly. This does not
indicate a malfunction.
Dehumidified defrosting or defogging:
1. Push the “
” front defroster button.
(The indicator light on the button will
come on.)
2. Turn the temperature control dial to set the desired temperature.
. To quickly remove ice from the out-
side of the windows, turn the “
” fan
speed control dial and set it to the
maximum position.
. As soon as possible after the wind-
shield is clean, push the “AUTO” button
to return to the auto mode.
. When the “
” front defroster button
is pushed, the air conditioner will
automatically be turned on at outside
temperatures above 23°F (−5°C) to
defog the windshield, and the air
recirculate mode will automatically
be turned off. Outside air is drawn into the passen-
ger compartment to improve the
defogging performance.
Manual operation
Fan speed control:
Turn the “
” fan speed control dial to
manually control the fan speed.
Push the “AUTO” button to return to
automatic control of the fan speed.
Temperature control:
Turn the temperature control dial to set
the desired temperature.
. The temperature can be set within the
following range.
— For U.S.: 60 to 90°F (16 to 32°C)
— For Canada: 64 to 90°F (18 to 32°C)
Air intake control:
. Push the “
” air intake control
button to recirculate interior air inside
the vehicle. The indicator light “
”
will come on.
The air recirculation mode cannot be
activated when the air conditioner is
in the front defrosting mode “
”.
. Push the “
” air intake control
button to switch to the outside air
intake mode. The indicator light “
”
will turn off. .
To switch to the automatic control
mode, push the “
” air intake control
button for approximately 2 seconds.
The indicator light will flash, and then
the air intake will be controlled auto-
matically.
Air flow control:
Pushing the “MODE” manual air flow
control button selects the air outlet to:
: Air flows from center and side venti- lators.
: Air flows from center and side venti-lators and foot outlets.
: Air flows mainly from foot outlets.
: Air flows from defroster and footoutlets.
To turn the system off
Push the “OFF” button.
Center display, heater, air conditioner, audio, phone and voice recognition systems4-35
Page 390 of 455

8-22Do-it-yourself
JVM0467X
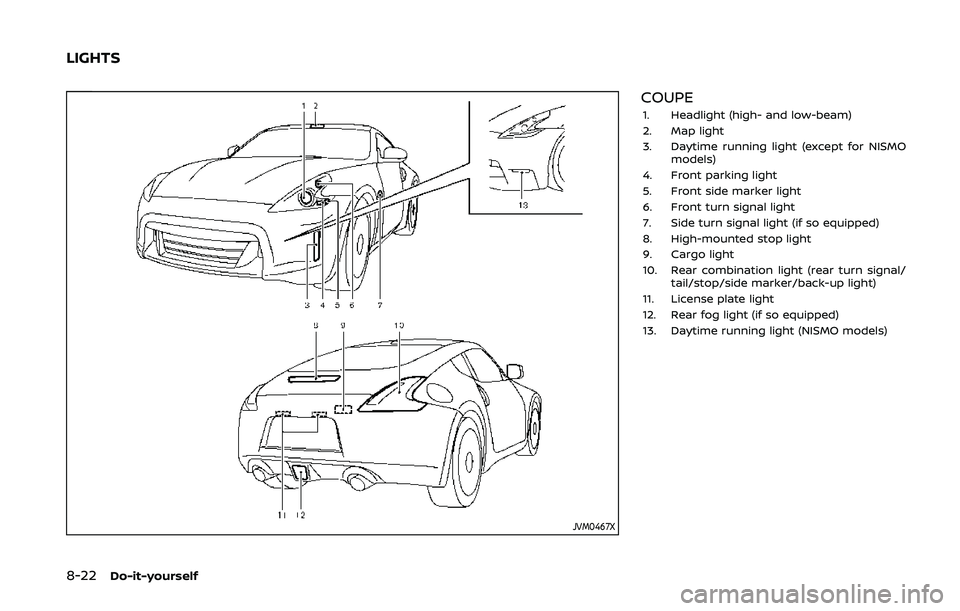
COUPE1. Headlight (high- and low-beam)
2. Map light
3. Daytime running light (except for NISMOmodels)
4. Front parking light
5. Front side marker light
6. Front turn signal light
7. Side turn signal light (if so equipped)
8. High-mounted stop light
9. Cargo light
10. Rear combination light (rear turn signal/ tail/stop/side marker/back-up light)
11. License plate light
12. Rear fog light (if so equipped)
13. Daytime running light (NISMO models)
LIGHTS
Page 391 of 455

JVM0140X
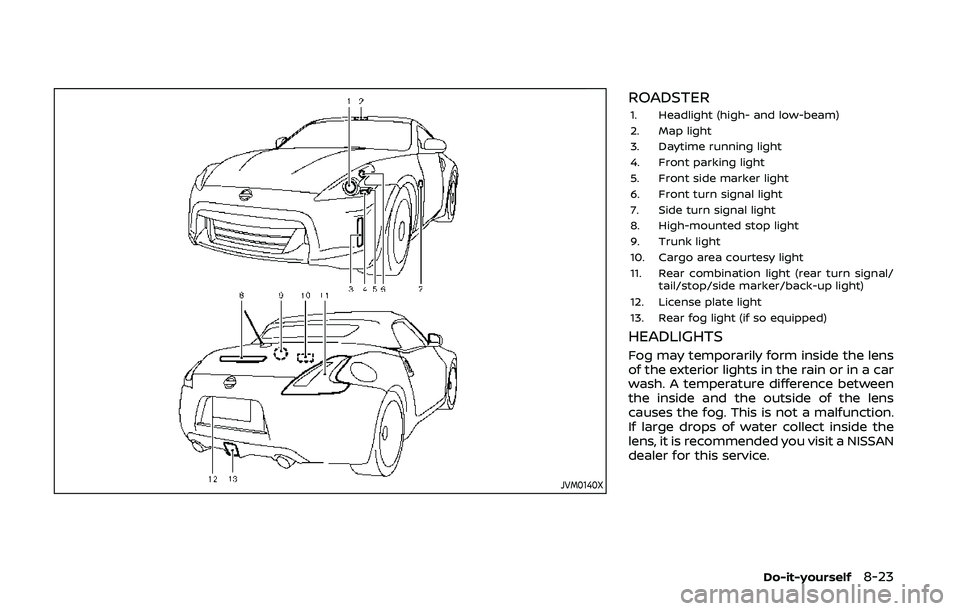
ROADSTER1. Headlight (high- and low-beam)
2. Map light
3. Daytime running light
4. Front parking light
5. Front side marker light
6. Front turn signal light
7. Side turn signal light
8. High-mounted stop light
9. Trunk light
10. Cargo area courtesy light
11. Rear combination light (rear turn signal/tail/stop/side marker/back-up light)
12. License plate light
13. Rear fog light (if so equipped)
HEADLIGHTS
Fog may temporarily form inside the lens
of the exterior lights in the rain or in a car
wash. A temperature difference between
the inside and the outside of the lens
causes the fog. This is not a malfunction.
If large drops of water collect inside the
lens, it is recommended you visit a NISSAN
dealer for this service.
Do-it-yourself8-23
Page 392 of 455

8-24Do-it-yourself
Replacing
WARNING
HIGH VOLTAGE
When xenon headlights are on, they
produce a high voltage. To prevent
an electric shock, never attempt to
modify or disassemble. We recom-
mend you have your xenon head-
lights replaced at a NISSAN dealer.
For additional information, see
“Headlight and turn signal switch”
(P.2-35).
Use the same number and wattage
shown in the following chart as originally
installed.
It is recommended you visit a NISSAN
dealer if replacement is required.
EXTERIOR AND INTERIOR LIGHTS
Item Wattage (W)Bulb No.
Headlight*
High/Low beams (Xenon) 35D2S
Front turn signal light* 28/87444NA
Front parking light* 5W5W
Front side marker light* LED—
Side turn signal light (if so equipped)* LED—
Daytime running light* LED—
Rear combination light*
back-up 16W16W
turn signal 21WY21W
stop/tail/side marker LED—
Rear fog light (if so equipped)* 21W21W
License plate light* 5W5W
Map light 8—
Vanity mirror light* 1.8—
Cargo area courtesy light (Roadster)* 5—
Cargo light (Coupe)* 5—
Trunk light (Roadster)* 3.4—
High-mounted stop light* LED—
Glove box light* 1.4—
*: It is recommended you visit a NISSAN dealer for replacement.
NOTE: Always check with the Parts Department at a NISSAN dealer for the latest information about parts.
Page 448 of 455

11-2
Clock ........................................................................\
... 2-9, 2-28
Clutch fluid........................................................................\
.... 8-9
Cockpit ........................................................................\
............. 2-3
Cold weather driving ................................................ 5-33
Compact Disc (CD) player (See
audio system) ................................................................. 4-60
Compact spare tire.................................................... 8-37
Console box ..................................................................... 2-46
CoolantCapacities and
recommended fluids/lubricants............... 10-2
Changing engine coolant ................................. 8-5
Checking engine coolant level...................... 8-5
Corrosion protection .................................................... 7-8
Cover, Cargo cover..................................................... 2-47
Cruise control ................................................................. 5-22
Cup holders...................................................................... 2-44
D
Dampers, Performance dampers.................... 5-32
Daytime running light system........................... 2-38
Defroster switch, Rear window
defroster switch ........................................................... 2-34
Dimensions .................................................................... 10-11
Drive belts...................................................................\
....... 8-14
Driving Cold weather driving ......................................... 5-33
Driving with
automatic transmission .................................. 5-12
Driving with manual transmission.......... 5-17
Precautions when starting
and driving.................................................................... 5-2
DVD player operation............................................... 4-61
E
Economy, Fuel................................................................ 5-25
Elapsed time.................................................................... 2-26
Emergency tire puncture repair kit .................. 6-9
Emission control information label............ 10-13
Emission control system warranty ............ 10-24
Engine Before starting the engine............................ 5-11
Break-in schedule ................................................ 5-24
Capacities and
recommended fluids/lubricants............... 10-2
Changing engine coolant ................................. 8-5
Changing engine oil and filter ...................... 8-6
Checking engine coolant level...................... 8-5
Checking engine oil level................................... 8-6
Coolant temperature gauge .......................... 2-7
Emergency engine shut off.......................... 5-10
Engine block heater ........................................... 5-34
Engine compartment
check locations ......................................................... 8-3
Engine cooling system ........................................ 8-4
Engine oil.....................................................................\
... 8-6
Engine oil and oil
filter recommendation ..................................... 10-7
Engine oil replacement indicator ............ 2-24
Engine oil temperature gauge...................... 2-8
Engine oil viscosity .............................................. 10-7
Engine serial number .................................... 10-13
Engine specifications......................................... 10-9
Engine start operation indicator.............. 2-20
Engine start operation indicator
(Manual Transmission models).................. 2-21
If your vehicle overheats ................................ 6-17
Starting the engine............................................. 5-11
Event Data Recorders (EDR)............................. 10-25
Exhaust gas (carbon monoxide) ......................... 5-2 Explanation of scheduled
maintenance items ........................................................ 9-5
Extended storage fuse warning ...................... 2-23
Exterior light indicator............................................. 2-16
F
F.M.V.S.S./C.M.V.S.S. certification label ...... 10-13
Filter
Air cleaner housing filter ................................ 8-15
Changing engine oil and filter ...................... 8-6
Flashers (See hazard warning
flasher switch).................................................................... 6-2
Flat tire........................................................................\
............. 6-3 Repairing flat tire (with emergency tire
puncture repair kit) ................................................ 6-9
Flat towing..................................................................... 10-22
Floor mat cleaning ......................................................... 7-6
Floor mat installation................................................... 7-7
Fluid Automatic Transmission Fluid (ATF) ........ 8-8
Brake and clutch fluid ......................................... 8-9
Brake fluid ..................................................................... 8-9
Capacities and
recommended fluids/lubricants............... 10-2
Engine coolant........................................................... 8-4
Engine oil.....................................................................\
... 8-6
Power steering fluid .............................................. 8-8
Window washer fluid ......................................... 8-10
FM-AM radio with Compact Disc
(CD) player ........................................................................\
. 4-49
FM-AM-SAT radio with Compact Disc
(CD) player ........................................................................\
. 4-58
Fog light switch ............................................................ 2-39
Front manual seat adjustment ............................ 1-4
Front passenger air bag and
status light........................................................................\
1-39