2020 NISSAN 370Z ECO mode
[x] Cancel search: ECO modePage 335 of 455
6 In case of emergency
Hazard warning flasher switch ......................................... 6-2
Roadside assistance program ........................................... 6-2
Emergency engine shut off .................................................. 6-3
Flat tire ........................................................................\
.......................... 6-3Tire Pressure Monitoring System (TPMS) ........... 6-3
Changing a flat tire (for models with
spare tire) ........................................................................\
............. 6-4
Repairing flat tire (for models with
emergency tire puncture repair kit) ....................... 6-9
Jump starting ........................................................................\
....... 6-15
Push starting ........................................................................\
......... 6-17 If your vehicle overheats .................................................... 6-17
Towing your vehicle ............................................................... 6-19
Towing Automatic Transmission
recommended by NISSAN (except for
NISMO models) ................................................................... 6-20
Towing Manual Transmission recommended
by NISSAN (except for NISMO models) ............ 6-21
Towing recommended by NISSAN
(NISMO models) .................................................................. 6-22
Vehicle recovery (freeing a stuck vehicle) ...... 6-22
Page 338 of 455
6-4In case of emergency
possible. It is recommended you
visit a NISSAN dealer for these
services.
. Replacing tires with those not
originally specified by NISSAN
could affect the proper operation
of the TPMS.
. NISSAN recommends using only
Genuine NISSAN Emergency Tire
Sealant provided with your vehi-
cle. Other tire sealants may da-
mage the valve stem seal which
can cause the tire to lose air
pressure. It is recommended you
visit a NISSAN dealer as soon as
possible after using tire repair
sealant (for models equipped
with the emergency tire puncture
repair kit).
CHANGING A FLAT TIRE (for models
with spare tire)
If you have a flat tire, follow the instruc-
tions below.
Stopping the vehicle
1. Safely move the vehicle off the road
and away from traffic.
2. Turn on the hazard warning flashers.
3. Park on a level surface and apply the parking brake. Move the shift lever to
the P (Park) position (Automatic trans-
mission models). Move the shift lever
to the R (Reverse) gear (Manual trans-
mission models).
4. Turn off the engine.
5. Raise the hood to warn other traffic, and to signal professional road assis-
tance personnel that you need assis-
tance.
6. Have all passengers get out of the vehicle and stand in a safe place, away
from traffic and clear of the vehicle.
WARNING
.Make sure the parking brake is
securely applied and the manual
transmission is shifted into R
(Reverse), or the automatic trans-
mission into P (Park).
. Never change tires when the ve-
hicle is on a slope, ice or slippery
areas. This is hazardous. .
Never change tires if oncoming
traffic is close to your vehicle.
Wait for professional road assis-
tance.
Page 342 of 455

6-8In case of emergency
aligned with the pin on the brake
rotor.
3. With the wheel nut wrench, tighten wheel nuts alternately and evenly in
the sequence illustrated (
,,,,)
until they are tight.
4. Lower the vehicle slowly until the tire touches the ground. Then, with the
wheel nut wrench, tighten the wheel
nuts securely in the sequence as
illustrated. Lower the vehicle comple-
tely.
WARNING
.Incorrect wheel nuts or impro-
perly tightened wheel nuts can
cause the wheel to become loose
or come off. This could cause an
accident.
. Do not use oil or grease on the
wheel studs or nuts. This could
cause the nuts to become loose.
. Retighten the wheel nuts when
the vehicle has been driven for
600 miles (1,000 km) (also in
cases of a flat tire, etc.).
. As soon as possible, tighten the
wheel nuts to the specified torque
with a torque wrench. Wheel nut tightening torque:
80 ft-lb (108 N·m)
The wheel nuts must be kept tigh-
tened to specification at all times. It
is recommended that wheel nuts be
tightened to specifications at each
lubrication interval.
. Adjust tire pressure to the COLD
pressure.
COLD pressure:
After the vehicle has been parked for
three hours or more or driven less
than 1 mile (1.6 km).
COLD tire pressures are shown on
the Tire and Loading Information
label affixed to the driver side center
pillar.
Stowing the damaged tire and
tools
Coupe models:
1. Securely store the damaged tire and
jacking tools in the storage area.
2. Place the spare tire cover and the cargo room carpet over the damaged
tire.
3. Close the rear hatch.
SCE0845
Roadster models:
Securely store the jacking tools in the
storage area.
Place the spare tire cover and trunk room
carpet back in the trunk, and then close
the trunk lid.
Securely store the damaged tire accord-
ing to the following procedure as illu-
strated.
1. Put the damaged tire in the plastic bag
stored in the trunk.
2. Move the passenger seat forward, and then place the damaged tire
wrapped in the plastic bag behind
the seat.
Page 343 of 455

3. Move the passenger seat backward tosecure the damaged tire.
WARNING
.Always make sure that the spare
tire and jacking equipment are
properly secured after use. Such
items can become dangerous
projectiles in an accident or sud-
den stop.
. The spare tire is designed for
emergency use. See specific in-
structions under the heading
“Wheels and tires” (P.8-26).
REPAIRING FLAT TIRE (for models
with emergency tire puncture re-
pair kit)
WARNING
.After using Emergency Tire Sea-
lant to repair a minor tire punc-
ture, do not drive the vehicle at
speeds faster than 50 MPH (80
km/h).
. Immediately after using the
Emergency Tire Sealant to repair
a minor tire puncture, take your vehicle to inspect, and repair or
replace the tire. It is recom-
mended you visit a NISSAN dealer
for this service. The Emergency
Tire Sealant cannot permanently
seal a punctured tire. Continuing
operation of the vehicle without a
permanent tire repair can lead to
a crash.
. NISSAN recommends using only
Genuine NISSAN Emergency Tire
Sealant provided with your vehi-
cle. Other tire sealants may da-
mage the valve stem seal which
can cause the tire to lose air
pressure. It is recommended you
visit a NISSAN dealer as soon as
possible after using tire repair
sealant.
This vehicle does not have a spare tire.
The emergency tire puncture repair kit
(Emergency Tire Sealant) is supplied with
the vehicle instead of a spare tire. It can
be used to temporarily repair minor tire
punctures.
If possible, have the vehicle towed to a
facility that can repair or replace the flat
tire. Using the emergency tire puncture
repair kit may cause a malfunction of the
tire pressure sensor and cause the low
tire pressure warning light to illuminate. If you have a flat tire, follow the instruc-
tions below.
CAUTION
.
To avoid the emergency tire
puncture repair kit being da-
maged during storage or use:
— Only use the emergency tire
puncture repair kit on your
vehicle. Do not use it on other
vehicles.
— Only use the kit to inflate the tires of your vehicle and to
check the vehicle’s tire pres-
sure.
— Only plug the compressor into a 12V DC car power point.
— Keep the kit free of water and dirt.
— Do not disassemble or modify the kit.
— Do not drop the kit or allow hard impacts to the kit.
. Do not use the emergency tire
puncture repair kit under the
following conditions. It is recom-
mended you visit a NISSAN dealer
or professional road assistance.
In case of emergency6-9
Page 350 of 455
6-16In case of emergency
SCE0791
WARNING
Always follow the instructions below.
Failure to do so could result in
damage to the charging system and
cause personal injury.
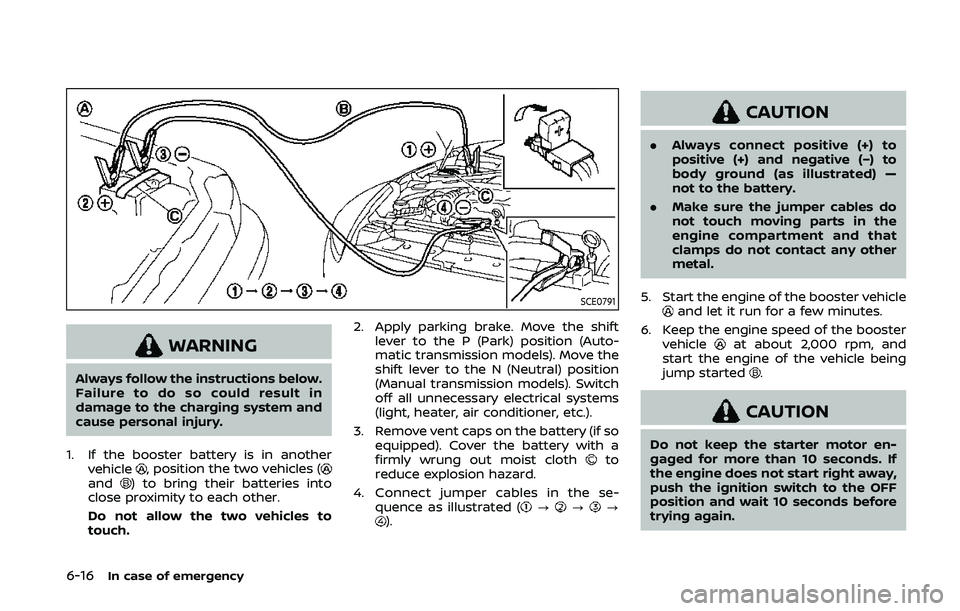
1. If the booster battery is in another vehicle
, position the two vehicles (and) to bring their batteries into
close proximity to each other.
Do not allow the two vehicles to
touch. 2. Apply parking brake. Move the shift
lever to the P (Park) position (Auto-
matic transmission models). Move the
shift lever to the N (Neutral) position
(Manual transmission models). Switch
off all unnecessary electrical systems
(light, heater, air conditioner, etc.).
3. Remove vent caps on the battery (if so equipped). Cover the battery with a
firmly wrung out moist cloth
to
reduce explosion hazard.
4. Connect jumper cables in the se- quence as illustrated (
???).
CAUTION
.Always connect positive (+) to
positive (+) and negative (−) to
body ground (as illustrated) —
not to the battery.
. Make sure the jumper cables do
not touch moving parts in the
engine compartment and that
clamps do not contact any other
metal.
5. Start the engine of the booster vehicle
and let it run for a few minutes.
6. Keep the engine speed of the booster vehicle
at about 2,000 rpm, and
start the engine of the vehicle being
jump started
.
CAUTION
Do not keep the starter motor en-
gaged for more than 10 seconds. If
the engine does not start right away,
push the ignition switch to the OFF
position and wait 10 seconds before
trying again.
Page 354 of 455
6-20In case of emergency
SCE0792
TOWING AUTOMATIC TRANSMIS-
SION RECOMMENDED BY NISSAN
(except for NISMO models)
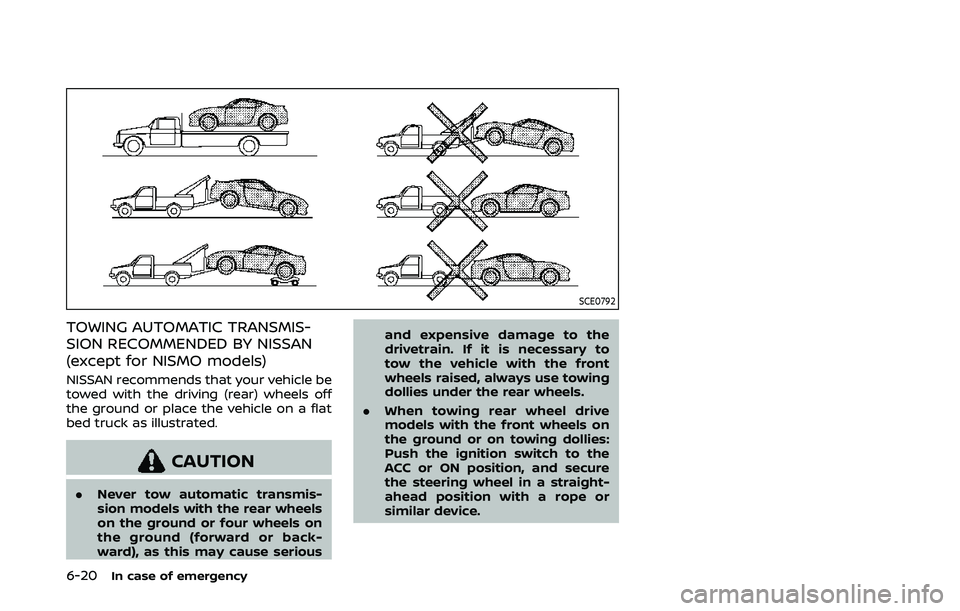
NISSAN recommends that your vehicle be
towed with the driving (rear) wheels off
the ground or place the vehicle on a flat
bed truck as illustrated.
CAUTION
.Never tow automatic transmis-
sion models with the rear wheels
on the ground or four wheels on
the ground (forward or back-
ward), as this may cause serious and expensive damage to the
drivetrain. If it is necessary to
tow the vehicle with the front
wheels raised, always use towing
dollies under the rear wheels.
. When towing rear wheel drive
models with the front wheels on
the ground or on towing dollies:
Push the ignition switch to the
ACC or ON position, and secure
the steering wheel in a straight-
ahead position with a rope or
similar device.
Page 355 of 455
JVE0415X
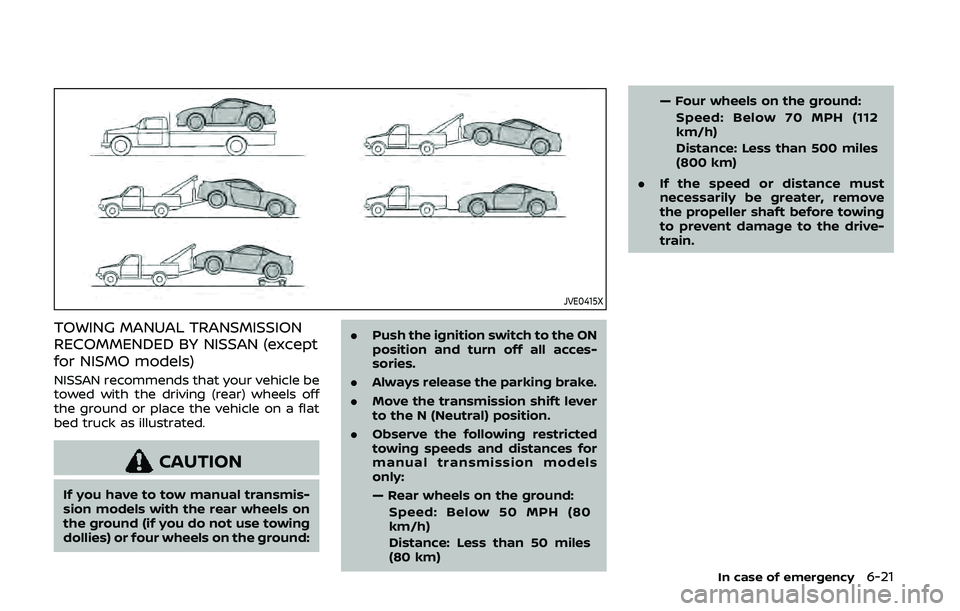
TOWING MANUAL TRANSMISSION
RECOMMENDED BY NISSAN (except
for NISMO models)
NISSAN recommends that your vehicle be
towed with the driving (rear) wheels off
the ground or place the vehicle on a flat
bed truck as illustrated.
CAUTION
If you have to tow manual transmis-
sion models with the rear wheels on
the ground (if you do not use towing
dollies) or four wheels on the ground:.
Push the ignition switch to the ON
position and turn off all acces-
sories.
. Always release the parking brake.
. Move the transmission shift lever
to the N (Neutral) position.
. Observe the following restricted
towing speeds and distances for
manual transmission models
only:
— Rear wheels on the ground:
Speed: Below 50 MPH (80
km/h)
Distance: Less than 50 miles
(80 km) — Four wheels on the ground:
Speed: Below 70 MPH (112
km/h)
Distance: Less than 500 miles
(800 km)
. If the speed or distance must
necessarily be greater, remove
the propeller shaft before towing
to prevent damage to the drive-
train.
In case of emergency6-21
Page 356 of 455
6-22In case of emergency
SCE0836
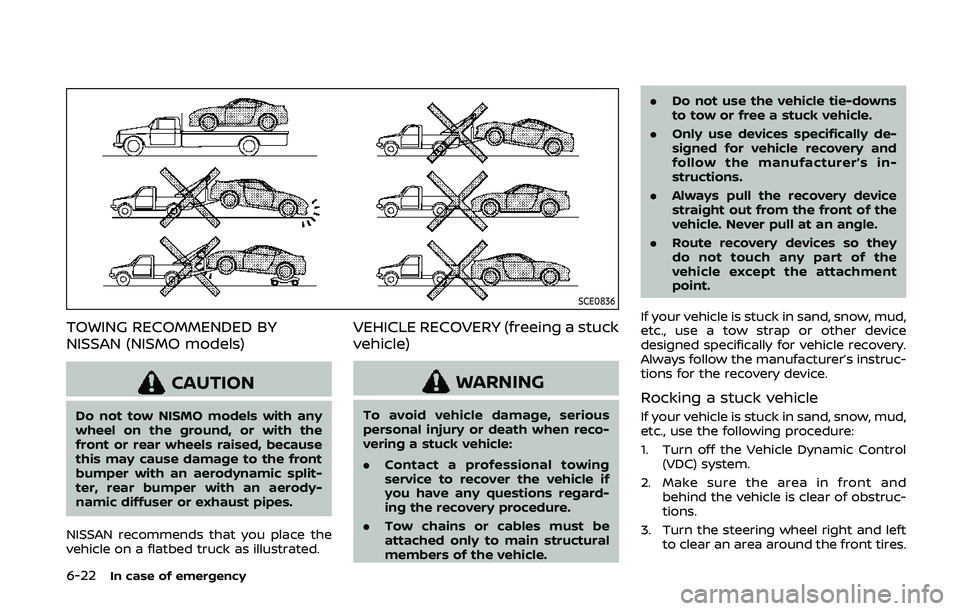
TOWING RECOMMENDED BY
NISSAN (NISMO models)
CAUTION
Do not tow NISMO models with any
wheel on the ground, or with the
front or rear wheels raised, because
this may cause damage to the front
bumper with an aerodynamic split-
ter, rear bumper with an aerody-
namic diffuser or exhaust pipes.
NISSAN recommends that you place the
vehicle on a flatbed truck as illustrated.
VEHICLE RECOVERY (freeing a stuck
vehicle)
WARNING
To avoid vehicle damage, serious
personal injury or death when reco-
vering a stuck vehicle:
. Contact a professional towing
service to recover the vehicle if
you have any questions regard-
ing the recovery procedure.
. Tow chains or cables must be
attached only to main structural
members of the vehicle. .
Do not use the vehicle tie-downs
to tow or free a stuck vehicle.
. Only use devices specifically de-
signed for vehicle recovery and
follow the manufacturer’s in-
structions.
. Always pull the recovery device
straight out from the front of the
vehicle. Never pull at an angle.
. Route recovery devices so they
do not touch any part of the
vehicle except the attachment
point.
If your vehicle is stuck in sand, snow, mud,
etc., use a tow strap or other device
designed specifically for vehicle recovery.
Always follow the manufacturer’s instruc-
tions for the recovery device.
Rocking a stuck vehicle
If your vehicle is stuck in sand, snow, mud,
etc., use the following procedure:
1. Turn off the Vehicle Dynamic Control (VDC) system.
2. Make sure the area in front and behind the vehicle is clear of obstruc-
tions.
3. Turn the steering wheel right and left to clear an area around the front tires.