2020 MERCEDES-BENZ SLC ignition
[x] Cancel search: ignitionPage 264 of 310
R
Make surethatthepositive terminal ofac onn ected battery doesnotcome intocontactwith
vehicle parts.
R Never placemetal object sortools onabattery.
R Itis important thatyouobserve thedescribed orderofthe battery terminals whenconnect-
ing and disconnec tingabattery.
R When jump-st arting,makesurethatthebattery poleswithidentical polarityareconn ected.
R Itis particularly importanttoobserve thedescribed orderwhenconnecting anddisconnec t-
ing the jumper cables.
R Never connectordisconnec tthe battery terminals whiletheengine isrunning. G
WARNING
Ad ischarged batterycanfreeze attemperatures belowfreezing point.Whenjump-st artingthe
vehicle orcharging thebattery, gasescanescape fromthebattery. Thereisar isk ofan explo-
sion.
Allow thefrozen battery tothaw outbefore charging itor jump-st arting.
! Avoid
repeated andlengthy startingattempt s.Otherwise, thecatalytic convertercould be
damaged bythe non- combusted fuel.
If the indicator/warnin glamps donot light upatlow temperatures, itis very likely thatthedis-
charged batteryhasfrozen .Int his case, youmay neither chargethebattery norjump-st artthe
vehicle. Theservice lifeofat hawed-out batterymaybeshorter. Thestartin gcharacterist icscan
be impaired, particularly atlow temperatures. Havethethawed-out batterycheckedataq uali-
fied specialist workshop.
Do not start thevehicle usingarapid charging device.Ifyour vehicle's batteryisdischarged, the
engine canbejump-st artedfromanother vehicleorfrom adonor battery usingjumper cables.
Observe thefollowing points:
R The battery isnot accessible inall vehicles. Ifthe other vehicle's batteryisnot accessible,
jump-st artthe vehicle usingadonor battery orajump-st artingdevice.
R You may onlyjump-st artthe vehicle whentheengine andexhaust systemarecold.
R Do not start theengine ifthe battery isfrozen .Let the battery thawfirst.
R Only jump-st artfrom batteries witha12V voltage rating.
R Only usejumper cableswhichhaveasufficient cross-sectionandinsulated terminalclamps.
R Ifthe battery isfully discharged, leavethebattery thatisbeing usedtojump-st artconn ected
for afew minutes beforeattempt ingtostart. Thischarges thebattery slightly.
R Make surethatthetwo vehicles donot touch.
Make surethat:
R The jumper cablesarenot damaged.
R Bare parts ofthe terminal clampdonot come intocontactwith other metal partswhile the
jumper cablesareconn ected tothe battery.
R The jumper cablescannot comeintocontactwith parts which canmove whentheengine is
running, suchasthe V-belt pulleyorthe fan.
X Secure thevehicle byapply ingthe electric parking brake.
X Shift thetransmission toposition 005D.
X Make surethattheignition isswitched off.Allindicator lampsinthe instrumen tcluster must
be off. When usingtheSmartK ey,turn theSmartK eytoposition 0092inthe ignition lockand
remove it(Y page 118). 262
Jump
-startingBr eakdown assistance
Page 267 of 310
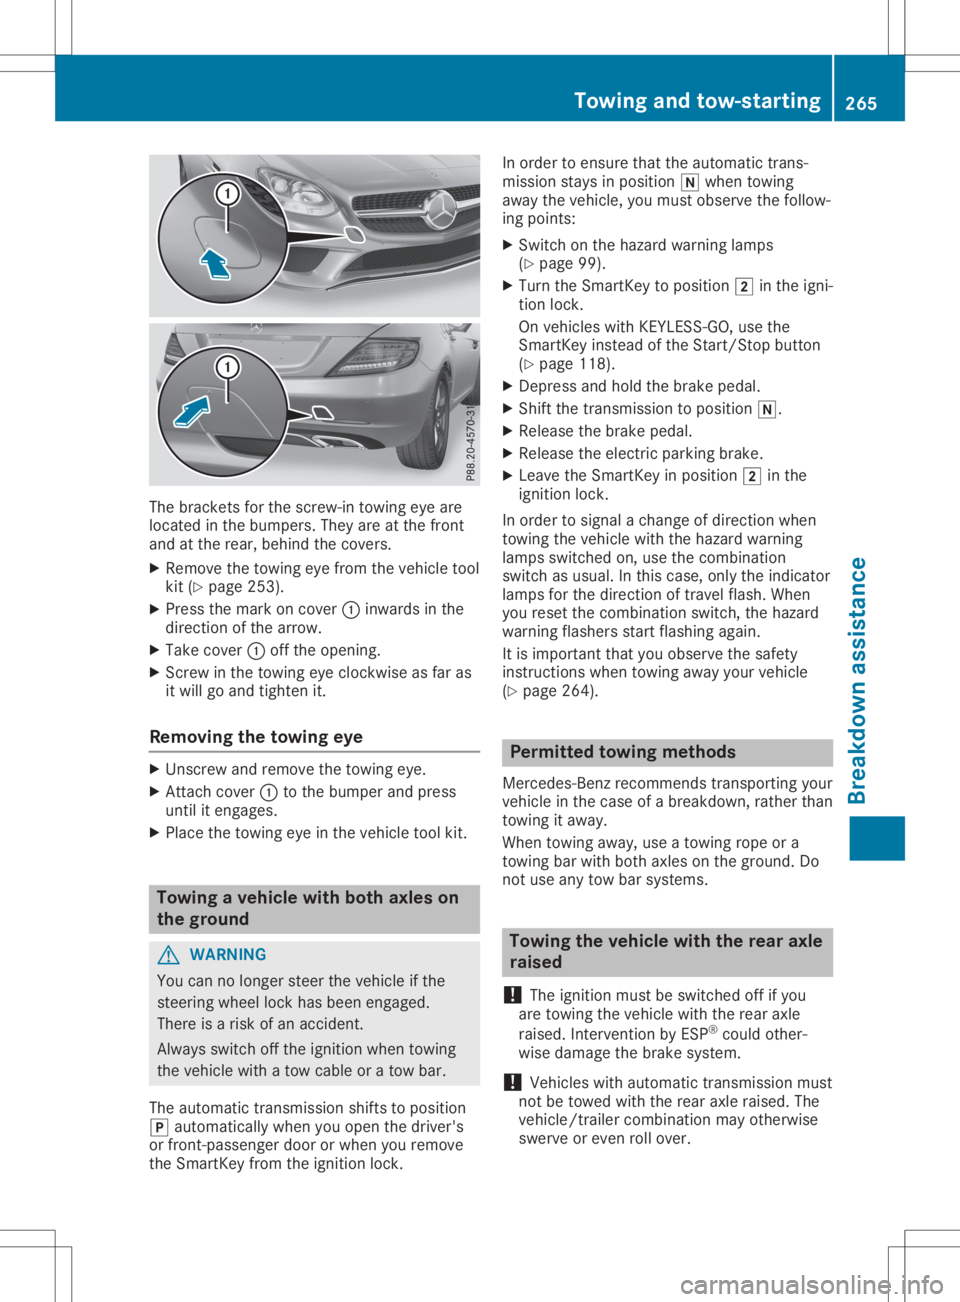
The
bracket sfor the screw-in towingeyeare
located inthe bumpers. Theyareatthe front
and atthe rear, behind thecovers.
X Remove thetowing eyefrom thevehicle tool
kit (Ypage 253).
X Press themark oncover 0043inwards inthe
direction ofthe arrow.
X Take cover 0043offthe opening.
X Scr ew inthe towing eyeclock wiseasfar as
it will goand tighten it.
Removing thetowing eye X
Unsc rewand remove thetowing eye.
X Attach cover 0043tothe bumper andpress
until itengages.
X Place thetowing eyeinthe vehicle toolkit. Towing
avehicle withboth axles on
the ground G
WARNIN
G
You cannolonger steerthevehicle ifthe
steerin gwheel lockhasbeen engaged.
There isar isk ofan accident .
Always switchoffthe ignition whentowing
the vehicle withatow cable oratow bar.
The automatic transmission shiftstoposition
005D automatically whenyouopen thedriver's
or front -passenger doororwhen youremove
the Smart Keyfrom theignition lock. In
order toensure thattheautomatic trans-
mission staysinposition 005Cwhen towing
away thevehicle, youmust observe thefollow-
ing points:
X Switch onthe hazard warning lamps
(Y page 99).
X Turn theSmart Keytoposition 0048inthe igni-
tion lock.
On vehicles withKEYLE SS-GO, usethe
Smart Keyinstead ofthe Start /Stopbutton
(Y page 118).
X Depress andhold thebrake pedal.
X Shift thetrans mission toposition 005C.
X Release thebrake pedal.
X Release theelectric parking brake.
X Leave theSmart Keyinposition 0048inthe
ignition lock.
In order tosignal achange ofdirection when
towing thevehicle withthehazard warning
lamps switched on,use thecombinat ion
switch asusual. Inthis case, onlytheindicator
lamps forthe direction oftravel flash.When
you reset thecombinat ionswitch, thehazard
warning flashersstartflashing again.
It is important thatyouobserve thesafety
instr uctions whentowing awayyourvehicle
(Y page 264). Permit
tedtowing methods
Mercedes- Benzrecomm endstransportin gyour
vehicle inthe case ofab reakdown, ratherthan
towing itaway .
When towing away,use atowing ropeora
towing barwith both axles onthe ground. Do
not use anytow barsystems. Towing
thevehicle withtherear axle
raised
! The
ignition mustbeswitched offifyou
are towing thevehicle withtherear axle
raised. Intervent ionbyESP ®
could other-
wise damage thebrake system.
! Vehicles
withautomatic transmission must
not betowed withtherear axle raised. The
vehicle/t railercombinat ionmay otherwise
swerve oreven rollover. Towing
andtow-sta rting
265Breakdown assistance Z
Page 269 of 310

X
Make surethattheignition isswitched off
(Y page 118).
or
X When usingtheSmartK ey,turn theSmart-
Key toposition 0092inthe ignition lockand
remove it(Y page 118).
X Secure thevehicle against rollingaway
(Y page 134).
All indicator lampsinthe instrumen tcluster
must beoff.
The fuses arelocated invarious fuseboxes:
R Fuse boxinthe engine compartmen tonthe
left-hand sideofthe vehicle, whenviewed in
the direction oftravel
R Fuse boxinthe trunk Fuse
boxinthe engine compart ment
i Observe
the"Important safetynotes" sec-
tion (Ypage 266). G
WARNING
When thehood isopen andthewindshield
wipers aresetinmotion, youcan beinjured
by the wiper linkage. Thereisar isk ofinjury.
Always switchoffthe windshield wipersand
the ignition beforeopening thehood. X
Make surethatthewindshield wipersare
turned off.
X Open thehood.
X Use adrycloth toremove anymoisture
from thefuse box.
X To open: openclamps 0044.
X Remove fuseboxcover 0043forwards. X
To close :check whether theseal islying
correct lyin cover 0043.
X Insert cover0043atthe rear ofthe fuse box
into theretainer.
X Fold down cover 0043and close clamps 0044.
X Close thehood. Fuse
boxinthe trunk
i Observe
the"Important safetynotes" sec-
tion (Ypage 266). The
fuse boxislocated inthe trunk behind the
partition covering.
X Open thetrunk lid.
X To open: release cover0043onthe right and
left-hand sideswithaflat object .
X Open cover 0043downwards inthe direction
of the arrow. Fuses
267Breakdown assistance Z
Page 280 of 310
If
the wheel positio nson the vehicle arerota-
ted, thetire pressu resmay bedispl ayedfor
the wrong positionsfor ashort time. Thisis
rectified afterafew minutes ofdriving, andthe
tire pressu resare displ ayedfor the correct
positio ns.
Restarting thetire pressure monitor When
yourestart thetire pressu remonitor, all
existing warning messagesare dele tedand the
warning lampsgoo ut. The monitor usesthe
currently settire pressu resasthe reference
valu esfor monitoring. Inmost cases, thetire
pressu remonitor willautoma tically detect the
new reference valuesafter youhave changed
the tire pressu re.However, youcan also set
reference valuesmanua llyas describe dhere.
The tirepressu remonitor thenmonitors the
new tirepressu revalu es.
X Set thetire pressu reto the valu erecom-
mended forthe corresponding drivingsitua-
tion onthe Tire andLoadi ngInformation
pla card onthe driver's sideB-pilla r
(Y page 271).
Additional tirepressu revalu esfor different
load scan also befound onthe tire pressu re
table onthe inside ofthe fuel fillerflap
(Y page 271).
X Make surethatthetire pressu reiscorrect
on allfour wheel s.
X Ensure thattheSmartKey isin positio n0048
in the ignition lock.
X Press the0059 or0065 button onthe steer-
ing wheel toselect theServ. Serv.
menu.
X Press the0063 or0064 button toselect
Tire Pressure Tire
Pressure.
X Press 0076.
The multifu nctiondisplayshows thecurrent
tire pressu refor the individ ualtires orthe
Tire pressure willbedisplayed Tire
pressure willbedisplayed
after driving afew minutes after
driving afew minutes message.
X Press the0064 button.
The Use Current Pressures asNew Use
Current Pressures asNew
Reference Values Reference
Valuesmessage appearsinthe
multifu nctiondisplay.
If you wishtoc onfirm therestart:
X Press 0076.
The Tire Press. Monitor Restarted Tire
Press. Monitor Restarted
message appearsinthe multifu nctiondis-
pla y. After
driving forafew minutes, thesystem
checks whether thecurrent tirepressu res
are within thespecifie drange. Thenew tire
pressu resare then accepted asreference
valu esand monitored.
If you wishtoc anc elthe restart:
X Press 0038.
The tirepressu revalu esstored atthe last
restart willcontinue tobe monitored. 278
Tire
pressureWheel sand tires
Page 292 of 310
Clean
thec ontac tsurf aces ofthew heel and
th eb rak edisc thoro ughly everytim eaw heel
is rot ate d.Chec kthe tirep ressur eand,ifn ec-
ess ary, restartthe tirep ressur eloss warn ing
syst emorthet irep ressur emonito r. Direct
ionofrot ation
Tire swithas pecifiedd irection ofrot atio nhave
addit ionalben efits,e.g .ift he re isar isko f
hydr oplan ing.Thes eadvan tagescan onlybe
gain edifth et ires are install ed correspo nding
to thed irection ofrot atio n.
An arrow onthes idew allofthet irei nd icat es
its correct dire ction ofrot atio n. St
ori ng wheels
St ore wheel sthata re notb ein gu sed inac ool,
dry and preferably dark place.Pro tect thet ires
fr om oil,grease, gaso linea nd diese l. Mou
nting awheel
Pr epa ringthe vehi cle X
Stop thev ehicle onsolid ,non -slipp ery and
leve lground.
X Ap ply thee lectric park ingbrak emanually.
X Bring thef ront wheel sintot he straigh t-
ahead position.
X Sh ift thet rans mis sion toposi tion005D.
X Swit choff thee ngine.
X Veh icles withoutKEYLESS- GO:remove
th eS martKey from thei gn ition lock.
X Veh icles withKEYLESS- GO:open thed riv-
er' sd oor .
The vehicle elec tron ics nowh ave status 0.
This isthes ame astheS martKey having
been removed.
X Veh icles withKEYLESS- GO:remove the
St art /S topb utto nf romt heignition lock
(Y page 118).
X Ifinc luded inthev ehicle equipm ent,rem ove
th et ire- ch ang etoolkitfrom thev ehicle .
X Saf eguar dthe veh icle again stroll ing away.
i Due
todiff ere nces inveh icle equipm ent,
no ta llveh iclesareequipp edwithat ire-
ch ang etoolkit.F or inform ationonw hich to
ols are required toper formaw heel
ch ang eonyour vehicle,con sul tana uth or-
ize dM erced es-Ben zCenter.
Nec essary tire-ch ang ingtools can include,
for example :
R Jack
R Whee lcho ck
R Lug wren ch
Secur ingthev ehi cle toprevent itfrom
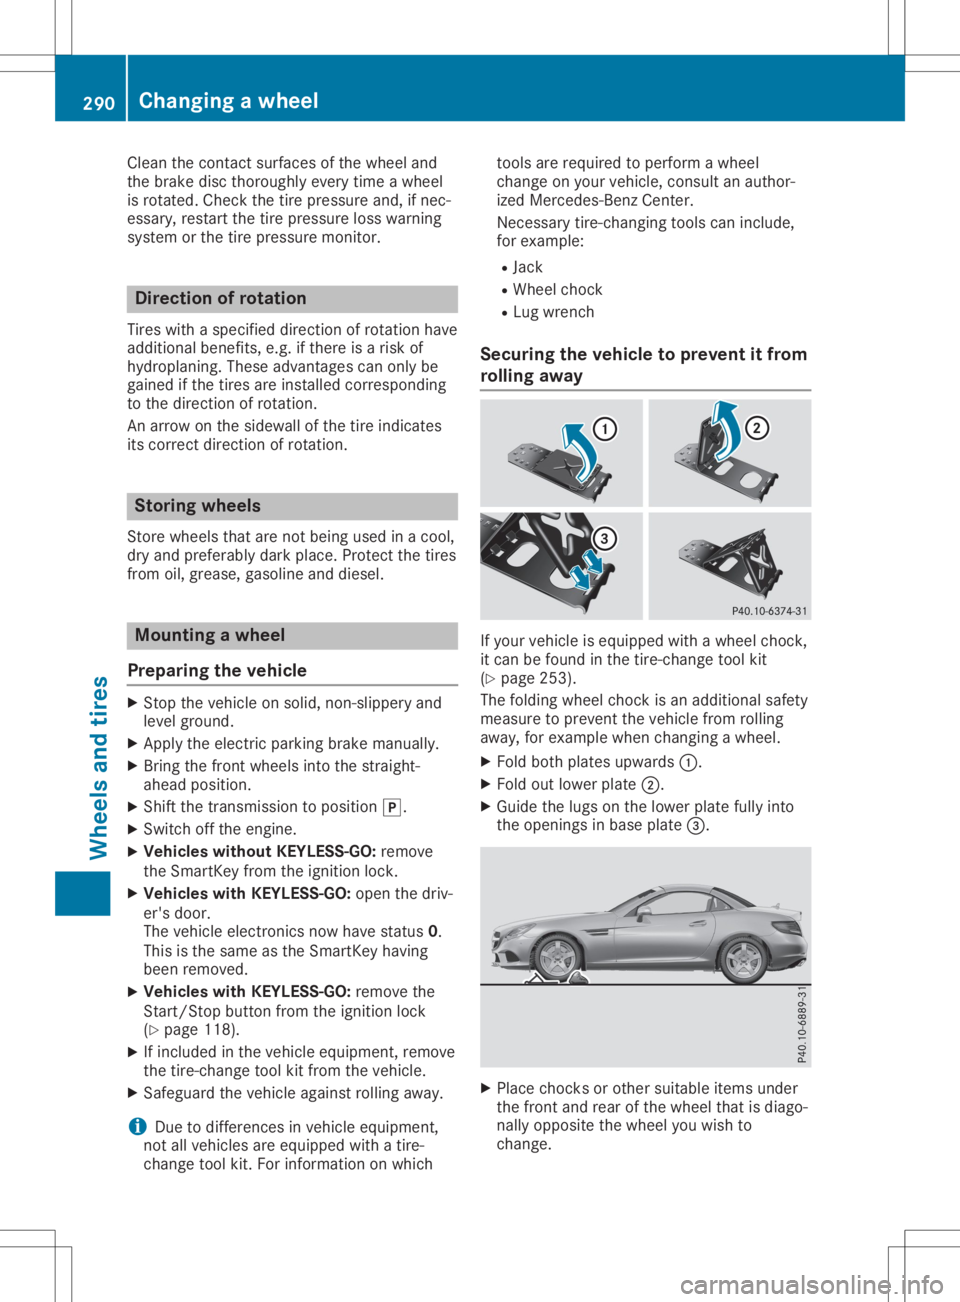
rol ling away If
your vehicle isequipp edwithaw heelchoc k,
it can befoun dint he tire-ch ang etoolkit
(Y page 253).
The foldingwheel choc kisa na ddit ionalsafe ty
meas uretopre ven tthe veh icle from rolling
away, forexample whenchang ingawheel .
X Fol db othp lates upward s0043.
X Fol do utlower plate0044.
X Guide thel ugs onthel ower platefully into
th eo pen ingsinb ase plate0087. X
Plac echockso rother suit able items unde r
th ef ront and rear ofthew heel that isdiago-
nall yoppo sitet he wheel youwish to
ch ang e. 290
Cha
nging awheelWh eels andtires
Page 303 of 310
!
Never
refuelusing:
R Diesel
R Regu largasoli newith anoctane number
lower than91RON
R Gasol inewith more than10vol. %etha-
nol, e.g. E15, E20, E85,E100
R Gasol inewith more than3vol. %m etha-
nol, e.g. M15, M30
R Gasol inewith metalliferou sadditives
If you accidentally refuelwiththewrong
fuel:
R Do not switch theignition on
R Consult aqualified speciali stworkshop.
Do not mix such fuels withthefuel recommen-
ded foryour vehicle.
In accordance withEuropean standardEN
16942, youcan find thefollowi ngcompatibili ty
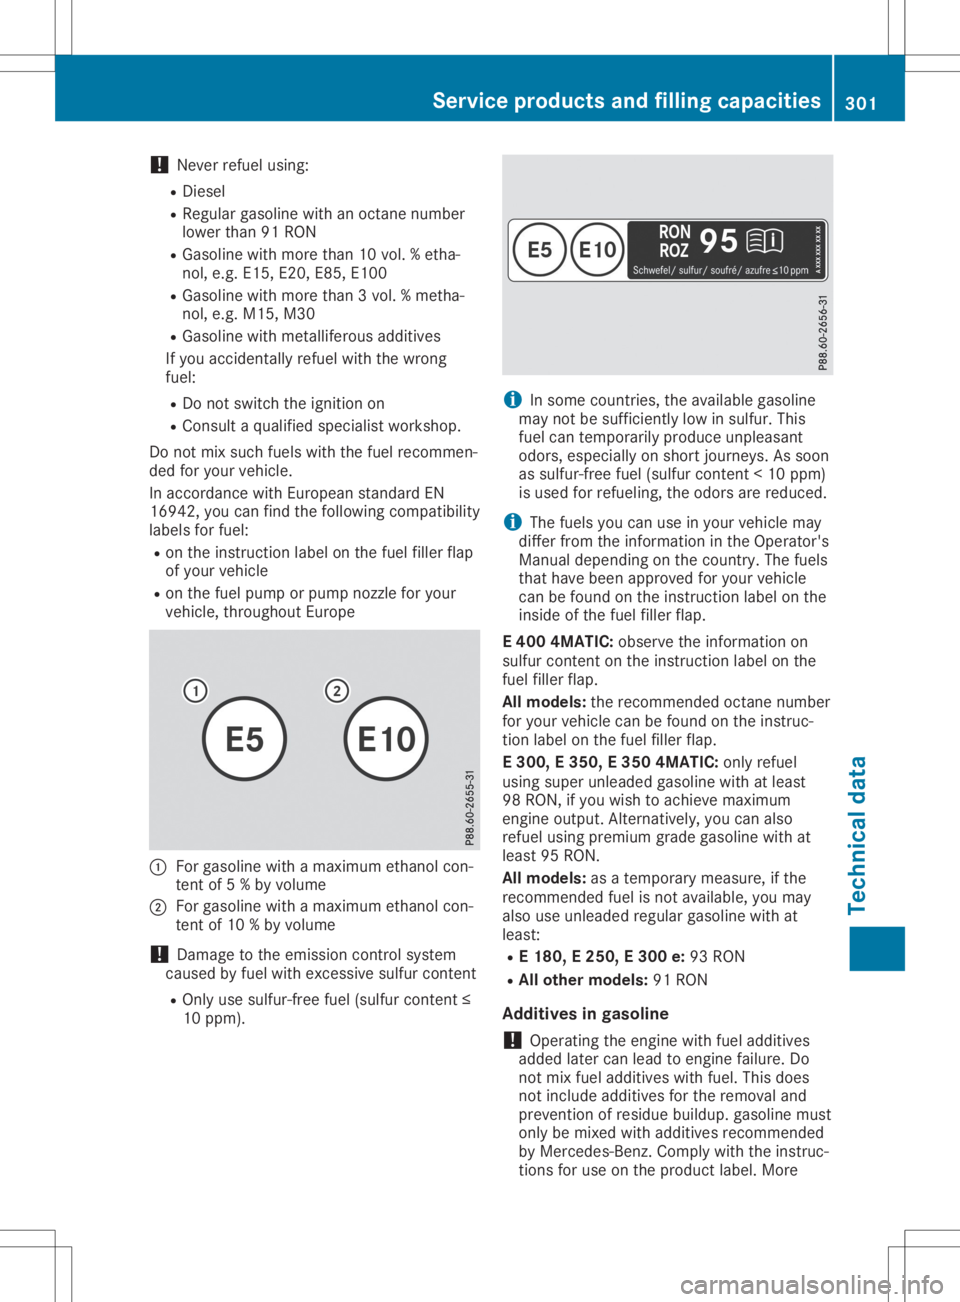
label sfor fuel:
R on the instruction labelonthe fuel filler flap
of your vehicle
R on the fuel pump orpump nozzlefor your
vehicle, throughout Europe 0043
For gasoli newith amaximum ethanolcon-
tent of5%b yvolume
0044 For gasoli newith amaximum ethanolcon-
tent of10 %b yvolume
! Damage
tothe emission controlsystem
caused byfuel with excessive sulfurcontent
R Only usesulfur-free fuel(sulfu rcont ent ≤
10 ppm ). i
In
some countries, theavail able gasoli ne
may notbesufficiently lowinsulfur. This
fuel cantemporarily produceunpleasa nt
odors, especial lyon short journeys. Assoon
as sulfur-free fuel(sulfu rcont ent <10p pm)
is used forrefueling, theodors arereduced.
i The
fuels youcan useinyour vehicle may
differ fromtheinformation inthe Operator's
Manual depending onthe country. Thefuels
that have been approved foryour vehicle
can befound onthe instruction labelonthe
inside ofthe fuel filler flap.
E4 00 4MATIC: observetheinformation on
sulfur contentonthe instruction labelonthe
fuel filler flap.
All models: therecommended octanenumber
for your vehicle canbefound onthe instruc-
tion label onthe fuel filler flap.
E3 00, E350, E350 4MATIC: onlyrefuel
using super unleade dgasoli newith atleast
98 RON, ifyou wish toachieve maximum
engine output. Alternatively, youcan also
refuel usingpremium gradegasolinewith at
least 95RON.
All models: asatemporary measure,ifthe
recommended fuelisnot avail able, youmay
also useunleade dregula rgasoli newith at
least:
R E1 80, E250, E300 e:93 RON
R All other models: 91RON
Additives ingasolin e
! Operating
theengine withfueladditives
added latercanlead toengine failure.Do
not mix fuel additives withfuel. Thisdoes
not include additives forthe removal and
prevention ofresidue buildup. gasoli nemust
only bemixed withadditives recommended
by Mercedes-Benz .Comply withtheinstruc-
tions foruse onthe product label.More Service
productsand fillingcapacities
301Technicaldat a Z