2020 MERCEDES-BENZ SLC light
[x] Cancel search: lightPage 249 of 310
R
solvents
R cleaning agentscontaining solvents
Do not scrub.
Do not touch thesurfaces andfilms with
hard objects, e.g.rings orice scrapers. Oth-
erwise, youmay scratch ordamage thesur-
faces andfilms.
! Do
not park yourvehicle foralong period
of time directly aftercleaning, particularly
after cleaning thewheel rimwith wheel
cleaner. Wheelcleaner canlead tothe
increased corrosionofthe brake discsand
pads. Therefore, driveforafew minutes
after cleaning. Byheating upthe brakes, the
brake discsandpads dry.Thevehicle can
then beparked foralong period oftime.
Regu larcare ofyour vehicle isac ondition for
retaining thequal ityinthe long term.
Use care products andcleaning agentsrecom-
mended andapproved byMercedes-Benz . Washing
thevehicl eand cleani ng
the paintwork
Automatic carwash G
WARNING
Braking efficiency isreduced afterwashing
the vehicle. Thereisar isk ofan accident.
Aft erthe vehicle hasbeen washed, brake
carefully whilepayingattent iontothe traffic
conditions untilfullbraking poweris
restored.
! When
DISTRONIC PLUSorthe HOLD func-
tion isactivated, thevehicle brakesauto-
matically incertain situations.
To avoid damage tothe vehicle, deactivate
DISTRONIC PLUSandtheHOLD function in
the followi ngorsimilar situations:
R when towing thevehicle
R in the carwash
! It
is preferable touse carwashes with
adjustable high-pressure pre-cleaningthat
corresponds tothe specification forthe
Cabri oletprogram. Incar washes thatuse
high water pressures, thereisar isk that a
small amount ofwater mayleakintothe
vehicle. !
Lock
thecarifyou wash itin an automatic
car wash. Otherwise, thevehicle mightbe
damaged .
! Never
cleanyourvehicle inaT ouchless
Automatic CarWash asthese usespecial
cleaning agents.Thesecleaning agentscan
damage thepaintwork orplastic parts.
If you have yourvehicle cleaned inah igh-
pressure automatic carwash, small
amounts ofwater mayenter thevehicle.
! Make
surethattheautomatic transmission
is in position Nwhen washing yourvehicle
in at ow-through carwash. Thevehicle could
be damaged ifthe transmission isin another
position.
! Make
surethat:
R the side windows androof arecompletely
closed
R the climate controlblower isswitched off
R the windshiel dwiper switch isin position
0
The vehicle mayotherwise bedamaged .
You canclean thevehicle atan automatic car
wash fromthevery start.
Preferably cleanthevehicle atautomatic car
washes thatusetextilewashing elements
without brushes. Thisprevents finescratches
from forming onthe paintwork andfilm.
If the vehicle isvery dirty, pre-wash itbefore
cleaning itin an automatic carwash.
Aft erusing anautomatic carwash, wipeoff
wax from thewindshiel dand the wiper blades.
This willprevent smearsandreduce wiping
noises caused byresidue onthe windshiel d.
i Vehicles
withdecorative film:select a
wash program withouthotwax atthe auto-
matic carwash.
Washing byhand In
some countries, washingbyhand isonly
allow edatspeciall yequip ped washing bays.
Observe thelegal requirements ineach coun-
try.
X Do not use hotwater anddonot wash the
vehicle indirect sunlight.
X Use asoft sponge toclean.
X Use amildcleaning agent,suchasac ar
shampoo approved byMercedes-Benz . Care
247Maintenance andcare Z
Page 250 of 310
X
Thoroughly hosedown thevehicle witha
gentle jetofwater.
X Do not point thewater jetdirectly towards
the airinlet orthe edges ofdecorative foils.
X Use plenty ofwater andrinse outthe
sponge frequent ly.
X Rinse thevehicle withclean water anddry
thoroughly withachamois.
X Do not letthe cleaning agentdryonthe
paintwork orthe decorative foils.
Carefully removealldeposits ofroad saltas
soon aspossible whendriving inwinter.
Power washers G
WARNIN
G
The water jetfrom acircular jetnozzle (dirt
blasters) cancause invisible exteriordam-
age tothe tires orchassis compon ents.
Component sdamaged inthis way may fail
unexpect edly.There isar isk ofan accident .
Do not use power washers withcircular jet
noz zles toclean thevehicle. Havedamaged
tires orchassis compon entsreplaced imme-
diately.
! Vehicles
withdecorative film:parts ofyour
vehicle arecovered withdecorative film.
Maintain adistance ofat least 27.5in
(70 cm) between thefilm-c overed partsof
the vehicle andthenozz leof the power
washer.
Infor mation aboutthecorrec tdistance is
availabl efrom theequipment manufacturer.
Move thepower washer nozzlearound when
cleaning yourvehicle.
The water temperat ureofthe power washer
must notexceed 140‡(60 †).
! Always
maintain adistance ofat least
12 in(30 cm) between thevehicle andthe
power washer nozzle. Infor mation aboutthe
correc tdistance isavailabl efrom theequip-
ment manufact urer.
Move thepower washer nozzlearound when
cleaning yourvehicle.
Do not aim directly atany ofthe following:
R Tires
R Door gaps, roofgaps, joints,etc.
R Elect ricalcompon ents R
Batt ery
R Plug-type couplings
R Light bulbs
R Seals
R Trim elements
R Vent ilation slots
Damaged sealsorelectric alcompon ents
can lead toleaks orfailures.
! If
you clean thetank fillerrecess whenitis
open, donot use apower washer. Thiscan
cause damage tothe seals orother compo-
nent s.
Cleaning thepaint work !
Do
not affix:
R stick ers
R films
R magnetic platesorsimilar items
to painted surfaces. Youcould otherwise
damage thepaintwork .
Scr atches, corrosiv edeposits, areasaffected
by corrosion anddamage causedbyinade-
quate carecannotalway sbec ompletely
repaired. Insuch cases, visitaqualified spe-
cialist workshop.
X Remove dirtimmediately, wherepossible,
while avoiding rubbingtoohard.
X Soak insect remains withinsect remover
and rinse offthe treated areasafterwards.
X Soak birddroppings withwater andrinse off
the treated areasafterwards.
X Remove treeresin, oils,fuels andgreases by
rubbing gentlywithacloth soaked inpetro-
leum ether orlighter fluid
X Remove coolantandbrake fluidwithamoist
cloth andclear water.
X Use tarremover toremove tarstains.
X Use silicone remover toremove wax.
If water nolonger forms"beads" onthe paint
surface, usethepaint careproducts recom-
mended andapproved byMercedes- Benz.This
is the case approximately everythreetofive
mont hs,depending onthe climate conditions
and thecare product used.
If dirt has penetr atedthepaint surface orif
the paint hasbecome dull,thepaint cleaner
recomm endedandapproved byMercedes-
Benz should beused. 248
CareMaintenance
andcare
Page 251 of 310
Do
not uset hese car eprodu cts inthe suno r
on the hoodwhile the hoodish ot.
X Use asuita blet ouch-u pstick, e.g.M B
To uch -Up Stick, torep airs ligh td am aget o
the paintw orkquickl yand pro visional ly.
Matte finishc are !
Nev
erpolish the vehicleo rthe light allo y
wh eels.P olish ing causes thefinishtoshi ne.
! The
followi ng can give the paint agloss y
ap pe arance andthusreduce thematt
eff ect:
R Ru bbing hard with uns uitab leag ents
R Wa shing the vehiclei nd irect sunli ght
! Nev
erusep aint cle ane r,bu ffing orpolish-
ing products, orgloss preserver,e.g.w ax,
for the purpo seofpaintw orkcare.The se
pro ducts areo nlys uita blef or high- gloss sur-
fa ces .The irus eo nvehicles with ma tte
pa intw orklead st oc ons idera bles urface
da ma geor, mor especific ally,t os hiny, spot-
ted area s.
Alw aysh avep aintw ork repairs car riedo utat
aq ualifi ed speci alistw orksh op.
! Onl
yuseautoma ticcar washe swhich cor-
res pond tothe latest technologica lstand-
ar ds .N ever usew ashp rogra ms which finish
by trea ting thevehiclew ithh otwa x.
Ob ser vethe senote sify ou rv ehicleh asac lear
ma tte finish. Thisw illh elpy ou toavoidd am-
ag et ot he paintw orkduet oinco rrecttrea t-
ment.
The senote salsoa pplyto light allo yw heels
wi th ac lear ma tte finish.
i Use
onlyins ect rem overand car shampo o
fro mt herange ofreco mme ndedand
ap pro ved Merced es-Benz careprodu cts.
Cl ean ingt he dec orati vefilm !
The
followi ng ma yhavea ne ffect onthe
ser vicelifea nd colorofdecora tivefilm:
R sunli ght
R temp erature,e.g .hot-a irfan
R we ath ercond itions
R stone impacts anddirt
R che micalcle ani ng agents
R gre asys ubstance s !
Do
not usea nytyp esofpolish on matt
de cora tivefilm. Polishi ng surfa ces cove red
wi th filmg ives itas hiny fini sh.
! Do
not trea tmatto rstru ctur eddecora tive
fil mw ithw ax.T hism aylead toma rks that
canno tberem ove d.
Ob ser vethe note sint he sec tiono nthe car e
and treatment ofma tte paintw ork
(Y page 249 );the senote salsoa pplyto ma tte
de cora tivefilm.
To clean, usep lenty ofwa ter and amildc lean-
ing agent withou tadditio nal orabrasive pro d-
ucts ,e.g.ac arsha mpo oapproved by
Me rced es-Benz.
X Dry vehicles cove redwith filmu sing asoft,
ab sor bent clo thafter eve rywa sh.
Wa ter marks couldothe rwisef orm.
Scra tches,corr osive depo sits, area sa ffecte d
by corr osion and dama gecau sed byina de-
qu ate carecanno talway sb ec omp letel y
rep aired .Ins uchc ases, visitaq ualifi ed spe-
cia list wo rksh op.
X Re mov edirti mm ediatel y,wh ere possi ble,
wh ilea voidin grubbing too hard.
The decora tivefilmm aybe irrep arab lyda m-
ag ed .
X Soa kinsect rem ains with ins ect rem over
and rinse off the trea tedarea sa fterw ards .
X Soa kbirdd ropp ing sw ithw ater and rinse off
the trea tedarea sa fterw ards .
The cleani ng pro duct, Paint Clea ner, which has
be en appro ved and reco mme ndedby
Me rced es-Benz, shouldb eusedw hend irth as
pe netra tedthedecora tivefilms urface orthe
de cora tivefilmh asbecome dull.
The manuf actu rercan providey ou with info r-
ma tiono nspecial car eand cleani ng pro ducts.
La min atedsurfaces mayexhibit op tica ldiffe r-
ence stos urfaces which werenot protecte dby
ad ecora tive filmw hent he decora tivefilmi s
rem oved.
i Hav
eworko rrep airs on decora tivefilm
car riedo utataq ualifi ed speci alistw ork-
sho p.Me rced es-Benz recomme ndsthatyou
us ea na uthor izedM erced es-Benz Center for
thi sp urpo se. Ca
re
249Mai ntenan ceand care Z
Page 252 of 310
Clean
ingthev ehi cle parts
Clean ingthew heels G
WAR
NING
The wate rjet from acircular jetn ozzle (dirt
blast ers)can caus einvisible exterior dam-
age tothet ires orchassis components.
Comp onents damag edinthis way may fail
une xpectedly. Thereisar isko fana cciden t.
Do notu se power washerswit hc ircular jet
no zzles tocle an thev ehicle .Haved amag ed
tir es orchassis components repl aced imme-
diat ely.
! Do
notu se acid icwheel cleanin gproduct s
to rem ove brak edust .This coul ddamag e
wheel boltsand brak ecom pon ents.
! Do
notp ark your vehicle foralon gp eriod
of tim edirectly aft ercle anin g,part icular ly
aft ercle anin gthe wheel rimwithw heel
cle ane r.Whee lcleane rcan lead tothe
inc reas edcor rosion oftheb rak ediscsa nd
pads. Therefore, driv efor afew min utes
aft ercle anin g.By heat inguptheb rak es, the
brak ediscsa nd pads dry.Thevehicle can
th en be park edfor alon gp eriod oftim e.
Clean ingthew indows G
WAR
NING
You couldbecome trapped bythew ind-
shie ldwiper sifthe ys tart mov ingwhile
cle anin gthe wind shieldor wiper blades .
Ther eisar isko finjury.
Always switchoff thew indshie ldwiper sand
th ei gn ition bef ore cleanin gthe wind shield
or wiper blades .
! Do
notu se dry cloths, abras iveproduct s,
solv ents or cle anin gagen tscon tain ingsol-
ven tsto cle an thei nside ofthew indows. Do
no ttou ch thei nsides ofthew indows with
hard object s,e.g .anice scrape rorring.
Ther eiso therwise arisko fdamag ingthe
wind ows.
! Clean
thew aterdrain age chann elsofthe
wind shieldand ther ear wind owatreg ular
int erv als. Deposi tssuc hasleave s,pet als
and polle nmayunde rcertain circum stanc es prev
entw ate rfromd rain ingaway. Thiscan
lead tocor rosion damag eand damag eto
elec tron iccom ponents.
X Clean thei nside and outside ofthew indows
wit had amp clothand acleanin gproduct
th at isrec omm ended andappro vedby
Mer cedes-Ben z.
Clean ingwiper blades G
WAR
NING
If th ew indshie ldwiper sareset inmot ion
while youarecleanin gthe wind shield,you
can betrapped bythew iper arm.Ther eisa
ris ko finjury.
Always switchoff thew indshie ldwiper sand
th ei gn ition bef ore cleanin gthe wind shield.
! Do
notp ull thew iper blade. Other wise, the
wiper bladecouldbedamag ed.
! Do
notc lean wiper blades tooo ften and
do notrub them tooh ard .Otherwise, the
grap hitec oatin gc oul db edamag ed.This
coul dcaus ewiper noise.
! Hol
dthe wiper armsecurely when folding
back .The wind shieldcoul dbedamag edif
th ew iper arm smac ksagain stitsudde nly.
X Fol dthe wind shieldwiper armsaway from
th ew indshie ld.
X Caref ullyclean thew iper blades witha
damp cloth.
X Fol dthe wind shieldwiper armsback again
bef ore swit ching onthei gn ition .
Clean ingthee xteri or ligh ting !
On
lyuse cleanin gagen tsor cle anin g
clo thst hata re suit able forplast iclen ses .
Caust ic,irritan toro therwise unsuitab le
cle anin gagen tsor cle anin gcloth sc oul d
sc rat ch ordamag ethe exterior light ingplas-
tic lenses .
X Clean thep last iclen ses ofthee xteri or light s
wit haw etspon geand amildcleanin g
agen t,e.g .M erced es-Ben zcarsham pooor
cle anin gcloth s. 250
Car
eMaintenance andcare
Page 254 of 310
Where
willIf ind...? Refle
ctive safety jacket
Removi ng/replac ingrefle ctive safety
jackets The
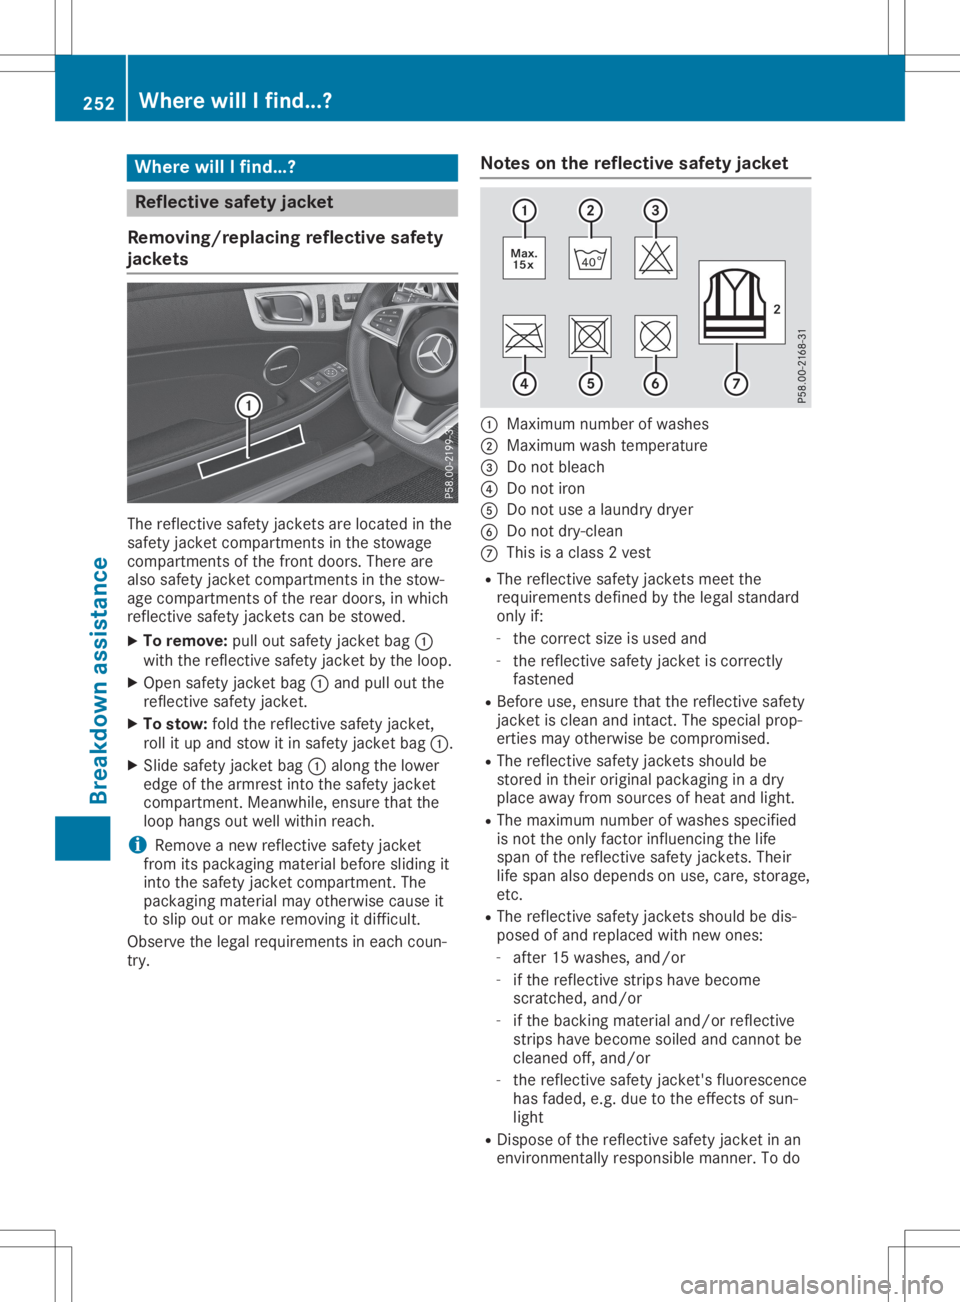
refle ctive safetyjackets areloca tedinthe
safe tyjacket compartments inthe stowa ge
compa rtments ofthe front doors .There are
als os afe tyjacket compartments inthe stow-
age compa rtments ofthe rear doors ,inw hich
refle ctive safetyjackets canbestowed .
X To remove :pul lout safe tyjacket bag0043
with therefle ctive safetyjacket bythe loop .
X Open safetyjacket bag0043and pullout the
refle ctive safetyjacket.
X To stow :fold therefle ctive safetyjacket,
roll itup and stow itin safe tyjacket bag0043.
X Slid esafe tyjacket bag0043along the lower
edge ofthe armres tinto thesafe tyjacket
compa rtment. Meanwhil e,ensure thatthe
loop hangs outwellwithi nreach.
i Remo
vean ew refle ctive safetyjacket
from itspacka gingmateri albefore sliding it
into thesafe tyjacket compartment. The
packa gingmateri almay otherw isecaus eit
to slipo utor make removi ngitdiffi cult.
Obser vethe lega lrequ ireme ntsineach coun-
try. Notes
onthe refle ctive safety jacket 0043
Maxim umnumbe rofw ashes
0044 Maxim umwash tempera ture
0087 Donot bleach
0085 Donot iron
0083 Donot use alau ndry dryer
0084 Donot dry-cl ean
006B This isac lass2v est
R The refle ctive safetyjackets meetthe
requ ireme ntsdefined bythe lega lstanda rd
only if:
- the correct sizeisuse dand
- the refle ctive safetyjacket iscorrectly
fastened
R Before use,ensure thattherefle ctive safety
jacket isclea nand intact. Thespeci alprop-
erties mayotherw isebecompromi sed.
R The refle ctive safetyjackets shouldbe
stored intheir originalpacka ginginad ry
pla ceaway from sourcesofhea tand light.
R The maximu mnumbe rofw ashes speci fied
is not theonly factor influencing thelife
spa nofthe refle ctive safetyjackets. Their
life spanalsod epe nds onuse ,care, storage ,
etc.
R The refle ctive safetyjackets shouldbe dis-
pose dofand repl aced withnewones:
- after 15washes, and/or
- ifthe refle ctive strips havebecome
scratched ,and/or
- ifthe backing materialand/or reflective
strips havebecome soiledand cannot be
clea ned off,and/or
- the refle ctive safetyjacket's fluorescence
has fade d,e.g. due tothe effects ofsun-
lig ht
R Dispos eofthe refle ctive safetyjacket inan
environmenta llyrespo nsiblemanner. Todo 252
Where
willIf ind...?Breakdown assistance
Page 258 of 310
Using
theTIREFIT kit X
Do not remov eanyforeign objectswhich
have penet rated thetire, e.g.screws or
nails.
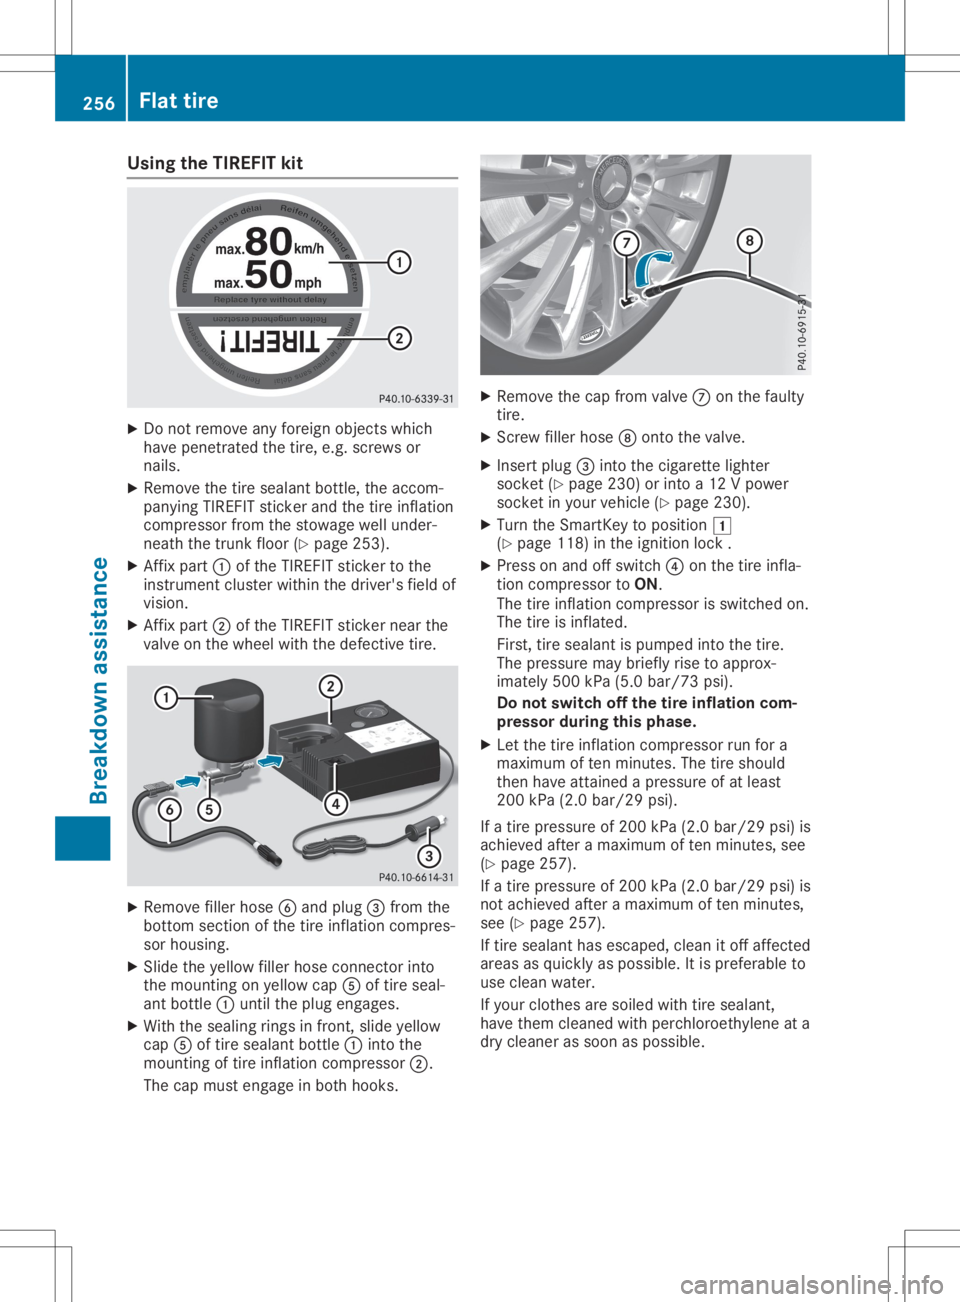
X Remove thetire sealant bottle,the accom -
panying TIREFITstic ker and thetire inflat ion
compr essorfromthestowage wellunder-
neat hthe trun kfloor (Ypage 253).
X Aff ixpart 0043ofthe TIREF ITstic ker tothe
inst rumen tclust erwithin thedriver' sfield of
vision .
X Aff ixpart 0044ofthe TIREF ITstic ker near the
valve onthe wheel withthedefect ivetire. X
Remove fillerhose 0084and plug 0087from the
bott omsect ionofthe tire inflat ioncompr es-
sor housing.
X Slide theyellow fillerhose connectorinto
the mount ingonyellow cap0083oftire seal-
ant bott le0043 until theplug engages.
X With thesealing ringsinfron t,slide yellow
cap 0083oftire sealant bottle0043 intot he
mount ingoftire inflat ioncompr essor0044.
The capmust engage inboth hooks . X
Remove thecap from valve 006Bonthe faulty
tire.
X Sc rew filler hose 006Contothe valve.
X Ins ert plug 0087intot he cigaret telighter
sock et(Y page 230)orintoa1 2Vp ower
sock etinyour vehicle (Ypage 230).
X Turn theSmart Keytoposition 0047
(Y page 118)inthe ignit ionlock .
X Press onand offswitc h0085 onthe tire infla-
tion compr essortoON.
The tireinflat ioncompr essorisswitc hedon.
The tireisinflat ed.
First ,tire sealant ispumped intot he tire.
The pressure maybriefly risetoapprox-
imately 500kPa(5.0 bar/7 3psi).
Do not switch offthe tirei nflat ioncom-
pr essor during this phase.
X Let the tire inflat ioncompr essorrunfora
maximum often minut es.The tireshould
then have attained apressure ofat least
200 kPa(2.0 bar/29 psi).
If at ire pressure of200 kPa(2.0 bar/2 9psi)is
achieved afteramaximum often minut es,see
(Y page 257).
If at ire pressure of200 kPa(2.0 bar/29 psi)is
not achieved afteramaximum often minut es,
see (Ypage 257).
If tire sealant hasescaped, cleanitoff affec ted
areas asquickly aspossible. Itis prefer ableto
use clean water.
If your clothes aresoiled withtiresealant ,
have them cleaned withperch loroet hylene ata
dry cleaner assoon aspossible. 256
Flat
tireBr eakd ownassist ance
Page 260 of 310

X
To reduc ethe tire pres sure :de pre sspre s-
su re release button 0043next topre ssu re
ga ge 0044.
X Whe nthe tire pressu reiscorr ect, unscrew
the fillerh osef rom thevalve ofthe sealed
tire .
X Screw thevalve cap onto thetire valve of
the sealedt ire. X
To rem ove thetire sealant bottle from the
tire inflation comp ressor ,press toge ther the
lo cking tabsonthe yellow cap .
X Pu llthe tire sealant bottle outo fthe tire
infl ation comp ressor .
The fillerh oser em ains atta chedtothe tire
sea lant bottle .
X Driv etot he nea restqualifi ed spe cialist
wo rksh opand have the tire changed there.
X Hav ethe tire sealant bottle and thefiller
hos ereplaced assoo naspossibl ea ta
qu alifi ed spe cialist wo rksh op.
X Hav ethe tire sealant bottle replaced every
fou ryears at aq ualifi ed spe cialist wo rksh op. Battery
(vehi cle) Impo
rtant safetynotes
Spe cialtool sand exp ertknow ledge are
req uired when working onthe battery ,e.g.
rem ovaland installatio n.Yo us houldt her efore
ha ve allw orki nvo lving the battery carriedo ut
at aq ualifi ed spe cialist wo rksh op. G
WAR
NING
Wor kcarrie do utinco rrectly onthe battery
can lead ,for exa mpl e,to as hortcirc uita nd
thu sdam aget he veh iclee lectro nics .This
can lead tofunc tionr estricti onsapplying to
sa fety -releva ntsystem s,e.g .the lighti ng
sy stem ,the ABS (anti-l ock braking system )
or the ESP ®
(El ectro nicStab ility Pro gram).
The opera ting safety ofyour veh iclem aybe
res tricte d.
Yo uc ouldlose contro lofthe veh icle, for
exa mpl e:
R wh en bra king
R in the eventofabrupt stee ring maneu vers
and /or when the vehicle's spe edisnot
ad apted tothe roadcond itions
The reisar isko fana ccident.
In the eventofas hortcirc uito ra simil ar
inci dent, conta ctaq ualifi ed spe cialist wo rk-
sho pimm ediatel y.Do not drive any further .
Yo us houldh avea llwo rkinvo lving the bat-
tery carriedo utataq ualifi ed spe cialist
wo rksh op.
For further informa tiona bout ABS andESP®
,
see (Ypage 57)and (Ypage 60). G
WAR
NING
Ele ctros taticbuild -u pc an lead tothe crea -
tio no fspa rks, which cou ldignite thehighl y
exp losive gases ofab attery .The re isar isk
of an exp losion.
Befo rehandl ing the battery ,tou ch the vehi-
cle body torem ove anyexisting electro static
bu ild-u p.
The highl yflamma bleg asmixtu reform swhen
cha rging the battery aswellas when jump -
sta rting . 25
8 Battery
(vehi cle)Breakdo wnassis tan ce
Page 263 of 310
If
the indicator/wa rninglampsdon otlight up
at low temperature s,itis very likely thatthe
discha rgedbattery hasfrozen. Inthis case,
you may neither chargethebattery norjump-
start thevehicle .The service lifeofat hawed -
out battery maybeshorter. Thestarting char-
acteristics canbeimpa ired, particul arlyatlow
temperature s.Have thethawed -outbattery
checked ataq ualifie dspecia listworkshop.
Rea dthe battery charger's operatinginstruc-
tions before charging thebattery.
X Open thehood.
X Connect thebattery charger tothe positive
terminal andground pointinthe same order
as when connecting thedonor battery inthe
jump-starting procedure(Y page 261). Replaci
ngthe 12Vb attery
Observe thenotes onthe 12Vb attery
(Y page 258).
Mercedes-Benz recommendsthatyouhave
the 12Vb attery replacedataq ualifie dspe-
ciali stworkshop, e.g.atan authori zed
Mercedes-Benz Center. If
you want torepla cethe battery yourself,
observe thefollow ingnotes:
R Alway srepla cead efective batterywitha
battery whichmeets thespecific require-
ments ofthe vehicle .
The vehicle isequi pped withanAGM
(Absorbent GlassMat) technology battery.
Full vehicle functionality isonly guaranteed
with anAGM battery. Forsafety reasons,
Mercedes-Benz recommendsthatyouonly
use batteries whichhavebeen tested and
appro vedforyou rvehicle byMercedes-
Benz.
R Use detachab leparts suchasbreather
hoses, angled connecting piecesorterminal
covers fromthebattery whichisto be
repla ced.
R Make surethatthevent hose isalw ays con-
nected tothe origina lopening onthe bat-
tery side.
R Install existing orsupp liedcellcaps topre-
vent gases orbattery acidfrom escapi ng.
R Make surethatthedetachab leparts are
connected againinthe same way. Jump-star
ting
For thejump-starting procedure,use only thejump-starting connectionpointinthe engine com-
partment, consisting ofap ositive terminal andaground point. G
WARNING
Battery acidiscaustic. Thereisar isk ofinjury.
Avoid contact withskin, eyesorclothing. Donot inhal eanybattery gases.Don otlea no ver the
battery. Keepchildre nawayfrom batteries. Washawaybattery acidimmedi atelywithplenty of
clean water andseek medica lattention. G
WARNING
During charging andjump-starting, explosivegases canescape fromthebattery. Thereisa
risk ofan explosi on.
Particul arlyavoid fire,open flames ,creating sparksandsmoking. Ensurethereissufficie nt
ventilation whilecharging andjump-starting. Donot leano ver abattery. G
WARNING
During thecharging process,abattery produceshydro gengas. Ifas hort circuit occurs or
sparks arecreated, thehydro gengascan ignite. Thereisar isk ofan explosi on. Jump-st
arting
261Breakd owna ssis tance
Z