2020 MERCEDES-BENZ SL ROADSTER change time
[x] Cancel search: change timePage 198 of 334
X
Press the0059 or0065 button onthe steer-
ing wheel toselect theTrip Trip
menu.
X Press 0063or0064 toselect thedisplay
with approximate range0043and curren tfuel
cons umption 0044.
Approx imaterange 0043that canbecovered
is calculated accordingto your curren tdriv-
ing style andtheamount offuel inthe tank .
If there isonly asmall amount offuel leftin
the fuel tank ,a vehicle beingrefueled 00A8
appears insteadofapproximate range0043.
Recuperation display0087shows youif
energy hasbeen recuperated fromthe
kinet icenergy inoverrun modeandsaved in
the battery. Recuperation display0087
depends onthe engine installed andis
theref orenot availabl ein all vehicles.
Digital speedomet er X
Press the0059 or0065 button onthe steer-
ing wheel toselect theTrip Trip
menu.
X Press the0063 or0064 button toselect the
digital speedometer.
A gearshift recommendation 0097may also
appear inthe display.
Observe theinform ationongearshift recom-
mendation whenshiftin gmanually
(Y page 144).
Mercedes- AMGvehicles: agearshift recom-
mendation isshown inthe status barofthe
multifunc tiondisplay andnotinthe digital
speedometer display.
Resetting values X
Press the0059 or0065 button onthe steer-
ing wheel toselect theTrip Trip
menu.
X Press the0063 or0064 button toselect the
funct ionthat youwish toreset.
X Press 0076toconf irmyour selection .
X Press 0064toselect Yes Yes
andpress 0076to
conf irm.
You canreset thevalues ofthe following func-
tions:
R Trip odometer
R "From Start"trip computer
R "From Reset" tripcomputer
R ECO display
If you reset thevalues inthe ECO display, the
values inthe "From Start"trip computer arealso
reset. Ifyou reset thevalues inthe "From
Start "trip computer ,the values inthe ECO dis-
play arealso reset. Naviga
tionsystem menu
Displaying navigation instructions In
the Navi Navi
menu, themultifunc tiondisplay
shows navigation instruction s.
Observe theadditional informationonnaviga-
tion inthe Digital Operator's Manualofthe
multimedia system.
X Switc hon the multimedia system(seethe
Digital Operator's Manual)
X Press the0059 or0065 button onthe steer-
ing wheel toselect theNavi Navi
menu.
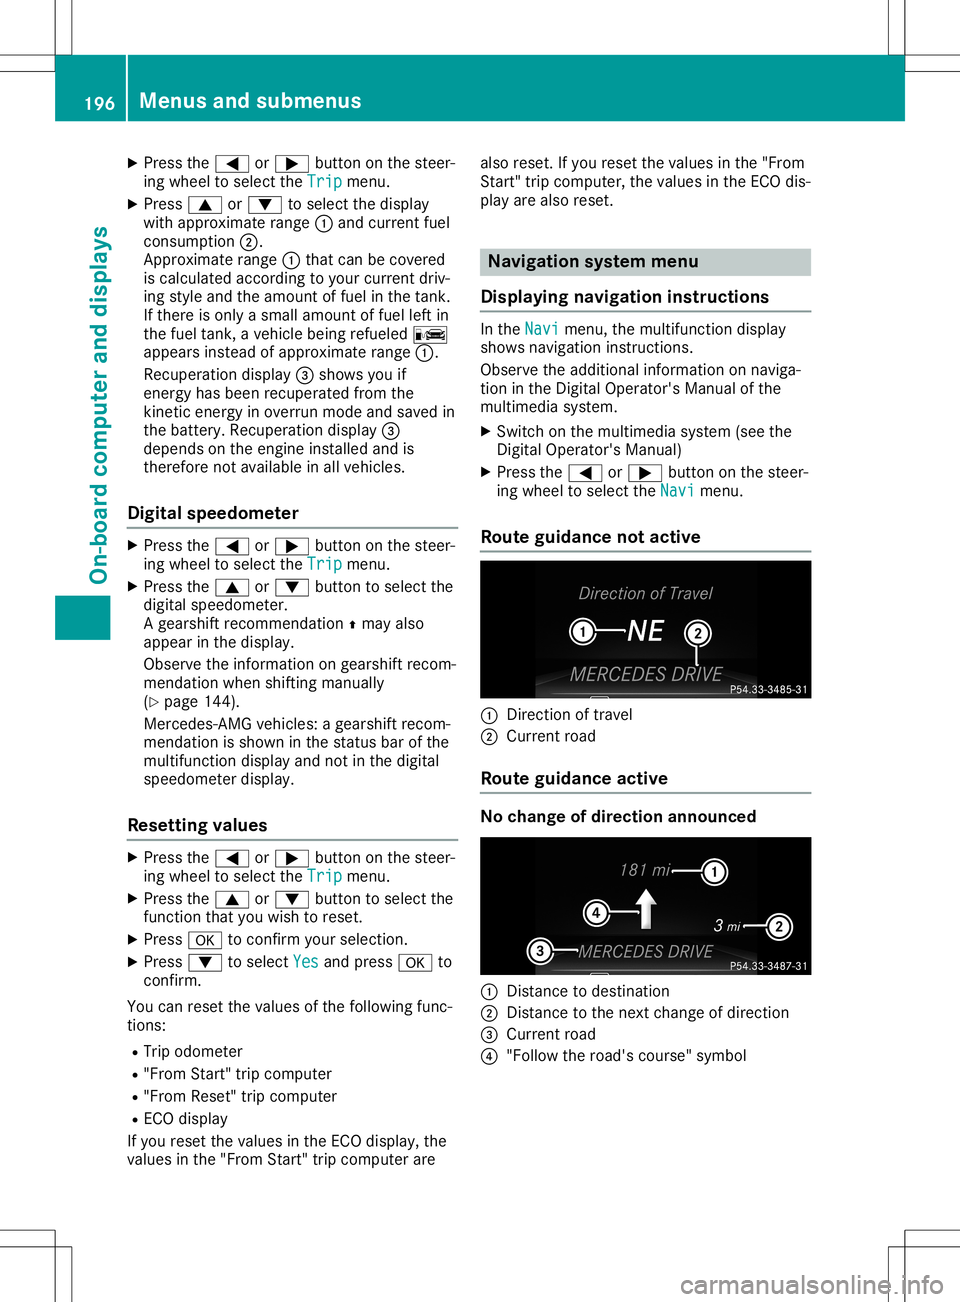
Rout eguidance notactive 0043
Direct ionoftravel
0044 Current road
Rout eguidance active No
change ofdirection announced 0043
Dist ance todestinat ion
0044 Dist ance tothe next change ofdirection
0087 Current road
0085 "Follow theroad's course" symbol 196
Menus
andsubmenusOn-board computerand display s
Page 204 of 334
X
Press the0059 or0065 button onthe steer-
ing wheel toselect theSett. Sett.
menu.
X Press the0064 or0063 button toselect the
Instrument Cluster Instrument
Clustersubmenu.
X Press 0076toconf irm.
X Press the0064 or0063 button toselect the
Permanent Display: Permanent
Display:function.
The curren tsett ing, Outside Temperatur e Outside
Temperatur e
or Speedomete r[km/h] Speedomete
r[km/h] orSpeedomete r Speedomete
r
[mph] [mph],
appears.
X To change thesetting: press0076again.
Lights Setting
thedayt imerunning lamps
This funct ionisnot availabl ein Canada.
X Press the0059 or0065 button onthe steer-
ing wheel toselect theSett. Sett.
menu.
X Press the0064 or0063 button toselect the
Light Light
submenu.
X Press 0076toconf irm.
X Press the0064 or0063 button toselect the
Daytime RunningLights Daytime
RunningLightsfunction.
If the Daytime RunningLights Daytime
RunningLightsfunction
has been switched on,the cone oflight and
the 0086 symbol inthe multifunc tiondisplay
are shown inorange.
X Press the0076 button tosave thesetting.
Further informationondaytime runninglamps
(Y page 109).
Setting thebright nessofthe ambient
lighting
X Press the0059 or0065 button onthe steer-
ing wheel toselect theSett. Sett.
menu.
X Press the0064 or0063 button toselect the
Light Light
submenu.
X Press 0076toconf irm.
X Press the0064 or0063 button toselect the
Amb. Light +/- Amb.
Light +/-funct ion.
The curren tsett ingappears.
X Press 0076toconf irm.
X Press the0064 or0063 button toadjust the
brightn esstoany level from Off Off
toLevel 5 Level
5
(bright).
X Press the0076 or0038 button tosave the
sett ing. Setting
theambient lightingcolor
X Press the0059 or0065 button onthe steer-
ing wheel toselect theSett. Sett.
menu.
X Press the0064 or0063 button toselect the
Light Light
submenu.
X Press 0076toconf irm.
X Press the0064 or0063 button toselect the
Amb. Light Col. Amb.
Light Col.function.
X Press 0076toconf irm.
X Press the0064 or0063 button toset the
color toSOLAR SOLAR,
SOLAR Orange SOLAR
Orange orSOLAR SOLAR
Red Red.
X Press the0076 or0038 button tosave the
sett ing.
<002400460057004C005900440057004C0051004A001200470048004400460057
004C00590044> tingsurround light-
ing and exterior lightingdelayed switch-
off
X Press the0059 or0065 button onthe steer-
ing wheel toselect theSett. Sett.
menu.
X Press the0064 or0063 button toselect the
Lights Lights
submenu.
X Press 0076toconf irm.
X Press 0064or0063 toselect theSur‐ Sur‐
round Lighting round
Lighting function.
If the Surround Lighting Surround
Lightingfunctionisacti-
vated, themultifunc tiondisplay showsthe
light cone andthearea around thevehicle in
orange.
X Press the0076 button tosave thesetting.
Deact ivating exteriorlighting delayed switch-
off temporarily:
X Before leaving thevehicle, turntheSmart -
Key toposition 0092inthe ignition lock.
X Turn theSmart Keytoposition 0048inthe igni-
tion lock.
Ex terior lighting delayed switch-offisdeacti-
vated.
Ex terior lighting delayed switch-offisreactiva-
ted thenext time youstart theengine.
If you have activat edthe Surround Lighting Surround
Lighting
funct ionand youturn thelight switch to0058,
the following functionsareactivat edwhen itis
dark:
R surr ound lighting: theexter iorlighting
remains litfor 40seconds afterunlockin g
with theSmart Key.Ifyou start theengine,
the surround lightingisswitched offand 202
Menus
andsubmenusOn-board computerand display s
Page 248 of 334
Gene
ralnotes
The multime diasystem section inthis Opera -
tor's Manua ldescrib esthe basi cprincipl esfor
opera tion.More information canbefound in
the Digital Operator'sManua l. Important
safetynotes G
WARNING
If you opera teinformation systemsandcom-
municatio nequ ipment integrated inthe
vehicle whendriving, youmay bedistracted
from thetraffic situation. Youcould also
lose control ofthe vehicle .There isarisk of
an accide nt.
Only opera tethis equipment whenthetraffic
situa tionpermits. Ifyou arenot sure that
this ispossi ble,park thevehicle paying
attention totraffic conditions andopera te
the equipment whenthevehicle isstation-
ary .
You must observe thelega lrequ irements for
the country inwhich youarecurrently driving
when operatingthemultime diasystem.
The multime diasystem calculates theroute to
the destinati onwithou ttaking thefollo wing
into account, forexampl e:
R traffic lights
R stop andyieldsigns
R parking orstopping restrictions
R road narrowi ng
R other roadandtraffic rulesand regul ations
The multime diasystem maygiveincorrect nav-
iga tion recommendati onsifthe actual street/
traffic situationdoes notcorrespond withthe
digi talmap's data.
For exampl e:
R adiverted route
R the road layout orthe direction ofaone-way
street hasbeen changed
For this reaso n,you must alwaysobserve road
and traffic rulesand regul ations duringyou r
journey. Roadand traffic rulesand regul ations
alw ayshave priorityover multime diasystem
driving recommendati ons. Navig
ation announcements areintended to
direct youwhiledriving withoutdiverting your
attention fromtheroad anddriving.
Plea sealw aysuse this feature instead ofcon-
sul ting themap displayfordirections. Looking
at the icons ormap displaycan distract you
from traffic conditions anddriving, and
increase therisk ofan accide nt.
This equipment complieswith FCCradiation
exposu relimi tsset forth foruncontrolled
equ ipment andmeets theFCC radiofreque ncy
(RF) Exposure Guideli nes inSuppl ement Cto
OET65.
This equipment hasvery lowlevel sof RF
energy thatisdeeme dto comply withoutmaxi-
mum permis siveexposu reeval uation(MPE).
However, itis recommended toinstall itat a
distance ofat lea st8inches (approx. 20cm)
betwee nthe radiation source andaperson's
body (notinclud inglimb ssuch ashands,
wrists, feetandlegs) . G
WARNING
Modi fications toelectronic components,
their software aswel las wiri ngcan impa ir
their function and/orthefunction ofother
networked components. Inparticu lar,sys-
tems releva ntto safety couldalsobeaffec-
ted. Asaresul t,these maynolonger func-
tion asintended and/orjeopardizethe oper-
ating safety ofthe vehicle .There isan
increase drisk ofan accide ntand injury.
Never tamper withthewiringaswel las elec-
tronic components ortheir software .You
shoul dhave allwork toelectrica land elec-
tronic equipment carried outataqua lified
specia listworkshop . Func
tionrestrictio ns
For safety reasons,some functions arerestric-
ted orunava ilable whil ethe vehicle isin
motion. Youwillnotice this,forexampl e,
becau seeither youwillnot beableto sele ct
certain menuitemsoramessag ewil lapp ear
to this effect. 246
Func
tionrestrictio nsMultimedia system
Page 249 of 334
Opera
tingsystem Overview
General notes !
Do
not use thespace infron tof the dis-
play forstor age. Objec tsplaced herecould
damage thedisplay orimpair itsfunc tion.
Avoid anydirect contact with thedisplay
surface. Pressure onthe display surface
may result inimpairment sto the display,
which couldbeirrever sible.
Wearing polarized sunglasses mayimpair your
ability toread thedisplay.
The display hasanautomatic temperature-
con trolled switch- offfeature. Thebrightn essis
automatic allyreduced ifthe temper atureis
too high. Thedisplay maytempor arilyswitch
off complet ely.
Cleaning instructions !
Do
not touch thedisplay. Thedisplay hasa
very sensit ivehigh-gloss surface;thereisa
risk ofscrat ching .If you have toclean the
screen ,however, useamild cleanin gagent
and asoft ,lint- free cloth .
The display mustbeswitched offand have
cooled downbefore youstart cleanin g.Do not
apply pressure tothe display surface when
cleanin git, as this could cause irreversible
damage tothe display.
Switching themult imedia system
on/off X
Press the0043con trol knob.
Adju sting thevolume X
Turn the0043con trol knob.
The volume isadjusted:
R for the curren tlyselect edmedia source
R during trafficor navigation announcements
R in hands- freemode during anactive call
Switching thesound onoroff X
Press the0063 button onthe control panel.
If the audio output isswitched off,thesta-
tus line willshow the0063 symbol. Ifyou switch
themedia source orset the volume,
the sound isautomatic allyswitched on.
i Navigation
announcementswill beheard
even ifthe sound ismuted.
Functions The
multimedia systemhasthefollowing func-
tion s:
R Radio mode
R Media modewithmedia search
R Sound systems
R Navigation system
R Communicat ionfunc tions
R SIRIUS Weather
R Vehicle functionswith system settings
R Favorit esfunc tions
Controller The
controller inthe cent ercon sole letsyou:
R select menuitemsonthe display
R ent ercharact ers
R select adestin ationonthe map
R save entries
The controller canbe:
R turn ed3
R slid leftorright 1
R slid forwards orback 4
R slid diagonally 2
R pressed brieflyorpressed andheld7
Back button You
canusethe0038 button toexit amenu or
to call upthe main menu ofthe curren toperat-
ing mode.
X To exit themenu: brieflypressthe0038
button .
The multimedia systemchanges tothe next
higher menulevelinthe curren toperatin g
mode.
X To call upthe main menu: pressthe0038
button forlonger thantwosecon ds.
The multimedia systemchanges tothe main
menu ofthe curren toperatin gmode. Opera
tingsystem
247Multimedia system Z
Page 252 of 334
Mobile
phone:
X Act ivate Bluetooth ®
and, ifnecessary, Blue-
tooth ®
visibili tyfor other devices (seethe
manufacturer's operatinginstructions).
The Bluetooth ®
device names forallofone
manufacturer's productsmightbeidentical. To
make itpossible toclearly identify yourmobile
phone, change thedevice name(seetheman-
ufacturer's operatinginstructions).
If the mobile phonesupports thePBAP (Phone
Book Access Profile) andMAP (Message
Access Profile)Bluetooth ®
profiles, thefollow-
ing information willbetransmit tedafter you
conn ect:
R Phone book
R Call lists
R Text messages ande-mail
i Further
information onsuitable mobile
phones canbefound at:http://
www .mer<004600480047004800560010004500480051005D001100460052005000120046
0052> nnect
i In
the USA, youcan getintouch withthe
Mercedes-Ben zCustomer AssistanceCenter
on 1-80 0-FO R-MERCedes
(1-800 -367-637 2).
In Canada ,you can getintouch withthe
Customer Relations Center on
1-80 0-387-0100.
Searching forand auth orizing (con-
necting) amobile phone Before
usingyourmobile phonewiththemulti-
media system forthe first time, youwillneed
to search forthe phone andthen authorize
(connec t)it. Depending onthe mobile phone,
authorization eithertakesplacebymeans of
Secure SimplePairing orby enterin gapass-
key. Themultimedia systemautomatically
makes theprocedure thatisrelevant foryour
mobile phoneavailable.Themobile phoneis
alwa ysconn ected automatically afterauthori-
zation. Further information onusing amobile
phone withthemultimedia system(seethe
Digital Operator's Manual).
If the multimedia systemdoesnotdetect your
mobile phone, thismay bedue toparticular
security settingson your mobile phone(see
the manufacturer's operatinginstructions).
Only onemobile phonecanbeconn ected to
the multimedia systematany one time.
Searching foramobile phone Multimedia
system:
X Select Tel/ Tel/00A7007BConn. Conn.
Device Device007BSearch
forPhones Search
forPhones007BStart Start
Search Search.
The availa blemobile phones aredisplay ed.
Symbols inthe device list Sym-
bol Explanation
00D3
New
mobile phonefound, notyet
authorized. 00DC
Mobile
phoneisauthorized, butis
not conn ected. Conne
ctingamobile phone
Authorizat ionusing Secure SimplePairing:
X Select mobile phone.
A code isdisplay edinthe multimedia sys-
tem andonthe mobile phone.
X Ifcodes match:select Yes Yes
onthe multime-
dia system.
X Confirm codeonthe mobile phone. Depend-
ing onthe mobile phoneused,confirm the
conn ection tothe multimedia systemand
for the PBAP andMAP Bluetooth ®
profiles.
The prompt toconfirm maytake uptotwo
minutes tobe display ed(see themanufac-
turer's operating instructions).
X Ifthe codes aredifferent: selectNo No
on the
multimedia system.
The process iscanceled.
Repea tauthorization.
Authorizat ionbyenterin gapasskey (pass-
code):
X Select theBluetooth ®
name ofthe mobile
phone.
The input menu forthe passkey isdisplay ed.
X Choose aone tosixteen- digitnumber com-
bination asapasskey.
X Ent erthe passkey onthe multimedia sys-
tem.
X Press 0054toconfirm .
X Ent erand confirm thepasskey onthe
mobile phone. Depending onthe mobile
phone used,confirm theconn ection tothe
multimedia systemandforthe PBAP and
MAP Bluetooth ®
profiles. Theprompt to
confirm maytake uptotwo minutes tobe 250
Operat
ingsystemMultim ediasystem
Page 275 of 334
Maintaining
thetime-dependent servicesched-
ule:
X Note down theservice duedate display edin
the multifunction displaybeforedisconnec t-
ing the battery.
or X Aft erreconn ectingthebattery, subtract the
battery disconnec tionperiods fromtheser-
vice date shown onthe display . Hiding
service displays
X Press the0076 or0038 button onthe steer-
ing wheel. Showing
servicedisplays
X Switch onthe ignition.
X Press 0059or0065 onthe steering wheel
to select theServ. Serv.
menu.
X Press 0063or0064 toselect theASSYST ASSYST
PLUS PLUS
submenu andconfirm bypressing the
0076 button.
The service duedate appears inthe multi-
funct iondisplay . Informat
ionabout Service
Resetting theASSYST PLUSservice
interval display !
If
the ASS YST PLUS service interval dis-
play hasbeen inadvertent lyreset, thisset-
ting canbecorrect edataqual ified special-
ist workshop.
Have service workcarried outasdescribed
in the Maintenanc eBooklet. Thismay other-
wise leadtoincreased wearanddamage to
the major assemblies orthe vehicle.
A qual ified specialist workshop, e.g.anauthor-
ized Mercedes-Ben zCenter, willreset the
ASS YST PLUS service interval displayafterthe
service workhasbeen carried out.Youcan
also obtain further information onmainte-
nance work,forexample. Special
servicerequirements The
specified maintenanc einterval takesonly
the normal operation ofthe vehicle into
account. Serviceworkwillneed tobe per-
formed moreoften ifthe vehicle isoperated
under arduou scondition sor increased loads.
The ASSYST PLUS service interval displayis
only anaid. Thedriver ofthe vehicle isrespon-
sible forwhether serviceworkwillneed tobe
performed morefrequently thanrequired asa
result ofthe actual operating conditions
and/or loads.
Examples ofarduou soperating conditions:
R regular citydriving withfrequent intermedi-
ate stops
R the vehicle isprimarily usedtotravel short
distances
R frequent useinmountainous terrainoron
poor roadsurfaces
R the engine isoften leftidling forlong peri-
ods
R particularly dustycondition s,or ifair-recir-
culation modeisfrequently used
In these orsimilar operating conditions,have
the interior filter,airfilter, engine oiland oilfil-
ter, forexample, changedmorefrequently.
Under arduou soperating conditions,the tires
must becheck edmore often. Further informa-
tion canbeobtained ataqual ified specialist
workshop.
Driving abroad An
exten siveMercedes-Ben zService network
is also availa bleinother countr ies.You can
obtain further information fromanyauthorized
Mercedes-Ben zService Center. Care
Notes
oncare H
Environmental
note
Dispose ofempty packaging andcleaning
cloths inan environm entallyresponsible
manner.
! When
cleaning yourcar,donot use:
R dry, coarse orhard cloths
R abrasive cleaningagents Care
273Maintenance andcare Z
Page 285 of 334
There
isarisk ofan accident .
Do not drive thevehicle. Contact aqualified
specialist workshop. G
WARNIN
G
The tiresealant isharmful andcauses irrita-
tion. Itmust notcome intocontactwith your
skin, eyesorclothin gor be swallowe d.Do
not inhale TIREFIT fumes.Keeptiresealant
away fromchildren. Thereisarisk ofinjury.
If you come intocontactwith thetire seal-
ant, observe thefollowing:
R Rinse offthe tire sealant fromyourskin
immediately withwater.
R Ifthe tire sealant comesintocontactwith
your eyes, immediately rinsethem thor-
oughly withclean water.
R Iftire sealant isswallowe d,immediately
rinse yourmouth outthoroughly anddrink
plenty ofwater. Donot induce vomitin g,
and seek medical attentionimmediately.
R Immediately changeoutofclothin gwhich
has come intocontactwith tiresealant.
R Ifan allergic reaction occurs,seekmedi-
cal atten tionimmediately.
! Do
not operate thetire inflation compres-
sor forlonger thaneight minutes atatime
without abreak. Itmay otherwise overheat.
The tireinflation compressor canbeoper-
ated again onceithas cooled down.
Comply withthemanufact urer’ssafety instruc-
tions onthe stick eron the tire inflation com-
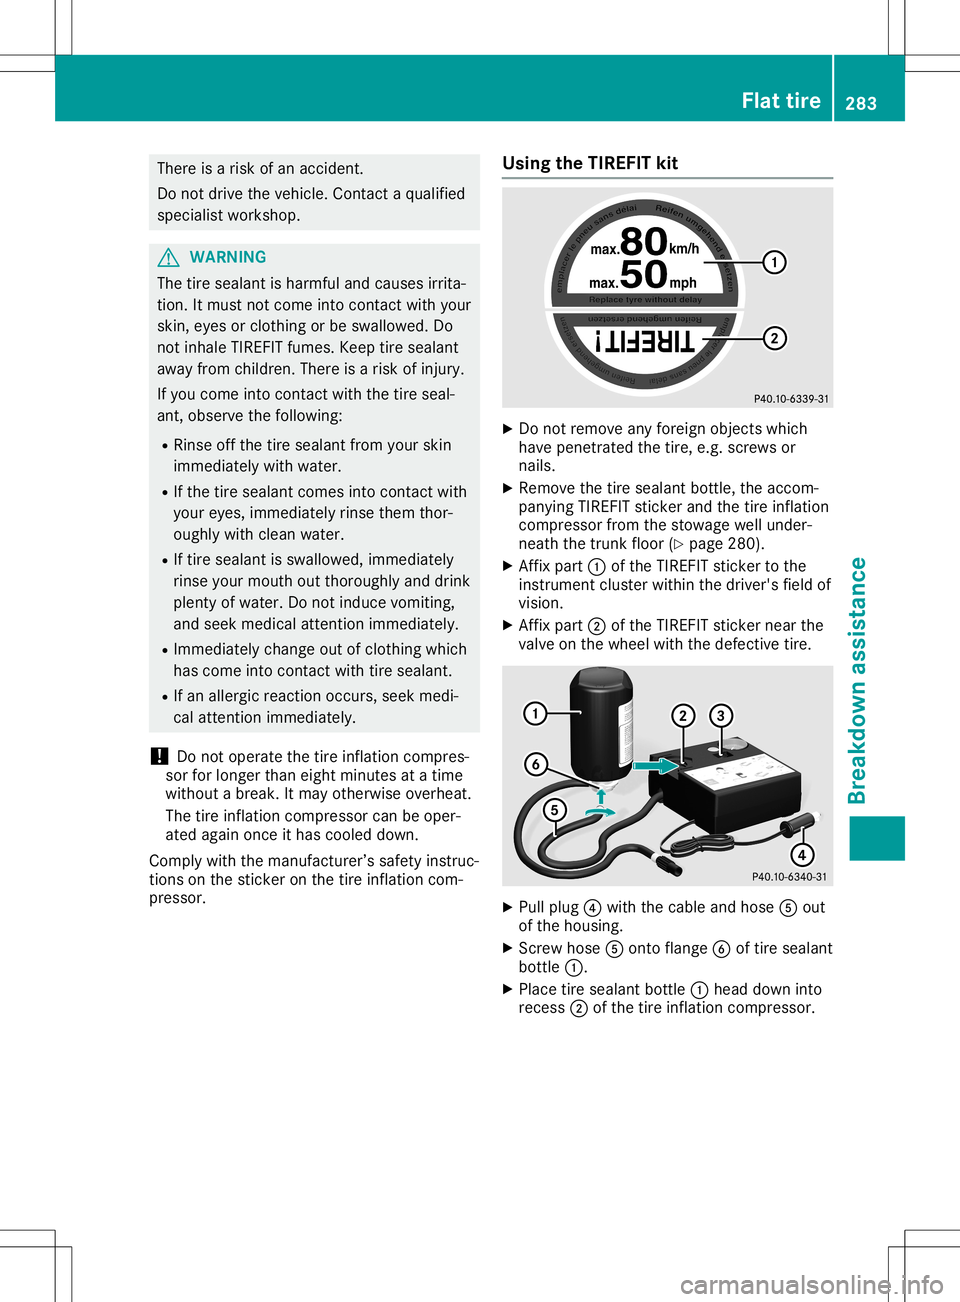
pressor. Using
theTIREFIT kit X
Do not remove anyforeign objectswhich
have penetr atedthetire, e.g.screws or
nails.
X Remove thetire sealant bottle,theaccom-
panying TIREFITstickerand thetire inflation
compressor fromthestowage wellunder-
neath thetrunk floor(Ypage 280).
X Aff ixpart 0043ofthe TIREFIT stickerto the
instr ument cluster withinthedriver's fieldof
vision.
X Aff ixpart 0044ofthe TIREFIT stickernear the
valve onthe wheel withthedefect ivetire. X
Pull plug 0085with thecable andhose 0083out
of the housing.
X Scr ew hose 0083ontoflange 0084oftire sealant
bottle 0043.
X Place tiresealant bottle0043head down into
recess 0044ofthe tire inflation compressor . Flat
tire
283Breakdown assistance Z
Page 306 of 334
stantly,
thetire pressure monitorismalfunc-
tioning.
In addition tothe warning lamp,amessage
appea rsinthe multifunction display.Observe
the information ondispla ymessages
(Y page 230).
It may take uptoten minutes foramalfunc-
tion ofthe tire pressure monitortobe indica-
ted. Amalfunction willbeindicated bythe tire
pressure warninglampflashing forapprox-
imately oneminute andthen remaining lit.
When themalfunction hasbeen rectified, the
tire pressure warninglampgoesoutafter a
few minutes ofdriving.
The tirepressure valuesindicated bythe on-
board computer maydiffer fromthose meas-
ured atagas station withapressure gage.The
tire pressures shownbythe on-board com-
puter refertothose measured atsea level. At
high altitudes, thetire pressure valuesindica-
ted byapressure gagearehigher thanthose
shown bythe on-board computer. Inthis case,
do not reduce thetire pressures.
The operation ofthe tire pressure monitorcan
be affected byinterferen cefrom radio trans-
mitting equipment (e.g.radio headphones,
two-way radios)thatmay bebeing operated in
or near thevehicle.
Checki ngthe tire pressure electroni-
cally X
Make surethattheSmartKey isin position
0048 (Ypage 126)inthe ignition lock.
X Press the0059 or0065 button onthe steer-
ing wheel toselect theServ. Serv.
menu.
X Press the0063 or0064 button toselect
Tire Pressure Tire
Pressure.
X Press 0076.
The current tirepressure ofeach tireis
shown inthe multifunction display.
If the vehicle hasbeen parked forover
20 minutes, theTire pressure willbe Tire
pressure willbe
displayed afterdriving afew minutes displayed
afterdriving afew minutes
message appears.
Aft erateach-in process, thetire pressure
monitor automatically detectsnewwheels or
new sensors. Aslong asaclear allocation of
the tire pressure valuetothe individua lwheels
is not possible ,the Tire Pressure Monitor Tire
Pressure Monitor
Active Active
displaymessage isshown instead of
the tire pressure display.The tirepressures
are alread ybeing monitored. Tire
pressure monitorwarning mes-
sages The
tirepressure monitordetectsapressure
loss inone ormore tires:
R Ifthe tire pressure monitordetectsapres-
sure lossinone ormore tires,awarning
message isshown inthe multifunction dis-
play .The yellow tire pressure warninglamp
then lights up.
R Ifthe Please Correct TirePressure Please
Correct TirePressure
message appearsinthe multifunction dis-
play ,the tire pressure inat least onetireis
too low. Thetirepressure mustbecorrect ed
when theopportunity arises.
R Ifthe Check Tires Check
Tiresmessage appearsinthe
multifunction display,the tire pressure inat
least onetirehas dropped significantly. The
tires must bechecked.
R Ifthe Warning TireMalfunction Warning
TireMalfunction mes-
sage appea rsinthe multifunction display,
the tire pressure inat least onetirehas
dropped suddenly .The tires must be
checked.
Observe theinstruct ionsandsafety notesin
the displa ymessages inthe "Tires" section
(Y page 230).
If the wheel positions onthe vehicle arerota-
ted, thetire pressures maybedispla yedfor
the wrong positions forashort time.Thisis
rectified afterafew minutes ofdriving, andthe
tire pressures aredispla yedforthe correct
positions.
Restart ingthe tire pressure monitor When
yourestart thetire pressure monitor,all
existing warning messages aredeleted andthe
warning lampsgoout. Themonitor usesthe
currently settire pressures asthe reference
values formonitoring. Inmost cases, thetire
pressure monitorwillautomaticall ydetect the
new reference valuesafteryouhave changed
the tire pressure. However, youcan also set
reference valuesmanuall yas described here.
The tirepressure monitorthenmonitors the
new tirepressure values.
X Set thetire pressure tothe value recom-
mended forthe corresponding drivingsitua-
tion onthe Tire andLoading Information
placard onthe driver's sideB-pillar
(Y page 299). 304
Tire
pressur eWheels andtires