2020 MERCEDES-BENZ SL ROADSTER light
[x] Cancel search: lightPage 257 of 334
opened,
theloading aidrises automatically.
When theroof isclosed, thetrunk partition
remains inthe open position. Thetrunk par- tition
moves tothe closed position automat-
ically when theroof islowered.
Problems withtheloading aid Problem
Possible
causes/conse quencesand0050 0050
Solutions It
is no longer possible
to lower thestowed
roof inthe trunk using
the loading aid. You
cann otclose thetrunk anymore.
X Call aquali fiedspecialist workshop. Stowage
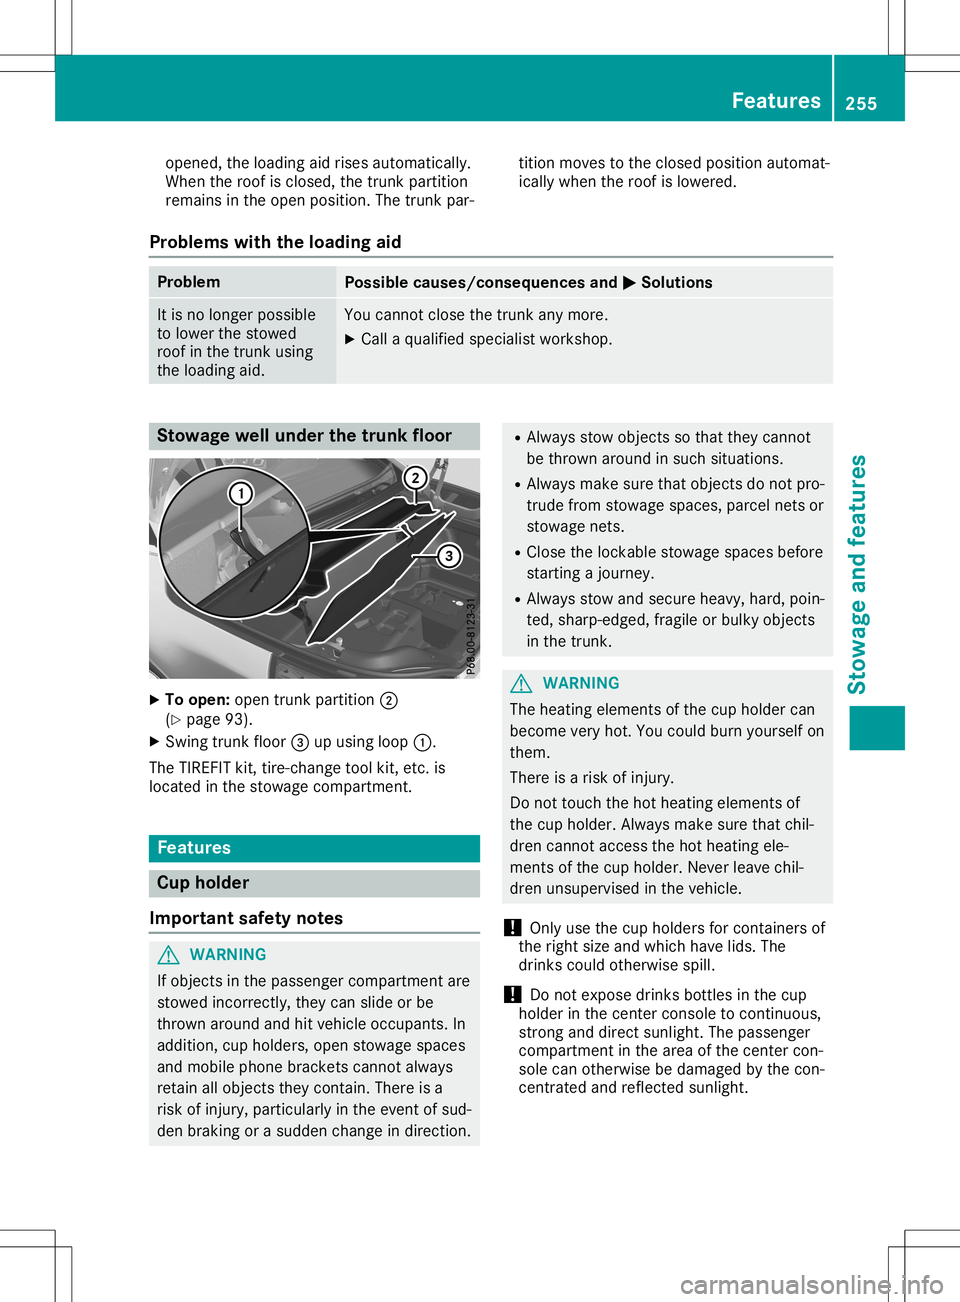
wellunder thetrunk floor X
To open: opentrunk partition 0044
(Y page 93).
X Swing trunkfloor0087upusing loop0043.
The TIREFIT kit,tire-c hange toolkit,etc. is
located inthe stowage compartm ent. Featur
es Cup
holder
Import antsafety notes G
WARNING
If object sin the passenger compartmentare
stowed incorrectly, theycanslide orbe
thrown around andhitvehicle occupant s.In
addition, cupholders, openstowage spaces
and mobile phonebracket scann otalway s
retain allobject sthey contain.There isa
risk ofinjury, particularly inthe event ofsud-
den braking orasudden changeindirection . R
Always stowobject sso that they cannot
be thrown around insuch situations.
R Always makesurethatobject sdo not pro-
trude fromstowage spaces,parcelnetsor
stowage nets.
R Close thelockable stowagespacesbefore
start ingajourney.
R Always stowandsecure heavy,hard,poin-
ted, sharp-edged, fragileorbulky object s
in the trunk . G
WARNING
The heating elements ofthe cup holder can
become veryhot.Youcould burnyourself on
them.
There isarisk ofinjury.
Do not touch thehot heating elements of
the cup holder. Alwaysmakesurethatchil-
dren cannotaccess thehot heating ele-
ment sof the cup holder. Neverleavechil-
dren unsupervised inthe vehicle.
! Only
usethecup holders forcont ainers of
the right sizeandwhich havelids.The
drinks couldotherwise spill.
! Do
not expose drinksbottles inthe cup
holder inthe cent erconsole tocont inuous,
stron gand direct sunlight. Thepassenger
compartm entinthe area ofthe cent ercon-
sole canotherwise bedamaged bythe con-
cent rated andreflect edsunlight. Featur
es
255Stowage andfeatu res Z
Page 258 of 334
Cup
holderinthecent erconsole X
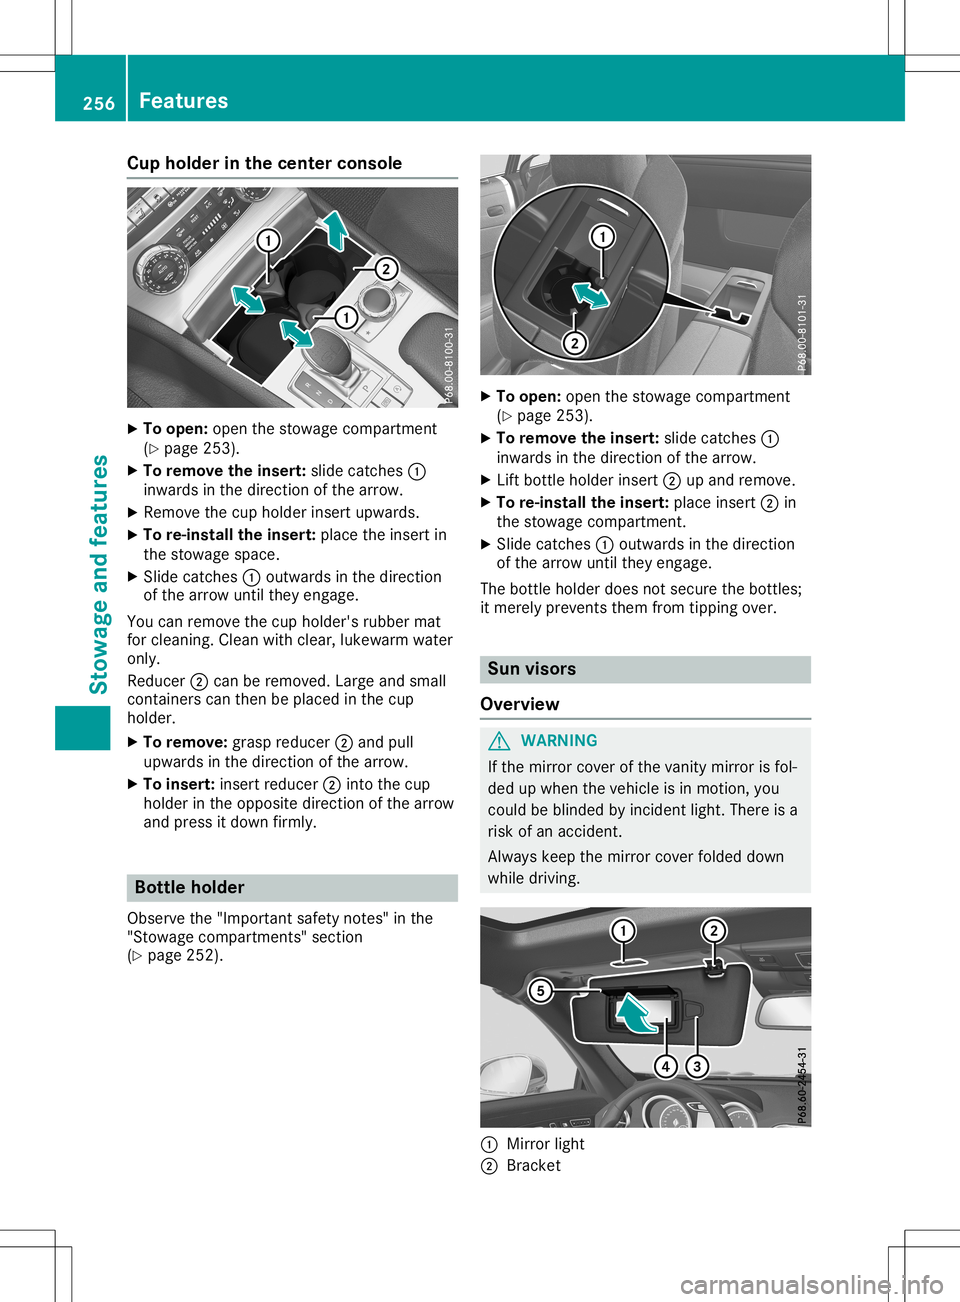
To open :open thest owage compartmen t
(Y page 253).
X To rem ove theinser t:slide catches 0043
inwar dsinthedire ction ofthearr ow.
X Remo vethecup holde rins ert upward s.
X To re-inst alltheinser t:plac eth eins ert in
th est owage space.
X Slid ecat ches 0043 outwards inthedire ction
of thearr ow untilth ey engage.
You canremove thecup holde r'srubbe rmat
for cleanin g.Clean withcle ar, luke warm water
on ly.
Reduc er0044 can berem oved.Lar geand smal l
con tain erscan then be plac edinthecup
hold er.
X To rem ove: graspreduc er0044 and pull
upward sin thedire ction ofthearr ow.
X To inser t:ins ert reduc er0044 intoth ecup
hold erintheoppo sitedire ction ofthearr ow
and pres sit down firmly. Bot
tlehold er
Obse rveth e"Imp ortant safe tyno tes" inthe
"St owage compartmen ts"sec tion
(Y page 252). X
To open :open thest owage compartmen t
(Y page 253).
X To rem ove theinser t:slide catches 0043
inwar dsinthedire ction ofthearr ow.
X Lif tbot tlehold erins ert 0044upand remove.
X To re-inst alltheinser t:plac eins ert 0044in
th est owage compartmen t.
X Slid ecat ches 0043 outwards inthedire ction
of thearr ow untilth ey engage.
The bottlehold erdoes notsec ure thebot tles;
it mer elyprev ents them from tippin gove r. Sun
visor s
Over view G
WAR
NING
If th emir ror coverofthevan itymir ror isfol-
ded upwhen theveh icle isin mot ion,you
coul dbe blin ded byinciden tlight .Ther eis a
ris kof an acc iden t.
Always keep themir ror coverfold eddown
while driving. 0043
Mirr orlight
0044 Brack et 256
Feat
uresSt owage andfeatures
Page 260 of 334
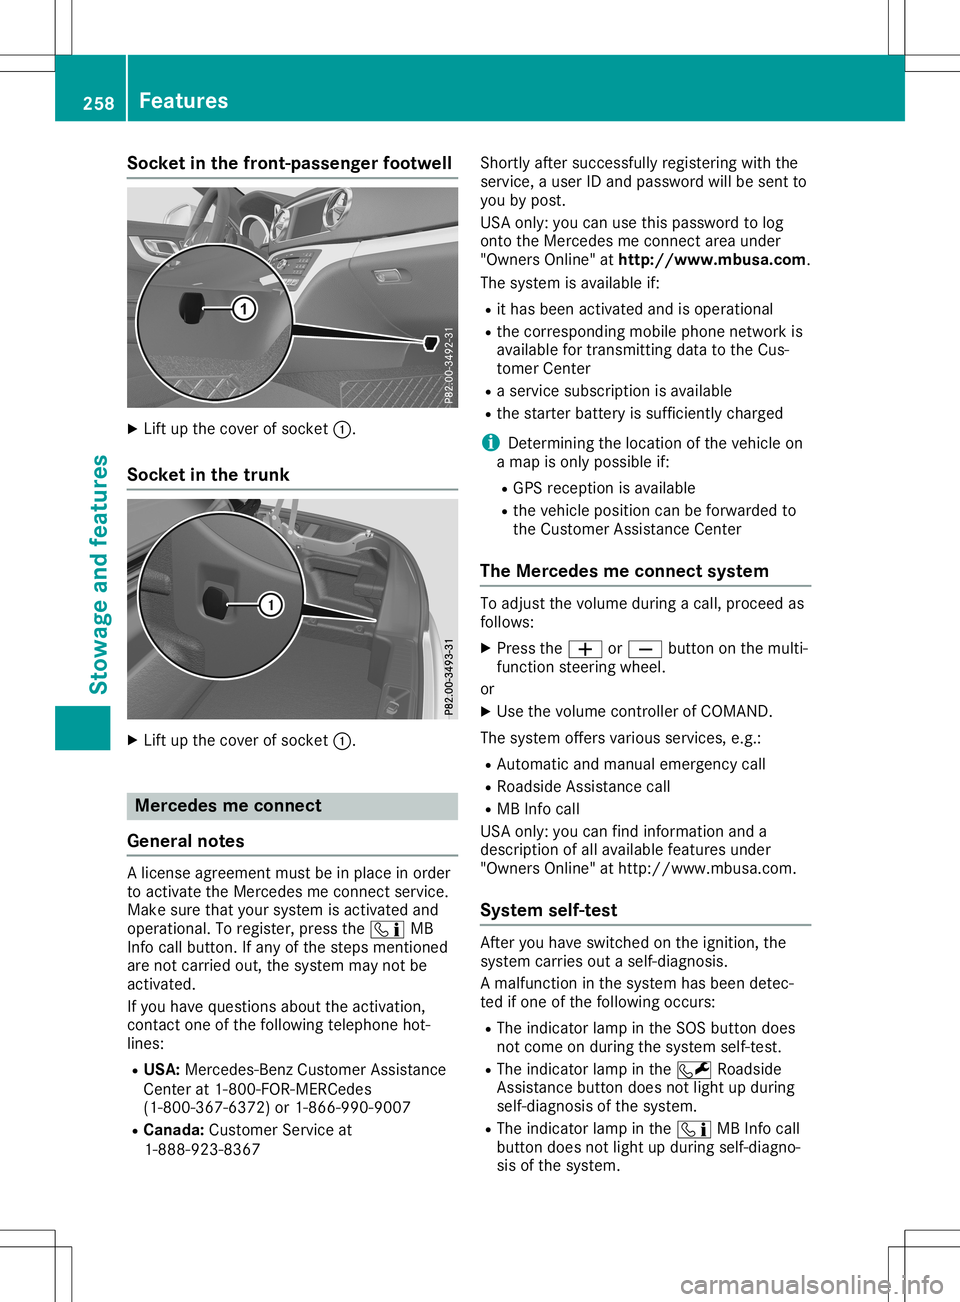
Socket
inthe front- passenger footwell X
Lift upthe cover ofsocket 0043.
Socket inthe trunk X
Lift upthe cover ofsocket 0043. Mercedes
meconne ct
General notes A
license agreement mustbeinplace inorder
to activate theMercedes meconn ectservice.
Make surethatyour system isactivated and
operational. Toregister, pressthe00D9 MB
Info callbutton. Ifany ofthe steps mentioned
are not carried out,thesystem maynotbe
activated.
If you have questions abouttheactivation,
cont actone ofthe following telephone hot-
lines:
R USA: Mercedes-B enzCustomer Assistance
Center at1-80 0-FOR-MERCedes
(1-80 0-367-6372)or1-86 6-990-9007
R Canada: Customer Serviceat
1-88 8-92 3-8367 Short
lyafter successfully registeringwiththe
service, auser IDand password willbesent to
you bypost.
USA only: youcan usethis password tolog
onto theMercedes meconn ectarea under
"Owners Online"athtt <0053001D00120012005A005A005A001100500045005800560044001100460052
0050>.
The system isavaila bleif:
R ithas been activated andisoperational
R the correspondin gmobile phonenetwork is
availa blefortransm ittingdatatothe Cus-
tomer Center
R aservice subscription isavaila ble
R the starter battery issufficiently charged
i Determ iningthelocation ofthe vehicle on
a map isonly possible if:
R GPS reception isavaila ble
R the vehicle position canbeforwarded to
the Customer AssistanceCenter
The Mercedes meconne ctsystem To
adjust thevolume duringacall, proceed as
follows:
X Press the0081 or0082 button onthe multi-
funct ionsteering wheel.
or
X Use thevolume controller ofCOMAND.
The system offersvarious services, e.g.:
R Automatic andmanual emergency call
R Roadsid eAssistanc ecall
R MB Info call
USA only: youcan find information anda
description ofall availa blefeatures under
"Owners Online"athttp: //www.mbusa.com.
System self-test Aft
eryou have switched onthe ignition, the
system carriesoutaself-diagnosis.
A malfunction inthe system hasbeen detec-
ted ifone ofthe following occurs:
R The indicator lampinthe SOS button does
not come onduring thesystem self-test .
R The indicator lampinthe 0052 Roadsid e
Assistanc ebutton doesnotlight upduring
self-diagnosis ofthe system.
R The indicator lampinthe 00D9 MBInfo call
button doesnotlight upduring self-diagno-
sis ofthe system. 258
FeaturesStowage
andfeatu res
Page 261 of 334
R
The indicator lampinone ormore ofthe fol-
lowing buttonscont inues tolight upred
after thesystem self-diagnosis:
- SOS button
- 0052 Roadside Assistancecallbutton
- 00D9 MBInfo callbutton
R Aft erthe system self-diagnosis, theInoper‐ Inoper‐
ative ative
orService NotActivated Service
NotActivated mes-
sage appears inthe multifunct iondisplay .
If amalfunct ionisindicated asoutlined above,
the system maynotoperate asexpect ed.In
the event ofan emergenc y,help willhave to
be summoned byother means.
Have thesystem checkedatthe nearest
Mercedes- BenzServic eCenter orcont actthe
following servicehotlines:
R USA: Mercedes- BenzCustomer Assistance
Center at1-8 00-FOR-ME RCedes
(1-80 0-367-6372 )or 1-86 6-990-9007
R Canada: Customer Serviceat
1-88 8-92 3-8367
Emergency call Import
antsafety notes G
WARNING
It can bedangerous toremain inthe vehicle,
even ifyou have pressed theSOS button in
an emergenc yif:
R you seesmoke insideoroutside ofthe
vehicle, e.g.ifthere isafire after anacci-
dent
R the vehicle ison adangerous sectionof
road
R the vehicle isnot visible orcann oteasily
be seen byother roadusers, particularly
when darkorinpoor visibility conditions
There isarisk ofan accident andinjury.
Leave thevehicle immediately inthis orsim-
ilar situations assoon asitis safe todo so.
Move toasafe location alongwithother
vehicle occupant s.In such situations, secure
the vehicle inaccordanc ewith national regu-
lations, e.g. with awarning triangle.
A license agreement mustbeinplace inorder
to activate theMercedes meconn ectservice.
Make surethatyour system isactivated andoperational.
Toregister, pressthe00D9 MB
Info callbutton .If any ofthe steps mentioned
are not carried out,thesystem maynotbe
activated.
If you have questions abouttheactivation ,
cont actone ofthe following telephone hot-
lines:
R USA: Mercedes-B enzCustomer Assistance
Center at1-80 0-FOR-MERCedes
(1-80 0-367-6372)or1-86 6-990-9007
R Canada: Customer Serviceat
1-88 8-923-8367
General notes
An emergenc ycall isdialed automatically ifan
air bag orEmergen cyTensionin gDevice istrig-
gered.
i You
cann otend anautomatically triggered
emergenc ycall yourself.
An emergenc ycall can also beinitiated man-
ually .
As soon asthe emergenc ycall has been initi-
ated, theindicator lampinthe SOS button
flashes. Themultifunct iondisplay showsthe
Connecting Call Connecting
Callmessage.
The audio output ismuted.
Once theconn ection hasbeen made, the
Call Connected Call
Connected messageappearsinthe mul-
tifunc tiondisplay .
All important informationonthe emergenc yis
transm itted,forexample:
R Current location ofthe vehicle (asdeter-
mined bythe GPS system)
R Vehicle identificat ionnumber
R Infor mation onthe severity ofthe accident
Short lyafter theemergenc ycall has been initi-
ated, avoice connection isautomatically
established betweentheCustomer Assistance
Center andthevehicle occupant s.
R Ifthe vehicle occupant sare responsive, the
Mercedes-B enzCustomer AssistanceCenter
attempt sto get more informat iononthe
emergenc y.
R Ifthere isno response fromthevehicle
occupant s,an ambulance isimmediately
sent tothe vehicle.
If no voice connection canbeestablished to
the Mercedes-B enzCustomer AssistanceCen-
ter, thesystem hasbeen unable toinitiate an
emergenc ycall. Featur
es
259Stowage andfeatu res Z
Page 265 of 334
garage
dooropener, contactanauthorized
Mercedes-B enzCenter.
Altern atively, youcan callthefollowing tele-
phone assistance services:
R USA: Mercedes-B enzCustomer Assistance
Center at1-80 0-FOR-MERCedes
R Canada: Customer Serviceat
1-80 0-38 7-0100
R HomeLink ®
hotline 1-800-355-3515(free of
charge)
More informat iononHomeLink ®
and/or com-
patible products isalso availa bleonline at
htt p:// www.homelink.c om.
Notes onthe declaration ofconf ormity
(Y page 28).
USA: FCCID:CB2HMIH L4
Canada: IC:279B -HMIH L4
Import antsafety notes G
WARNING
When youoperate orprogram thedoor with
the integrat edgarage dooropener, persons
in the range ofmovement ofthe door may
become trappedorbe struck bythe door.
There isarisk ofinjury.
When usingtheintegrat edgarage door
opener, alwaysmake surethatnobody is
within therange ofmovement ofthe door. G
DANGER
Combustion enginesemitpoisonous
exhaust gasessuchascarbon monoxide.
Inhaling theseexhaust gasesishazardous to
health andcanresult inpoisoning. Thereisa
risk offatal injury. Therefore, neverleavethe
engine runningan enclosed spacewithout
adequa tevent ilation.
Program ming Program
mingthebutt ons
Pay atten tiontothe "Important safetynotes"
(Y page 263). Garage
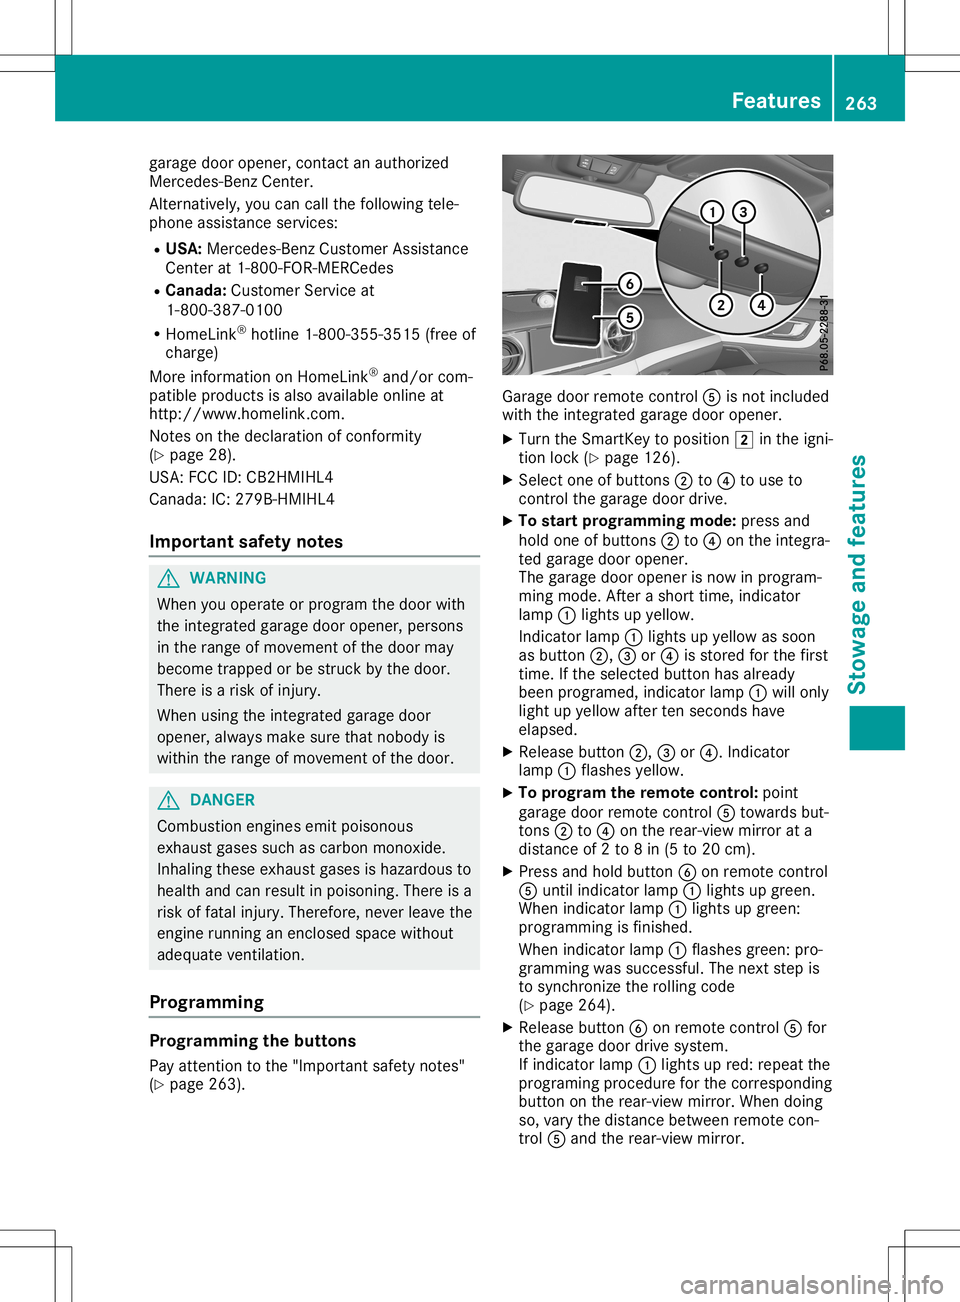
doorremote control0083 isnot included
with theintegrat edgarage dooropener.
X Turn theSmart Keytoposition 0048inthe igni-
tion lock (Ypage 126).
X Select oneofbutton s0044 to0085 touse to
cont rolthe garage doordrive.
X To star tprogr ammingmode: pressand
hold oneofbutton s0044 to0085 onthe integra-
ted garage dooropener.
The garage dooropener isnow inprogram-
ming mode. Afterashort time,indicator
lamp 0043lights upyellow .
Indicator lamp0043lights upyellow assoon
as button 0044,0087or0085 isstored forthe first
time. Ifthe selected buttonhasalready
been programed, indicatorlamp0043will only
light upyellow aftertenseconds have
elapsed.
X Release button0044,0087or0085. Indicator
lamp 0043flashes yellow.
X To progr amthe remote control: point
garage doorremote control0083 towards but-
tons 0044to0085 onthe rear-view mirrorata
distance of2to 8in (5 to 20 cm).
X Press andhold button 0084onremote control
0083 until indicator lamp0043lights upgreen.
When indicator lamp0043lights upgreen:
programming isfinished.
When indicator lamp0043flashes green:pro-
gramming wassuccessful. Thenext step is
to synchron izethe rolling code
(Y page 264).
X Release button0084onremote control0083 for
the garage doordrive system.
If indicator lamp0043lights upred: repeat the
programing procedureforthe correspon ding
button onthe rear-view mirror.Whendoing
so, vary thedistance between remotecon-
trol 0083and therear-view mirror. Featur
es
263Stowage andfeatu res Z
Page 266 of 334
The
required distance between remotecon-
trol 0083and theintegr atedgarage door
opener depends onthe garage doordrive
system. Severalattemptsmight beneces-
sary. Youshould testevery position forat
least 25seconds beforetryinganother posi-
tion.
Synchronizing therolling code
Pay atten tiontothe "Importan tsafety notes"
(Y page 263).
If the garage doorsystem usesarolling code,
you willalso have tosynchron izethe garage
door system withtheintegr atedgarage door
opener inthe rear-view mirror.Todo this you
will need touse theprogramming buttonon
the door drive controlpanel. Theprogramming
button maybelocated indifferent places
depending onthe manufact urer.Itis usuall y
located onthe door drive unitonthe garage
ceiling.
Familiarize yourselfwiththegarage doordrive
operating instructions ,e.g. under "Program-
ming additional remotecontrols", before carry-
ing out thefollowing steps.
Your vehicle mustbewithin reachofthe
garage doororgate opener drive.Makesure
that neither yourvehicle norany persons/
object sare present withinthesweep ofthe
door orgate.
X Turn theSmart Keytoposition 0048inthe igni-
tion lock (Ypage 126).
X Get outofthe vehicle.
X Press theprogramming buttononthe door
drive unit.
Usually ,you now have 30seconds toinitiate
the next step.
X Get into thevehicle.
X Press previously programed button0044,0087
or 0085 onthe integr atedgarage dooropener
repeatedly untilthedoor closes.
The rolling codesynchron izationisthen
complete.
Notes onprogr ammingthe remot econ-
tr ol
Canadian radiofrequency lawsrequire a
"break" (orinter ruption) ofthe trans mission
signals afterbroadcasting forafew seconds.
Therefore, thesesignals maynotlast long
enough forthe integr atedgarage dooropener.
The signal isnot recogn izedduring program-
ming. Comparable withCanadian law,some U.S.
garage dooropeners alsofeature a
"break".
Proceed asfollows:
R ifyou liveinCanada.
R ifyou have difficulties programming the
garage dooropener (regardless ofwhere
you live) when following theprogramming
steps.
X Press andhold oneofbutton s0044 to0085 on
the integr atedgarage dooropener.
Aft erashort time,indicator lamp0043lights
up yellow.
X Release thebutton .
Indicat orlamp 0043flashes yellow.
X Press button 0084ofgarage doorremote con-
trol 0083for two seconds, thenrelease itfor
two seconds.
X Press button 0084again fortwo seconds.
X Repeat thissequence onbutton 0084of
remote control0083 until indicator lamp0043
lights upgreen.
When indicator lamp0043lights upgreen:
programming isfinished.
When indicator lamp0043flashes green:pro-
gramming wassuccessful. Thenext step is
to synchron izethe rolling code.
X Release button0084ofremote control0083 of
the garage doordrive.
When indicator lamp0043lights upred:
repeat theprogramming processforthe cor-
responding buttononthe rear-view mirror.
When doingso,vary thedistance between
remote control0083 and therear-view mirror.
The required distance between remotecon-
trol 0083and theintegr atedgarage door
opener depends onthe garage doordrive
system. Severalattemptsmight beneces-
sary. Youshould testevery position forat
least 25seconds beforetryinganother posi-
tion.
Problems whenprogramming
If you areexperienc ingproblems programming
the integr atedgarage dooropener onthe rear-
view mirror, takenoteof the following instruc-
tions:
R Check thetrans mitterfrequency usedby
garage doordrive remote control0083 and
whether itis supported. Thetrans mitterfre-
quency canusuall ybe found onthe back of
remote control0083 for the garage doordrive. 264
Featur
esStowage andfeatu res
Page 267 of 334
The
integr atedgarage dooropener iscom-
patible withdevices thathave units which
operate inthe frequency rangeof280 to
433 MHz.
R Replace thebatteries ingarage doorremote
cont rol0083. This increases thelikelihood that
garage doorremote control0083 will trans mit
a stron gand precise signaltothe integr ated
garage dooropener.
R When programming, holdremote control0083
at varying distances andangles frombut-
ton s0044 to0085 which youareprogramming.
Try various anglesatadistance between
2and 8inches (5to20cm) oratthe same
angle butatvarying distances .
R Ifafurther remote control0083 isavailabl efor
the same garage doordrive, repeat the
same programming stepswiththisremote
cont rol0083. Before performin gthese steps,
make surethatnew batteries havebeen
installed ingarage doordrive remote control
0083.
R Note thatsome remote controlsonly trans -
mit foralimited amount oftime (theindica-
tor lamp onthe remote controlgoes out).
Press button 0084onremote control0083 again
before transmission ends.
R Align theanten nacable ofthe garage door
opener unit.Thiscanimprove signalrecep-
tion/ transmission.
Opening/clo singthegara gedoor Aft
erithas been programmed, theintegr ated
garage dooropener performs thefunct ionof
the garage doorsystem remote control.Please
also read theoperating instructions forthe
garage doorsystem.
X Turn theSmart Keytoposition 0048inthe igni-
tion lock (Ypage 126).
X Press either button 0044,0087or0085 which you
have programmed tooperate thegarage
door.
Garage doorsystem withafixed code: indi-
cator lamp0043lights upgreen.
Garage doorsystem witharolling code:indi-
cator lamp0043flashes green.
The trans mitterwill trans mitasignal aslong
as the button ispressed. Thetrans mission
is halted afteramaximum often seconds
and indicator lamp0043lights upyellow.
X Press button 0044,0087or0085 again ifneces-
sary. Clearing
thememor y Make
surethatyouclear thememory ofthe
integr atedgarage dooropener beforeselling
the vehicle.
X Turn theSmart Keytoposition 0048inthe igni-
tion lock (Ypage 126).
X Press andhold button s0044 and 0085.
The indicator lampinitially lightsupyellow
and then green.
X Release buttons0044 and 0085.
The memory ofthe integr atedgarage door
opener inthe rear-view mirroriscleared. Compass
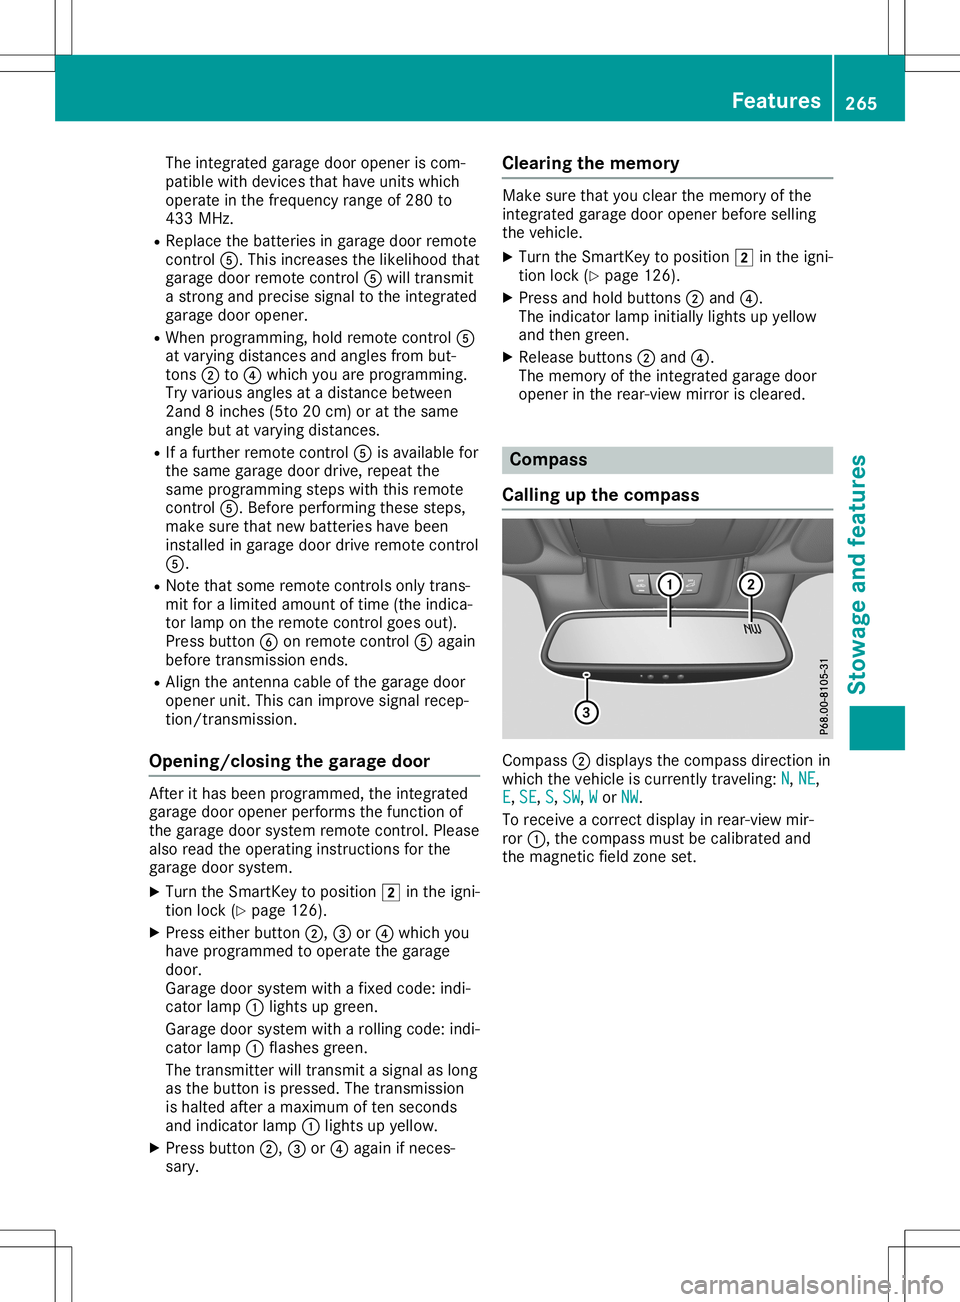
Calling upthe compass Compass
0044display sthe compass directionin
which thevehicle iscurrent lytraveling: N N,
NE NE,
E E,
SE SE,
S S,
SW SW,
W W
or NW NW.
To receive acorrec tdisplay inrear-view mir-
ror 0043, thecompass mustbecalibrated and
the magnetic fieldzone set. Featur
es
265Stowage andfeatu res Z
Page 277 of 334
Observe
thelegal requirements ineach coun-
try.
X Do not use hotwater anddonot wash the
vehicle indirect sunlight.
X Use asoft sponge toclean.
X Use amild cleaning agent,suchasacar
shampoo approved byMercedes-Benz .
X Thoroughly hosedown thevehicle witha
gentle jetofwater.
X Do not point thewater jetdirectly towards
the airinlet orthe edges ofdecorative foils.
X Use plenty ofwater andrinse outthe
sponge frequently.
X Rinse thevehicle withclean water anddry
thoroughly withachamois.
X Do not letthe cleaning agentdryonthe
paintwork orthe decorative foils.
Careful lyremove alldeposits ofroad saltas
soon aspossible whendriving inwinter.
Powe rwashers G
WARNING
The water jetfrom acircular jetnozz le(dirt
blasters) cancause invisible exteriordam-
age tothe tires orchassis component s.
Components damagedinthis way may fail
unexpectedly. Thereisarisk ofan accident.
Do not use power washers withcircular jet
nozz lestoclean thevehicle. Havedamaged
tires orchassis component sreplaced imme-
diately .
! Vehicles
withdecorative film:parts ofyour
vehicle arecovered withdecorative film.
Maintain adistance ofat least 27.5in
(70 cm) between thefilm-covered partsof
the vehicle andthenozz leof the power
washer.
Information aboutthe correct distance is
avail able from theequip ment manufacturer.
Move thepower washer nozzlearound when
cleaning yourvehicle.
The water temperature ofthe power washer
must notexceed 140‡(60 †).
! Alway
smaintain adistance ofat least
12 in(30 cm) between thevehicle andthe
power washer nozzle.Information aboutthe
correct distance isavail able from theequip -
ment manufacturer. Move
thepower washer nozzlearound when
cleaning yourvehicle.
Do not aim directly atany ofthe followi ng:
R Tires
R Door gaps, roofgaps, joints, etc.
R Electrical component s
R Battery
R Plug-type couplings
R Light bulbs
R Seals
R Trim elements
R Ventilation slots
Damaged sealsorelectrical component s
can lead toleaks orfailu res.
! Vehicles
withHAND S-FREE ACCESS: ifa
key with KEYLES S-GOiswithin thedetec-
tion range ofthe KEYLES S-GOantenn as,the
trunk lidcould openunintent ionallyinthe
followi ngsituations, forexample:
R when usinganautomatic carwash
R when usingapower washer
Make surethatthekey isat least 6.5ft
(2 m) awa yfrom thevehicle.
Cleani ngthe paintwork !
Do
not affix:
R stickers
R films
R magnetic platesorsimila ritems
to painted surfaces. Youcould otherwise
damage thepaintwork.
Scratc hes,corrosive deposits,areasaffected
by corrosion anddamage causedbyinade-
quate carecannot alwaysbe completely
repaired. Insuch cases, visitaqual ified spe-
cialist workshop.
X Remove dirtimmediately ,where possible ,
while avoidi ngrubbing toohard.
X Soak insect remains withinsect remover
and rinse offthe treated areasafterwards.
X Soak birddroppings withwater andrinse off
the treated areasafterwards.
X Remove treeresin, oils,fuels andgreases by
rubbing gentlywithacloth soaked inpetro-
leum ether orlighter fluid
X Remove coolantandbrake fluidwithamoist
cloth andclear water. Care
275Maintenance andcare Z