2020 MERCEDES-BENZ GLS SUV fuel
[x] Cancel search: fuelPage 309 of 549
7
Coolant temp erature display
During normal operation, the coolant tem‐
perature display is permitted torise to
12 0°C.
Ve hicles with 48 V on-board electrical sys‐
te m: POWER and CHARGE displ ay(elect rical
drive suppo rtand recuperation po wer of the
electric mo tor)
8 Selected drive program
9 Selected transmission position
A Multifunction display (e xamp le:standard dis‐
play for trip): Assis tance / Telephone / Navi‐
ga tion / Trip / Media / Radio / Styles and
displa ys/ Service
B Fuel le vel, fuel filler flap location indicator,
ra nge Overvi
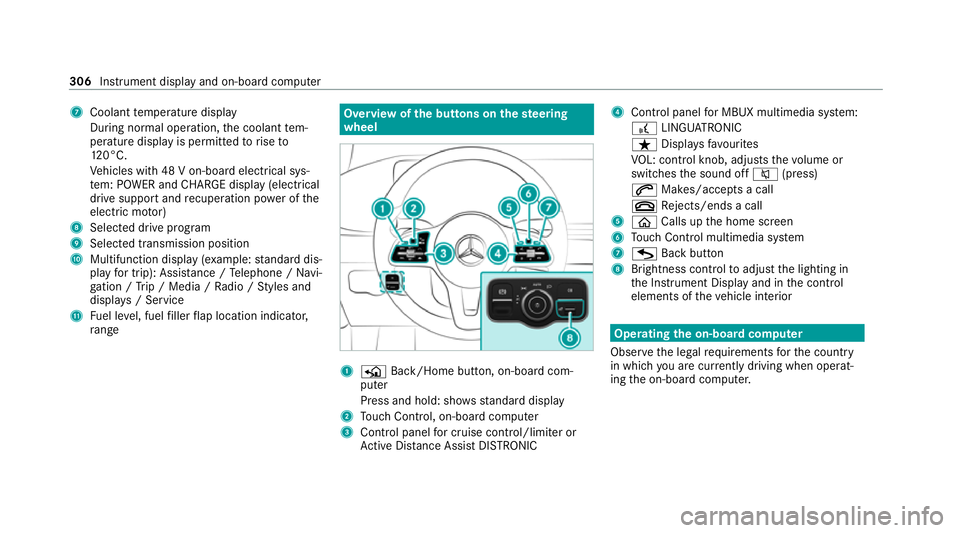
ewofthe but tons on thest eering
wheel 1
P Back/Home button, on-board com‐
puter
Press and hold: sho wsstandard display
2 Touch Control, on-board co mputer
3 Control panel for cruise control/limiter or
Ac tive Dis tance Assi stDISTRONIC 4
Control panel for MBUX multimedia sy stem:
£ LINGU ATRO NIC
ß Displa ysfavo urites
VO L: control knob, adjusts thevo lume or
switches the sound off 8(press)
6 Makes/accepts a call
~ Rejects/ends a call
5 ò Calls up the home screen
6 Touch Control multimedia sy stem
7 G Back button
8 Brightness control toadjust the lighting in
th e Instrument Display and in the control
elements of theve hicle interior Operating
the on-boa rdcompu ter
Obser vethe legal requ irements forth e count ry
in which you are cur rently driving when operat‐
ing the on-board computer. 306
Instrument display and on-board computer
Page 362 of 549
&
WARNING Risk of inju rydue tomoving
parts
Components in the engine compartment may
continue running or start up sudden ly,even if
th e ignition is switched off.
Make sure of thefo llowing before per form ing
ta sks in the engine compartmen t:#
Switch the ignition off. #
Neverre ach into the danger zone sur‐
ro unding moving co mponents, e.g. the
ro tation area of thefa n. #
Remo vejewe llery and watches. #
Keep items of clo thing and hair away
from moving parts. &
WARNING Risk of inju ryfrom touching
co mp onents under voltage
The ignition sy stem and the fuel injection
sy stem workunder high voltage. You could
re cei vean electric shoc k. #
Neverto uch co mponents of the ignition
sy stem or the fuel injection sy stem
when the ignition is switched on. &
WARNING Risk of bu rns from hot com‐
ponent parts in the engine compartment
Cer tain component parts in the engine com‐
partment can be very hot, e.g. the engine,
th e cooler and parts of theex haust sy stem. #
Allow the engine tocool down and only
to uch co mponent parts described in
th efo llowing. &
WARNING Risk of inju ryfrom using the
windscreen wipers while the engine bon‐
net is open
When the engine bonn etis open, and the
windscreen wipers are set in motion, you can
be trapped bythe wiper linkage. #
Alw ays switch off the windscreen wip‐
ers and ignition before opening the
engine bonn et. Opening
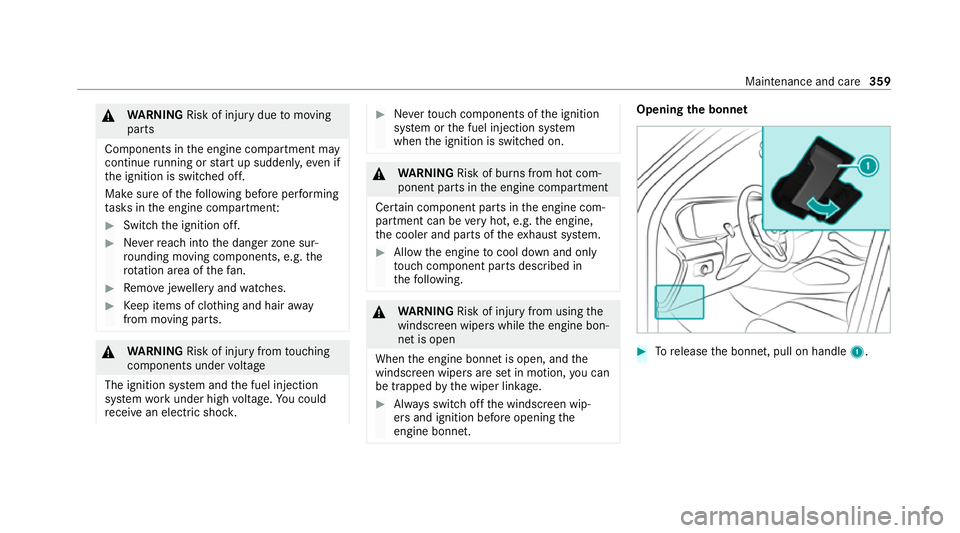
the bonnet #
Torelease the bonn et, pull on handle 1. Maintenance and care
359
Page 370 of 549
Maintain a dis
tance of at least 70 cm
between thefo il-c ove red parts of theve hicle
and the nozzle of the high-pressure cleaner.
Mo vethe high-pressure cleaner nozzle
around whilst cleaning. The waterte mp era‐
ture of the high-pressure cleaner must not
ex ceed 60°C.
R obser vethe information on the cor rect dis‐
ta nce in the implement manufacturer's oper‐
ating instructions.
R do not direct the nozzle of the high-pressure
cleaner directly at sensitive parts, e.g. tyres,
ga ps, elect rical components, batteries, light
sou rces and ventilation slits. Wa
shing theve hicle byhand *
NO
TEEngine dama gedue towater
ingress #
Take care not topoint thewate r jet
directly towa rdsth e air inlet grille below
th e bonn et. obser
vethe legal requ irements, e.g. in a number
of countries, washing byhand is only permitted
in specially designated wash ba ys. #
Use a mild cleaning agent, e.g. car shampoo. #
Washtheve hicle with luk ewarmwate r using
a soft car sponge. When doing so, do not
ex pose theve hicle todirect sunlight. #
Carefully hose theve hicle off with water and
dry using a chamois.
% Obse rveth e no tes on the care of car parts
(/ page 369). Note
s on paint work/matt finish paint work
care Obse
rveth e no tes on cleaning and care toavo id
damaging the paintwork and inter fering wi th the
driver assis tance sy stems.
Pa int
R Insect remains: soak with insect remo ver and
ri nse off the treated areas af terw ards.
R Bird droppings: soak with water and rinse off
af te rw ards. R
Tree resin, oils, fuels and greases: remo veby
ru bbing gently wi tha clo thsoaked in petro‐
leum ether or lighter fluid.
R Coolant and brake fluid: remo vewith a damp
clo thand clean water.
R Tarst ains: use tar remo ver.
R Wax: use silicone remo ver.
R Do not attach sticke rs,fi lms or similar mate‐
ri als. On ly havefilm attached tothe bumper
at a qualified specialist workshop.
R Remo vedirt immediatel y,where possible.
Matt finish
R Only use care products appr ovedfor
Mercedes-Benz.
R Do not attach sticke rs,fi lms or similar mate‐
ri als. On lyha ve film attached tothe bumper
at a qualified specialist workshop.
R Do not polish theve hicle and light-alloy
wheels.
R Only use car washes that cor respond tothe
latest engineering standards. Main
tenance and care 367
Page 386 of 549
&
WARNING Risk ofexplosion during
ch arging process and starting assis tance
During thech arging process and starting
assis tance, the battery may release an explo‐
sive gas mixture. #
Avoid fire , naked flames, creating
spar ksand smoking. #
Make sure there is suf ficient ventila‐
tion. #
Do not lean over a batter y. &
WARNING Risk ofexplosion from a fro‐
zen battery
A dischar ged battery may freeze at temp era‐
tures slightly abo veor below freezing point.
During starting assis tance or battery charg‐
ing, bat tery gas can be released. #
Alw ays allow a battery tothaw before
ch arging it or per form ing starting assis‐
ta nce. If
th e indicator/warning lamps in the instrument
clus ter do not light up at low temp eratures, it is
ve ry likely that the dischar ged battery has fro‐
zen. In this case you may neither jump-s tart the
ve hicle nor charge the batter y.
The service life of a battery that has been
th awe d may be dramatically shor tened. The
st arting characteristics may be impaired, espe‐
cially at low temp eratures.
It is recommended that you ha veathaw ed bat‐
te ry checked at a qualified specialist workshop.
All vehicles
* NO
TEDama gecaused bynumerous or
ex tended attem ptsto start the engine Nume
rous or extended attem ptsto start the
engine may damage the catalytic con verter
due tonon-combu sted fuel. #
Avoid numerous and extended attem pts
to start the engine. Obser
vethefo llowing points during starting
assis tance and when charging the battery:
R Only use undamaged jump lead/charging
cables with a suf ficient cross-section and
insula tedte rm inal clamps.
R Non- insulated parts of thete rm inal clamps
must not come into con tact wi thother me tal
parts while the jump lead/charging cable is
connected tothe battery/jump-s tart connec‐
tion point.
R The jump lead/charging cable must not
come into contact wi thany parts which may
mo vewhen the engine is running.
R Alw ays make sure that nei ther you nor the
battery is elect rostatically charge d.
R Keep away from fire and naked flames.
R Do not lean overth e batter y.
Obser vethe additional following points when
ch arging the battery:
R Only use battery charge rs tested and
appr oved for Mercedes-Benz.
R Read the battery charge r's operating instruc‐
tions before charging the batter y. Breakdown assis
tance 383
Page 398 of 549
#
Adjust the tyre pressure where neces‐
sar y. Ty
re pressure which is too high or too low can:
R Shor tenth e service life of the tyres.
R Cause increased tyre damage.
R Adversely af fect driving characteristics and
th us driving saf ety, e.g. due toaquaplaning. &
WARNING Risk of accident due torepea‐
te d pressure drop in the tyres
The wheels, valves or tyres could be dam‐
aged.
To o low a tyre pressure can lead tothe tyres
bur sting. #
Examine the tyres forfo re ign objects. #
Check whe ther the tyre has a puncture
or theva lve has a leak. #
Ifyo u are unable torectify the damage,
conta ct aqualified specialist workshop. Information on
there commended tyre pressure
fo rth eve hicle's factor y-fitted tyres can be found on
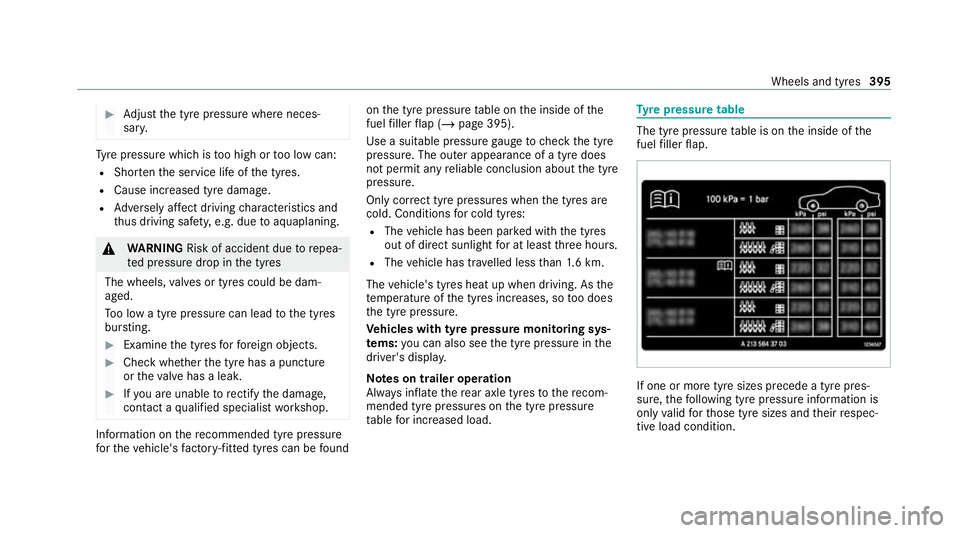
the tyre pressure table on the inside of the
fuel filler flap (/ page 395).
Use a suitable pressure gauge tocheck the tyre
pressure. The outer appearance of a tyre does
not permit any reliable conclusion about the tyre
pressure.
Only cor rect tyre pressures when the tyres are
cold. Conditions for cold tyres:
R The vehicle has been par ked with the tyres
out of direct sunlight for at least thre e hours.
R The vehicle has tr avelled less than 1.6 km.
The vehicle's tyres heat up when driving. As the
te mp erature of the tyres increases, so too does
th e tyre pressure.
Ve hicles with tyre pressure monitoring sys‐
te ms: you can also see the tyre pressure in the
driver's displa y.
Note s on trailer operation
Alw ays inflate there ar axle tyres tothere com‐
mended tyre pressures on the tyre pressure
ta ble for increased load. Ty
re pressure table The tyre pressure
table is on the inside of the
fuel filler flap. If one or more tyre sizes precede a tyre pres‐
sure, thefo llowing tyre pressure information is
only valid forth ose tyre sizes and their respec‐
tive load condition. Wheels and tyres
395
Page 399 of 549
If
th e preceding tyre sizes are complemented by
th e+ symbol, the tyre pressure information
fo llowing sho wsalternative tyre pressures. Fuel
consum ption may then increase slightl y.
The load conditions "partially laden" and "fully
laden" are defined in theta ble for dif fere nt num‐
be rs of passengers and amounts of luggage. The
actual number of seats may dif fer from this. Ty
re pressure moni toring sy stem Fu
nction of the ty repressure moni toring sys‐
tem
The sy stem checks the tyre pressure and the
tyre temp erature of the tyres fitted totheve hicle
by means of a tyre pressu resensor.
The tyre pressure and the tyre temp erature
appear in the on-board computer (/ page 396).
If th ere is a subs tantial pressure loss or if the
tyre temp erature is excessive, you will be
wa rned in thefo llowing ways:
R via display messa ges (/ page 482).
R viatheh warning lamp in the instrument
clus ter (/ page 504) The tyre pressu
remonitoring sy stem is only an
aid. It is the driver's responsibility toset the tyre
pressure tothere commended cold tyre pressure
suitable forth e operating situation.
In most cases, the tyre pressure monitoring sys‐
te m will auto maticallyupdate the new refere nce
va lues af teryo u ha vechanged the tyre pressure.
Yo u can, ho wever,also update there fere nce val‐
ues byrestarting the tyre pressure monitoring
sy stem manually (/ page 397).
Sy stem limits
The sy stem may be impaired or may not function
particular lyin thefo llowing situations:
R the tyre pressure has been set incor rectly
R sudden pressure loss caused byafo re ign
object penetrating the tyre, forex ample
R there is a malfunction caused byano ther
ra dio signal source
Checking the ty repressure with the tyre
pressure moni toring sy stem
Re quirements:
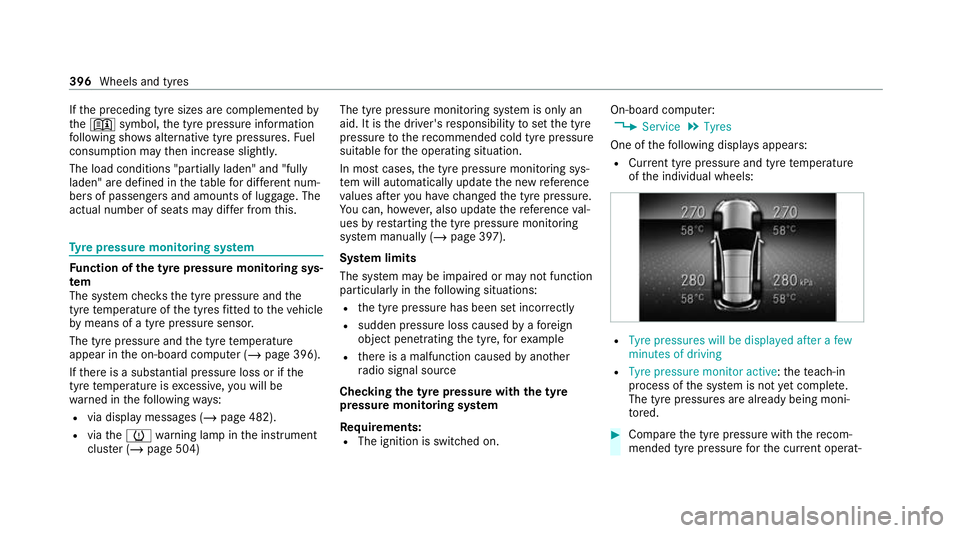
R The ignition is switched on. On-board computer:
4 Service 5
Tyres
One of thefo llowing displa ysappears:
R Cur rent tyre pressure and tyre temp erature
of the individual wheels: R
Tyre pressures will be displayed after a few
minutes of driving
R Tyre pressure monitor active: thete ach-in
process of the sy stem is not yet compl ete.
The tyre pressures are already being moni‐
to re d. #
Compare the tyre pressure with there com‐
mended tyre pressure forth e cur rent operat‐ 396
Wheels and tyres
Page 404 of 549
R
rear wheels wear more in the cent reofthe
tyre
Do not drive wi thtyres that ha vetoo little tread
dep th. This significantly reduces traction on wet
ro ads (aquaplaning).
On vehicles with the same front and rear wheel
size, you can inter change the wheels every
5000 to10,000 km, depending on thewe ar.
Ensure the direction of rotation is maintained for
th e wheels.
Obser vethe instructions and saf ety no tes on
"Changing a wheel" when doing so
(/ page 402). Note
s onstoring wheels When
storing wheels, obser vethefo llowing
no tes:
R Afterre moving wheels, store them in a cool,
dry and preferably dark place.
R Protect the tyres from conta ct withoil,
grease or fuel. Overview of
the ty re-change tool kit Apart from some countr
y-specific variants, vehi‐
cles are not equipped with a tyre-change tool kit.
Fo r more information on which tools are
re qu ired and appr ovedto per form a wheel
ch ange on your vehicle, consult a qualified spe‐
cialist workshop.
Re quired tyre-changing tools may include, for
ex ample:
R Jack
R Chock
R Wheel wrench
% The jack weighs appr oximately 3.4 kg.
The maximum load capacity of the jack can
be found on thest icke r af fixe dto the jac k.
The jack is maintenance-free. If there is a
malfunction, please conta ct aqualified spe‐
cialist workshop.
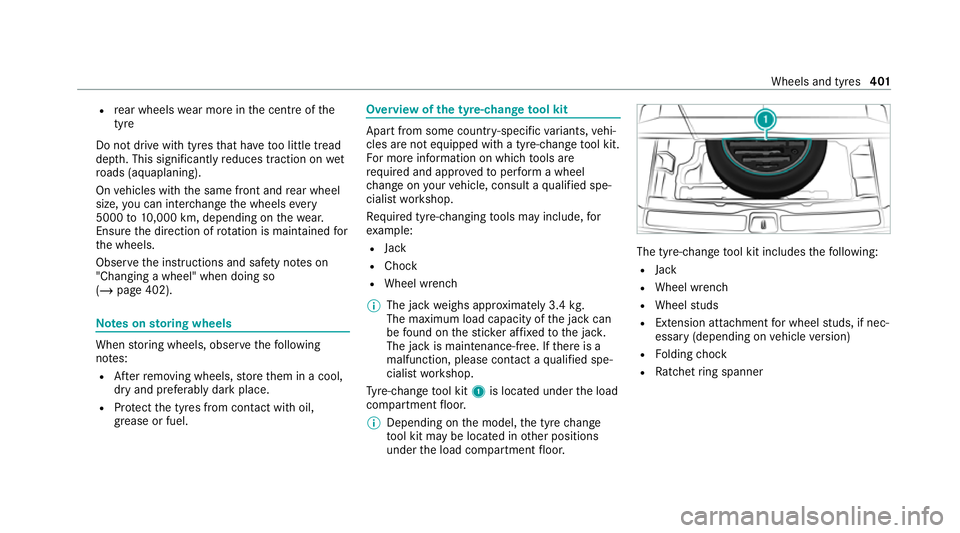
Ty re-change tool kit 1is located under the load
compartment floor.
% Depending on the model, the tyre change
to ol kit may be located in other positions
under the load compartment floor. The tyre-change
tool kit includes thefo llowing:
R Jack
R Wheel wrench
R Wheel studs
R Extension attachment for wheel studs, if nec‐
essary (depending on vehicle version)
R Folding chock
R Ratchet ring spanner Wheels and tyres
401
Page 421 of 549
+
ENVIRONMENTAL
NOTEEnvironmental
pollution caused byenvironmen tally ir re‐
sponsible disposal #
Dispose of operating fluids in an envi‐
ro nmentally responsible manner. Operating
fluids include thefo llowing:
R fuels
R DeNOx agent AdBlue ®
forex haust gas af ter‐
treatment
R lubri cants
R coolant
R brake fluid
R windsc reen washer fluid
R climate cont rol sy stem refrigerant
Only use products app rove dby Mercedes-Benz.
Damage caused bythe use of products that ha ve
not been appr oved is not co veredby the
Mercedes-Benz warranty or goodwill gestures.
The operating fluids appr ovedby Mercedes-Benz
can be identified bythefo llowing insc ript ions on
th e conta iner: R
MB- Freigabe (e.g. MB-Fr eigabe 229.51 )
R MB-Appr oval (e.g. MB-App rova l 229.51)
Fu rther information on appr oved operating flu‐
ids:
R inthe Mercedes-Benz Specifications for
Operating Fluids byentering the designation
- at https://be vo.mercedes-benz.com
- inthe Mercedes-Benz BeVo App
R at a qualified specialist workshop &
WARNING Risk offire or explosion from
fuel
Fu els are highly flammable. #
Fire, naked flames, smoking and crea‐
tion of spar ksmust be avoided. #
Swit choff the ignition and, if available,
th est ationary heater, before and while
re fuelling theve hicle. &
WARNING Risk of inju ryfrom fuels
Fu els are poisonous and hazardous to your
health. #
Do not swallow fuel or let it come into
contact with skin, eyes or clo thing. #
Do not inhale fuel vapour. #
Keep children away from fuel. #
Keep doors and windo wsclosed du ring
th ere fuelling process.
If yo u or other people come into contact with
fuel, obser vethefo llowing: #
Immediately rinse fuel off your skin with
soap and water. #
If fuel comes into contact with your
ey es, immediately rinse them thor‐
oughly with clean water.Seek medical
attention immediately. #
Ifyo u swallow fuel, seek medical atten‐
tion immediatel y.Do not induce vomit‐
ing. 41 8
Tech nical da ta