2020 MERCEDES-BENZ GLS SUV ignition
[x] Cancel search: ignitionPage 160 of 549
5
L Low beam/high beam
6 R Switches there ar fog lamp on/off
When low beam is activated, theT indicator
lamp forth est anding lights will be deactivated
and replaced bytheL low- beam indicator
lamp. #
Alw ays park your vehicle safely using suf fi‐
cient lighting, in acco rdance with there le‐
va nt le galst ipulations.
* NO
TEBattery discharging byoperating
th est anding lights Operating
thest anding lights over a period of
hours puts a stra in on the batter y. #
Where possible, switch on the
ri ght X or left Wparking light. If
th e battery is insuf ficiently charge d, thest and‐
ing lights or parking lights will be swit ched off
automatically tofacilitate the next engine start. The
exterior lighting (e xcept standing and park‐
ing lights) will swit choff automatically when the
driver's door is opened.
R Obser vethe no tes on sur round lighting
(/ page 163).
Au tomatic driving lights function
The standing lights, low beam and daytime run‐
ning lights are switched on au tomatically
depending on the ignition status and the light
conditions. &
WARNING Risk of accident when the
dipped beam is switched off in poor visi‐
bility
When the light switch is set toà ,the
dipped beam may not be switched on auto‐
matically if there is fog, snow or other causes
of poor visibility such as spr ay. #
In such cases, turn the light switch to
L . The automatic driving lights are only an aid.
Yo u
are responsible forve hicle lighting. Switching
there ar fog lights on or off
Re quirements:
R The light switch is in theL orà posi‐
tion. #
Press the R button.
Please obser vethe count ry-specific la wsonthe
use of rear fog lamps.
% Vehicles with AIRMATIC or E- ACTIVE BODY
CO NTROL with off-road pac kage : when the
re ar fog light is switched on, off-road le vel
+3 will not be available. If there ar fog light is
switched on and off-road le vel +3 is activa‐
te d, theve hicle will be lo weredto off-road
le ve l +2. Light and sight
157
Page 164 of 549

Fu
nction of the off-road light
The off- road light impr oves illumination during
off-road driving. The low beam is distributed
symmetrically and across a wide angle, and
brightness is increased slightl y.This makes it
easier tofind your wa y when driving off- road and
to detect obs tacles at an ea rly st age. The active
headlamps are deactivated during this time so
th at steering mo vements do not change the illu‐
mination.
The function is active when the low beam is
switched on if you are not driving at a speed
greater than 50 km/h and theF (Offroad) or
G (Offroad Plus) drive program has been
selected.
Switching the Intelligent Light Sy stem
on/off
Re quirements:
R the ignition is switched on.
Multimedia sy stem:
4 © 5
Settings 5
Lights
5 Intelligent Light System #
Activate or deacti vate the function. Ad
aptive Highbeam Assist Plus Ad
aptive Highbeam Assist Plus function &
WARNING Risk of accident despi te
Ad aptive Highbeam Assist Plus
Ad aptive Highbeam Assist Plus does not
re act to:
R road users without lights, e.g. pedes‐
trians
R road users with poor lighting, e.g. cyclists
R road users whose lighting is obstructed,
e.g. bya bar rier
On very rare occasions, Adaptive Highbeam
Assist Plus may failto recognise other road
users with their own lighting, or may recog‐
nise them too late.
In these, or in similar situations, the auto‐
matic high beam will not be deactivated or
will be activated despite the presence of
ot her road users. #
Alw ays obser vethero ad and traf fic
conditions carefully and switch off the
high beam in good time. Ad
aptive Highbeam Assist Plus cannot take into
account road, weather or traf fic conditions.
De tection may be restricted in thefo llowing
cases:
R In poor visibilit y,e.g. fog, heavy rain or snow
R ifth ere is dirt on the sensors or the sensors
are obscured
Ad aptive Highbeam Assist Plus is on lyan aid.
Yo u are responsible for adju sting theve hicle's
lighting tothe pr evailing light, visibility and traf‐
fi c conditions. Light and sight
161
Page 169 of 549
#
Switching intermittent wiping on/off:
press button 2.
Ve hicles with rain sensor: the wipe inter val
automatically adapts tothe driving condi‐
tions.
The è symbol will appear on the instru‐
ment clus ter when there ar wind owwiper is
swit ched on. Re
placing the windsc reen wiper blades &
WARNING Risk of becoming trapped if
th e windscreen wipers are switched on
while wiper blades are being replaced
If th e windscreen wipers begin tomo vewhile
yo u are changing the wiper blades, you can
be trapped bythe wiper arm. #
Alw ays switch off the windscreen wip‐
ers and ignition before changing the
wiper blades. Moving
the wiper arms into there placement
position #
Switch the ignition on and then off again
immediatel y. #
Within around 15seconds, press and hold
th eî button on the combination switch
fo r appro ximately thre e seconds
(/ page 165).
The wiper arms will mo veinto there place‐
ment position.
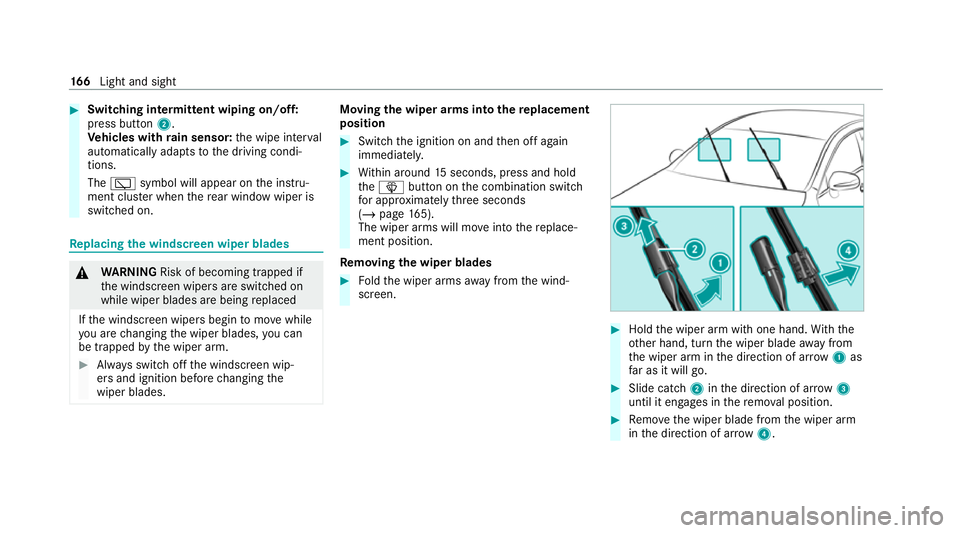
Re moving the wiper blades #
Foldthe wiper arms away from the wind‐
screen. #
Hold the wiper arm with one hand. With the
ot her hand, turn the wiper blade away from
th e wiper arm in the direction of ar row 1 as
fa r as it will go. #
Slide catch 2inthe direction of ar row 3
until it engages in there mo val position. #
Remo vethe wiper blade from the wiper arm
in the direction of ar row4. 16 6
Light and sight
Page 170 of 549
Fi
tting the wiper blades #
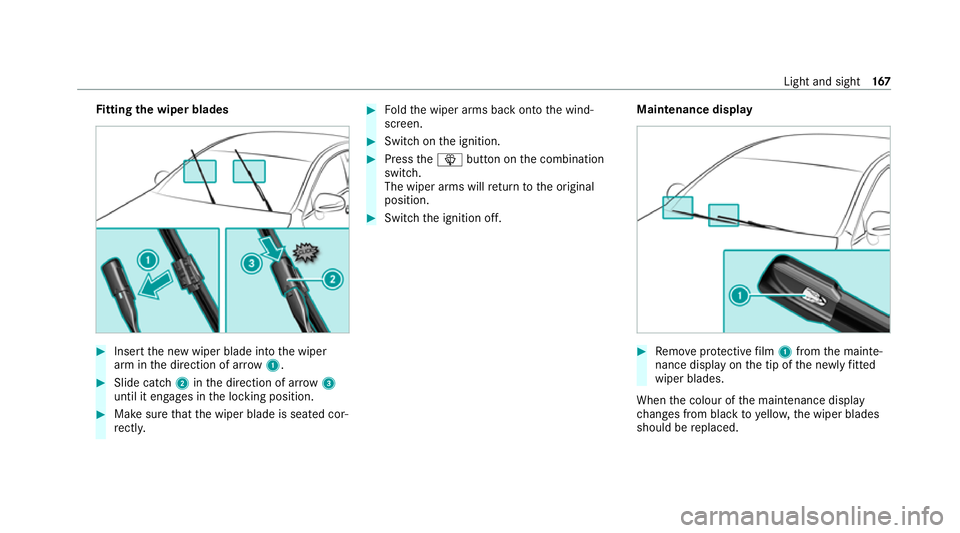
Inse rtthe new wiper blade into the wiper
arm in the direction of ar row1. #
Slide catch 2inthe direction of ar row 3
until it engages in the locking position. #
Make sure that the wiper blade is seated cor‐
re ctly. #
Foldthe wiper arms back onto the wind‐
screen. #
Switch on the ignition. #
Press theî button on the combination
switch.
The wiper arms will return tothe original
position. #
Switch the ignition off. Maintenance display #
Remo veprotective film 1 from the mainte‐
nance display on the tip of the newly fitted
wiper blades.
When the colour of the maintenance display
ch anges from black to yellow, the wiper blades
should be replaced. Light and sight
167
Page 171 of 549
%
The duration until the colour changes varies
depending on the usage conditions. Re
placing the windsc reen wiper blades
(MAGIC VISION CONT ROL) Moving
the wiper arms into there placement
position #
Switch the ignition off. #
Within around 15seconds, press theî
button on the combination switch
(/ page 165).
The wiper arms will mo veinto there place‐
ment position. Re
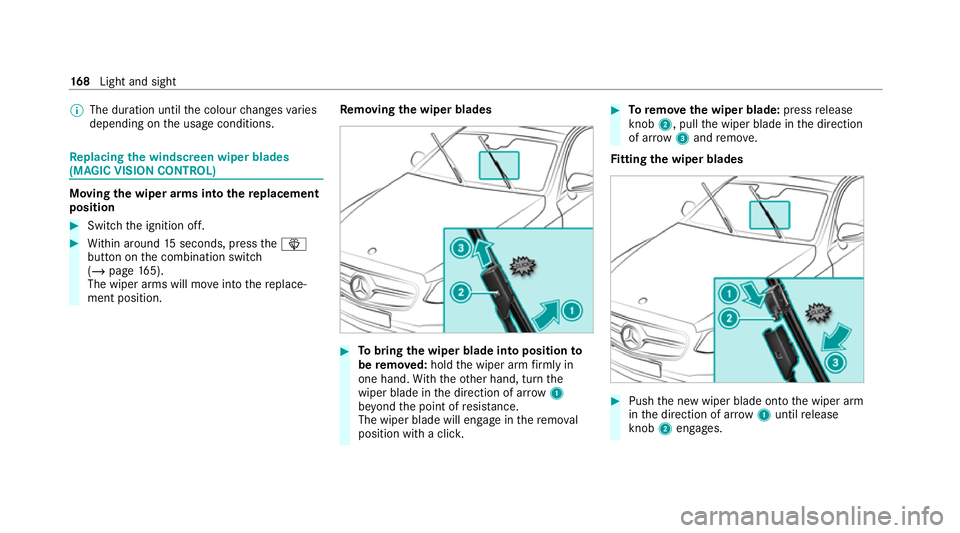
moving the wiper blades #
Tobring the wiper blade into position to
be remo ved: hold the wiper arm firm ly in
one hand. With th eot her hand, turn the
wiper blade in the direction of ar row1
be yond the point of resis tance.
The wiper blade will engage in there mo val
position with a clic k. #
Toremo vethe wiper blade: pressrelease
knob 2, pull the wiper blade in the direction
of ar row3and remo ve.
Fi tting the wiper blades #
Push the new wiper blade onto the wiper arm
in the direction of ar row1until release
knob 2engages. 16 8
Light and sight
Page 172 of 549
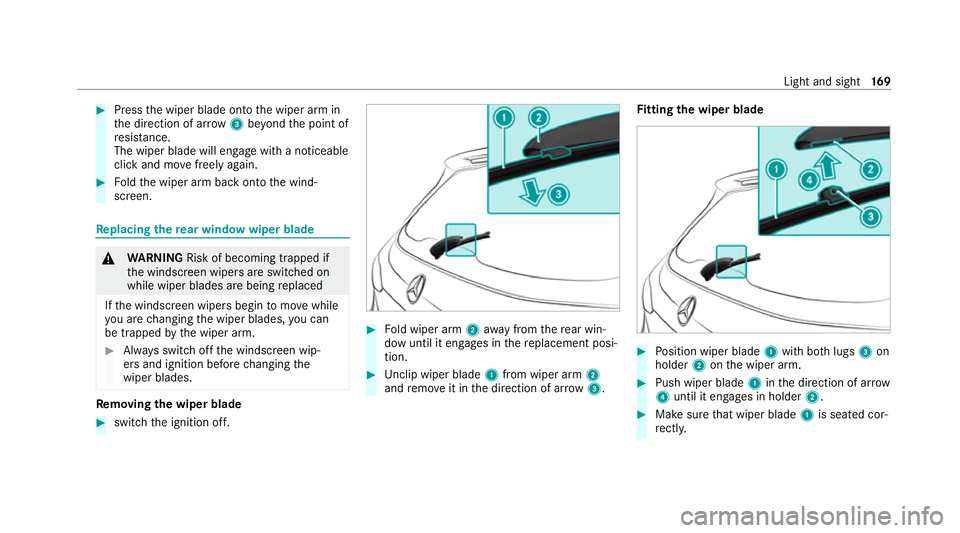
#
Press the wiper blade onto the wiper arm in
th e direction of ar row3beyond the point of
re sis tance.
The wiper blade will engage wi tha noticeable
click and mo vefreely again. #
Foldthe wiper arm back onto the wind‐
screen. Re
placing the rear window wiper blade &
WARNING Risk of becoming trapped if
th e windscreen wipers are switched on
while wiper blades are being replaced
If th e windscreen wipers begin tomo vewhile
yo u are changing the wiper blades, you can
be trapped bythe wiper arm. #
Alw ays switch off the windscreen wip‐
ers and ignition before changing the
wiper blades. Re
moving the wiper blade #
switch the ignition off. #
Fold wiper arm 2away from there ar win‐
dow until it engages in there placement posi‐
tion. #
Unclip wiper blade 1from wiper arm 2
and remo veit in the direction of ar row 3. Fi
tting the wiper blade #
Position wiper blade 1with bo thlugs 3on
holder 2onthe wiper arm. #
Push wiper blade 1inthe direction of ar row
4 until it en gage s in holder 2. #
Make sure that wiper blade 1is seated cor‐
re ctly. Light and sight
16 9
Page 190 of 549
Driving
Note
s on Mercedes-AMG vehicles Obser
vethe no tes on thefo llowing topics in the
Supplement, otherwise you may failto recognise
dangers.
% The availability of cer tain functions depends
on the equipment and model of theve hicle.
R Emotion Start
R AMG Performance exhaust sy stem
R AMG ceramic high-per form ance composite
brake sy stem
R AMG ACTIVE RIDE CONTROL
R AMG steering-wheel buttons Switching on
the po wer supp lyor ignition &
WARNING Risk of accident and inju ry
due tochildren left unat tended in the
ve hicle
If ch ildren are left unsupervised in theve hi‐
cle, they could, in pa rticular:
R open doors, thereby endangering other
persons or road users.
R get out and be stru ck byoncoming traf‐
fi c.
R ope rate ve hicle equipment and become
trapped, forex ample.
In addition, thech ildren could also set the
ve hicle in motion, forex ample by:
R releasing the parking brake.
R changing the transmission position.
R starting theve hicle. #
Never lea vechildren unat tended in the
ve hicle. #
When leaving theve hicle, alw aysta ke
th eke y with you and lock theve hicle. #
Keep theve hicle key out of reach of
ch ildren. Re
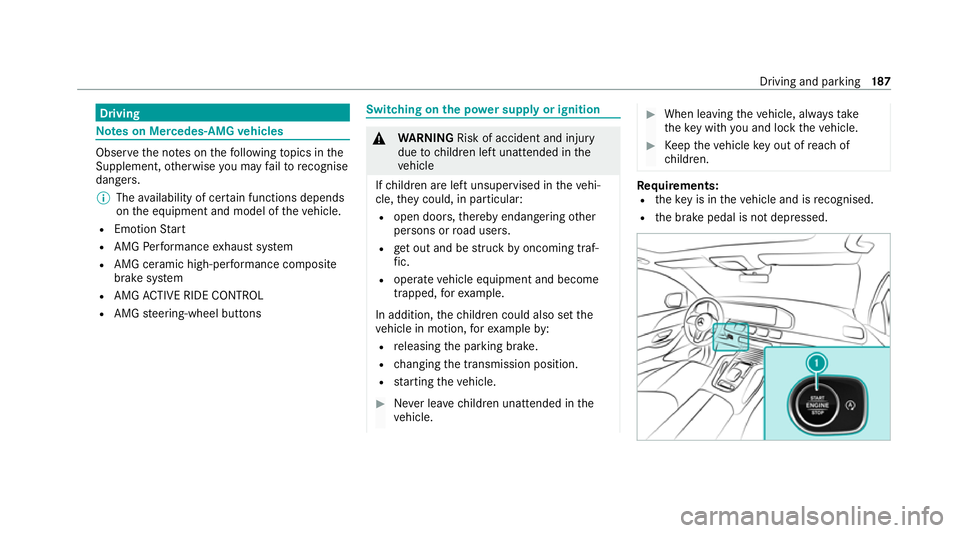
quirements:
R theke y is in theve hicle and is recognised.
R the brake pedal is not depressed. Driving and parking
187
Page 191 of 549
#
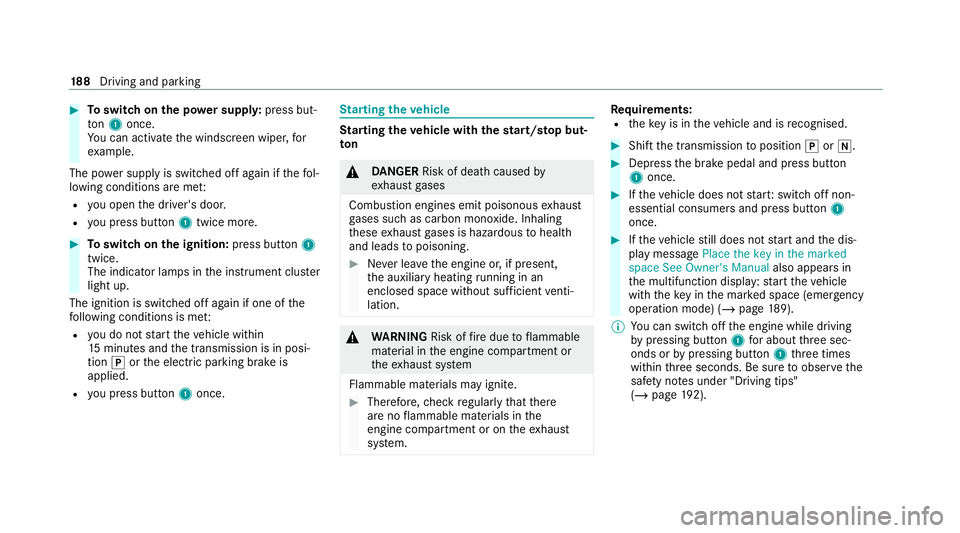
Toswitch on the po wer supp ly:press but‐
to n1 once.
Yo u can activate the windscreen wiper, for
ex ample.
The po wer supp lyis switched off again if thefo l‐
lowing conditions are me t:
R you open the driver's door.
R you press but ton1 twice more. #
Toswitch on the ignition: press button 1
twice.
The indicator lamps in the instrument clus ter
light up.
The ignition is switched off again if one of the
fo llowing conditions is me t:
R you do not start theve hicle within
15 minutes and the transmission is in posi‐
tion jorthe electric parking brake is
applied.
R you press but ton1 once. St
arting theve hicle St
arting theve hicle with thest art/s top but‐
ton &
DANG ER Risk of death caused by
ex haust gases
Combustion engines emit poisonous exhaust
ga ses such as carbon monoxide. Inhaling
th ese exhaust gases is hazardous tohealth
and leads topoisoning. #
Never lea vethe engine or, if present,
th e auxiliary heating running in an
enclosed space wi thout suf ficient venti‐
lation. &
WARNING Risk offire due toflammable
material in the engine compartment or
th eex haust sy stem
Flammable materials may ignite. #
Therefore, check regularly that there
are no flammable materials in the
engine compartment or on theex haust
sy stem. Re
quirements:
R theke y is in theve hicle and is recognised. #
Shift the transmission toposition jori. #
Depress the brake pedal and press button
1 once. #
Ifth eve hicle does not star t:switch off non-
essential consumers and press button 1
once. #
Ifth eve hicle still does not start and the dis‐
play message Place the key in the marked
space See Owner's Manual also appears in
th e multifunction display: start theve hicle
with theke y in the mar ked space (emer gency
operation mode) (/ page 189).
% You can swit choff the engine while driving
by pressing button 1for about thre e sec‐
onds or bypressing button 1thre e times
within thre e seconds. Be sure toobser vethe
saf ety no tes under "Driving tips"
(/ page 192). 18 8
Driving and pa rking