2020 MERCEDES-BENZ GLA transmission
[x] Cancel search: transmissionPage 273 of 346

The
signal isnot detect edduring program-
ming. Comparable withCanadian law,some
U.S. garage dooropeners alsofeature a
"break".
Proceed asfollows:
R ifyou liveinCanada
R ifyou have difficulties programming the
garage dooropener (regardless ofwhere
you live) asyou follow theprogramming
steps.
X Press andhold oneofbutton s0044 to0085 on
the integr atedgarage dooropener.
Aft erashort time,indicator lamp0043lights
up yellow.
X Release thebutton .
Indicat orlamp 0043flashes yellow.
X Press button 0084ofgarage doorremote con-
trol 0083for two seconds, thenrelease itfor
two seconds.
X Press button 0084again fortwo seconds.
X Repeat thissequence onbutton 0084of
remote control0083 until indicator lamp0043
lights upgreen.
When indicator lamp0043lights upgreen:
programming isfinished.
When indicator lamp0043flashes green:pro-
gramming wassuccessful. Thenext step is
to synchron izethe rolling code.
X Release button0084ofremote control0083 of
the garage doordrive.
If indicator lamp0043lights upred: repeat the
programming processforthe correspon ding
button onthe rear-view mirror.Whendoing
so, vary thedistance between remotecon-
trol 0083and therear-view mirror.
The required distance between remotecon-
trol 0083and theintegr atedgarage door
opener depends onthe garage doordrive
system. Severalattemptsmight beneces-
sary. Youshould testevery position forat
least 25seconds beforetryinganother posi-
tion.
Problems whenprogramming
If you areexperienc ingproblems programming
the integr atedgarage dooropener onthe rear-
view mirror, takenoteof the following instruc-
tions:
R Check thetrans mitterfrequency usedby
garage doordrive remote control0083 and
whether itis supported. Thetrans mitterfre- quency
canusuall ybe found onthe back of
remote control0083 for the garage doordrive.
The integr atedgarage dooropener iscom-
patible withdevices thathave units which
operate inthe frequency rangeof280 to
433 MHz.
R Replace thebatteries ingarage doorremote
cont rol0083. This increases thelikelihood that
garage doorremote control0083 will trans mit
a stron gand precise signaltothe integr ated
garage dooropener.
R When programming, holdremote control0083
at varying distances andangles frombut-
ton s0044 to0085 which youareprogramming.
Try various anglesatadistance between
2and 8inches (5to20cm) oratthe same
angle butatvarying distances .
R Ifanother remotecontrol0083 isavailab lefor
the same garage doordrive, repeat the
same programming stepswiththisremote
cont rol0083. Before performin gthese steps,
make surethatnew batteries havebeen
installed ingarage doordrive remote control
0083.
R Note thatsome remote controlsonly trans -
mit foralimited amount oftime (theindica-
tor lamp onthe remote controlgoes out).
Press button 0084onremote control0083 again
before transmission ends.
R Align theanten nacable ofthe garage door
opener unit.Thiscanimprove signalrecep-
tion/ transmission.
Opening/clo singthegara gedoor Aft
erithas been programmed, theintegr ated
garage dooropener performs thefunct ionof
the garage doorsystem remote control.Please
also read theoperating instructions forthe
garage doorsystem.
X Turn theSmart Keytoposition 2in the igni-
tion lock (Ypage 125).
X Press button 0044,0087or0085 which youhave
programmed tooperate thegarage door.
Garage doorsystem withafixed code: indi-
cator lamp0043lights upgreen.
Garage doorsystem witharolling code:indi-
cator lamp0043flashes green.
The trans mitterwill trans mitasignal aslong
as the button ispressed. Thetrans mission Featur
es
271Stowage andfeatu res Z
Page 296 of 346

or
sparks arecreated, thehydrogen gascan
ignite. Thereisarisk ofan explosion.
R Make surethatthepositive terminalof a
conn ected battery doesnotcome into
cont actwith vehicle parts.
R Never placemetal object sor tools ona
battery.
R Itis important thatyouobserve the
described orderofthe battery terminals
when connectin gand disconn ectingabat-
tery.
R When jump-st arting,makesurethatthe
battery poleswithidentical polarityare
conn ected.
R Itis particularly importanttoobserve the
described orderwhen connectin gand dis-
conn ectin gthe jumper cables.
R Never connectordisconn ectthe battery
termin alswhile theengine isrunnin g. G
WARNING
Batt eryacid iscaustic. Thereisarisk of
injury.
Avoid contactwith skin, eyesorclothin g.Do
not inhale anybattery gases.Donot lean
over thebattery. Keepchildren awayfrom
batteries. Washawaybattery acidimmedi-
ately withplenty ofclean water andseek
medical attention. H
Environmental
note Batt
eries containpollutants.
It is illegal todispose of
them withthehousehold
rubbish. Theymust becol-
lected separately anddis-
posed ofinan environ men-
tally responsible recycling
system. Dispose
ofbatteries inan
environ mentallyresponsible
manner. Takedischarged
batteries toaquali fiedspe-
cialist workshop ortoacol- lection
pointforused bat-
teries.
! Have
thebattery regularly checkedata
quali fiedspecialist workshop.
Comply withtheservice intervalsinthe
Maintenan ceBooklet ,or cont actaquali fied
specialist workshop formore informat ion.
! You
should haveallwork involving thebat-
tery carried outataquali fiedspecialist
workshop. Inthe except ionalcasethatitis
necessary foryou todisconn ectthe battery
yourself, makesurethat:
R switch offthe engine andremove the
Smart Key.Onvehicles withKEYLE SS-GO,
make surethattheignition isswitched
off. Check thatallthe indicator lampsin
the instr ument cluster areoff. Otherwise,
electron iccomponen ts,such asthe alter-
nator, maybedamaged.
R you first remove thenegative terminal
clamp andthen thepositive terminal
clamp. Neverswapthetermin alclamps.
Otherwise, thevehicle's electronicsystem
may bedamaged.
R in vehicles withautomatic transmission,
the transm issionislocked inposition 005D
after thebattery isdisconn ected.The
vehicle issecured againstrollingaway.
You canthen nolonger movethevehicle.
The battery andthecover ofthe positive ter-
minal clamp mustbeinstalled securelydur-
ing operation.
Comply withsafety precautions andtake pro-
tect ivemeasures whenhandling batteries. Risk
ofexplosion. Fire,
open flames andsmokin gare
prohibited whenhandling thebat-
tery. Avoid creatin gsparks. Batt
eryacid iscaustic. Avoidcon-
tact with skin, eyesorclothin g.
Wear suitable protectiveclothin g,
especially gloves,apronandface-
guard.
Rinse anyacid spills immediately
with clear water. Contact aphysi-
cian ifnecessary. 294
Bat
tery (vehicl e)Breakdown assistance
Page 303 of 346

X
When thevehicle isstation ary,depress the
brake pedalandkeep itdepressed.
X Shift theautomatic transmission toposition
005D.
X Release thebrake pedal.
X Release theelectr icparking brake.
X Switc hoff the automatic locking
(Y page 199).
X Switc hon the hazard warning lamps
(Y page 104).
X Turn theSmart Keyinthe ignition lockto
position 005Aand leave theSmart Keyinthe
ignition lock. Towing
avehicle withboth axles on
the ground
It is importan tthat youobserve thesafety
inst ruction swhen towing awayyourvehicle
(Y page 299).
X On
vehicles withKEYLE SS-GO orthe
KEYLE SS-GO startfunction: youmust use
the Smart Keyinstead ofthe Start/S topbut-
ton (Ypage 126).
The automatic transmission automatically
shifts toposition 005Dwhen youopen thedriv-
er's orfron t-passenger doororwhen you
remove theSmart Keyfrom theignition lock.In
order toensure thattheautomatic transmis-
sion stays inposition 005Cwhen towing away
the vehicle, youmust observe thefollowing
points :
X Make surethatthevehicle isstation ary.
X Turn theSmart Keytoposition 0048inthe igni-
tion lock.
X Depress andhold thebrake pedal.
X Shift theautomatic transmission toposition
005C.
X Leave theSmart Keyinposition 0048inthe
ignition lock.
X Release thebrake pedal.
X Release theelectr icparking brake.
X Switc hon the hazard warning lamps
(Y page 104).
i In
order tosignal achange ofdirect ion
when towing thevehicle withthehazard
warning lampsswitched on,use thecombi-
nation switch asusual. Inthis case, onlythe
indicator lampsforthe direct ionoftravel flash.
Afterresett ingthe combin ation
switch, thehazard warning lampstarts
flashing again. Perm
ittedtowing methods
Mercedes- Benzrecomm endstransportin gyour
vehicle inthe case ofabreakdown, ratherthan
towing itaway.
When towing away,useatowing ropeora
towing barwith both axles onthe ground. Do
not use anytow barsystems. Tr
anspor tingthevehicle
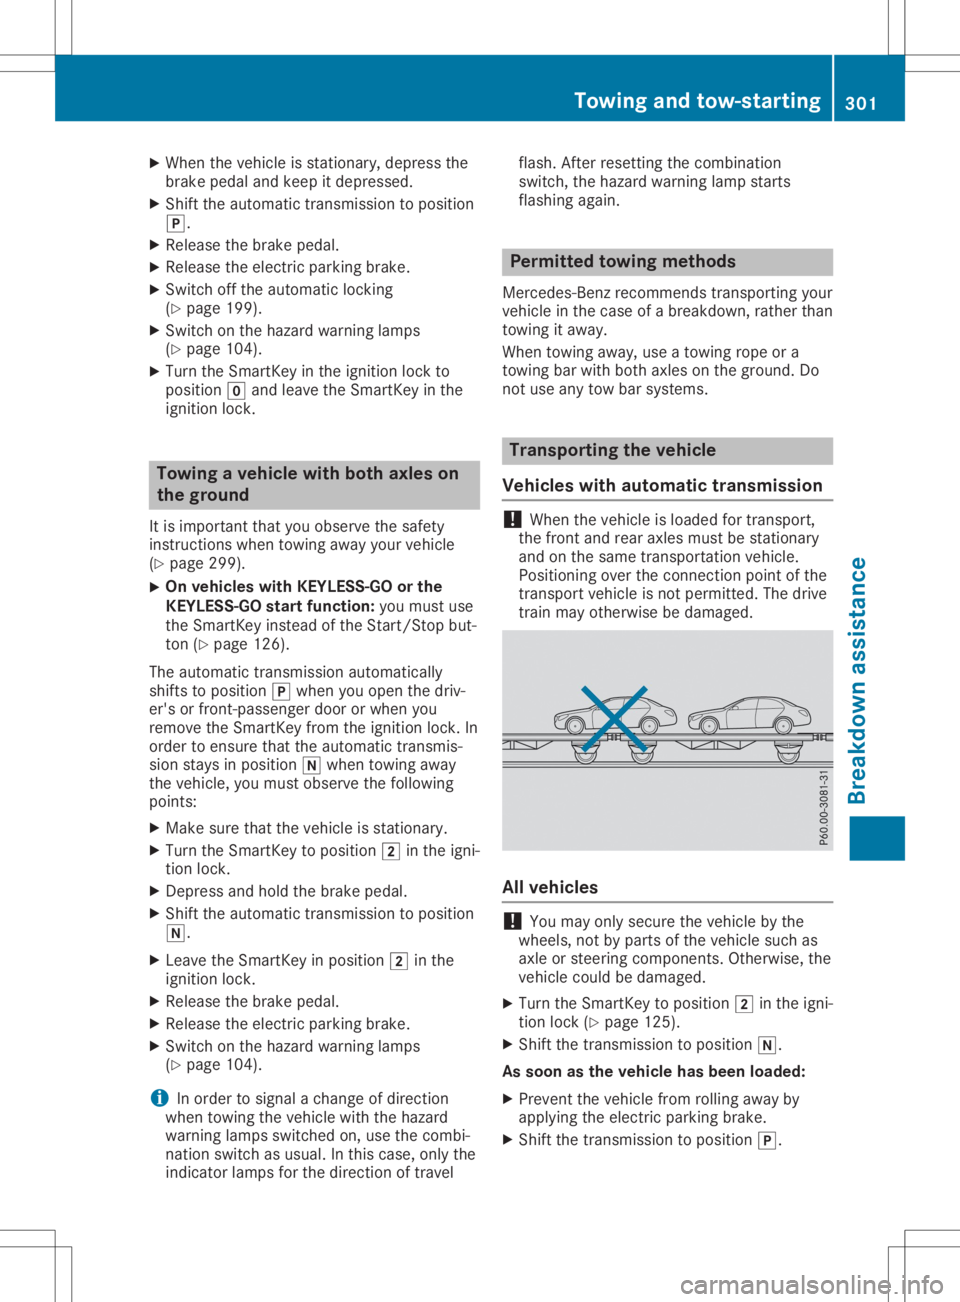
Vehicles withautomat ictransmission !
When
thevehicle isloaded fortran sport,
the fron tand rear axles mustbestation ary
and onthe same transportat ionvehicle.
Position ingover theconn ection pointofthe
tran sport vehicle isnot permitt ed.The drive
train mayotherwise bedamaged. All
vehicles !
You
may onlysecure thevehicle bythe
wheels, notbyparts ofthe vehicle suchas
axle orsteerin gcompon ents.Other wise, the
vehicle couldbedamaged.
X Turn theSmart Keytoposition 0048inthe igni-
tion lock (Ypage 125).
X Shift thetran smission toposition 005C.
As soon asthe vehicle hasbeen loaded:
X Preven tthe vehicle fromrolling awayby
applying theelectr icparking brake.
X Shift thetran smission toposition 005D. Towing
andtow-sta rting
301Breakdown assistance Z
Page 304 of 346

X
Turn theSmart Keytoposition 005Ainthe igni-
tion lock andremove it.
X Secure thevehicle.
The towing eyecan beused topull thevehicle
ont oatrailer ortrans porter fortrans portin g
purposes. Notes
on4MATIC vehicles
! Vehicles
with4MATI Cmust notbetowed
with either thefront orthe rear axle raised,
as doing sowill damage thetrans mission.
Vehicles with4MATI Cmay onlyeither be
towed awaywithboth axles onthe ground or
be loaded upand trans ported.
If the vehicle's transmission, front,or rear axle
is damaged, havethevehicle transported ona
truck ortrailer.
In the event ofdam agetothe electrical
system:
If the battery isdefect ive,theautomatic trans-
mission willbelocked inposition 005D.Toshift
the automatic transmission toposition 005C,you
must provide powertothe vehicle's on-board
electric alsystem inthe same wayaswhen
jump-st arting(Ypage 296).
Have thevehicle transported onatrans porter
or trailer. Tow-star
ting(emergency engine
star ting)
! Vehicles
withautomatic transmission must
not betow-st arted. Youcould otherwise
damage theautomatic transmission.
i You
canfind inform ationon"Jump-start-
ing" under (Ypage 296). Fuses
Import
antsafety notes G
WARNIN
G
If you manipulate orbridge afaulty fuseorif
you replace itwith afuse withahigher
amperage, theelectric cablescouldbeover-
loaded. Thiscould result inafire. There isa
risk ofan accident andinjury. Always
replace faultyfuseswiththespeci-
fied new fuses having thecorrec tamperage.
! Only
usefuses thathave been approved
for Mercedes- Benzvehicles andwhich have
the correc tfuse rating forthe system con-
cern ed.Only usefuses marked withan"S".
Otherwise, componentsorsystems couldbe
damaged.
! Make
surethatnomoisture canenter the
fuse boxwhen thecover isopen.
! When
closing thecover, makesurethatit
is lying correc tlyon the fuse box. Moisture
seeping inor dirt could otherwise impairthe
operation ofthe fuses.
The fuses inyour vehicle servetoclose down
faulty circuits. Ifafuse blows, allthe compo-
nent son the circuit andtheir functionsstop
operating.
Blown fusesmustbereplaced withfuses of
the same rating, whichyoucan recogn izeby
the color andvalue. Thefuse ratings, and
other items ofinform ationtobe complied with
are, listed inthe fuse allocation chart.
The fuse allocation chartisin the fuse boxin
the front -passenger footwell(Ypage 303).
If anewly insertedfuse alsoblows, havethe
cause traced andrectified ataqualified spe-
cialist workshop, e.g.anauthorized Mercedes-
Benz Center. Before
changing afuse
X Secure thevehicle against rollingaway
(Y page 145).
X Switch offallelectric alconsumer s.
X Vehicles withoutKEYLESS-GO: remove
the Smart Keyfrom theignition lock.
X Vehicles
withKEYL ESS-GO start-func-
tion orKEYL ESS-GO: openthedriver's
door.
The vehicle electron icsare now inposition
005A. This isthe same asthe Smart Keybeing
removed fromtheignition.
The fuses arelocated invarious fuseboxes:
R Fuse boxinthe engine compart mentonthe
left- hand sideofthe vehicle, whenviewed in
the direction oftravel
R Fuse boxinthe front -passenger footwell 302
FusesBr
eakdown assistance
Page 336 of 346

The
maximum transmission output(PEAK)at
the base ofthe anten namust notexceed the
following values: Frequency
band Maximu
m
tra nsmission
outpu t Short
wave
3 -54 MHz 100
W 4
m waveband
74 -88 MHz 30
W 2
m waveband
144 -174 MHz 50
W Trunked
radiosystem/
Tetra
380 -460 MHz 10
W 70
cm waveband
400 -460 MHz 35
W Mobile
commun ications
(2G/3G/4G) 10
W The
following canbeused inthe vehicle with-
out restr iction s:
R RF trans mitterswith amaximum transmis-
sion output ofup to100 mW
R RF trans mitterswith trans mitterfrequencies
in the 380 -410 MHz frequency bandanda
maximum transmission outputofup to2W
(trunk edradio system/Tet ra)
R Mobile phones (2G/3G/4G)
There isno restr iction foranten napositions on
the outside ofthe vehicle forthe following fre-
quency bands:
R Trunked radiosystem/Tet ra
R 70 cm waveband
R 2G/3G/4 G Identification
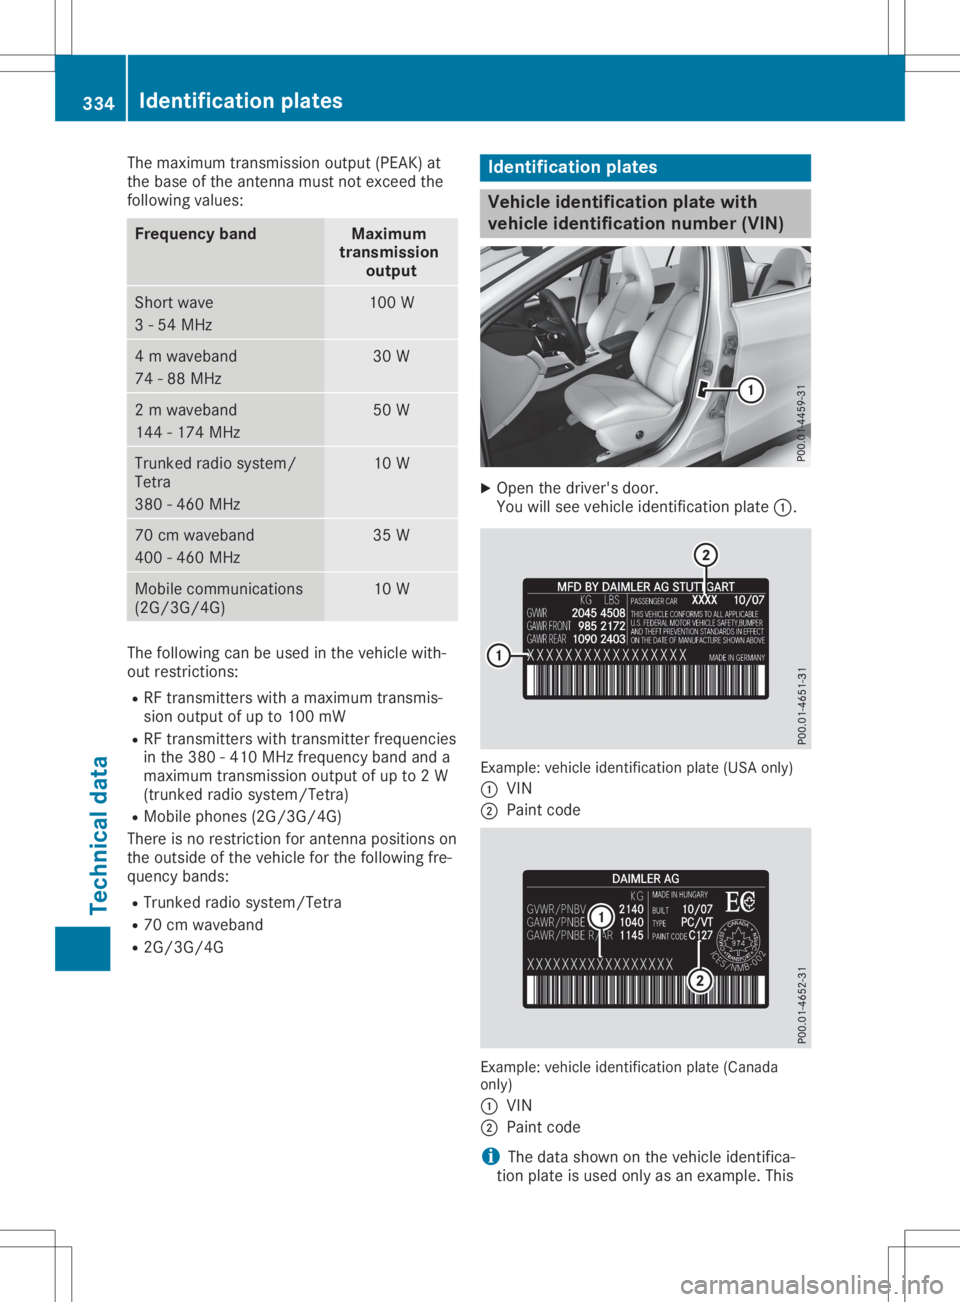
plates Vehicle
identification platewith
vehicle identification number(VIN) X
Open thedriver's door.
You willsee vehicle identific ationplate0043. Example:
vehicleidentific ationplate(USA only)
0043 VIN
0044 Paint code Example:
vehicleidentific ationplate(Canada
only)
0043 VIN
0044 Paint code
i The
data shown onthe vehicle identific a-
tion plate isused onlyasan example. This 334
Identification
platesTechnical data