2020 MERCEDES-BENZ GLA windshield wipers
[x] Cancel search: windshield wipersPage 105 of 346
daytime
runninglamps orlow-beam head-
lamps goout after 3minut es.
When theengin eis runn ing,thevehicle issta-
tion aryand inbright ambient light:ifyou turn
the light switch tothe 0060 position ,the day-
time runninglamps andparkin glamps turnon.
If the engin eis runn ingand youturn thelight
switch tothe 0058 position ,the manual set-
tin gs take preceden ceover thedaytime run-
ning lamps.
USA only:
The daytime runninglamps improve thevisibil-
ity ofyour vehicle duringtheday. Todo this,
the daytime runninglamps function must be
switch edon using theon-board comput er
(Y page 199).
If the engin eis runn ingand youturn thelight
switch tothe 0060 or0058 position ,the man-
ual sett ings take preceden ceover thedaytime
runn inglamps.
Low-beam headlamp s
Even ifthe light sensor doesnotdetec tthat it
is dark, theparkin glamps andlow-beam head-
lamps switch onwhen theignit ionisswitch ed
on and thelight switch isset tothe 0058 posi-
tion .This isapartic ularly useful function inthe
event ofrain andfog.
X To
switch onthe low-beam headlamp s:
turn theSmart Keytoposition 0048inthe igni-
tion lock orstart theengin e.
X Turn thelight switch to0058.
The green 0058indicat orlamp inthe instru-
ment cluster lightsup.
Front foglamp s
In con dition swhere visibility ispoor dueto
fog, snow orrain, thefoglamps improve visi-
bility aswell asmakin git easier forother road
users tosee you. They canbeoperated
toget herwith theparkin glamps ortoget her
with theparkin glamps andlow-beam head-
lamps.
X To switch onthe foglamp s:turn the
Smart Keytoposition 0048inthe ignit ionlock
or start theengin e.
X Turn thelight switch to0058 or0058. X
Press the005A button.
The green 005Aindicat orlamp inthe instru-
ment cluster lightsup.
X To switch offthe foglamp s:press the
005A button.
The green 005Aindicat orlamp inthe instru-
ment cluster goesout.
Rear foglamp
The rear foglamp improves visibilityofyour
vehicle forthe trafficbehind inthe event of
thic kfog. Please takenoteof the count ry-spe-
cific regulations forthe use ofrear foglamps.
X To switch onthe rear foglamp :turn the
Smart Keyinthe ignit ionlock toposition 0048
or start theengin e.
X Turn thelight switch to0058 or0058.
X Press the005E button.
The yellow 005Eindicat orlamp inthe instru-
ment cluster lightsup.
X To switch offthe rear foglamp :press the
005E button.
The yellow 005Eindicat orlamp inthe instru-
ment cluster goesout.
Par king lamp s
! If
the batte rycharge isvery low,thepark-
ing lamps orstan ding lamps areautomati-
cally switch edoff toenable thenextengin e
start .Always parkyourvehicle safelyandin
a well litarea, inaccor dance withtherele-
vant legal stipulation s.Avoid usingthe0060
parkin glamps overaperiod ofseveral
hours. Ifpossible, switchonthe right -hand
0064 orleft- hand 0063 standing lamps.
X To switch on:turn thelight switch to0060.
The green 0060indicat orlamp inthe instru-
ment cluster lightsup.
Sta nding lamps
Switc hingonthe stan ding lamps ensures the
corr espondin gside ofthe vehicle isillumina-
ted.
X To switch onthe stand inglamp s:the
Smart Keyisnot inthe ignit ionlock oritis in
position 005Ainthe ignit ionlock .
X Turn thelight switch to0063 (left-hand side
of the vehicle) or0064 (right- handsideof
the vehicle). Exter
iorlighting
103Lightsandwindshield wipers Z
Page 107 of 346
direct
ionyou areturn ing, enabling bettervisi-
bility intight bends, forexample. Itcan only be
activ ated when thelow-beam headlamps are
switch edon.
Active:
R ifyou aredriving atspeeds below25mph
(40 km/ h)and switch onthe turn signal or
turn thesteer ingwheel
R ifyou aredriving atspeeds between 25mph
(40 km/ h)and 45mph (70km/ h)and turn
the steer ingwheel
The corn ering lampmayremain litfor ashort
time, butisautomatic allyswitch edoff after no
more thanthree minut es. Head
lampsfogged uponthe inside
Certain climatic andphysical condition smay
cause moisturetoform inthe headlamp. This
moist uredoes notaffect thefunc tionality of
the headlamp. Interior
lighting Overview
ofinterior lighting
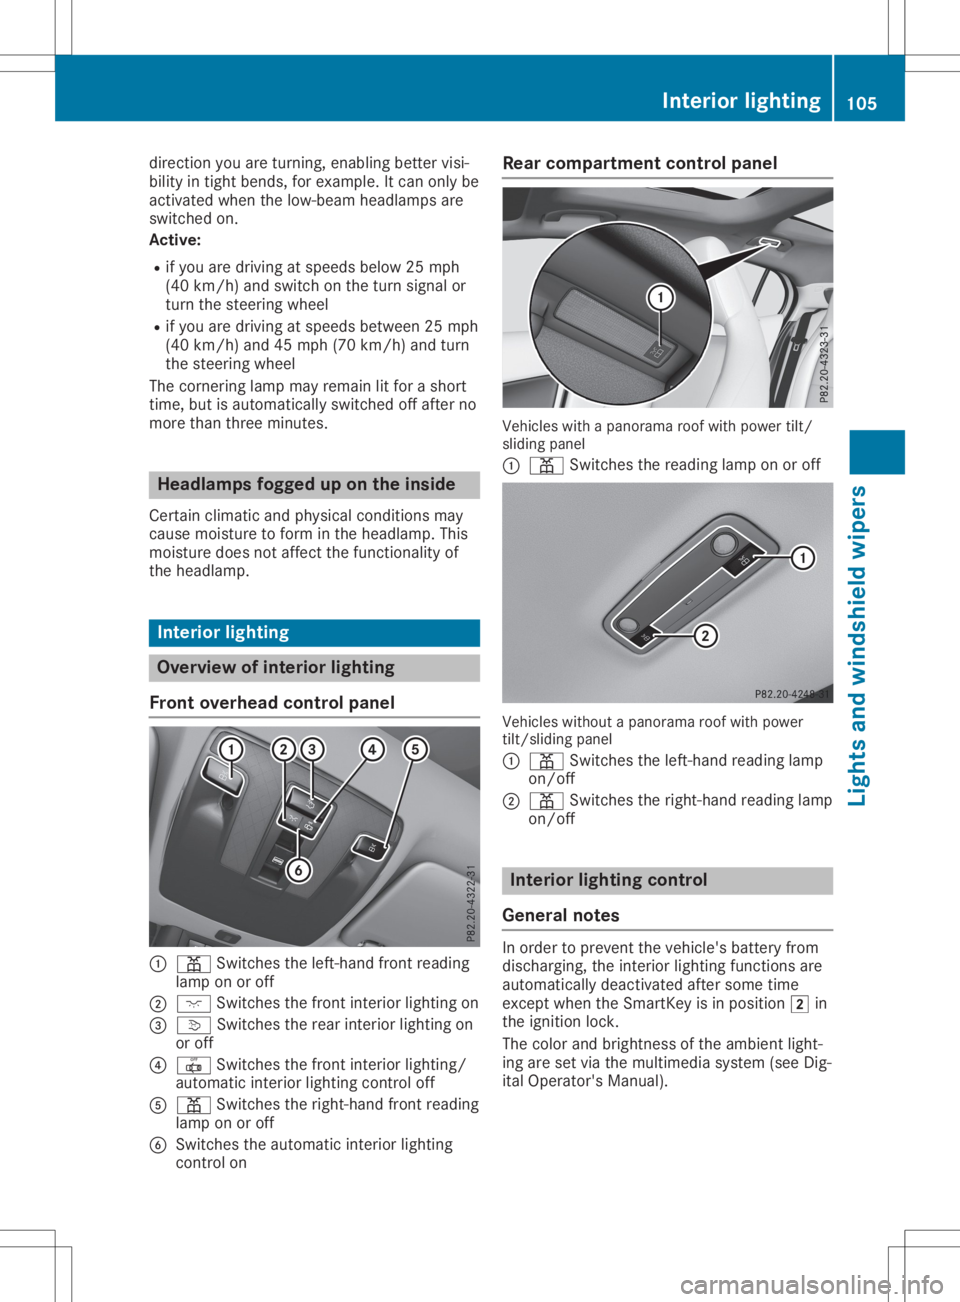
Front overhead controlpanel 0043
003D Switchestheleft- hand frontreading
lamp onoroff
0044 004A Switchesthefron tint erior lightin gon
0087 0043 Switchestherear interior lightin gon
or off
0085 0033 Switchesthefron tint erior lightin g/
automatic interior lightin gcon trol off
0083 003D Switchestheright -handfron treading
lamp onoroff
0084 Switc hestheautomatic interior lightin g
con trol on Rear
compa rtment control panel Vehicles
withapanorama roofwith power tilt/
sliding panel
0043 003D Switchesthereading lamponoroff Vehicles
withoutapanorama roofwith power
tilt/ sliding panel
0043 003D Switchestheleft- hand reading lamp
on/ off
0044 003D Switchestheright -handreading lamp
on/ off Interior
lighting control
General notes In
order topreven tthe vehicle's batteryfrom
dischargin g,the interior lightin gfunc tionsare
automatic allydeactiv atedafter some time
exc ept when theSmart Keyisin position 0048in
the ignit ionlock .
The color andbright nessofthe ambient light-
ing are setviathe multimedia system(seeDig-
ital Operator 'sManual). Interior
lighting
105Lightsandwindshield wipers Z
Page 109 of 346
Tail
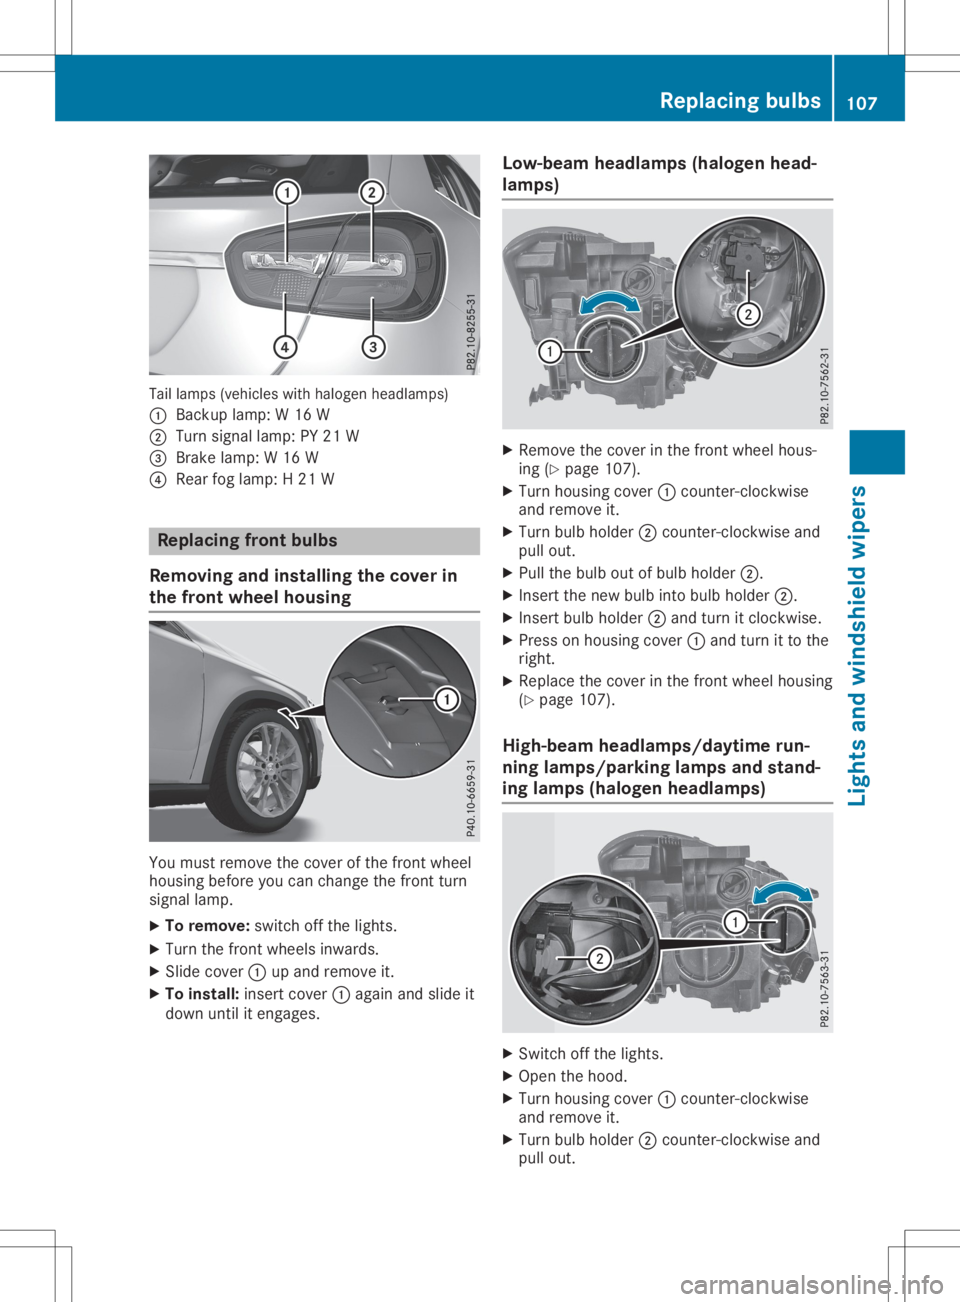
lamps (vehicles withhalogen headlamps)
0043 Backup lamp:W16 W
0044 Turn signal lamp:PY21 W
0087 Brake lamp:W16 W
0085 Rear foglamp: H21 W Replacing
frontbulbs
Removing andinstalling thecover in
the front wheel housing You
must remove thecover ofthe front wheel
housing beforeyoucan change thefront turn
signal lamp.
X To remove: switchoffthe lights.
X Turn thefront wheels inwards.
X Slide cover 0043upand remove it.
X To install: insertcover0043again andslide it
down untilitengages. Low-beam
headlamps(halogen head-
lamp s) X
Remove thecover inthe front wheel hous-
ing (Ypage 107).
X Turn housing cover0043count er-clockwise
and remove it.
X Turn bulbholder 0044count er-clockwise and
pull out.
X Pull thebulb outofbulb holder 0044.
X Insert thenew bulb intobulb holder 0044.
X Insert bulbholder 0044and turn itclock wise.
X Press onhousing cover0043and turn itto the
right.
X Replace thecover inthe front wheel housing
(Y page 107).
High-beam headlamps/daytimerun-
ning lamp s/park inglamp sand stand -
ing lamp s(halogen headlamps) X
Switch offthe lights.
X Open thehood.
X Turn housing cover0043count er-clockwise
and remove it.
X Turn bulbholder 0044count er-clockwise and
pull out. Replacing
bulbs
107Lightsandwindshield wipers Z
Page 111 of 346
Tail
lamps
X Loosen screws0087using ascrewdriver.
X Remove thebulb holder fromthetaillamp. Bulb
holder
0085 Turn signals
0083 Brake lamp
X Tur nsignal: pressthebulb gently intothe
bulb holder, turnitcount er-clockwise and
remove itfrom thebulb holder.
X Insert thenew bulb intothebulb holder and
turn itclock wise.
X Bra kelamp :remove thecorrespon ding
bulb from thebulb holder.
X Insert thenew bulb intothebulb holder.
X Insert thebulb holder intothetaillamp and
screw itfirmly intoplace usingscrews 0087.
X Insert thetaillamp intothevehicle.
X Tighten fendernut0043and re-est ablish con-
tact with conn ector 0044.
X Close theside trimpanel (Ypage 108). Windshield
wipers Switching
thewindshield wipers
on/off
! Do
not operate thewindshield wipers
when thewindshield isdry, asthis could
damage thewiper blades. Moreover, dust
that hascollected onthe windshield can
scratc hthe glass ifwiping takesplacewhen
the windshield isdry.
If it is necessary toswitch onthe windshield
wipers indry weather conditions,alway suse
washer fluidwhen operating thewindshield
wipers.
! If
the windshield wipersleavesmears on
the windshield afterthevehicle hasbeen
washed inan automatic carwash, waxor
other residues maybethe reason forthis.
Clean thewindshield usingwasher fluid
after washing thevehicle inan automatic
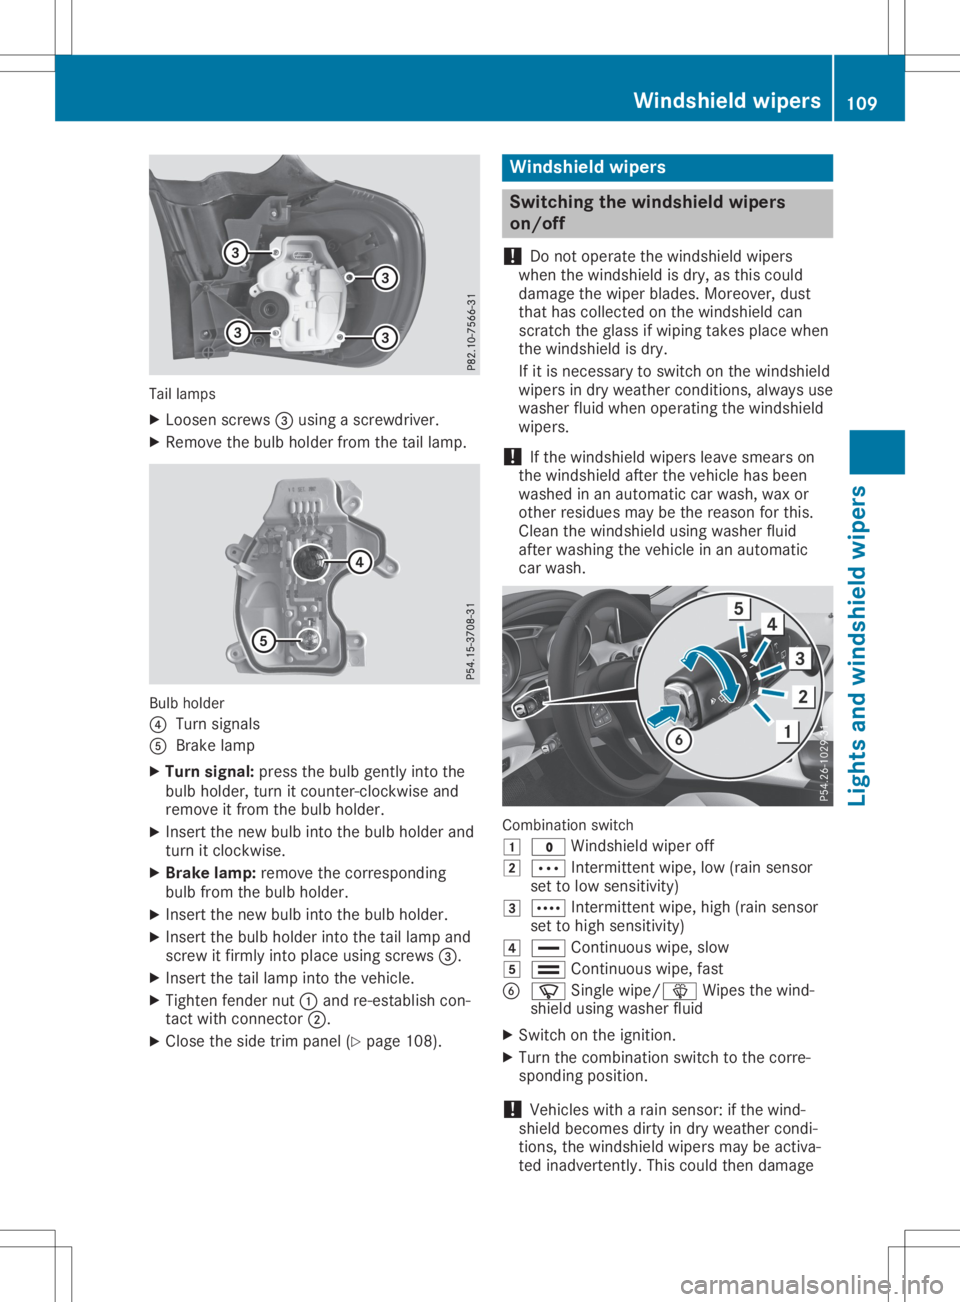
car wash. Combination
switch
0047 003F Windshield wiperoff
0048 0062 Intermitt entwipe, low(rain sensor
set tolow sensitivit y)
0049 0063 Intermitt entwipe, high(rain sensor
set tohigh sensitivit y)
004A 00AA Continuous wipe,slow
004B 00A9 Continuous wipe,fast
0084 00D3 Single wipe/00D4 Wipesthewind-
shield usingwasher fluid
X Switch onthe ignition.
X Turn thecombinat ionswitch tothe corre-
sponding position.
! Vehicles
witharain sensor: ifthe wind-
shield becomes dirtyindry weather condi-
tions, thewindshield wipersmaybeactiva-
ted inadverten tly.This could thendamage Windshield
wipers
109Lightsandwindshield wipers Z
Page 127 of 346

There
isarisk offire and anaccident .
Release theparking brakefullybefore driv-
ing off.
! Do
not warm upthe engine whilestation -
ary. Pullaway immediately. Avoidhigh
engine speeds andfullthrot tleuntil the
engine hasreached itsoperating tempera-
ture.
In vehicles withautomatic transmission,
engage positions Pand Ronly when the
vehicle isstation ary.
Where possible, avoidspinnin gthe drive
wheels whenpulling awayonslippery roads.
You could otherwise damagethedrive train.
! Mercedes-AMG
vehicles:avoidfull-load
operation andengine speeds greater than
5000 rpmwhen theengine iscold. This
helps toprotec tthe engine andavoids
uncomf ortable driving. Key
positions
Smar tKey 005A
Toremove theSmart Key
(shift thetrans mission toposition 005D)
0047 Power supply forsome consumer s,such
as the windshield wipers
0048 Ignit ion(power supplyforallconsumer s)
and drive position
0049 Tostart theengine
i The
Smart Keycanbeturned inthe ignition
lock even ifit is not thecorrec tSmart Key
for the vehicle. Theignition isnot switched
on. The engine cannotbe start ed. Star
t/Stop button General
notes
Vehicles withKEYLE SS-GO are equipped with
Smart Keysfeaturing theintegr atedKEYLE SS-
GO funct ionand adetachable Start/Stopbut-
ton .
A check whichperiodically establishesaradio
conn ection between thevehicle andthe
Smart Keydetermin eswhether avalid Smart -
Key isin the vehicle. Thisoccurs, forexample,
when startingthe engine.
When youinsert theStart /Stopbutton into
the ignition lock,thesystem needsapprox-
imately twoseconds recognitiontime. Youcan
then usetheStart /Stopbutton .
Pressing theStart /Stopbutton several times
in succession correspondstothe different
Smart Keypositions inthe ignition lock.Thisis
only thecase ifyou arenot depressing the
brake pedal.
If you depress thebrake pedalandpress the
Start /Stopbutton ,the engine startsimmedi-
ately.
To start thevehicle without actively usingthe
Smart Key:
R the Start /Stopbutton mustbeinsert edin
the ignition lock
R the Smart Keymust beinthe vehicle
R the vehicle mustnotbelocked withthe
Smart KeyorKEYLE SS-GO (Ypage 70)
Do not keep theKEYLE SS-GO key:
R with electron icdevices, e.g.amobile phone
or another SmartKey.
R with metallic objects,e.g. coins ormetal
foil.
R inside metallic objects,e.g. ametal case.
This canaffect thefunct ionality ofKEYLE SS-
GO.
If you lock thevehicle withtheSmart Key
remote controlorwith KEYLE SS-GO, after a
short time:
R you willnotbeable toswitch onthe ignition
with theStart /Stopbutton .
R you willnolonger beable tostart theengine
with theStart /Stopbutton untilthevehicle
is unlocked again.
If you lock thevehicle centrally using thebut-
ton onthe front door(Ypage 75),youcan
cont inue tostart theengine withtheStart /
Stop button . Driving
125Drivingandparking Z
Page 128 of 346

The
engine canbeswitched offwhile thevehi-
cle isin motion bypressing andholding the
Start /Stopbutton forthree seconds. This
funct ionoperates independent lyof the ECO
start /stopautomatic engineswitch-offfunc-
tion.
Key positions withtheStar t/Stop button 0043
Start /Stopbutton
0044 Ignit ionlock
As soon asthe ignition isswitched on,allthe
indicator lampsinthe instr ument cluster light
up.
For further informationonsituations inwhich
an indicator lampeither failstogo out after
the engine isstart edorlights upwhile driving,
please referto"Warning andindicator lampsin
the instr ument cluster" (Ypage 233).
If Start /Stopbutton 0043has notyetbeen
pressed, thisisthe same asthe Smart Key
being removed fromtheignition.
X To switch onthe power supply:press
Start /Stopbutton 0043once.
The power supply isswitched on.You can
now activate thewindshield wipers,for
example.
The power supply isswitched offagain if:
R the driver's doorisopened and
R you press Start/Stopbutton 0043twice when
in this position
X To switch onthe ignition: pressStart/
Stop button 0043twice.
The ignition isswitched on.
If you press Start/Stopbutton 0043once
when inthis position, theignition is
switched offagain. Removing
theStar t/Stop button
You canremove theStart /Stopbutton from
the ignition lockandstart thevehicle asnor-
mal using theSmart Key.
You canonly switch between Start/Stopbut-
ton mode andSmart Keyoperation whenthe
vehicle isstation ary.
You must alsoengage parkposition 005D.
X Remove Start/Stopbutton 0043from ignition
lock 0044.
You donot have toremove theStart /Stopbut-
ton from theignition lockwhen youleave the
vehicle. Youshould, however, alwaystake the
Smart Keywith youwhen leaving thevehicle.
As long asthe Smart Keyisin the vehicle:
R the vehicle canbestart edusing theStart /
Stop button
R the electric allypowered equipment canbe
operated Star
ting theengine
Import antsafety notes G
WARNIN
G
If children areleft unsupervised inthe vehi-
cle, they could:
R operate thevehicle's equipment
Addition ally,children couldsetthe vehicle in
motion if,for example, they:
R release theparking brake
R shift theautomatic transmission outof
park position 005D
R start theengine
There isarisk ofan accident andinjury.
Never leavechildren oranimals unattended
in the vehicle.
When leaving thevehicle, alwaystake the
Smart Keywith youand lock thevehicle. This
also applies forthe Digital Vehicle Keyifthe
"Digital Vehicle Key"functionisactivated via
Mercedes meconn ect. G
DANGER
Combustion enginesemitpoisonous
exhaust gasessuchascarbon monoxide. 126
DrivingDriving
andparking
Page 277 of 346
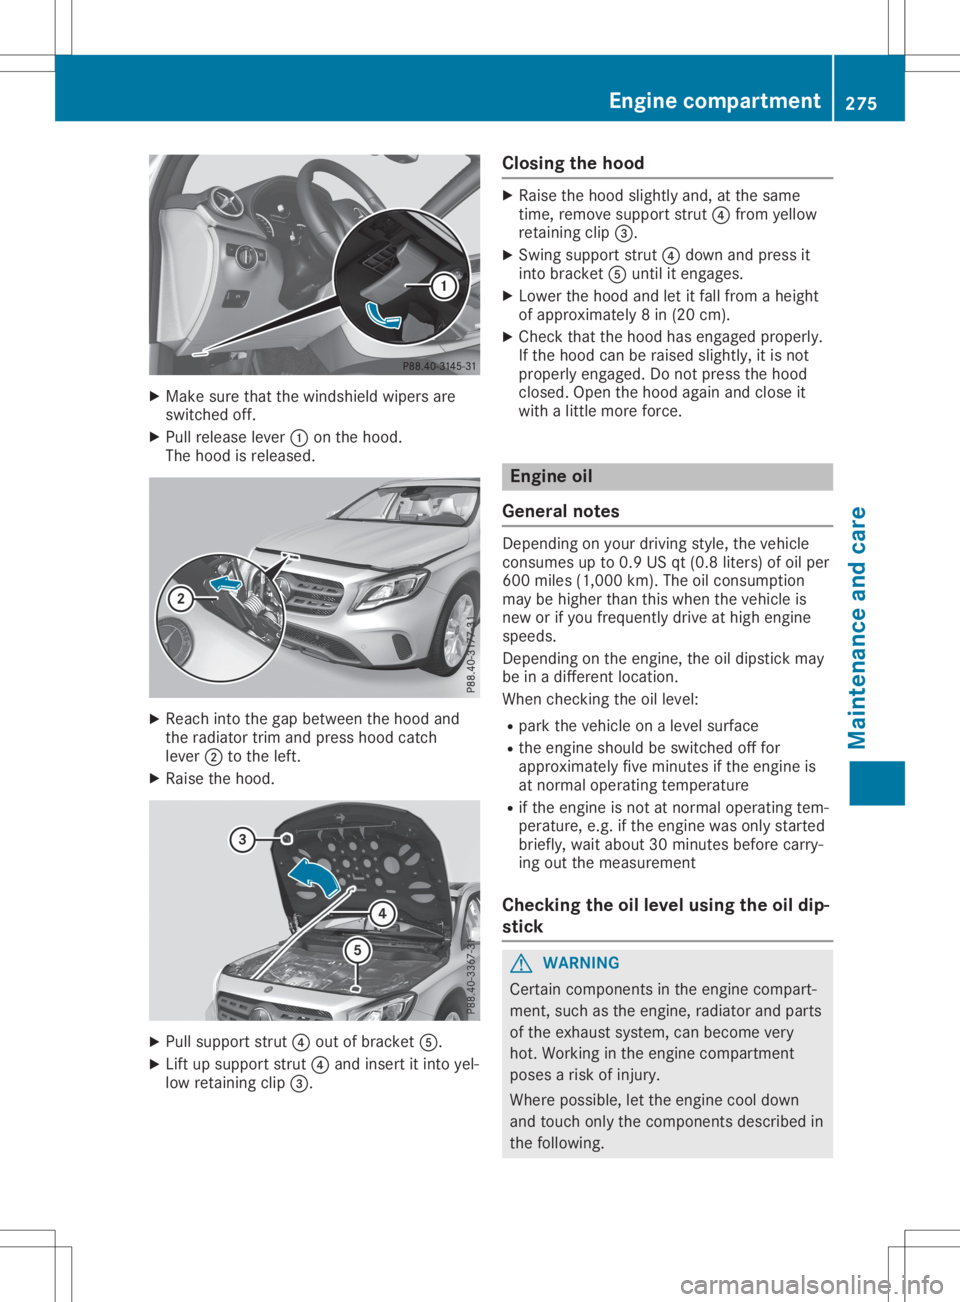
X
Make surethatthewindshield wipersare
switched off.
X Pull release lever0043onthe hood.
The hood isreleased. X
Reach intothegap between thehood and
the radiator trimandpress hoodcatch
lever 0044tothe left.
X Raise thehood. X
Pull support strut0085out ofbracket 0083.
X Lift upsupport strut0085and insert itinto yel-
low retaining clip0087. Closi
ngthe hood X
Raise thehood slightly and,atthe same
time, remove support strut0085from yellow
retaining clip0087.
X Swing support strut0085down andpress it
into bracket 0083until itengages.
X Lower thehood andletitfall from aheight
of approximately 8in (20 cm).
X Check thatthehood hasengaged properly.
If the hood canberaised slightly, itis not
properly engaged. Donot press thehood
closed. Openthehood again andclose it
with alittle more force. Engine
oil
General notes Depending
onyour driving style,thevehicle
consumes upto0.9 USqt(0.8 liters) ofoil per
600 miles (1,000 km).Theoilconsumption
may behigher thanthiswhen thevehicle is
new orifyou frequently driveathigh engine
speeds.
Depending onthe engine, theoildipstick may
be inadifferent location.
When checkingthe oillevel:
R park thevehicle onalevel surface
R the engine shouldbeswitched offfor
approximately fiveminutes ifthe engine is
at normal operating temperature
R ifthe engine isnot atnormal operating tem-
perature, e.g.ifthe engine wasonly started
briefly, waitabout 30minutes beforecarry-
ing out themeasurement
Checking theoillevel using theoildip-
stick G
WARNING
Certain componen tsinthe engine compart-
ment, suchasthe engine, radiator andparts
of the exhaust system,canbecome very
hot. Working inthe engine compartmen t
poses arisk ofinjury.
Where possible, letthe engine cooldown
and touch onlythecomponen tsdescribed in
the following. Engi
necompar tment
275Maintenance andcare Z
Page 284 of 346
These
notesalso apply tolight alloy wheels
with aclear mattefinish.
Use only insect remover andcarshampoo
from therange ofcare products approved by
Mercedes- Benz.
Cleaning thedecorative film !
The
following mayhave aneffect onthe
service lifeand color ofdecorative film:
R sunlight
R temperat ure,e.g.hot-airfan
R weather conditions
R ston eimpacts anddirt
R chemical cleaningagents
R greasy substances
! Do
not use anytypes ofpolish onmatt
decorative film.Polishing surfacescovered
with filmgives itashiny finish.
! Do
not treat mattorstruct ureddecorative
film with wax. Thismay lead tomarks that
cann otbe removed.
Observe thenotesinthe section onthe care
and treatm entofmatte paintwork
(Y page 281), these notesalso apply tomatte
decorative film.
To clean, useplenty ofwater andamild clean-
ing agent without additional orabrasive prod-
ucts, e.g.useacar shampoo approved for
Mercedes- Benz.
X Dry vehicles coveredwithfilmusing asoft,
absorbent clothafterevery wash.
Water marks couldotherwise form.
Scr atches, corrosiv edeposits, areasaffected
by corrosion anddamage causedbyinade-
quate carecannotalway sbe completely
repaired. Insuch cases, visitaqualified spe-
cialist workshop.
X Remove dirtimmediately, wherepossible,
while avoiding rubbingtoohard.
The decorative filmmay beirreparably dam-
aged.
X Soak insect remains withinsect remover
and rinse offthe treated areasafterwards.
X Soak birddroppings withwater andrinse off
the treated areasafterwards.
The Paint Cleaner cleaning product, whichhas
been approved andrecomm endedby
Mercedes- Benz,should beused when dirthas penetr
atedthedecorative filmsurface orthe
decorative filmhasbecome dull.
The manufact urercanprovide youwith infor-
mation onspecial careandcleaning products.
Laminated surfacesmayexhibit optical differ-
ences tosurfaces whichwerenotprotec tedby
a decorative filmwhen thedecorative filmis
removed.
i Have
workorrepairs ondecorative film
carried outataqualified specialist work-
shop. Mercedes- Benzrecomm endsthatyou
use anauthorized Mercedes-BenzCenter for
this purpose. Cleaning
thevehicle parts
Cleaning thewheels G
WARNIN
G
The water jetfrom acircular jetnozz le(dirt
blasters) cancause invisible exteriordam-
age tothe tires orchassis compon ents.
Component sdamaged inthis way may fail
unexpect edly.There isarisk ofan accident .
Do not use power washers withcircular jet
noz zles toclean thevehicle. Havedamaged
tires orchassis compon entsreplaced imme-
diately.
! Do
not use acidic wheel cleaning products
to remove brakedust.Thiscould damage
wheel boltsandbrake compon ents.
! Do
not park yourvehicle foralong period
of time directly aftercleaning, particularly
after cleaning thewheel rimwith wheel
cleaner. Wheelcleaner canlead tothe
increased corrosionofthe brake discsand
pads. Therefore, driveforafew minutes
after cleaning. Byheating upthe brakes, the
brake discsandpads dry.Thevehicle can
then beparked foralong period oftime.
Cleaning thewindows G
WARNIN
G
You could become trappedbythe wind-
shield wipers ifthey start moving while
cleaning thewindshield orwiper blades.
There isarisk ofinjury. 282
CareMaintenance
andcare