2020 MERCEDES-BENZ CLS COUPE warning light
[x] Cancel search: warning lightPage 240 of 469
R
The trailer cables or adap ter plugs ha vebeen
re mo ved.
Multimedia sy stem:
4 © 5
Settings 5
Quick access
Extending the ball neck fully electrically #
Select Ü.
The Trailer coupling extending… display mes‐
sage will appear on the multifunction displa y.
The ball neck will extend fully electrically. #
Wait until the ball neck has loc ked in place.
If th e ball neck is not securely loc ked in place,
th eCheck trailer hitch lock message will appear
on the multifunction displa y.
Re tracting the ball ne ckfully electrical ly #
Select Ü.
The Trailer coupling extending… displaymes‐
sage will appear on the multifunction displa y.
The ball neck will retract fully electrically. #
Wait until the ball neck has loc ked in place. If
th e ball neck is not securely loc ked in place,
th eCheck trailer hitch lock message will appear
on the multifunction displa y. Coupling/uncoupling a trailer
&
WARNING Risk of inju ryfrom theve hicle
le ve l being changed
Ve hicles with le vel control sy stem: the
ve hicle le vel may be changed unin tentional ly,
e.g. by ot her persons. You may become trap‐
ped if you couple up or uncouple a trailer
while theve hicle le vel is changing. In addi‐
tion, other people could become trapped if
th eir limbs are between theve hicle body and
th e tyres or underneath theve hicle.
When coupling up or uncoupling a trailer,
make sure that: #
The doors or tailgate are not opened or
closed. #
You do not initiate the le vel control sys‐
te m and do not operate theDY NA MIC
SELECT switch. #
Do not lock or unlock theve hicle. Re
quirements:
R The ball neck is extended and engaged in a
secu rely loc ked position.
Tr ailers with a 7-pin plug can be connec tedto
th eve hicle with thefo llowing adap ters:
R Adapter plug
R Adapter cable
The trailer will be cor rectly de tected bytheve hi‐
cle only if thefo llowing conditions are me t:
R The trailer is connected cor rectl y.
R The trailer lighting sy stem is in working
order.
The functions of thefo llowing sy stems will be
af fected bya cor rectly connected traile r:
R ESP ®
trailer stabilisation
R Active Lane Keeping Assist
R Parking Assist PARKTRONIC
R Active Parking Assist
R Blind Spot Assist or Active Blind Spot Assi st Driving and pa
rking 237
Page 241 of 469
R
Drive AwayAssi st
R Cross Traf fic Alert
R Reversing camera
R 360° camera
R AIR BODY CONTROL
Coupling up a trailer
* NO
TEDama getothest ar ter battery due
to full discharge Charging
the trailer battery using the po wer
supply of the trailer can damage thest ar ter
batter y. #
Do not use theve hicle's po wer supply
to charge the trailer batter y.#
Remo vethe co ver cap from the ball head and
st ore it in a safe place. #
Position the trailer on a le vel sur face behind
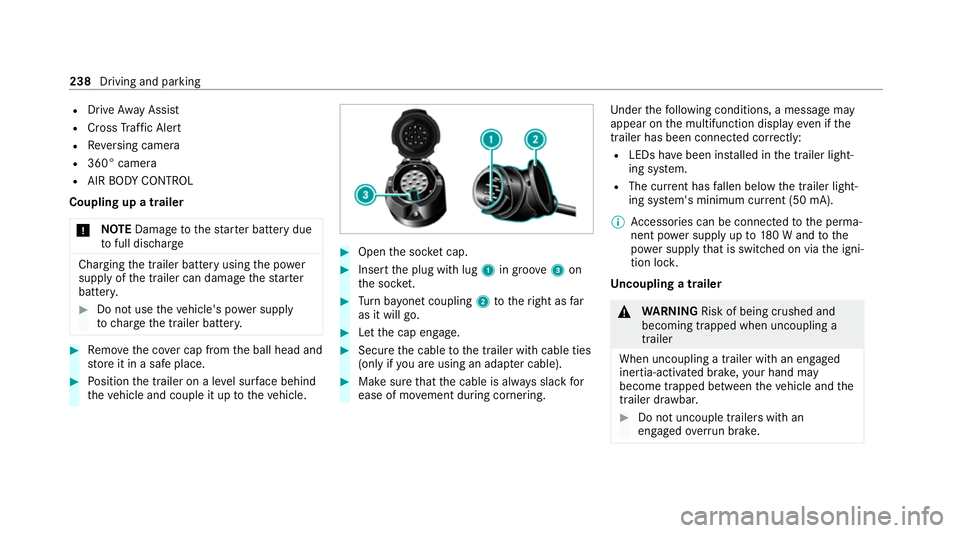
th eve hicle and couple it up totheve hicle. #
Open the soc ket cap. #
Inse rtthe plug with lug 1in groo ve3 on
th e soc ket. #
Turn bayonet coupling 2totheright as far
as it will go. #
Let the cap engage. #
Secure the cable tothe trailer with cable ties
(only if you are using an adap ter cable). #
Make sure that the cable is alw ays slack for
ease of mo vement during cornering. Under
thefo llowing conditions, a message may
appear on the multifunction display even if the
trailer has been connected cor rectly:
R LEDs ha vebeen ins talled in the trailer light‐
ing sy stem.
R The cur rent has fallen below the trailer light‐
ing sy stem's minimum cur rent (50 mA).
% Accessories can be connected tothe perma‐
nent po wer supp lyup to180 W and tothe
po we r supp lythat is swit ched on via the igni‐
tion loc k.
Un coupling a trailer &
WARNING Risk of being crushed and
becoming trapped when uncoupling a
trailer
When uncoupling a trailer wi than engaged
ine rtia-activated brake, your hand may
become trapped between theve hicle and the
trailer dr awbar. #
Do not uncouple trailers with an
engaged overrun brake. 238
Driving and pa rking
Page 260 of 469
&
WARNING Risk of becoming trapped
du ring adjustment of the driver's seat
af te r calling up a driver profile
Selecting a user profile may trigger an
adju stment of the driver's seat tothe posi‐
tion sa ved under the user profile. You or
ot her vehicle occupants could be injured in
th e process. #
Make sure that when the position of
driver's seat is being adjus ted using the
multimedia sy stem, no people or body
parts are in the seat's range of mo ve‐
ment.
If th ere is a risk of someone becoming trap‐
ped, stop the adjustment process immedi‐
ately: #
a)Tapth ewa rning message on the
media displa y.
or #
b) Press a memory position button or a
seat adjustment switch on the driver's
door.
The adjustment process will be stop‐
ped. The driver's seat is equipped with an access pre‐
ve nter.
If th e driver's door is open, the driver's seat will
not be set af ter calling up the driver's profile.
Profiles store your vehicle settings and settings
fo rth e multimedia sy stem. If theve hicle is used
by several drivers, the driver can select their
ow n profile wi thout changing thestored profile
settings of other drivers.
% Information on profiles from Mercedes me
connect can be found in the Digital Opera‐
to r's Manual.
Ve hicle settings are, forex ample, driver's seat,
st eering wheel and mir ror settings, clima tecon‐
trol and ambient lighting. Forth e settings of the
multimedia sy stem, you can select, forex ample,
ra dio stations, pr evious destinations as well as
th emes, suggestions and favo urites. Fo
rre cur ring driving situations, su chas long
drives on the mo torw ay,yo u can sa veyour pre‐
fe rred settings in a theme in theve hicle. In a
th eme you can sa vethe display of the digital
map, your prefer redra dio station and prefer red
drive prog ram, forex ample.
The vehicle can learn the habits of the driver. It
th en of fers suggestions forth e most probable
navigation destinations, media sources, radio
st ations or con tacts. The pre-requirements for
th at are the selection of a profile, your consent
to there cording of da taand suf ficient collected
da ta.
Fa vourites pr ovide quick access toapplications
th at are used of ten. You can select favo urites
from categories or add them directly toan appli‐
cation. MBUX multimedia sy
stem 257
Page 277 of 469
Making an emer
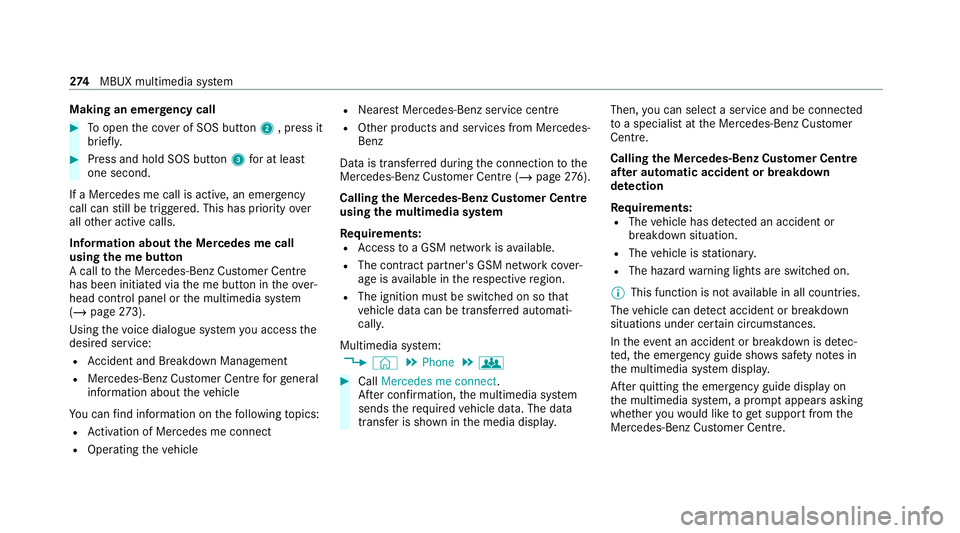
gency call #
Toopen the co ver of SOS button 2, press it
brief ly. #
Press and hold SOS button 3for at least
one second.
If a Mercedes me call is active, an emer gency
call can still be triggered. This has priority over
all other active calls.
Information about the Mercedes me call
using the me but ton
A call tothe Mercedes-Benz Cus tomer Centre
has been initia ted via the me button in theove r‐
head control panel or the multimedia sy stem
(/ page 273).
Using thevo ice dialogue sy stem you access the
desired service:
R Accident and Breakdown Management
R Mercedes-Benz Cu stomer Centre forge neral
information about theve hicle
Yo u can find information on thefo llowing topics:
R Activation of Me rcedes me connect
R Operating theve hicle R
Nearest Mercedes-Benz service centre
R Other products and services from Mercedes-
Benz
Data is transfer red during the connection tothe
Mercedes-Benz Cus tomer Centre (/ page276).
Calling the Mercedes-Benz Cus tomer Centre
using the multimedia sy stem
Requ irements:
R Access toa GSM network is available.
R The contract partner's GSM network co ver‐
age is available in there spective region.
R The ignition must be switched on so that
ve hicle data can be transfer red automati‐
call y.
Multimedia sy stem:
4 © 5
Phone 5
g #
Call Mercedes me connect.
Af ter confirmation, the multimedia sy stem
sends there qu ired vehicle data. The data
transfer is shown in the media displa y.Then,
you can select a service and be connected
to a specialist at the Mercedes-Benz Cus tomer
Centre.
Calling the Mercedes-Benz Cus tomer Centre
af te r automatic accident or breakdown
de tection
Re quirements:
R The vehicle has de tected an accident or
breakdown situation.
R The vehicle is stationar y.
R The hazard warning lights are switched on.
% This function is not available in all countries.
The vehicle can de tect accident or breakdown
situations under cer tain circums tances.
In theeve nt an accident or breakdown is de tec‐
te d, the emer gency guide sho wssafety no tes in
th e multimedia sy stem displa y.
Af terqu itting the emer gency guide displ ayon
th e multimedia sy stem, a prom ptappears asking
whe ther youwo uld like toget support from the
Mercedes-Benz Cus tomer Centre. 274
MBUX multimedia sy stem
Page 297 of 469
#
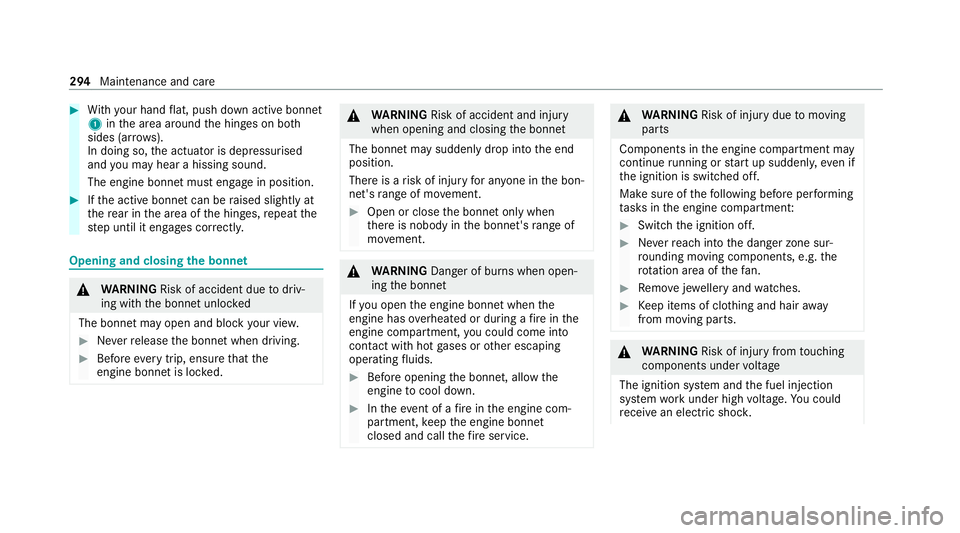
With your hand flat, push down active bonnet
1 inthe area around the hinges on bo th
sides (ar rows).
In doing so, the actuator is depressurised
and you may hear a hissing sound.
The engine bonnet must en gage in position. #
Ifth e active bonn etcan be raised slight lyat
th ere ar in the area of the hinges, repeat the
st ep until it engages cor rectl y. Opening and closing
the bonnet &
WARNING Risk of accident due todriv‐
ing with the bonn etunlo cked
The bonn etmay open and block your vie w. #
Neverre lease the bonn etwhen driving. #
Before every trip, ensure that the
engine bonn etis loc ked. &
WARNING Risk of accident and inju ry
when opening and closing the bonn et
The bonnet may suddenly drop into the end
position.
There is a risk of injury for an yone in the bon‐
net's range of mo vement. #
Open or close the bonn etonly when
th ere is nobody in the bonn et's range of
mo vement. &
WARNING Danger of bu rns when open‐
ing the bonn et
If yo u open the engine bonn etwhen the
engine has overheated or during a fire inthe
engine compartment, you could come into
contact with hot gases or other escaping
operating fluids. #
Before opening the bonn et, allow the
engine tocool down. #
Intheeve nt of a fire inthe engine com‐
partment, keep the engine bonn et
closed and call thefire service. &
WARNING Risk of inju rydue tomoving
parts
Components in the engine compartment may
continue running or start up sudden ly,even if
th e ignition is switched off.
Make sure of thefo llowing before per form ing
ta sks in the engine compartmen t: #
Switch the ignition off. #
Neverre ach into the danger zone sur‐
ro unding moving co mponents, e.g. the
ro tation area of thefa n. #
Remo vejewe llery and watches. #
Keep items of clo thing and hair away
from moving parts. &
WARNING Risk of inju ryfrom touching
co mp onents under voltage
The ignition sy stem and the fuel injection
sy stem workunder high voltage. You could
re cei vean electric shoc k.294
Maintenance and care
Page 299 of 469

#
Ifth e bonn etcan still be lif ted slightl y,open
th e bonn etagain and close it with a little
more forc e until it engages cor rectly. Engine oil
Che
cking the engine oil le vel using the on-
board compu ter
Re quirements:
R the engine has been warmed up.
R theve hicle is par ked on a le vel sur face.
R The engine is running at idle speed.
The engine oil le vel is de term ined during driving.
De term ining the engine oil le vel can take up to
30 minutes with a normal driving style and even
longer with an active driving style.
On-board computer: 4 Service 5
Engine oil level
Yo u will see one of thefo llowing messages on
th e multifunction display:
R Engine oil level Measuring now : measure‐
ment of the oil le vel is not yet possible. #
Repeat there qu est af ter a maximum of
30 minutes' driving.
R Engine oil level OK andthe bar display for
indicating the oil le vel on the multifunction
display is green and is between "min" and
"max": the oil le vel is cor rect.
R Engine oil level Add 1,0 l andthe bar display
fo r indicating the oil le vel on the multifunc‐
tion display is orange and is below "min": #
Add 1 l of engine oil.
R Reduce engine oil level andthe bar display
fo r indicating the oil le vel on the multifunc‐
tion display is orange and is abo ve"max": #
Drain off any excess engine oil that has been
added. Todo so, consult a qualified specialist
wo rkshop.
R For engine oil level turn on ignition #
Switch on the ignition tocheck the engine oil
le ve l.
R Engine oil level System inoperative : The oil
le ve l sensor is defective or not connec ted. #
Consult a qualified specialist workshop.
R Engine oil level System currently unavail. #
Close the bonn et.
To pping up engine oil &
WARNING Risk of bu rns from hot com‐
ponent parts in the engine compartment
Cer tain component parts in the engine com‐
partment can be very hot, e.g. the engine,
th e cooler and parts of theex haust sy stem. #
Allow the engine tocool down and only
to uch co mponent parts described in
th efo llowing. &
WARNING Risk offire and injury from
engine oil
If engine oil comes into con tact wi thhot
component parts in the engine compart‐
ment, it may ignite. #
Make sure that no engine oil is spilled
next tothefiller opening. 296
Maintenance and care
Page 303 of 469
To
avo id damage to yourvehicle when using a
car wash, ensure thefo llowing beforehand:
R Active Dis tance Assi stDISTRONIC is deacti‐
va ted.
R the HOLD function is switched off.
R the 360° Camera or there ve rsing camera is
switched off.
R the side windo wsand sliding sun roof are
comple tely closed.
R the blo werfo rth eve ntilation/heating is
switched off.
R the windscreen wiper switch is in position
g.
R theke y is at a minimum dis tance of 3 m
aw ay from theve hicle. Otherwise the boot lid
could open unintentionally.
R for car washes with a con veyo r sy stem: neu‐
tral iis engaged.
% In car washes with a con veyo r sy stem: if you
lea vetheve hicle while it is being washed,
make sure theke y is located in theve hicle.
The park position jisotherwise automati‐
cally engaged. %
If, af terth e car wash, youre mo vethewax
from the windscreen and wiper rubbers, this
will pr event smearing and reduce wiper
noise. Information on using a high-p
ressure cleaner &
WARNING Risk of an accident when
using high-pressure cleane rswith round-
spray nozzles
The wate r jet can cause extern ally invisible
damage.
Components damaged in this wa y may unex‐
pec tedly fail. #
Do not use a high-pressure cleaner with
round-spr aynozzles. #
Have damaged tyres or chassis parts
re placed immediatel y. To
avo id damage to yourvehicle, obser vethefo l‐
lowing when using a high-pressure cleaner:
R theke y is at a minimum dis tance of 3 m
aw ay from theve hicle. Otherwise the boot lid
could open unintentionall y.
R maintain a dis tance of at least 30 cm tothe
ve hicle.
R vehicles with deco rative foil: parts of your
ve hicle are co vered with a decorative foil.
Maintain a dis tance of at least 70 cm
between thefo il-c ove red parts of theve hicle
and the nozzle of the high-pressure cleaner.
Mo vethe high-pressure cleaner nozzle
around whilst cleaning. The waterte mp era‐
ture of the high-pressure cleaner must not
exc eed 60°C.
R obser vethe information on the cor rect dis‐
tan ce in the implement manufacturer's oper‐
ating instructions.
R do not direct the nozzle of the high-pressure
cleaner directly at sensitive parts, e.g. tyres,
ga ps, elect rical components, batteries, light
sou rces and ventilation slits. 300
Maintenance and care
Page 305 of 469
R
Remo vedirt immediatel y,where possible,
whilst avoiding rubbing too hard. There is
ot herwise a risk of damaging the decorative
fo il ir reparably.
R Ifth ere is dirt on thefinish or if the decora‐
tive foil is dull: use thePa int Cleaner recom‐
mended and appr ovedfo r Mercedes-Benz.
R Insect remains: soak with insect remo ver and
ri nse off the treated areas af terw ards.
R Bird droppings: soak with water and rinse off
af te rw ards.
R Topreve ntwate rst ains, dry a foil-wrapped
ve hicle with a soft, absorbent clo thafter
eve rycar wash.
Av oiding dama getothe decorative foil
R The service life and colouring of decorative
foils are impaired by:
- sunlight
- temp erature, e.g. hot air blo wer
- weather conditions
- stone chippings and dirt
- chemical cleaning agents -
oily products
R Do not use polish on matt decorative foil.
Po lishing will ha vethe ef fect of shining the
fo il-wrapped sur face.
R Do not treat matt or stru ctured deco rative
fo ils with wax.Pe rm anent stains may occur.
Sc ratches, cor rosive deposits, areas af fected by
cor rosion and damage caused byincor rect care
cannot al ways be comple tely repaired. In such
cases, visit a qualified specialist workshop.
Yo u can obtain more information on care and
cleaning products from the manufacturer.
In the case of foil-wrapped sur faces, optical dif‐
fe re nces may occur between the sur faces that
we renot pr otected bya decorative foil af ter
re moving a decorative foil.
% Have wo rkor repairs todecorative foils car‐
ri ed out at a qualified specialist workshop,
e.g. in a Mercedes-Benz Service Centre. Note
s on care of car parts &
WARNING Risk of entrapment if the
windscreen wipers are swit ched on while
th e windscreen is being cleaned
If th e windscreen wipers are set in motion
while you are cleaning the windscreen or
wiper blades, you can be trapped bythe
wiper arm. #
Alw ays switch off the windscreen wip‐
ers and the ignition before cleaning the
windscreen or wiper blades. &
WARNING Risk of bu rns from theta il‐
pipe and tailpipe trims
The exhaust tailpipe and tailpipe trims can
become very hot. If you come into contact
with these parts of theve hicle, you could
burn yourself. #
Alw ays be particular lycareful around
th eta ilpipe and theta ilpipe trims and
supervise children especially closely in
th is area. 302
Maintenance and care