2020 MERCEDES-BENZ C-CLASS ESTATE dimensions
[x] Cancel search: dimensionsPage 235 of 565
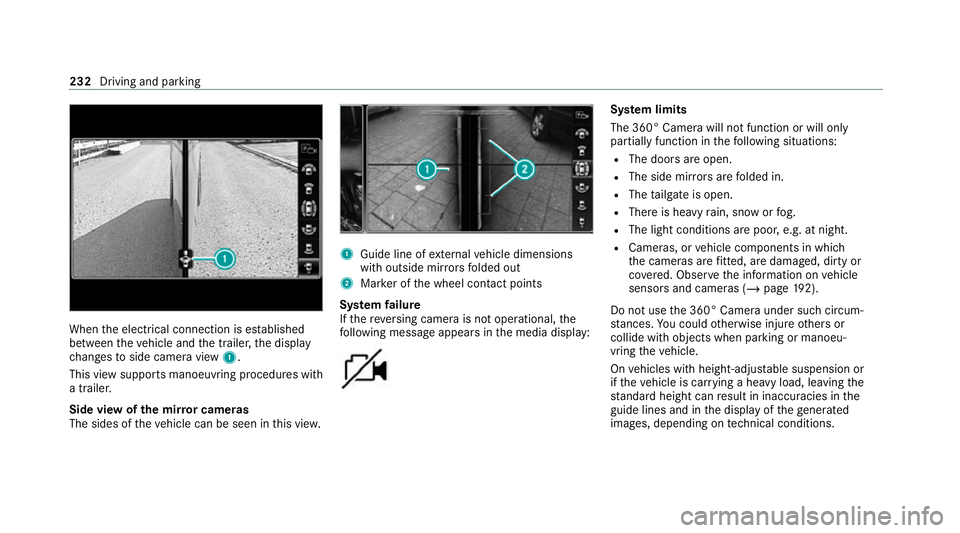
When
the electrical connection is es tablished
between theve hicle and the trailer, the display
ch anges toside camera view 1.
This view supports manoeuvring procedures with
a trailer.
Side view of the mir ror cameras
The sides of theve hicle can be seen in this vie w. 1
Guide line of extern al vehicle dimensions
with outside mir rors folded out
2 Marker of the wheel conta ct points
Sy stem failure
If th ere ve rsing camera is not operational, the
fo llowing message appears in the media display: Sy
stem limits
The 360° Camera will not function or will only
partially function in thefo llowing situations:
R The doors are open.
R The side mir rors are folded in.
R The tailgate is open.
R There is heavy rain, snow or fog.
R The light conditions are poor, e.g. at night.
R Cameras, or vehicle components in which
th e cameras are fitted, are dama ged, dirty or
co vered. Obser vethe information on vehicle
sensors and cameras (/ page192).
Do not use the 360° Camera under such circum‐
st ances. You could otherwise injure others or
collide with objects when parking or manoeu‐
vring theve hicle.
On vehicles with height-adjus table suspension or
if th eve hicle is car rying a heavy load, leaving the
st andard height can result in inaccuracies in the
guide lines and in the display of thege nerated
ima ges, depending on tech nical conditions. 232
Driving and pa rking
Page 390 of 565
Ke
eping the air-water duct free #
Keep the area between the bonn etand the
windscreen free of deposits, e.g. ice, snow
and lea ves. Cleaning and care
Information on
washing theve hicle in a car
wa sh &
WARNING Risk of an accident due to
re duced braking po wer af terwa shing the
ve hicle
Braking ef ficiency is reduced af terwa shing
th eve hicle. #
Afterth eve hicle has been washed,
brake carefully while paying attention to
th e traf fic conditions until braking
po we r has been fully restored. *
NO
TEDama gefrom auto matic braking If one of
thefo llowing functions is switched
on, theve hicle brakes automatically in cer‐
ta in situations:
R Active Brake Assi st
R Active Dis tance Assi stDISTRONIC
R HOLD function
R Active Parking Assist
To avo id damage totheve hicle, deactivate
th ese sy stems in thefo llowing or similar sit‐
uations: #
during towing #
in a car wash *
NO
TEDama gedue tounsuitable car
wa sh #
Before driving into a car wash make
sure that the car wash is suitable for
th eve hicle dimensions. #
Ensure there is suf ficient ground clear‐
ance between the underbody and the
guide rails of the car wash. #
Ensure that the clearance width of the
car wash, in particular the width of the
guide rails, is suf ficient. To
avo id damage to yourvehicle when using a
car wash, ensure thefo llowing beforehand:
R Active Dis tance Assi stDISTRONIC is deacti‐
va ted.
R the HOLD function is switched off.
R the 360° Camera or there ve rsing camera is
switched off.
R the side windo wsand sliding sun roof are
comple tely closed.
R the blo werfo rth eve ntilation/heating is
switched off.
R the windscreen wiper switch is in position
g.
R theke y is at a minimum dis tance of 3 m
aw ay from theve hicle. Otherwise theta ilgate
could open unin tentionally. Maintenance and care
387
Page 424 of 565
On-board computer:
4 Service 5
Tyres #
Swipe down wards on Touch Control on the
left-hand side of thesteering wheel.
The Use current tyre pressures as new refer-
ence values? message is shown in the multi‐
function displa y. #
Torestart, press Touch Control on the left-
hand side of thesteering wheel.
The Tyre press. monitor restarted message is
shown in the multifunction displa y.
Cur rent wa rning messages are dele ted and
th eye llow h warning lamp goes out.
Af teryo u ha vebeen driving for a few
minutes, the sy stem checks whe ther the cur‐
re nt tyre pressures are wi thin the specified
ra nge. The cur rent tyre pressures are then
accep ted as refere nce values and monitored.
Be sure toalso pay attention tothefo llowing
re lated topic:
R Notes on tyre pressure (/ page418) Wheel
change Note
s on selecting, fitting and replacing
tyres *
NO
TEMercedes-AMG vehicles #
Obser vethe no tes in the Supplement.
Yo u could otherwise failto recognise
dangers. &
WARNING Risk of accident due toincor‐
re ct dimensions of wheels and tyres
If wheels and tyres of the wrong size are
used, the wheel brakes or wheel suspension
components may become damaged. #
Alw aysre place wheels and tyres with
th ose that fulfil the specifications of the
original part.
When replacing wheels, make sure tofit the
cor rect:
R Designation
R Type When
replacing tyres, make sure tofit the
cor rect:
R Designation
R Manufactu rer
R Type &
WARNING Risk of injury thro ugh exceed‐
ing the specified tyre load-bearing capa‐
city or the permissible speed rating
Exceeding the load-bearing capacity of the
tyres can lead totyre dama geand could
cause the tyres toexplode. #
Therefore, only use tyre types and sizes
appr ovedfo ryo ur vehicle model. #
Obser vethe tyre load-bearing capacity
ra ting and speed rating requ iredfor
yo ur vehicle. Wheels and tyres
421
Page 427 of 565
If
th e tyre's maximum speed is below that of
th eve hicle, this must be indicated byan
appropriate label in the driver's field of
vision.
R Run in new tyres at moderate speeds forthe
fi rs t10 0 km.
R Replace the tyres af ter six years at the latest,
re ga rdless of wear.
R When replacing with tyres that do not
fe ature run-flat characteristics: vehicles
with MOExtended tyres are not equipped
with a TIREFIT kit at thefa ctor y.Equip the
ve hicle with a TIREFIT kit af terre placing with
tyres that do not feature run-flat characteris‐
tics, e.g. winter tyres.
% You can permanently limit the maximum
ve hicle speed for driving with winter tyres
(/ page 203).
Fo r more information on wheels and tyres, con‐
ta ct a qualified specialist workshop.
Be sure toalso obse rveth efo llowing fur ther
re lated subjects:
R Notes on tyre pressure (/ page418) R
Tyre pressure table (/ page419)
R Notes on the emer gency spa rewheel
(/ page 431) Note
s on inter changing wheels &
WARNING Risk of injury thro ugh dif fer‐
ent wheel sizes
Inter changing the front and rear wheels can
se verely impair the driving characteristics.
The disk brakes or wheel suspension compo‐
nents may also be damaged. #
Onlyinter change the front and rear
wheels if the wheels and tyres ha vethe
same dimensions. Inter
changing the front and rear wheels if the
wheels or tyres ha vediffere nt dimensions can
re nder thege neral operating pe rmit in valid.
The wear pat tern s on the front and rear wheels
dif fer:
R front wheels wear more on the tyre shoulder R
rear wheels wear more in the cent reofthe
tyre
Do not drive wi thtyres that ha vetoo little tread
dep th. This significantly reduces traction on wet
ro ads (aquaplaning).
On vehicles with the same front and rear wheel
size, you can inter change the wheels every
5000 to10,000 km, depending on thewe ar.
Ensure the direction of rotation is maintained for
th e wheels.
Obser vethe instructions and saf ety no tes on
"Changing a wheel" when doing so
(/ page 425). Note
s onstoring wheels When
storing wheels, obser vethefo llowing
no tes:
R Afterre moving wheels, store them in a cool,
dry and preferably dark place.
R Protect the tyres from conta ct withoil,
grease or fuel. 424
Wheels and tyres
Page 434 of 565
#
Ensu rethat the wheel bolts or wheel
nuts are tightened tothe prescribed
tightening torque. #
Ifyo u are not sure, do not mo vethe
ve hicle. Contact a qualified specialist
wo rkshop and ha vethe tightening tor‐
qu ech ecked immediately. #
Check the tyre pressure of the newly fitted
wheel and adjust it if necessa ry.#
Vehicles with a tyre pressure monitoring
sy stem: restart the tyre pressure monitoring
sy stem (/ page 420).
Exception: the new wheel is an emer gency
spa rewheel. Emer
gency spare wheel Note
s onthe emer gency spare wheel &
WARNING Risk of accident caused by
incor rect wheel and tyre dimensions
The wheel or tyre size and the tyre type of
th e emer gency spa rewheel or spare wheel
and the wheel tobe replaced may dif fer. The
emer gency spa rewheel or spare wheel can
significantly impair driving characteristics of
th eve hicle.
To preve nt hazardous situations: #
Drive carefully. #
Neverfit more than one emer gency
spa rewheel or spare wheel that dif fers
in size. #
Only use an emer gency spa rewheel or
spare wheel brief ly. #
Do not deacti vate ESP ®
. #
Have the emer gency spa rewheel or
spare wheel of a dif fere nt size replaced
at the nearest qualified specialist work‐ shop. The new wheel must ha
vethe
cor rect dimensions. %
The emergency spa rewheel is secured in the
emer gency spa rewheel bag in the load com‐
partment.
Obser vethefo llowing no tes on fitting an emer‐
ge ncy spa rewheel:
R Check the tyre pressure of the emer gency
spa rewheel fitted. Co rrect the pressure as
necessar y.
R The maximum permissible speed with an
emer gency spa rewheel fitted is 80 km/h.
R Do not fit th e emer gency spa rewheel with
sn ow ch ains.
R Replace the emer gency spa rewheel af ter six
ye ars at the latest, rega rdless of wear. Wheels and tyres
431
Page 450 of 565
Ve
hicle data Ve
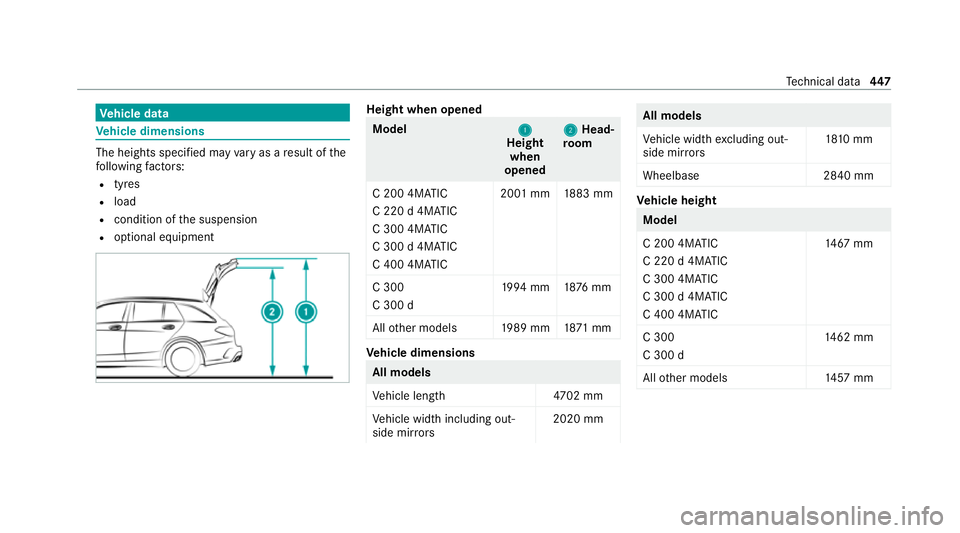
hicle dimensions The heights specifi
ed mayvary as a result of the
fo llowing factors:
R tyres
R load
R condition of the suspension
R optional equipment Height when opened
Model
1 1
Height
when
opened 2 2
Head‐
ro om
C 200 4MATIC
C 220 d 4MATIC
C 300 4MATIC
C 300 d 4MATIC
C 400 4MATIC 20
01 mm 1883 mm
C 300
C 300 d 19
94 mm 1876 mm
All other models 1989 mm 1871 mm Ve
hicle dimensions All models
Ve
hicle lengt h4 702 mm
Ve hicle width including out‐
side mir rors 2020 mm All models
Ve
hicle width excluding out‐
side mir rors 18
10 mm
Wheelbase 2840 mm Ve
hicle height Model
C 200 4MATIC
C 220 d 4MATIC
C 300 4MATIC
C 300 d 4MATIC
C 400 4MATIC
14 67
mm
C 300
C 300 d 14
62 mm
All other models 1457 mm Te
ch nical da ta447
Page 451 of 565
We
ights and loads Please obser
vethefo llowing no tesfo rth e speci‐
fi ed vehicle data:
R Items of optional equipment increase the
unladen weight and reduce the pa yload.
R Vehicle-specific weight information can be
fo und on theve hicle identification plate
(/ page 435).
Ro of load Model
Maximumroof load
All models 75kg Tr
ailer hitch Gene
ral no tes on the trailer hit ch Modifications
tothe engine cooling sy stem may
be necessar y,depending on theve hicle model.
The retrofitting of a trailer hitch is only pe rmissi‐
ble if a towing capacity is specified in your vehi‐
cle documents.
Fu rther information can be obtained at a quali‐
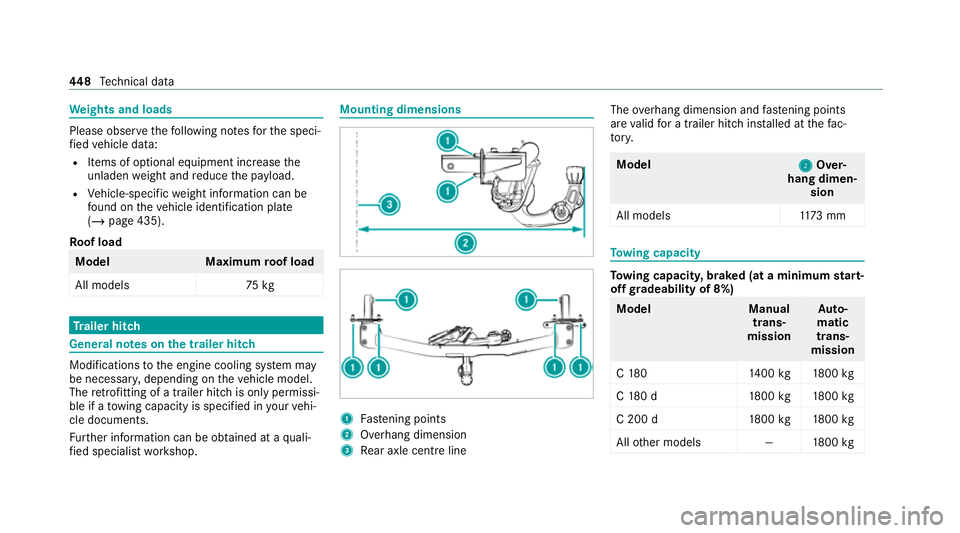
fi ed specialist workshop. Mounting dimensions
1
Fastening points
2 Overhang dimension
3 Rear axle centre line The
overhang dimension and fastening points
are valid for a trailer hitch ins talled at thefa c‐
to ry. Model
2 2Over‐
hang dimen‐ sion
All model s1 173 mm To
wing capacity To
wing capacit y,braked (at a minimum start-
off gradeability of 8%) Model
Manual
trans‐
mission Au
to‐
matic
trans‐
mission
C 18 01 400kg 1800 kg
C 18 0d1 800kg 1800 kg
C 200 d1 800kg 1800 kg
All other models —1800kg 448
Tech nical da ta
Page 554 of 565
St
ow age areas
see Loading
see Stow age space
St ow age comp artments
see Loading
see Stow age space
St ow age space
Armrest.................................................. 11 2
Centre console....................................... 11 2
Door....................................................... 11 2
Glo vecompa rtment............................... 11 2
USB ports.............................................. 11 2
Sulphur content........................................4 39
Sur round lighting
Setting................................................... 137
Sur round View
see 360° Camera
Suspension Setting the suspension le vel (AIR‐
MATIC)................................................. .226
Suspension see AIRMATIC Suspension le
vel (AIRMATIC)
Setting................................................... 226
SV HC (substances of very high con‐
cern) ............................................................. 32
Switch-off del aytime
Exterio r.................................................. 13 6
Interior.................................................. 13 8
Switching the sur round sound on/off
Burmes ter®
sur round sound sy stem......3 76
Switching volume adjustment on/off
Adva nced sound sy stem........................3 77
Synchronisation function Activating/deactivating (multimedia
sy stem).................................................. 154
Switching on/off (control panel )........... 15 3
Sy stem settings
Ac tivating/deactivating PIN pr otec‐
tion........................................................ 287
Re set function (multimedia sy stem)...... 291
Setting the dis tance uni t....................... 286
Setting the time and date automati‐
cally.......................................................2 81
Setting the time zone. ........................... 281
Setting the time/date form at................ 282 Swit
ching transmission of theve hicle
position on/off...................................... 282
Sy stem settings
see Blue tooth®
see Data import/export
see Language
see Wi-Fi T
Ta ilgate
Closing.................................................... 81
HANDS-FREE ACCES S............................. 83
Limiting the opening angle......................85
Opening................................................... 80
Opening dimensions.............................. 447
Unlocking (emergency key)..................... 85
Ta ilpipes (care)......................................... .390
Ta ke -back of end-of-life vehicles
Pr otection of the environmen t................. 21
Ta nk content
Ad Blue ®
................................................ 443
Fu el....................................................... 441
Re ser ve(fuel)........................................ 441 Index
551