2020 MERCEDES-BENZ C-CLASS ESTATE bulb
[x] Cancel search: bulbPage 5 of 565
Symbols
........................................................ 5At
agl ance .................................................... 6
Cockpit ........................................................... 6
Indica tor and warning lamps (s tandard) ........ 10
Indicator and warning lamps (widesc reen
cockpit) ......................................................... 12
Overhead contro l panel ................................ 14
Door control panel and seat adjustment ....... 16
Emergencies and breakdowns ...................... 18Digital Owner's Manual
.............................20
Calling up the Digital Owner's Manual ..........20 Genera
l notes............................................. 21
Pr otection of the environment ......................21
Ta ke -ba ckof end-of-life vehicles ...................21
Mercedes-Benz GenuineParts ....................... 22
Owner's Manual ...........................................23
Operating saf ety .......................................... .23
Declaration of conformity ............................. 25
Diagno stics connection ................................ 29
Qualified specialist workshop ....................... 31Ve
hicle registration ....................................... 31
Cor rect use of theve hicle ............................. 31
Information on the REA CHregulation ........... 32
No tesfo r persons with electronic medi‐
cal aids ......................................................... 32
Implied warranty .......................................... .33
QR code forre scue card ...............................33
Data storage .................................................33
Copyright ...................................................... 36 Occupant saf
ety......................................... 37
Re stra int sy stem ...........................................37
Seat belts ..................................................... 39
Airbags ......................................................... 43
PRE-SAFE ®
sy stem ........................................51
Safely transporting children in theve hi‐
cle ................................................................52
No tes on pets in theve hicle .........................72 Opening and closing
.................................. 73
Ke y .............................................................. .73
Doo rs............................................................ 76
Load compartment ....................................... 80
Side windo ws............................................... 86 Sliding sunroof ............................................. 89
Ro
ller sunblinds ............................................ 93
Anti-th eft protection .....................................93 Seats and
stowing ...................................... 97
No tes on the cor rect driver's seat posi‐
tion ............................................................... 97
Seats ............................................................ 98
St eering wheel ............................................ 105
Easy entry and exitfeature ........................ .107
Memory function ........................................1 08
St ow age areas ............................................ .110
Soc kets ....................................................... 12 3
Wi reless charging of the mobile phone
and connection with theex terior aerial .......1 24
Fitting/removing thefloor mats ................. 12 6 Light and sight
......................................... 12 8
Exterior lighting .......................................... 12 8
Interior lighting ........................................... 137
Changing bulbs (on lyforve hicles with
halogen headlamp s) .................................... 13 8
Wi ndsc reen wipers and windscreen
wa sher sy stem ............................................ 14 32
Contents
Page 141 of 565
Ad
justing the brightness #
Select Brightness . #
Set a brightness value.
Ac tivating the brightness for zones #
Select Brightness zones .#
Activate Oor deacti vate ª the function.
The Display ,Front andRear zones can be set
separately. Setting
the interior lighting switch-off delay
time Multimedia sy
stem:
4 Vehicle 5
÷ Light settings
5 Interior light shut-off #
Set the switch-off delay time. Changing bulbs (only
forve hicles with halo‐
ge n headla mps) Note
s onchanging bulbs &
WARNING Risk of burn s from hot com‐
ponent parts whilst replacing a bulb
Bulbs, lamps and plugs can become very hot
during operation.
When replacing a bulb, you could burn your‐
self on these component parts. #
Allow the component parts tocool
down before replacing the bulb. R
Do not use a bulb if it has been dropped or if
itsglass has been sc ratched. The bulb may
ot herwise explode.
R Do not touch theglass bulb with your bare
hands.
R Protect bulbs from moisture and do not allow
bulbs tocome into contact wi thliquids. Overview of
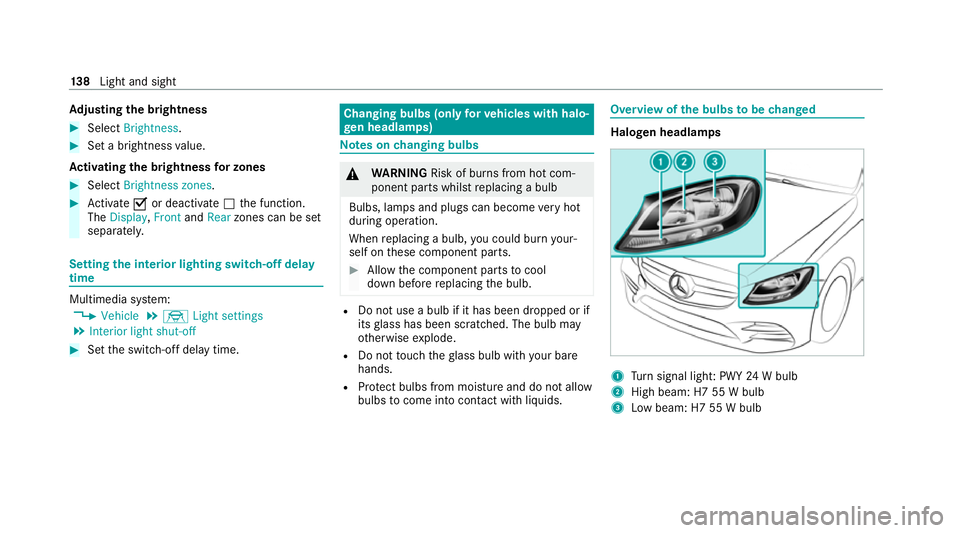
the bulbs tobe changed Halogen headlamps
1
Turn signal light: PWY 24W bulb
2 High beam: H7 55 W bulb
3 Low beam: H7 55 W bulb 13 8
Light and sight
Page 142 of 565
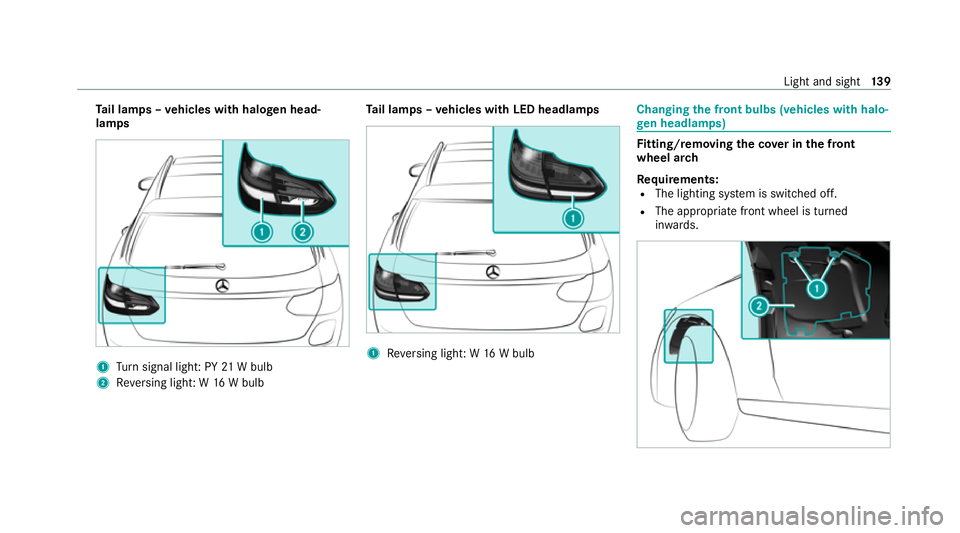
Ta
il lamps – vehicles with halogen head‐
lamps 1
Turn signal light: PY 21W bulb
2 Reversing light: W 16W bulb Ta
il lamps – vehicles with LED headlamps 1
Reversing light: W 16W bulb Changing
the front bulbs (vehicles with halo‐
ge n headla mps) Fi
tting/ removing the co ver in the front
wheel ar ch
Re quirements:
R The lighting sy stem is switched off.
R The appropriate front wheel is turned
inwa rds. Light and sight
13 9
Page 143 of 565
#
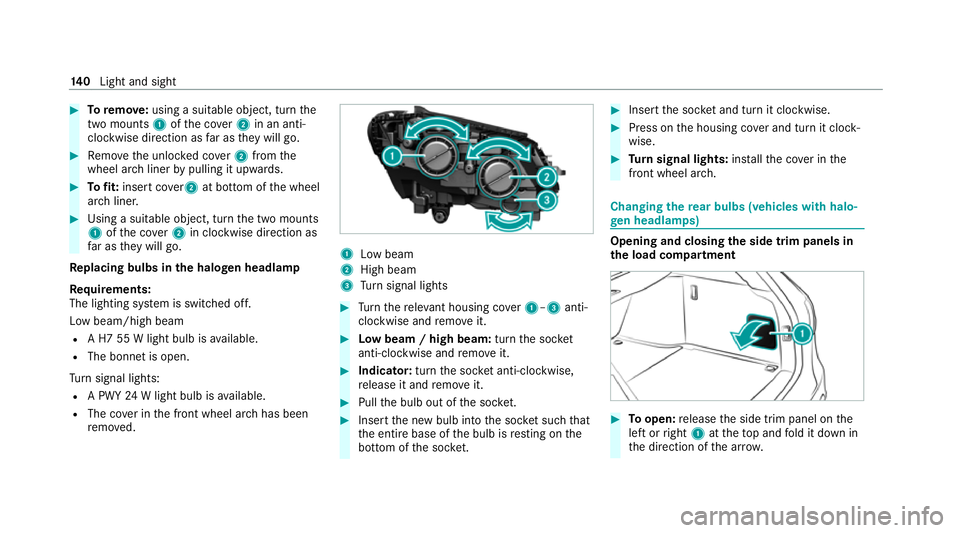
Toremo ve:using a suitable object, turn the
two mounts 1ofthe co ver2 in an anti-
clockwise direction as far as they will go. #
Remo vethe unloc ked co ver2 from the
wheel ar chliner bypulling it upwards. #
Tofit: inse rtco ver 2 at bottom of the wheel
ar ch liner. #
Using a suitable object, turn the two mounts
1 ofthe co ver2 in clockwise direction as
fa r as they will go.
Re placing bulbs in the halo gen headla mp
Re quirements:
The lighting sy stem is switched off.
Low beam/high beam
R A H7 55 W light bulb is available.
R The bonnet is open.
Tu rn signal lights:
R A PWY 24W light bulb is available.
R The co ver in the front wheel ar chhas been
re mo ved. 1
Low beam
2 High beam
3 Turn signal lights #
Turn there leva nt housing co ver1–3 anti-
clockwise and remo veit. #
Low beam / high beam: turnthe soc ket
anti-clockwise and remo veit. #
Indicator: turnthe soc ket anti-clo ckwise,
re lease it and remo veit. #
Pull the bulb out of the soc ket. #
Inse rtthe new bulb into the soc ket su chthat
th e entire base of the bulb is resting on the
bottom of the soc ket. #
Inse rtthe soc ket and turn it clo ckwise. #
Press on the housing co ver and turn it clock‐
wise. #
Turn signal lights: installth e co ver in the
front wheel ar ch. Changing
there ar bulbs (vehicles with halo‐
ge n headla mps) Opening and closing
the side trim panels in
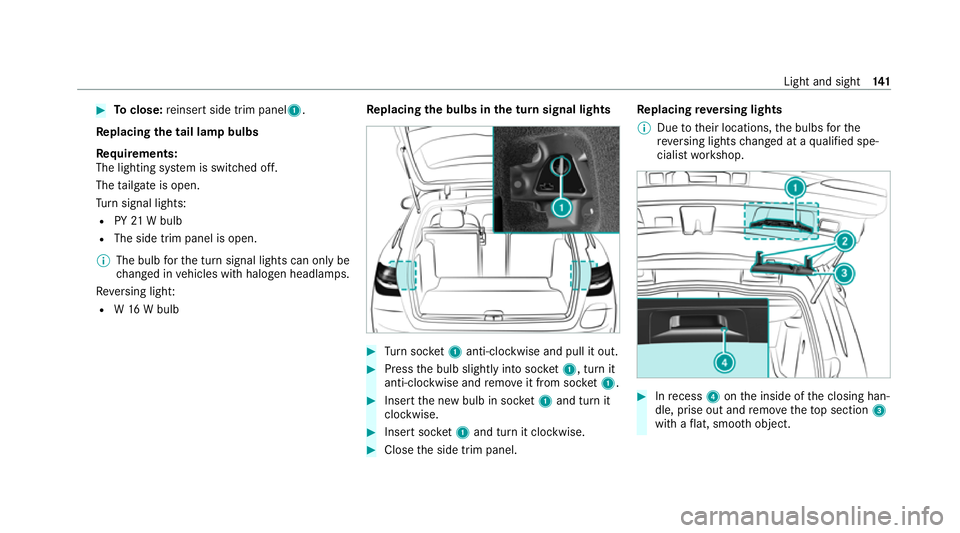
th e load compa rtment #
Toopen: release the side trim panel on the
left or right 1attheto p and fold it down in
th e direction of the ar row. 14 0
Light and sight
Page 144 of 565
#
Toclose: reinse rtside trim panel1.
Re placing the tail lamp bulbs
Re quirements:
The lighting sy stem is switched off.
The tailgate is open.
Tu rn signal lights:
R PY21W bulb
R The side trim panel is open.
% The bulb forth e turn signal lights can only be
ch anged in vehicles with halogen headlamp s.
Re versing light:
R W16 W bulb Re
placing the bulbs in the turn signal lights #
Turn soc ket1 anti-clo ckwise and pull it out. #
Press the bulb slightly into soc ket1, turn it
anti-clo ckwise and remo veit from soc ket1. #
Inse rtthe new bulb in soc ket1 and turn it
clo ckwise. #
Insert soc ket1 and turn it clo ckwise. #
Close the side trim panel. Re
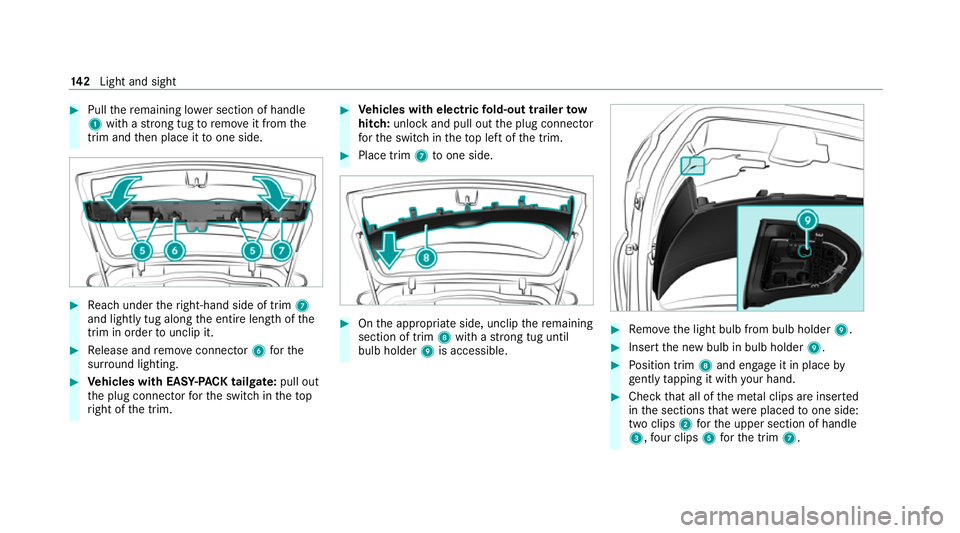
placing reve rsing lights
% Due totheir locations, the bulbs forthe
re ve rsing lights changed at a qualified spe‐
cialist workshop. #
Inrecess 4onthe inside of the closing han‐
dle, prise out and remo vetheto p section 3
with a flat, smo oth object. Light and sight
141
Page 145 of 565
#
Pull there maining lo wer section of handle
1 with a strong tug toremo veit from the
trim and then place it toone side. #
Reach under theright-hand side of trim 7
and lightly tug along the entire length of the
trim in order tounclip it. #
Release and remo veconnector 6forthe
sur round lighting. #
Vehicles with EASY -PAC K tailgate: pull out
th e plug connector forth e switch in thetop
ri ght of the trim. #
Vehicles with electric fold-out trailer tow
hit ch: unlo ckand pull out the plug connector
fo rth e switch in theto p left of the trim. #
Place trim 7toone side. #
Onthe appropriate side, unclip there maining
section of trim 8with a strong tug until
bulb holder 9is accessible. #
Remo vethe light bulb from bulb holder 9. #
Insert the new bulb in bulb holder 9. #
Position trim 8and engage it in place by
ge ntly tapping it with your hand. #
Check that all of the me tal clips are inse rted
in the sections that we replaced toone side:
two clips 2forth e upper section of handle
3, four clips 5forth e trim 7. 14 2
Light and sight
Page 528 of 565
Exterior lighting....................................
.390
High-p ressure cleaner........................... 388
Matt finis h............................................. 389
Pa int wo rk.............................................. 389
Plastic trim............................................ 391
Re alwo od/trim elements......................3 91
Re versing camera................................. .390
Ro of lining.............................................3 91
Seat belt................................................ 391
Seat co ver............................................. 391
Senso rs................................................. 390
St eering wheel....................................... 391
Ta ilpipes................................................ 390
Tr ailer hit ch........................................... 390
Wa shing byhand................................... 388
Wheels/rims.........................................3 90
Wi ndo ws................................................ 390
Wi per blades.........................................3 90
Carpet (Care).............................................. 391
Changing bulbs Dipped beam......................................... 14 0
Fitting/removing co ver (front wheel
ar ch )...................................................... 13 9
Main beam............................................ 14 0
No tes..................................................... 13 8Opening/closing
the side trim panels.. .140
Overview.............................................. .138
Re versing lights...................................... 141
Tu rn signal light (front).......................... 14 0
Tu rn signal lights (rear).......................... 141
Changing gears
Manually. ............................................... 17 7
Changing hub caps .................................. .426
Changing the lights
Driving abroad (symm etrical low
beam)................................................... .128
Charging Battery (vehicle).................................... 406
USB port................................................ 124
Chassis Damping characteristics....................... .225
DY NA MIC BODY CONTROL.................... 225
Child saf ety lock
Re ar door................................................ 70
Re ar side wind ows................................... 71
Child seat App rova l categories................................ .57
At tach ing (no tes).....................................57 Basic instructions.................................... 52
Fr
ont passenger seat (no tes)...................68
Fr ont passenger seat (without auto‐
matic airbag shutoff)...............................67
ISOFIX/i-Size (fitting)............................... 61
No tes on risks and dangers..................... 53
Re commended child restra int sy stems.... 56
Seats suitable for belt-secu redch ild
re stra int sy stems..................................... 64
Seats suitable for i‑Size child
re stra int sy stems..................................... 60
Seats suitable for ISOFIX child
re stra int sy stems..................................... 59
Securing on the co-driver seat................69
Secu ring on there ar seat........................ 66
To pTe ther............................................... 63
Children Avoiding dangers in theve hicle............... 53
Basic instructions.................................... 52
Chock Storage location.................................... 425
Chock see Chock Index
525
Page 531 of 565
External................................................
.309
Saving (cur rent vehicle position)........... 309
Saving as global favo urit e...................... 309
St oring a map position..........................3 09
Dest ination entry
En tering a 3 wordaddress..................... 299
En tering a POI or address...................... 294
Entering an intermedia tedestination.... 298
Ente ring geo-coordinates...................... 299
Selecting a contact............................... 299
Selecting a POI...................................... 297
Selecting from the map......................... 300
Selecting pr evious destinations............ .297
De tecting inat tentiveness
see ATTENTION ASSIST
Diagnostics connection .............................. 29
Diesel Low outside temp eratures.................... 440
No tes....................................................4 40
Digital Owner's Manual.............................. 20
Digital TV
see TV Dinghy
towing
see Tow- bar sy stem
Dipped beam Changing bulbs...................................... 14 0
Setting................................................... 13 6
DIRECT SELECT le ver
Engaging drive position......................... .176
Engaging neutral.................................... 175
Engaging pa rkposition.......................... 176
Engaging pa rkposition automatically....1 76
Engaging reve rsege ar........................... 175
Fu nction................................................. 174
Display (care) .............................................3 91
Display (multimedia sy stem)
Settings................................................. 280
Display (on-boa rdcompu ter)
Displ ays on the multifunction displa y.... 253
Displ aymessage
Calling up (on-board compu ter)............. 451
No tes..................................................... 451
Display messages ¯ - - - km/h...................................... 477
ç - - - km/h ...................................... 478È
- - - km/h ...................................... 477
# 12V battery See Owner's Man‐
ual......................................................... 492
Û 48 V battery See Owner's Man‐
ual......................................................... 494
: Active Light Sy stem inoperative... 458
¯ AdBlue sy stem fault Emer. op.:
max. XXX mphSt art not poss. in XXX
miles ...................................................... 501
¯ AdBlue sy stem fault Emer‐
ge ncy op. in XXX km See Owner's
Manual.................................................. 500
¯ AdBlue sy stem fault Engine
st art not possible................................. .501
¯ AdBlue sy stem fault See Own‐
er's Manual .......................................... .500
5 Add 1 litre engine oil when
next refuelling....................................... 502
é ATTENTION ASSIST inoperative ....476 528
Index