Page 257 of 542

#
Toswitc hon: chang eth emedia sourceor
tur nvo lume control 1. Ad
jus tingthe volum e Se
tting withth evo lum econtr ol On
themultifunc tionsteer ing wheel On
themultimedia system #
Turn volume control 1.
The volume ofthecur rent radio ormedia
sour ceisset.The volume ofother audi o
sour cescan beadjus tedsepar ately.
Ad jus tth is in thefo llo wing situat ions:
R Dur ing atraf fic annou ncement
R Dur ing ana vig ation annou ncement The
volume ofthena vig ation announ ce‐
ment chang esinacc ordanc ewit hth evo l‐
ume ofthecur rent med iasou rce.
R Dur ing ate lephon ecall
R When entering orexitin gapar kingspace
while using ActivePa rking Assist
Se tting inthemenu #
Sele ctSyst eminthemultimedia system. #
Select Audio. #
Select avo lume setting. #
Setth evo lume. Ent
ering charact ers Usi
ngthech aract erinput functi on &
WARNIN GRisk ofdist ra ction from infor‐
mati onsystems andcomm unication s
eq uipment
If yo uoper ateinf ormat ionand comm unic a‐
tio neq uipme ntintegratedin theve hicle
when driving, youwill bedistract ed from the Multimedia
system 255
Page 258 of 542

tr
af fic situ ation. Thiscou ldalso cau seyouto
lose control of theve hicle. #
Onlyoper ateth is eq uipmen twhen the
tr af fic situ ation per mits. #
Ifyo ucan notbe sur eof this, stop the
ve hicle whilstpa ying attention toroad
and traffic condi tions andoperate the
eq uipment withth eve hicle statio nary. Yo
umus tobse rveth eleg alrequ iremen tsforth e
cou ntryin whi chyouar ecur rentl ydr ivi ng when
op erati ng themultimedia system.
Use thech aract erinput function inthefo llo wing
situat ions,fo rex am ple:
R Renam ingafa vo rite
R Entering aPOI oraddress
R Making aph one call
The follo wing functionsar eav ailable:
R Select ing ach aract erinthech aract erbar
R Writin gach aract eron theto uc hpad
Charact erinput can bestar tedwit hacon trol
element andresumed withano ther. #
On theTo uc hCon trol and contr oller:
sele ctthech aract ersin thech aract erbar .
De pen dingon theta rget ent ry,th efo llo wing
ch aract ersar eav ailable:
R The fullsetof charact ersis sho wn
R Onlythose charact erswhic har eusef ul
fo rth ecur rent inpu tst ring are shown
Ot her charact ersar egr ay ed out. #
On theto uc hpad: selectthech aract ersin
th ech aract erbar .
or #
Write th ech aract erson theto uc h-sen sitive
sur face oftheto uc hpad.
Han dwriting recogni tionsuppo rts yo uby
means ofcharact ersugg estio ns and are ad-
aloud function .
Ex am ples ofcharact erent ry:
R Renam ingafa vo rite
R Entering aPOI oran address using free or
st ep-b y-step sear ch
R Entering awe baddr ess Ent
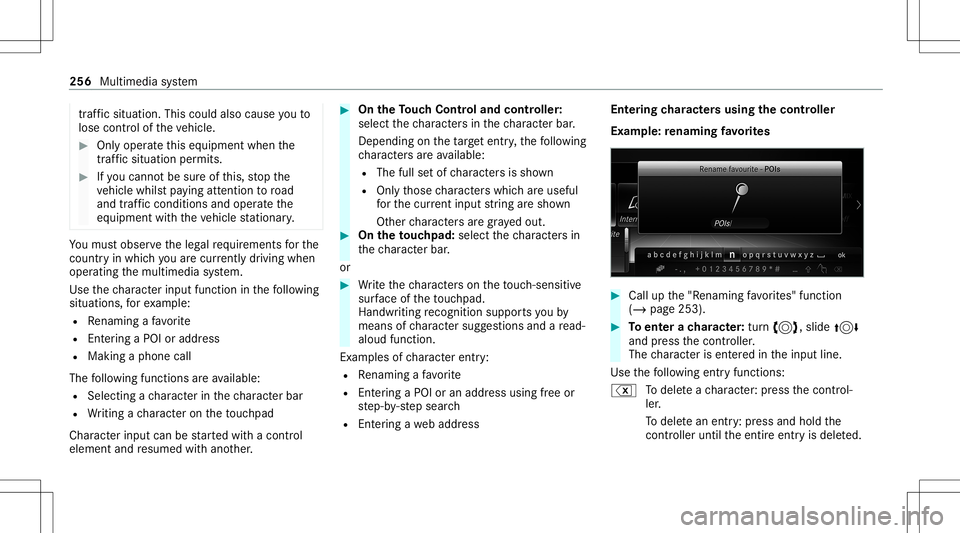
ering charact ersusin gth econtr oller
Ex am ple: renaming favo rite s #
Call upthe"R enaming favo rite s" function
(/ page253). #
Toent erach aract er:tur n3, slide 4
and press thecon troller .
The charact erisent ered intheinput line.
Use thefo llo wing entryfunctions:
% Todele teach aract er:pr ess thecon trol‐
ler .
To dele tean ent ry:pr ess and holdth e
contr oller unti lth eent ire ent ryisdele ted. 256
Multimedia system
Page 259 of 542

0062
To
switc hto special charact ersand sym‐
bols.
006A To
switc hto upper -case orlowe r-case let‐
te rs.
0054 To
switc hth elanguag e.
v Toswitc hto charact erent ryon theto uc h‐
pad.
% The available editingfunction sdepen don
th eediting task ,th elanguag ese tand the
ch aract erleve l. #
Toconf irm theentr y:select ¡.
Ex am ple: entering ades tination (navigation) #
EnterthePOI oraddr ess(/ page27 2).
Ent eringch aract erson theto uc hpad
Re quirement s:
R The touc hpad isswit ched on (/ page250).
R The entered orselect edcharact ershoul dbe
re ad out :th ehandwr itingrecogni tionread-
aloud function isswit ched on (/ page25 1). Ex
am ple: renaming favo rite s #
Call upthe"R enaming favo rite s" function
(/ page253). #
Toent erach aract er:use your fing er to
wr ite ch aract erson theto uc hpad.
The charact erisent ered intheinput line. If
dif fere nt interpr etatio nsareposs ible, charac‐
te rsugg estions aredisp laye d. #
Toselect ach aract ersugg estion :swi peup
or down ontheto uc hpad. #
Resume charact erinput. #
Toent eraspa ce:swipe right when thecur‐
sor islocat edintheinput line. #
Todel eteach aract er:swi peleftwhe nth e
cur sor isloca tedin theinput line. #
Toconf irm theentr y:press theto uc hpad. #
Tofinish charact erentr y:swipe upwards.
or #
Press the0038 button.
Ex am ple: entering ades tinat ion(navigation) #
Enterth ePOI oraddr ess(/ page27 2). Sy
stem settings Displa
y Conf
iguringdisp layse ttings
Multi media system:
4 System 5
0043 Display andDesign s
St yles #
Sele ctDes igns. #
Sele ctSpo rt,Classic orProg ressive.
Ad apting theam bient lightingforthe style #
Select Adju stAmb. Lighting .
Ac tivate0073 ordeacti vate 0053 thefunc tion. Multimedia
system 25
7
Page 260 of 542

This
funct ionadjus tstheambient lightingfor
th eselect eddispla yst yle.
Se tting thedisp laybr ight ness #
Sele ctDis play Bright ness. #
Sele ctabr ight nessva lue.
Switc hingthedisp layof f/on #
Off:selec tDis play Off. #
On: press abutt on,002B, forex am ple.
Displ aydes ign #
Select Day /Nig htDesi gn. #
Select Autom atic,Day DesignorNig ht
Desi gn.
Ad diti onaldispl ayarea
Dependi ngon theve hicle, various items ofaddi‐
tional information canbesho wn. The additional
displa yar ea com prises thelef t-hand orright-
hand third of thedispla y. #
Select Addi tiona lDisp .Area .
The follo wing displa ycon tent can beselect ed:
R Dyna mic R
Navig ation Map
R Consu mpti on
R Time and Date Time
anddate Se
ttin gthe time anddateaut omati cally
Multimedia system:
4 System 5
& TimeandDate #
Deact ivat e0053 Manual TimeAdjustmen t.
The time anddatear ese taut omaticall yfo r
th eselect edtime zoneand summer time
op tion .
% The correct time isrequ ired forth efo llo wing
func tions:
R Routeguidan cewithtim e-depen dent
traf fic gu idance .
R Calcu lation ofexpect edtime ofarriva l. Se
tting thetim ezone
Multi media system:
4 System 5
& TimeandDate
5 Time Zone:
The listof count ries isdispla yed. #
Select acount ry003B.
Dep endingonthecount ry,time zonesare
displa yed. #
Select atime zone.
The time zonese tis displa yedaf te rTime
Zone:.
Se tting summer time
The Automatic Daylight Saving TimeandDay-
lig ht Saving Timeoptions canno tbe sele cted in
all countr ies.
Mul timedi asy stem:
4 System 5
& TimeandDate
Au tomatic ally #
Swi tchAuto matic Day light Saving Time on
0073 oroff0053. 25
8
Mu ltimed iasystem
Page 261 of 542

Manuall
y #
Deactiv ate0053 Automatic Daylight Saving
Time. #
Select Daylight Saving Time. #
Select OnorOff.
Se tting thetim eand date form at
Mul timedi asy stem:
4 System 5
& TimeandDate
5 Set Form at #
Setth edat eand time form at003B.
Se tting thetim ema nua lly
Re quirement s:
R The Manual TimeAdjustm entfunc tion is
switc hedon.
Multime diasystem:
4 System 5
& TimeandDate
5 Set Time #
Setth ehour s. #
Navig ateto theright tosetth eminut es. #
Setth eminut es. #
Conf irm chang eswhen exitin gth emenu.
The dateis setaut omaticall yvia GPS. Connectivity
Switc
hingtransmission oftheve hicl eposi ‐
tion on/off
Mul timedi asy stem:
4 System 5
ö Connec tivity #
Select Transm itVehicle Pos.. #
Activate0073 ordeacti vate 0053 thefunc tion. Blue
tooth® Inf
orma tion abou tBlu etoo th®
Bl ue tooth®
tech nol ogy isast andar dfo rshor t-
ra ng ewi reless datatransf erup toappr oximat ely
32. 8ft (10 m).
Yo ucan useBlue tooth®
to connect your mob ile
phon eto themultimedia system and usethefo l‐
lo wing functions,forex am ple:
R Han ds-free system withaccess tothefo llo w‐
ing option s: -
con tacts (/ page 304)
- call lists (/ page306)
- text mes sage (/ pag e30 7)
R Interne tcon nection (/page31 9)
R Listening tomusi cvia Blue tooth®
audio
R Trans ferring busine sscar ds(vCar ds)intoth e
ve hicle
Blue tooth®
is are gis tere dtra demar kof Blue‐
to othSpecial Interes tGr oup (SIG) Inc.
% Interne tconn ection viaBlue tooth®
is no t
av ailable inall coun tries.
Ac tiv atin g/deac tivatin gBlue tooth®
Re quirement s:
R Deac tivateBlue tooth®
:Appl eCa rPlay™ isno t
activ e.
Mul timed iasystem:
4 System 5
ö Connec tivity #
Activate0073 ordeacti vate 0053 Bluetoo th®
.
If Andr oidAutoisact ive, apr om ptappear sask ‐
ing whe ther Blue tooth®
should bedeactiv ated. Multimedia
system 259
Page 262 of 542

#
Select Yes.
Andr oid Au toisclos edand Blue tooth®
is
deact ivat ed. Wi
-Fi Wi
-Fico nne ctio nove rview
Yo ucan useWi-Fi toestablish acon nection with
a Wi -Fi networkand toacc ess theInt erne tor
ot her networkde vices.
The follo wing connection option sar eav ailable:
R Wi-Fi conne ction
The Wi-Fi conne ctionto aWi -Fi-ca pable
de vice ,e.g .th ecus tomer's mobilephone or
a ta ble tPC ises tablished.
R Multimedia system asaWi -Fi hotspo t
Usi ngthis func tion,a ta ble tPC ornotebook
can becon nected, forex am ple.
To establish acon nection ,yo ucan usethefo l‐
lo wing methods:
R WPS PIN
The conn ection toasec ureWi -Fi networkis
mad evia aPIN . R
WPS PBC
The conne ctionto asec ureWi -Fi networkis
mad eby pressing abutt on(push button).
R Secur itykey
The conn ection toasec ureWi -Fi networkis
mad evia asecu rity key.
Se tting upWi-Fi
Re quirement s:
R The device tobe con nectedsuppor tsone of
th eth re emeans ofcon nect iondescr ibed
(/ page260).
Multimedia system:
4 System 5
ö Connec tivity
Ac tiv atin g/deac tivatin gWi -Fi #
Switc hWi-Fi on0073 oroff0053.
If Wi-Fi isdea ctivated 0053, communi cationvia
Wi -Fi toall devic es isint erru pte d.This also
means that acon nectionto theHERME S
comm unication modulecannotbe estab‐
lished. Thenfunctionssuc has dynamic route
guidan cewithLiv eTr af fic Inf ormati onareno t
av ailable. Connect
ingthemu ltim edia system witha
de vice viaWi-Fi
Thi sfunction isavailable ifaHE RME Scom mun i‐
cat ion modul eis no tins talled.
The type ofcon nection established mustbe
select edon themultimedia system and onthe
de vice tobe con nected.
% The connection procedur ema ydif fer
dependin gon thede vice. Followtheins truc‐
tion sth at aresho wninthedispla y.Fu rther
inf ormation (seethemanuf acturer'soper at‐
ing instruction s). #
Select Internet Setting s. #
Select Search forWi-Fi Network s.
Using asecur itykey #
Select aWi -Fi networkin thelis t. #
Have thesecur itykeydisp laye don thede vice
to be con nected(see themanuf acturer's
oper ating instruction s). #
Enterth is secur itykeyon themultimedia sys‐
te m. #
Conf irm theent rywit h¡. 260
Multimedia system
Page 263 of 542

%
Alldevice ssu pp orta sec urity keyas a
mean sof conn ection .
Usin gaWPS PIN #
Highlig htaWi -Fi networkin thelis t. #
Select ¥Connec tvia WPS PINInput.
The multimedia system gener ates an eight-
di gitPIN . #
Enterthis PIN onthede vice tobe con nected. #
Conf irm theent ry.
Using abutt on
% This function isonl yav ailable inaWi -Fi fre‐
qu ency of2.4 GHz. #
Highlight aWi -Fi networkin thelis t. #
Select ¥Connec tvia WPS PBC. #
Select "Connec tvia WPS PBC" intheop tion s
on thede vice tobe con nected. #
Press theWPS buttonon thede vice tobe
con nected. #
Select Continue inthemultimedia system. De
vice hasalready been connect ed: #
Toaut omatic allyco nne ct:high light aWi -Fi
ne tworkin thelis t. #
Activate¥ Connect Automatica lly0073 . #
Toconnect :high light aWi -Fi networkin the
lis t. #
Selec t¥ Connect.
The connection ises tablished again. These
func tionsar epossible whenthede vice has
alr eady been connect edtotheWi -Fi network.
Se tting upaWi -Fiho tspo t
Re quirement s:
R Forco nn ectio nby pres sin gabutt on:th is
func tion isonl yav ailable inaWi -Fi frequency
of 2.4 GHz.
Mu ltimed iasystem:
4 System 5
ö Connec tivity
Conf iguringthemu ltim edia system asaWi -
Fi ho tspo t
The type ofconnection established depends on
th ede vice tobe con nected. The func tion must
be suppor tedby themultimedia system and by th
ede vice tobe con nected. The type ofcon nec‐
tion established mustbe select edon themulti‐
media system and onthede vice tobe con nec‐
te d. #
Select SetUpHot spot. #
Highlight ConnectDevic eto Vehicle Hotspot.
Gener atingaWPS PIN #
Select ¥Connec tvia WPS PINGenera-
tion . #
Enterth ePIN showninthemedia displayon
th ede vice tobe con nectedand confirm .
Connect ingusin gaWPS PIN #
Sele ct¥ ConnectviaWPS PINInput. #
Sele ctEnter WPS PIN. #
Enterth ePIN that issho wnontheex tern al
de vic e's displa yon themultimedia system. #
Select Continue.
Connecting usingabutt on #
Select ¥Connec tvia WPS PBC. Multimedia
system 26
1
Page 264 of 542

#
Press theWPS buttonon thede vice tobe
con nectedor select Connec t. #
Select Continue inthemultimedia system.
Connecting usingasecur itykey #
Select Connect DevicetoVeh icleHotsp ot.
A secu rity keyis disp laye d. #
Select theve hicle from thede vice tobe con ‐
nec ted. The vehicle isdispla yedwit hth e
SSID MBHotsp otXXX XX. #
Enterthesecur itykeywhic his sho wninthe
media display on thede vice tobe con nected. #
Conf irm theent ry.
Connect ingusin gNFC #
Sele ctConn ection viaNFC. #
ActivateNFC onthemobile device (see the
manuf acturer'soper ating instructions). #
Bring themobile device intoth eNFC area of
th eve hicle (/page302). #
Select Done.
The mobile device isno wconn ectedtothe
multime diasystem hotspo tvia NFC. Gener
atingane wsecur itykey: #
Select Set UpHotsp ot. #
Select Genera teSecu rityKey.
A connecti onwillbe established withth e
ne wly crea tedsecur itykey. #
Tosave asec urity key:select Save.
When ane wsecur itykeyis save d, all existin g
Wi -Fi conne ctionsareth en discon nected.If
th eWi -Fi conne ctionsarebe ing re-es tab‐
lished, thene wsecur itykeymus tbe entere d. Mana
gingCOMAND Touc hde vic es Re
quirement s:
R The COMAND Touc happ isins talled onthe
ex tern al de vic e(e. g.table tor smar tphon e).
R Wi-Fi isacti vated(/ page260) andthemul‐
timedia system iscon figur edasaWi -Fi hot‐
spo t(/ page 261). Mul
timedi asy stem:
4 System 5
COMAND Touch
Connecting andauthor izing ane wde vice #
Select AuthorizeaNew Devic e. #
Select Connec tNew Devic e. #
Enterth esecur itykeyin theex tern al de vic e.
The Please start COMA NDTouc hon your
devi ceand follow theins truct ions.mes sage
appear s. #
Select Con tinue. #
Accep tth econ nect ionrequ estfr om thene w
de vice. #
Enterth ePIN shownontheex tern al de vic e.
The devic eis aut hor ized.
Au thorizing aconnect eddevice #
Sele ctAut hori zeaNew Device.
The devic es already connectedar edispla yed. #
Select Continue Using Connec tedDevic es.
The Please startCOMAND Touchonyour
device andfollow theinstruct ions. messag e
appear s. 262
Multimedia system