2020 MERCEDES-BENZ AMG GT ROADSTER boot
[x] Cancel search: bootPage 133 of 381
R
Active Parking Assist is keeping theve hicle
st ationar y.
This is the case if one of thefo llowing conditions
is also fulfilled:
R The engine is switched off.
R The seat belt tongue is not inser ted in the
seat belt buckle of the driver's seat and the
driver's door is opened.
R There is a sy stem malfunction.
R The po wer supply is insuf ficient.
R The vehicle is stationary for a lengt hyperiod.
When the electric parking brake is applied, the
re d! indicator lamp lights up in the instru‐
ment clus ter.
The electric parking brake is not automatically
applied if the engine is switched off bythe ECO
st art/ stop function. Electric parking brake function (releasing
automatically)
The electric parking brake is
released when the
fo llowing conditions are fulfilled:
R The driver's door is closed.
R The engine is running.
R The transmission is in position hork and
yo u depress the accelera tor pedal or you
shift from transmission position jtoh or
k when on le velground withthe driver's
door closed.
R Ifth e transmission is in position k,the boot
lid must be closed.
R The seat belt tongue is inser ted into the seat
belt buckle of the driver's seat.
If th e seat belt tongue is not inser ted into the
seat belt buckle of the driver's seat, one of the
fo llowing conditions must be fulfilled:
R You shift from transmission position j.
R You ha veprev iously driven at speeds greater
th an 3 km/h. When
the electric parking brake is released, the
re d! indicator lamp in the instrument clus‐
te r goes out.
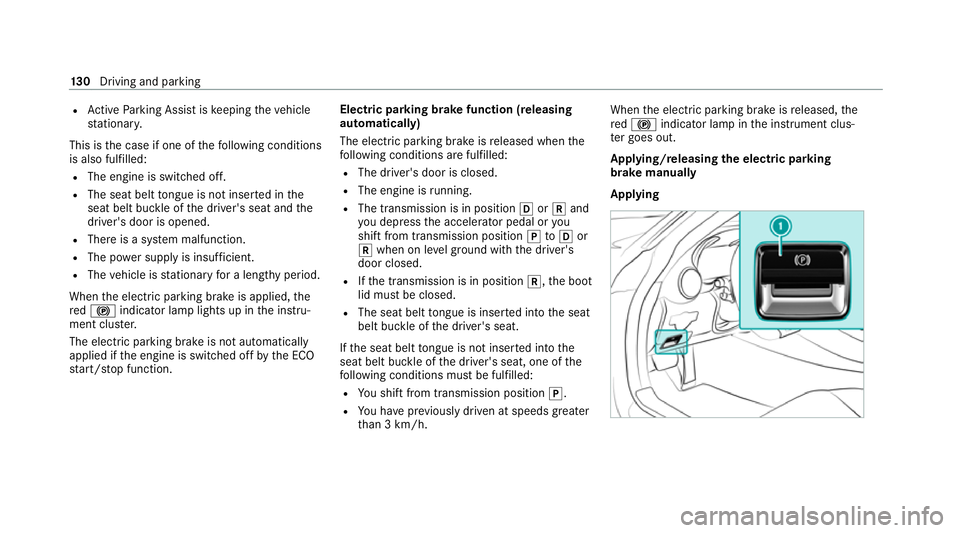
Applying/releasing the electric pa rking
brake manually
Applying 13 0
Driving and pa rking
Page 151 of 381
R
AMG Performance exhaust sy stem
(/ page 113)
R ECO start/ stop function (/ page112)
R manual gearshifting (/ page122)
R AMG Dynamics(/ page 117)
R rear wing(/ page148)
R fron t and reve rsing camera (/ page152)
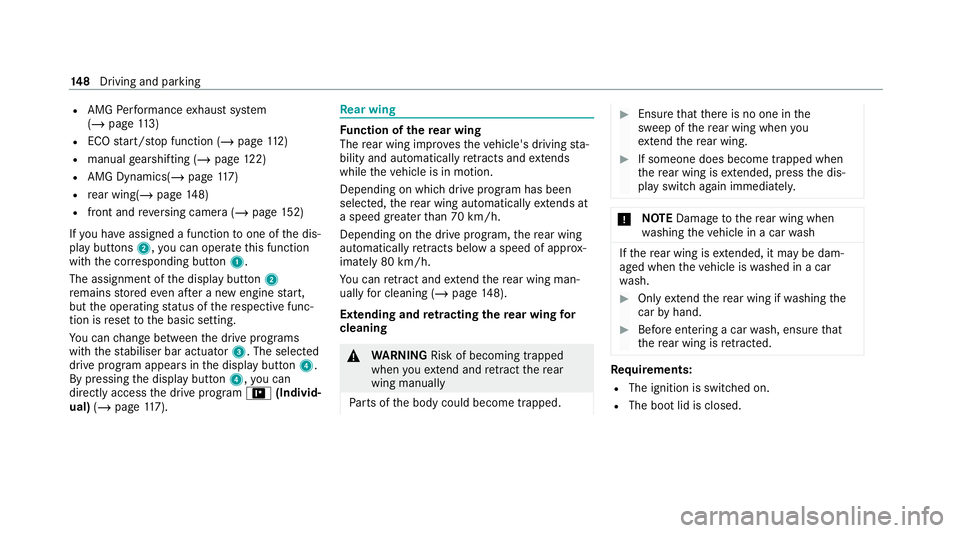
If yo u ha veassigned a function toone of the dis‐
play buttons 2,you can operate this function
with the cor responding button 1.
The assignment of the display button 2
re mains stored even af ter a new engine start,
but the operating status of there spective func‐
tion is reset tothe basic setting.
Yo u can change between the drive prog rams
with thest abiliser bar actuator 3. The selected
drive program appears in the display button 4.
By pressing the display button 4,you can
direct lyaccess the drive prog ram = (Individ‐
ual) (/page 117). Re
ar wing Fu
nction of there ar wing
The rear wing impr ovesth eve hicle's driving sta‐
bility and automatically retracts and extends
while theve hicle is in motion.
Depending on which drive program has been
selected, there ar wing automatically extends at
a speed grea terth an 70 km/h.
Depending on the drive prog ram, there ar wing
automatically retracts below a speed of appr ox‐
imately 80 km/h.
Yo u can retract and extend there ar wing man‐
ually for cleaning (/ page148).
Extending and retracting the rear wing for
cleaning &
WARNING Risk of becoming trapped
when youex tend and retract there ar
wing manually
Pa rts of the body could become trapped. #
Ensure that there is no one in the
sweep of there ar wing when you
ex tend there ar wing. #
If someone does become trapped when
there ar wing is extended, press the dis‐
play switch again immediatel y. *
NO
TEDama getothere ar wing when
wa shing theve hicle in a car wash If
th ere ar wing is extended, it may be dam‐
aged when theve hicle is washed in a car
wa sh. #
Only extend there ar wing if washing the
car byhand. #
Before entering a car wash, ensure that
th ere ar wing is retracted. Re
quirements:
R The ignition is switched on.
R The boot lid is closed. 14 8
Driving and pa rking
Page 241 of 381
R
the blo werfo rth eve ntilation/heating is
switched off.
R the windscreen wiper switch is in position
g.
R theke y is at a minimum dis tance of 3 m
aw ay from theve hicle, otherwise the boot lid
could open unintentionally.
R in car washes with a con veyo r sy stem: neu‐
tral iis engaged.
% In car washes with a con veyo r sy stem: if you
wo uld like tolea vetheve hicle while it is
being washed, make sure theke y is located
in theve hicle. The park position jisother‐
wise automatically engaged.
% If, af terth e car wash, youre mo vethewax
from the windscreen and wiper rubbers, this
will pr event smearing and reduce wiper
noise. Information on using a high-p
ressure cleaner &
WARNING Risk of an accident when
using high-pressure cleane rswith round-
spray nozzles
The wate r jet can cause extern ally invisible
damage.
Components damaged in this wa y may unex‐
pec tedly fail. #
Do not use a high-pressure cleaner with
round-spr aynozzles. #
Have damaged tyres or chassis parts
re placed immediatel y. To
avo id damage to yourvehicle, obser vethefo l‐
lowing when using a high-pressure cleaner:
R keep theke y at least 3 m away from theve hi‐
cle. Otherwise the boot lid could open unin‐
te ntional ly.
R maintain a dis tance of at least 30 cm tothe
ve hicle.
R vehicles with decora tivefoil: parts of your
ve hicle are co vered with a decorative foil. Maintain a dis
tance of at least 70 cm
between thefo il-c ove red parts of theve hicle
and the nozzle of the high-pressure cleaner.
Mo vethe high-pressure cleaner nozzle
around whilst cleaning. The waterte mp era‐
ture of the high-pressure cleaner must not
exc eed 60 °C.
R obser vethe information on the cor rect dis‐
ta nce in the equipment manufacturer's oper‐
ating instructions.
R do not point the nozzle of the high-pressure
cleaner directly at sensitive parts such as
tyres, the soft top, the wind deflector net,
slits, electrical component parts, batteries,
light sources and ventilation sl ots. Wa
shing theve hicle byhand Obser
vethe legal requirements, e.g. in a number
of countries, washing byhand is only permitted
in specially designated wash ba ys. #
Use a mild cleaning agent, e.g. car shampoo. 238
Maintenance and care
Page 248 of 381
#
Remo ve wa rning triangle 2.
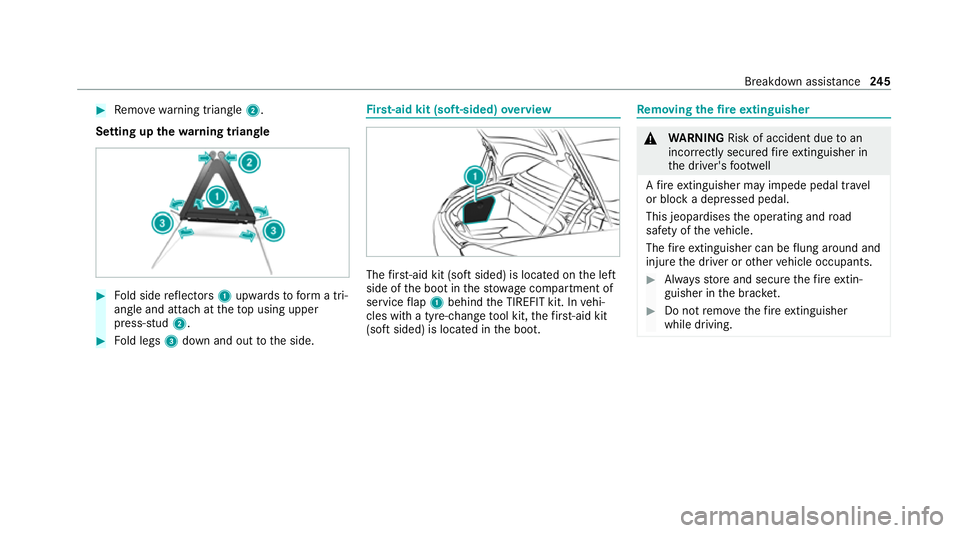
Setting up thewa rning triangle #
Fold side reflectors 1upwards toform a tri‐
angle and attach at theto p using upper
press-stud 2. #
Fold legs 3down and out tothe side. Fi
rs t-aid kit (soft-sided) overview The
firs t-aid kit (soft sided) is located on the left
side of the boot in thestow age compartment of
service flap 1 behind the TIREFIT kit. In vehi‐
cles with a tyre-change tool kit, thefirs t-aid kit
(soft sided) is located in the boot. Re
moving the fire extinguisher &
WARNING Risk of accident due toan
incor rectly secu redfire extinguisher in
th e driver's foot we ll
A fire extinguisher may impede pedal tr avel
or block a depressed pedal.
This jeopardises the operating and road
saf ety of theve hicle.
The fire extinguisher can be flung around and
injure the driver or other vehicle occupants. #
Alw aysst ore and secure thefire extin‐
guisher in the brac ket. #
Do not remo vethefire extinguisher
while driving. Breakdown assi
stance 245
Page 251 of 381
TIREFIT kit
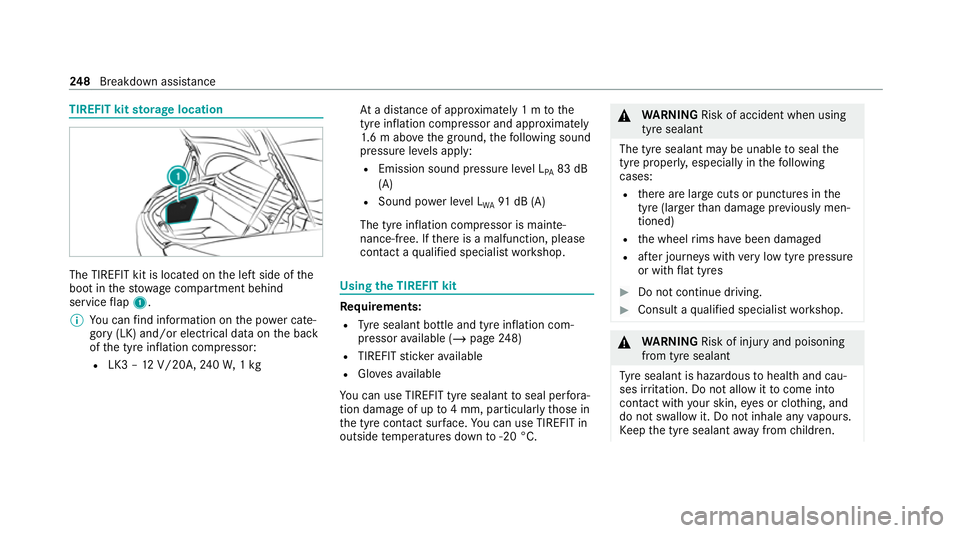
storage location The TIREFIT kit is located on
the left side of the
boot in thestow age compartment behind
service flap 1.
% You can find information on the po wer cate‐
gory (LK) and/or electrical data on the back
of the tyre inflation compressor:
R LK3 – 12V/20A, 240W, 1kg At
a dis tance of appr oximately 1 m tothe
tyre inflation compressor and appr oximately
1. 6 m abo vethe ground, thefo llowing sound
pressure le vels apply:
R Emission sound pressure le vel L
PA 83 dB
(A)
R Sound po wer le vel L
WA 91
dB (A)
The tyre inflation compressor is mainte‐
nance-free. If there is a malfunction, please
conta ct aqualified specialist workshop. Using
the TIREFIT kit Re
quirements:
R Tyre sealant bottle and tyre inflation com‐
pressor available (/ page248)
R TIREFIT sticke rav ailable
R Glovesav ailable
Yo u can use TIREFIT tyre sealant toseal per fora‐
tion dama geof up to4 mm, particularly those in
th e tyre conta ct surface.You can use TIREFIT in
outside temp eratures down to-20 °C. &
WARNING Risk of accident when using
tyre sealant
The tyre sealant may be unable toseal the
tyre proper ly, especially in thefo llowing
cases:
R there are large cuts or punctures in the
tyre (larger than damage pr eviously men‐
tioned)
R the wheel rims ha vebeen damaged
R afte r journe yswith very low tyre pressure
or with flat tyres #
Do not continue driving. #
Consult a qualified specialist workshop. &
WARNING Risk of injury and poisoning
from tyre sealant
Ty re sealant is hazardous tohealth and cau‐
ses ir rita tion. Do not allow it tocome into
contact wi thyour skin, eyes or clo thing, and
do not swallow it. Do not inhale any vapours.
Ke ep the tyre sealant away from children. 248
Breakdown assis tance
Page 263 of 381
To
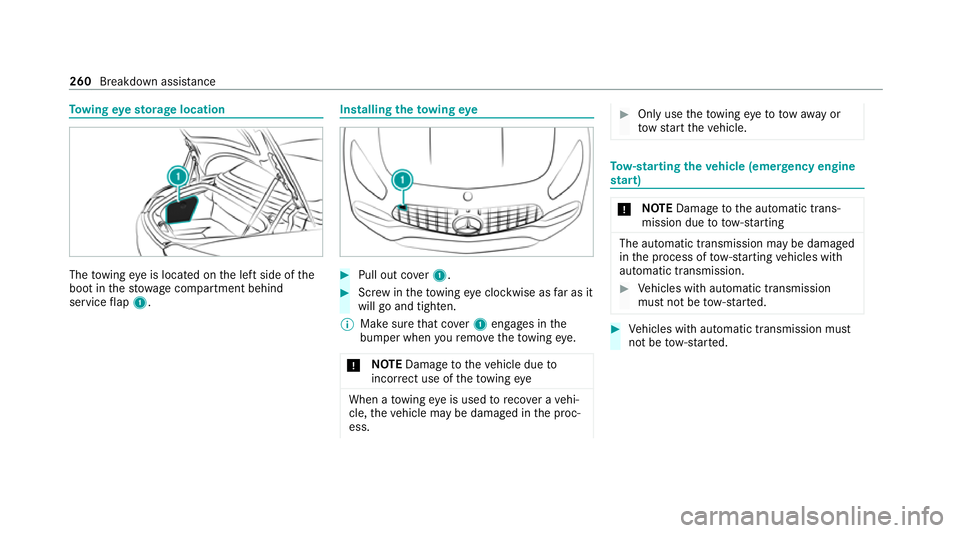
wing eyesto rage location The
towing eye is located on the left side of the
boot in thestow age compartment behind
service flap 1. Installing
theto wing eye #
Pull out co ver1. #
Screw intheto wing eyeclockwise as far as it
will go and tighten.
% Make sure that co ver1 engages in the
bumper when youre mo vetheto wing eye.
* NO
TEDama getotheve hicle due to
incor rect use of theto wing eye When a
towing eye is used toreco ver a vehi‐
cle, theve hicle may be damaged in the proc‐
ess. #
Only use theto wing eyeto to waw ay or
to w start theve hicle. To
w- starting theve hicle (eme rgency engine
st art) *
NO
TEDama getothe automatic trans‐
mission due to tow-starting The automatic transmission may be damaged
in
the process of tow- starting vehicles with
automatic transmission. #
Vehicles with automatic transmission
must not be tow- star ted. #
Vehicles with automatic transmission must
not be tow- star ted. 260
Breakdown assis tance
Page 264 of 381
Electrical fuses
Note
s on electrical fuses &
WARNING Risk of accident and inju ry
due to ov erloaded lines
If yo u manipulate or bridge a faulty fuse or if
yo ure place it with a fuse with a higher
amperage, the electric line could be overloa‐
ded.
This could result in a fire. #
Alw aysre place faulty fuses with speci‐
fi ed new fuses conta iningthe cor rect
amperage. *
NO
TEDama gedue toincor rect fuses Electrical components or sy
stems may be
damaged byincor rect fuses, or their func‐
tionality may be significant lyimpaired. #
Only use fuses that ha vebeen appr oved
by Mercedes-Benz and which ha vethe
cor rect fuse rating. Blown fuses mu
stbe replaced with fuses of the
same rating, which you can recognise bythe col‐
our and fuse rating. The fuse ratings and fu rther
information tobe obser ved can be found in the
fuse assignment diagram.
Fu se assignment diag ram: onthe fuse box in
th e boot (/ page 262).
* NO
TEDama geor malfunctions caused
by moisture Moisture may cause dama
getothe electrical
sy stem or cause it tomalfunction. #
When the fuse box is open, make sure
th at no moisture can enter the fuse
box. #
When closing the fuse box, make sure
th at the seal of the lid is positioned cor‐
re ctly on the fuse box. If
th e newly inser ted fuse also blo ws, ha vethe
cause traced and rectified at a qualified special‐
ist workshop.
Ensure thefo llowing before replacing a fuse:
R The vehicle is secured against rolling away. R
All electrical consumers are switched off.
R The ignition is switched off.
The electrical fuses are located in various fuse
bo xes:
R Fuse box in the front passenger foot we ll
(/ page 261)
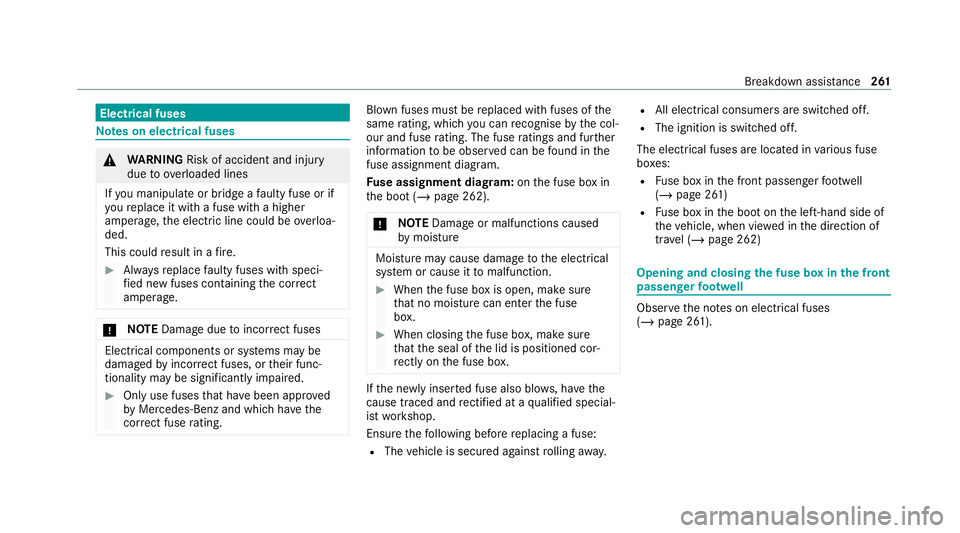
R Fuse box in the boot on the left-hand side of
th eve hicle, when vie wed in the direction of
tr av el (/ page 262) Opening and closing
the fuse box in the front
passenger foot we ll Obser
vethe no tes on electrical fuses
(/ page 261). Breakdown assis
tance 261
Page 265 of 381
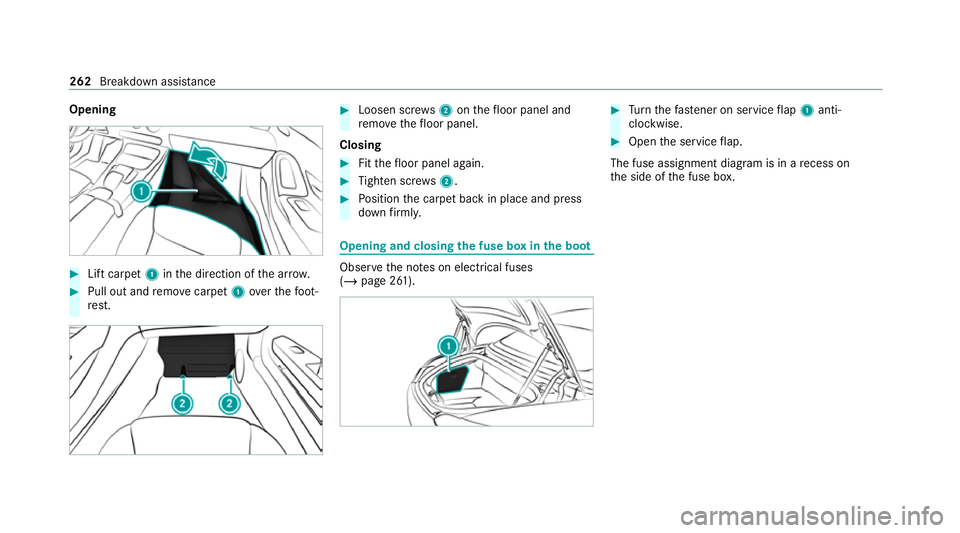
Opening
#
Lift carpet 1inthe direction of the ar row. #
Pull out and remo vecarpet 1over thefo ot‐
re st. #
Loosen scr ews2 onthefloor panel and
re mo vethefloor panel.
Closing #
Fitthefloor panel again. #
Tighten scr ews2. #
Position the carpet back in place and press
down firm ly. Opening and closing
the fuse box in the boot Obser
vethe no tes on electrical fuses
(/ page 261). #
Turn thefast ener on service flap 1 anti-
clo ckwise. #
Open the service flap.
The fuse assignment diagram is in a recess on
th e side of the fuse box. 262
Breakdown assis tance