2020 MASERATI GRANTURISMO fuel cap
[x] Cancel search: fuel capPage 23 of 286

Fuel Warning Label
The labels are applied inside the fuel
filler door.
Mercury Content Warning Label
This label is applied to the lower end
of the driver’s door.Tire and Loading Information Label
This label is applied on the driver’s
side at the base of the rear door pillar.
Lubricant Information Label
This label is applied on the covering in
the right-hand side of the engine
compartment.Engine Coolant Information Label
This label is applied in correspondence
of the coolant filling cap, in the
engine compartment.
Introduction
1
19
Page 153 of 286

Engine Start Failure
CAUTION!
• Do not attempt to push or tow your
vehicle to get it started. Vehicles
equipped with an automatic
transmission cannot be started this
way.
• If the vehicle battery is dead, booster
cables may be used to obtain a start
from a booster battery or the
battery in another vehicle. This type
of start can be dangerous if done
improperly. See “Auxiliary Jump
Start Procedure” in section “In an
Emergency” for further information.
Starting by cold engine
Start-off slowly, avoiding sudden
acceleration and rev the engine up at
low medium speeds. High-
performance driving should be
avoided until the engine temperature
reaches 65-70°C (149-158°F).
Engine Turn-Off
• Place the shift lever in P (Park) (see
“Automatic Transmission” in this
section).
• With the engine at idle, turn the key
in the ignition switch toSTOP (OFF)position. A burst on the accelerator
pedal before turning off the engine
has no purpose and increases fuel
consumption.
WARNING!
Never leave a vehicle out of the P
(Park) position, as it could move.
The key can only be removed from the
ignition switch when the transmission
is in P (Park) position and within 30
seconds after turning the key toSTOP
(OFF)position. If you do not remove
the key within 30 seconds, you will
need to turn it back toMAR (ON)and
then toSTOP (OFF)position to have a
further 30 seconds within which to
remove the key from the ignition
switch.
In the event that the key unlocking
system fails or if it is not possible to
shift the transmission to P (Park)
position, to remove the key you must
turn it toSTOP (OFF)position, then
remove the cap shown in picture using
a pen or sufficiently pointed tool.
Then press the button just uncovered
and at the same time extract the key
from the ignition switch. Once the key
has been removed, refit the removed
cap.
Driving
5
149
Page 185 of 286

•Under-inflation increases tire flexing
and can result in tire overheating.
•Over-inflation reduces a tire's ability
to cushion shock. Objects on the
road and potholes can cause
damage that results in tire failure.
•Over-inflated or under-inflated tires
can affect vehicle handling and can
fail suddenly, resulting in loss of
vehicle control.
•Unequal tire pressures can cause
steering problems.
•Unequal tire pressures from one side
of the vehicle to the other can cause
the vehicle to drift to the right or
left.
•Always drive with each tire inflated
to the recommended cold tire
inflation pressure.
Economy
Improper inflation pressures may
cause uneven wear patterns to
develop across the tire tread. These
abnormal wear patterns will reduce
tread life resulting in a need for
earlier tire replacement. Under-
inflation also increases tire rolling
resistance resulting in higher fuel
consumption.Ride comfort and vehicle stability
Proper tire inflation contributes to a
comfortable ride. Over-inflation
produces a jarring and uncomfortable
ride.
Tire Pressure Checkup
The proper cold tire inflation pressure
is indicated on the driver's side rear
door pillar and on the table “Tire
Inflation Pressure” in section
“Features and Specifications”.
Inflation pressure specified on the
table always refers to “cold tire
inflation pressure”. Cold tire inflation
pressure is defined as the tire pressure
after the vehicle has not been driven
for at least three hours, or driven less
than 1 mi (1,6 km) after a three hour
period.
Check tire pressures more often in
case of significant outside
temperature changes, as tire pressure
varies according to temperature
changes.
The pressure should be checked and if
necessary adjusted; tire wear and
overall conditions should also be
checked monthly. Tire pressures
change by approximately 1 PSI (0,07
bar) per 12°F (7°C) of air temperature
change. Keep this in mind whenchecking tire pressure inside a garage,
especially in winter.
Example: If garage temperature = 68°F
(20°C) and the outside temperature =
32°F (0°C) then the cold tire inflation
pressure should be increased by 3 PSI
(0,21 bar) for every 12°F (7°C) for this
outside temperature condition.
Tire pressure may increase from 2 to 6
PSI (0,13 to 0,4 bar) during operation.
DO NOT reduce this normal pressure
build-up or your tire pressure will be
too low. After inspecting or adjusting
the tire pressure, always reinstall the
valve stem cap. This will prevent
moisture and dirt from entering the
valve stem, which could damage the
valve stem and the TPMS sensor
connected to it.
Tread Wear Indicators
Tread wear indicators are in the
original equipment tires to help you
determine when your tires should be
replaced.
These indicators are molded into the
bottom of the tread grooves.
When the tread is worn to one of the
tread wear indicators, the tire should
be replaced.
Driving
5
181
Page 190 of 286

(Continued)
style. Aftermarket wheels can cause
sensor damage. Do not use
aftermarket tire sealants or balance
beads, as damage to the sensors may
result.
• The system can temporarily
experience radio-electric interference
emitted by devices using similar
frequencies.
• After inspecting or adjusting the tire
pressure, always reinstall the valve
stem cap. This will prevent moisture
and dirt from entering the valve
stem and damage the TPMS internal
sensor.
NOTE:
•Driving on a significantly
underinflated tire causes the tire to
overheat and may lead to tire failure.
Under-inflation also reduces fuel
efficiency and tire tread life, and may
affect the vehicle’s handling and
stopping ability.
•The TPMS is not a substitute for
proper tire maintenance, and it is the
driver’s responsibility to maintain
correct tire pressure using an
accurate tire pressure gage, even if
under-inflation has not reached thelevel to trigger illumination of the
TPMS light
.
•Seasonal temperature changes will
affect tire pressure, and the TPMS
will monitor the actual tire pressure
in the tire.
Viewing Messages on the
Display
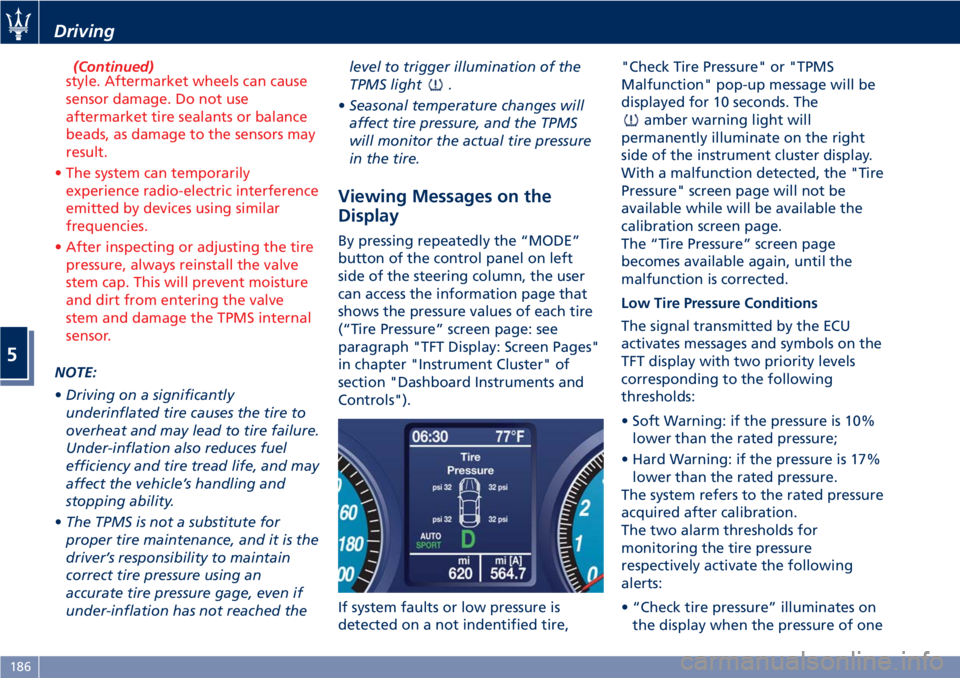
By pressing repeatedly the “MODE”
button of the control panel on left
side of the steering column, the user
can access the information page that
shows the pressure values of each tire
(“Tire Pressure” screen page: see
paragraph "TFT Display: Screen Pages"
in chapter "Instrument Cluster" of
section "Dashboard Instruments and
Controls").
If system faults or low pressure is
detected on a not indentified tire,"Check Tire Pressure" or "TPMS
Malfunction" pop-up message will be
displayed for 10 seconds. The
amber warning light will
permanently illuminate on the right
side of the instrument cluster display.
With a malfunction detected, the "Tire
Pressure" screen page will not be
available while will be available the
calibration screen page.
The “Tire Pressure” screen page
becomes available again, until the
malfunction is corrected.
Low Tire Pressure Conditions
The signal transmitted by the ECU
activates messages and symbols on the
TFT display with two priority levels
corresponding to the following
thresholds:
• Soft Warning: if the pressure is 10%
lower than the rated pressure;
• Hard Warning: if the pressure is 17%
lower than the rated pressure.
The system refers to the rated pressure
acquired after calibration.
The two alarm thresholds for
monitoring the tire pressure
respectively activate the following
alerts:
• “Check tire pressure” illuminates on
the display when the pressure of one
Driving
5
186
Page 196 of 286

Refueling
Fuel Filler Neck Access
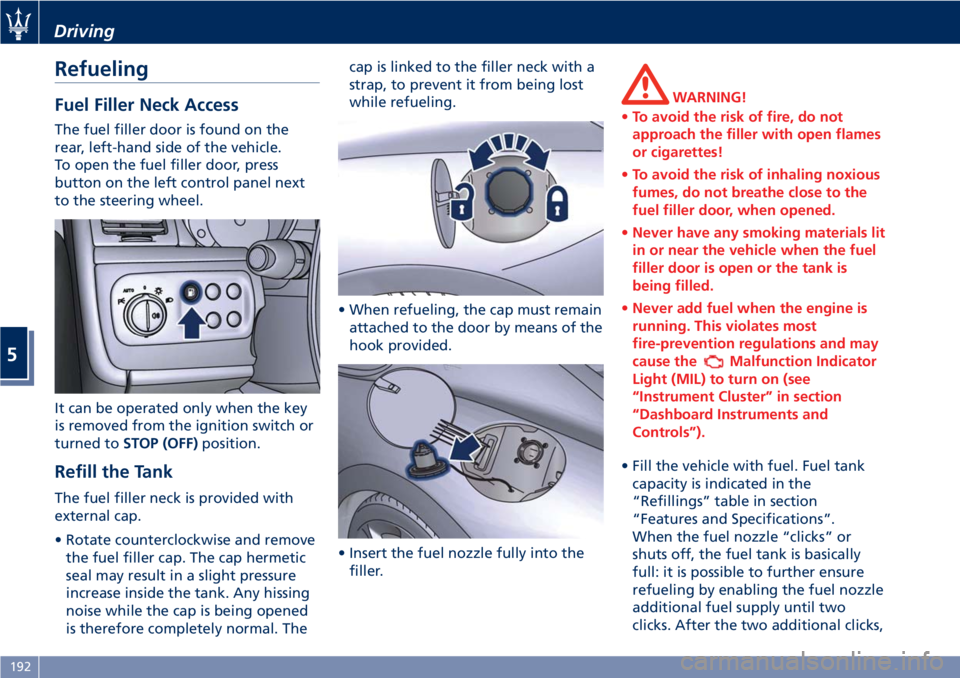
The fuel filler door is found on the
rear, left-hand side of the vehicle.
To open the fuel filler door, press
button on the left control panel next
to the steering wheel.
It can be operated only when the key
is removed from the ignition switch or
turned toSTOP (OFF)position.
Refill the Tank
The fuel filler neck is provided with
external cap.
• Rotate counterclockwise and remove
the fuel filler cap. The cap hermetic
seal may result in a slight pressure
increase inside the tank. Any hissing
noise while the cap is being opened
is therefore completely normal. Thecap is linked to the filler neck with a
strap, to prevent it from being lost
while refueling.
• When refueling, the cap must remain
attached to the door by means of the
hook provided.
• Insert the fuel nozzle fully into the
filler.
WARNING!
•To avoid the risk of fire, do not
approach the filler with open flames
or cigarettes!
•To avoid the risk of inhaling noxious
fumes, do not breathe close to the
fuel filler door, when opened.
•Never have any smoking materials lit
in or near the vehicle when the fuel
filler door is open or the tank is
being filled.
•Never add fuel when the engine is
running. This violates most
fire-prevention regulations and may
cause the
Malfunction Indicator
Light (MIL) to turn on (see
“Instrument Cluster” in section
“Dashboard Instruments and
Controls”).
• Fill the vehicle with fuel. Fuel tank
capacity is indicated in the
“Refillings” table in section
“Features and Specifications”.
When the fuel nozzle “clicks” or
shuts off, the fuel tank is basically
full: it is possible to further ensure
refueling by enabling the fuel nozzle
additional fuel supply until two
clicks. After the two additional clicks,
Driving
5
192
Page 197 of 286

the amount of fuel allowed by the
system is very low, we recommend
therefore not to persist further.
• Wait approximately 10 seconds
before removing the fuel nozzle in
order to ensure completed supply of
residual fuel and restrict the risk of
fouling the fuel filler door area.
• Remove the fuel nozzle.
• Insert the cap on the fuel filler neck.
• Tighten the cap, turning it clockwise
until it stops.
• Close the fuel tank door.
CAUTION!
To avoid fuel spillage and overfilling,
do not “top off” the fuel tank after
filling.
Emergency Fuel Filler Door
Release
If you are unable to unlock the fuel
filler door using the dedicated button,
use the fuel filler door emergency
release located in the trunk.
• Open the trunk lid (see “Open and
Close the Trunk Lid” in section
“Before Starting”).
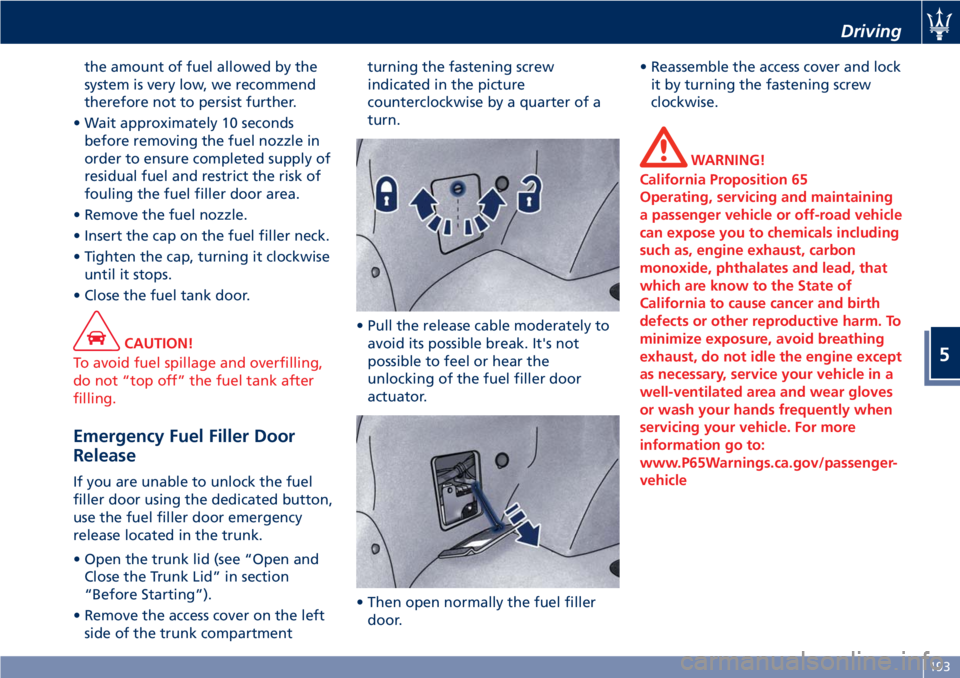
• Remove the access cover on the left
side of the trunk compartmentturning the fastening screw
indicated in the picture
counterclockwise by a quarter of a
turn.
• Pull the release cable moderately to
avoid its possible break. It's not
possible to feel or hear the
unlocking of the fuel filler door
actuator.
• Then open normally the fuel filler
door.• Reassemble the access cover and lock
it by turning the fastening screw
clockwise.
WARNING!
California Proposition 65
Operating, servicing and maintaining
a passenger vehicle or off-road vehicle
can expose you to chemicals including
such as, engine exhaust, carbon
monoxide, phthalates and lead, that
which are know to the State of
California to cause cancer and birth
defects or other reproductive harm. To
minimize exposure, avoid breathing
exhaust, do not idle the engine except
as necessary, service your vehicle in a
well-ventilated area and wear gloves
or wash your hands frequently when
servicing your vehicle. For more
information go to:
www.P65Warnings.ca.gov/passenger-
vehicle
Driving
5
193
Page 201 of 286

• Do not exceed 5 mph (8 km/h) when
driving through standing water. This
will minimize wave effects.
• Driving through standing water may
cause damage to your vehicle
drivetrain components. After driving
through standing water, do not drive
if you are not sure about drivetrain
condition. Such damage is not
covered by the New Vehicle
Warranty.
• Getting water inside your vehicle
engine can cause it to lock up and
stall out, and cause serious internal
damage to the engine. Such damage
is not covered by the New Vehicle
Warranty.
• After driving through standing
water always have the fluids (engine
oil, transmission oil, etc) checked for
contamination at anAuthorized
Maserati Dealer.
WARNING!
•Driving through standing water
limits your vehicle traction
capabilities. Do not exceed 5 mph
(8 km/h) when driving through
standing water.
•Driving through standing waterlimits your vehicle braking
capabilities, which increases
stopping distances. Therefore, after
driving through standing water,
drive slowly and lightly press on the
brake pedal several times to
progressively dry the brakes discs
and pads.
•Getting water inside your vehicle
engine can cause it to lock up and
stall out.
•Failure to follow these warnings
may result in injuries that are
serious or fatal to you, your
passengers, and others around you.
Pollution Control Devices
Even if the vehicle is fitted with
antipollution devices, the environment
deserves the greatest respect from
every one of us.
By following a few simple rules, the
driver can avoid damaging the
environment and very often can
reduce fuel consumption as well.
In this regard, some useful
information is listed here below;
please read it carefully.
• The first precaution is to follow the
Scheduled Service Plan scrupulously
(see “Scheduled Service Plan” in
section “Maintenance and Care”.
• The correct operation of the
antipollution devices not only helps
respect for the environment, but
also has an impact on vehicle
efficiency. Keeping these devices in
good working conditions is the first
rule for driving both ecologically
sound and economically.
• Always use unleaded fuel.
• If starting is difficult, do not make
prolonged attempts. In particular,
avoid push starts, towing or
downhill starts: these are all
maneuvers that can damage the
catalytic converters. For any
Driving
5
197
Page 272 of 286

WARNING!
California Proposition 65
Operating, servicing and maintaining
a passenger vehicle or off-road vehicle
can expose you to chemicals including
such as, engine exhaust, carbon
monoxide, phthalates and lead, that
which are know to the State of
California to cause cancer and birth
defects or other reproductive harm. To
minimize exposure, avoid breathing
exhaust, do not idle the engine except
as necessary, service your vehicle in a
well-ventilated area and wear gloves
or wash your hands frequently when
servicing your vehicle. For more
information go to:
www.P65Warnings.ca.gov/passenger-
vehicle
Engine Oil Identification
Symbol
This symbol means that the oil
has been certified by the
American Petroleum Institute
(API). Maserati only
recommends API Certified engine oils.
CAUTION!
Do not use chemical flushes in yourengine oil as the chemicals can
damage your engine. Damage caused
by use of non-approved chemicals is
not covered by the new Vehicle
Limited Warranty.
Engine Oil Viscosity (SAE
Grade)
SAE 5W-40 engine oil is recommended
for all operating temperatures.
The engine oil filler cap also shows the
recommended engine oil viscosity for
your engine. For information on
engine oil filler cap location, refer to
chapter “Maintenance Procedures” in
section “Maintenance and Care”.
Lubricants that do not have both the
engine oil certification mark and the
correct SAE viscosity grade number
should not be used.
Fuel Consumption
NOTE:
•The technical data, values and
specifications in this Owner’s Manual
are provided as guidance only. The
vehicle specific data can deviate from
the information provided, for
example, as a result of optional or
special equipment ordered with the
vehicle, vehicle loads, and country
specific measurement methods.
•The specifications described below
can change without prior
notification.
The fuel consumption values shown
(Miles Per Gallon - MPG) are
established using EPA test guidelines.
City:13MPG
Highway:21MPG
Combined:16MPG
Features and Specifications
8
268