2020 MASERATI GRANTURISMO child lock
[x] Cancel search: child lockPage 48 of 286

under “Child Restraint Systems” in this
section.
When the passenger seating position
with ALR is being used for normal
usage, only pull the belt out far
enough to comfortably wrap around
the occupant so as to not activate the
ALR. If the ALR is activated, you will
hear a ratcheting sound as the belt
retracts. In this case, allow the belt to
retract completely and then carefully
pull out only the amount of belt
necessary to comfortably wrap around
the seat occupant.
Slide the latch plate into the buckle
until you hear a "click".
WARNING!
•Remember that, in the event of a
violent impact, the passengers in the
rear seats that are not wearing the
seat belts are not only subject to
personal injury but they also
represent a danger for passengers
sitting in the front seats.
•Always fasten the seat belts.
•Traveling without the seat belts
fastened significantly increases the
risk of serious injury in the event of
a collision, even with the air bags.•In the event of a collision, the seat
belts help reduce the possibility of
the vehicle’s occupants being thrown
against the structures of the
passenger compartment or out of
the vehicle.
•The air bags are designed to work
together with the seat belts, not to
substitute them. The front air bags
only deploy in the event of certain
head-on collisions of sufficient
intensity. They may not be activated
if the vehicle rolls over, or in the
event of rear bumps or minor frontal
collisions, or non-frontal collisions.
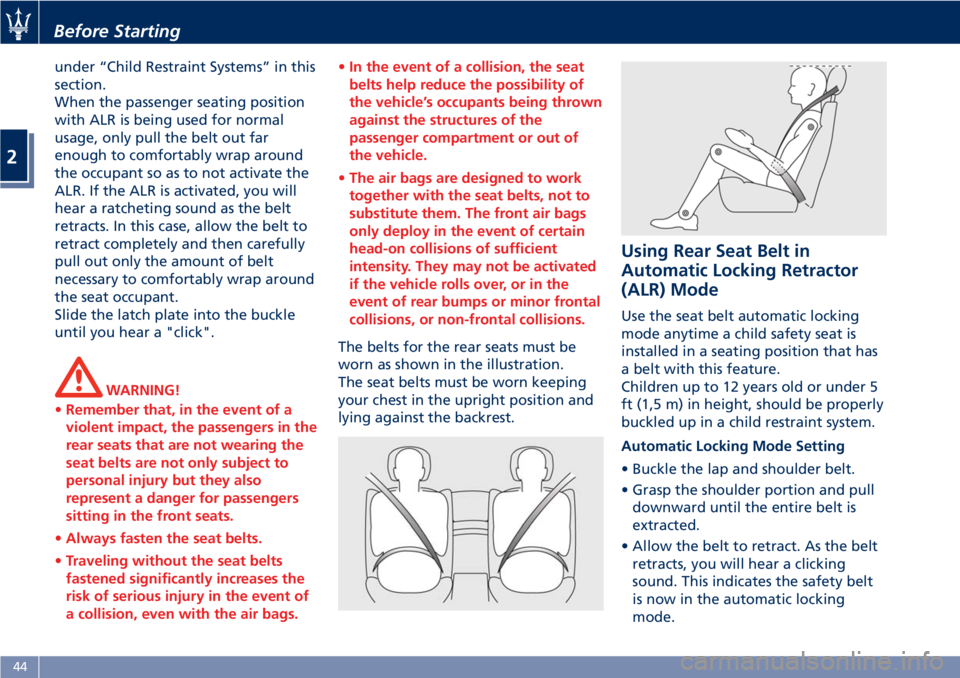
The belts for the rear seats must be
worn as shown in the illustration.
The seat belts must be worn keeping
your chest in the upright position and
lying against the backrest.
Using Rear Seat Belt in
Automatic Locking Retractor
(ALR) Mode
Use the seat belt automatic locking
mode anytime a child safety seat is
installed in a seating position that has
a belt with this feature.
Children up to 12 years old or under 5
ft (1,5 m) in height, should be properly
buckled up in a child restraint system.
Automatic Locking Mode Setting
• Buckle the lap and shoulder belt.
• Grasp the shoulder portion and pull
downward until the entire belt is
extracted.
• Allow the belt to retract. As the belt
retracts, you will hear a clicking
sound. This indicates the safety belt
is now in the automatic locking
mode.
Before Starting
2
44
Page 60 of 286

NOTE:
For additional information, refer to
www.seatcheck.org or call
1–866–SEATCHECK. Canadian residents
should refer to Transport Canada’s
website for additional information:
http://www.tc.gc.ca/roadsafety/
safedrivers/childsafety/index.htm
WARNING!
•Improper installation can lead to
failure of an infant or child restraint.
It could come loose in a collision. The
child could be badly injured or killed.
Follow the restraint manufacturer’s
directions exactly when installing an
infant or child restraint.
•A rearward-facing child restraint
should only be used in a rear seat. A
rearward-facing child restraint in the
front seat may be struck by a
deploying passenger air bag, which
may cause severe or fatal injury to
the infant.
Here are Some Tips on Getting
the Most Out of Your Child
Restraint
• Before buying any restraint system,
make sure that it has a labelcertifying that it meets all applicable
Safety Standards. Maserati also
recommends that you make sure that
you can install the child restraint in
the vehicle where you will use it
before you buy it.
• The restraint system must be
appropriate for your child’s weight
and height.
• Check the label on the restraint
system for weight and height limits.
• Carefully follow the instructions that
come with the restraint system.
• If installed improperly, it may not
work when needed.
• Fit the child into the seat according
to the child restraint manufacturer’s
directions.
WARNING!
When your child restraint system is
not in use, secure it in the vehicle with
the seat belt or remove it from the
vehicle. Do not leave it loose in the
vehicle. In a sudden stop or accident, it
could strike the occupants or
seatbacks and cause serious personal
injury.
Installing Child Restraint
Systems using the Vehicle Seat
Belt equipped with ALR
All the passenger seat belts are
equipped with an Automatic Locking
Retractor (ALR) to secure child
protection through a Child Restraint
System (CRS). These types of seat belts
are designed to keep the lap portion
of the seat belt tight around the child
restraint seat avoiding to use a locking
clip.
The ALR will make a ratcheting noise if
the entire belt is pulled out of the
retractor in order to enable the belt to
retract subsequently. For additional
information on ALR, see “Using Seat
Belt in Automatic Locking Retractor
(ALR) Mode” in “Occupants Restraint
Systems” in this section.
To install a Child Restraint System with
ALR, pull enough of the belt out of the
retractor leading it through the belt
path of the protection device. Slide the
latch into the buckle until it clicks,
then remove the entire safety belt
from the retractor in order to
rewound. While rewinding a click will
indicate the safety belt is now in
Automatic Locking mode.
Exert then a traction on the exceeded
lap section of the belt in order to
Before Starting
2
56
Page 62 of 286

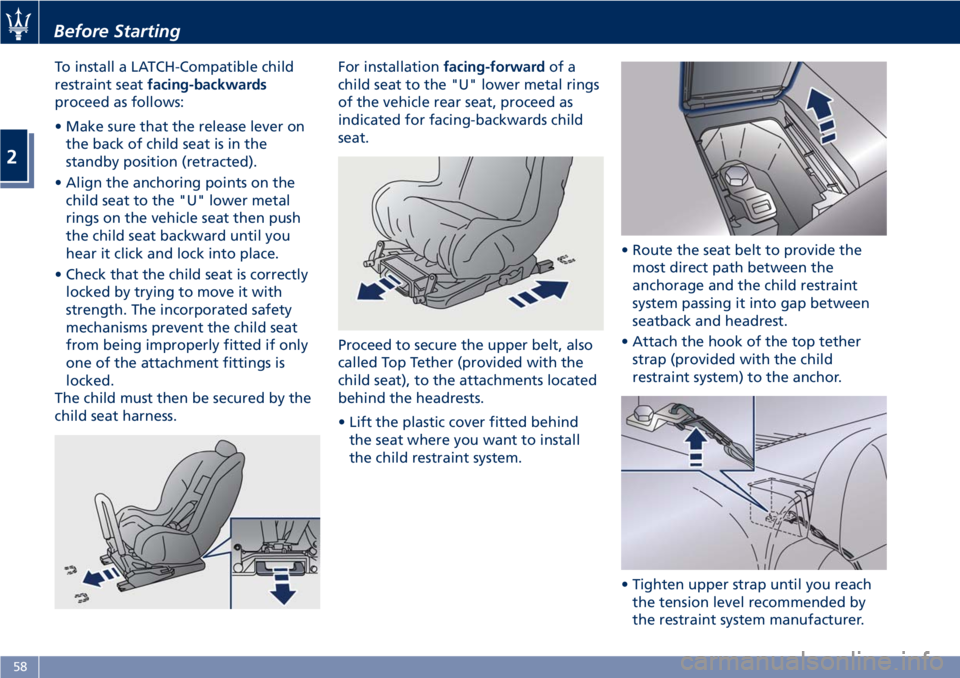
To install a LATCH-Compatible child
restraint seatfacing-backwards
proceed as follows:
• Make sure that the release lever on
the back of child seat is in the
standby position (retracted).
• Align the anchoring points on the
child seat to the "U" lower metal
rings on the vehicle seat then push
the child seat backward until you
hear it click and lock into place.
• Check that the child seat is correctly
locked by trying to move it with
strength. The incorporated safety
mechanisms prevent the child seat
from being improperly fitted if only
one of the attachment fittings is
locked.
The child must then be secured by the
child seat harness.For installationfacing-forwardof a
child seat to the "U" lower metal rings
of the vehicle rear seat, proceed as
indicated for facing-backwards child
seat.
Proceed to secure the upper belt, also
called Top Tether (provided with the
child seat), to the attachments located
behind the headrests.
• Lift the plastic cover fitted behind
the seat where you want to install
the child restraint system.• Route the seat belt to provide the
most direct path between the
anchorage and the child restraint
system passing it into gap between
seatback and headrest.
• Attach the hook of the top tether
strap (provided with the child
restraint system) to the anchor.
• Tighten upper strap until you reach
the tension level recommended by
the restraint system manufacturer.
Before Starting
2
58
Page 170 of 286

Parking Brake” in section “In an
Emergency”).
• “Parking Brake system revision: go to
dealer”
The EPB system requires
maintenance, therefore contact an
Authorized Maserati Dealerto have
the system corrected.
WARNING!
In the event of an EPB failure, take
your vehicle to the nearest Authorized
Maserati Dealer as soon as possible.
Initialize the EPB System after a
Battery Disconnecting
After the detachment and the
subsequent connection of the battery,
on the instrument cluster display the
warning light will light up.
To initialize the EPB system lift, release
and lift again the lever located next to
the transmission shift lever.
Emergency Disengagement
In case of brake lock with complete
electrical system failure, it is necessary
to act on the electric actuator using
the special tool provided in the tool kit
to release the pressure of the parking
brake shoes (see “Emergency Releaseof the Parking Brake” chapter in
section “In an Emergency”).
EPB Operation with
Overheated Brakes
Driving on mountain roads with steep
slopes or a sports use of the vehicle
could overheat the brake system
components. In these conditions,
parking brake must not be used since
the push of the power actuator might
not be sufficient to ensure vehicle
braking, especially on a slope.
Drive normally without braking to
allow the brakes to cool down a few
minutes before stopping. In this way,
the automatic or manual activation of
the parking brake will ensure vehicle
braking.
Parking
Straighten the wheels and turn off the
engine.
Before leaving the vehicle, make sure
that the parking brake is fully applied
in automatic or manual mode and
place the transmission lever in the P
(Park) position.
Remove the key from the ignition
switch.
WARNING!
•Always check that the vehicle is
locked before leaving it.
•Never leave children unattended in
the vehicle.
•Do not park the vehicle on paper,
grass, dry leaves or other flammable
materials. They could catch fire if
they come into contact with hot
parts of the exhaust system.
•Do not leave the engine running
while the vehicle is unattended.
CAUTION!
When you need to park the vehicle on
a steep slope, both with the engine on
and off, it is recommended not only to
Driving
5
166
Page 280 of 286

Abbreviations.................7
ABS (Anti-lock Braking System) . . .169
A/C Air Filter Replacement.......253
Accessories
Aftermarket Parts and Accessories
Statement.................11
Accident, in the event of........203
A/C System Maintenance........252
Airbag.....................47
Air bag System Components.....47
Air bag Warning Light.........66
Passenger Air bag Labels.......18
Supplemental Restraint System
(SRS).....................47
Air Conditioning Controls.......140
Air Conditioning Distribution.....101
Alarm, Vehicle Security..........26
ALR (Automatic Locking Retractor) . .44
Assistance....................9
Assistance, if you need.........9
Audio Controls...............128
Steering Wheel Audio Controls . .128
Audio, Customer Setting........136
Audio System................130
Automatic Transmission........150
Automatic Transmission Range . .152
AUX, USB and SD Memory Card
Ports.....................122
Battery....................237
Access the Battery...........215
Jump Start Procedure........215
Maintenance - Free Battery. . . .237To Disconnect the Battery.....237
To Reconnect the Battery......238
Bluetooth, Customer settings.....137
Bodywork Maintenance and Care . .255
Protection from Atmospheric
Agents..................255
Useful Advice to Keep the
Bodywork in Good Condition . . .256
Brakes
Brake and Stability Control
System...................167
Brake Fluid Level Check.......232
Brake Overheating..........172
Parking Brake..............164
Parking Brake - Manual
Release..................209
Using the Brakes............171
Bulb Replacement............247
Cargo Area
..................97
Child Restraint Systems
Children too large for Booster
Seats.....................55
Infants and Child Restraints.....54
Lower Anchors and Tether for
Children (LATCH)............57
Older Children and Child
Restraints.................55
Tips on getting the most out of
your child restraint...........56
Clock, analog................134
Comfort Pack Front Seats........76
Driver Memory Seat..........77Front Heated Seats...........76
Console
Central Console Components....73
Front Dome Console
Components...............71
Cruise Control...............175
Cupholders
Front Seats Cupholders........94
Rear Seats Cupholders.........94
Dashboard Components.........70
Data, Technical..............269
Defroster...................66
Doors Components.............72
Drive Mode, Controls..........159
Driving Conditions
Before the Trip.............194
Driving at Night............194
Driving in Fog..............195
Driving in the Mountains......195
Driving in the Rain..........194
Driving on Snow or Ice........196
Driving through Flooded
Sections..................196
Safe Driving...............194
DRL (Daytime Running Light)......84
Easy Entry/Exit function.........80
EDR (Event Data Recorder).......53
Emergency
Emergency Fuel Filler Door
Release..................193
Hazard Warning Flasher.......89
Index
9
276