2020 MASERATI GRANTURISMO buttons
[x] Cancel search: buttonsPage 92 of 286

CAUTION!
The high beams can only be switched
on manually by pushing the left-hand
multifunction lever forward.
WARNING!
If the high beams are activated, they
will turn on automatically every time
the low beams are switched on either
manually or automatically. We
recommend therefore that you switch
them off when they are no longer
necessary and every time the twilight
sensor deactivates the external lights.
“Follow me Home” Function
This function allows you to set a
timing for activation of the position
lights and low beams, so that they may
remain on for a set time after turning
off the vehicle.
This function is activated by pushing
the left-hand multifunction lever on
the steering column, used to flash the
headlights.
The position lights and low beams turn
on for 30 seconds, the message
“Follow me” appears on the
instrument cluster display for 20seconds, and the light activation time
is displayed.
When this function is active, every
time the left-hand multifunction lever
for flashing the headlights is operated,
the time the lights remain on is
increased by 30 seconds, with a
maximum total time of 210 seconds.
The display will show the time set.
If the left-hand multifunction lever for
flashing the headlights is operated for
more than 2 seconds, the function is
deactivated, and the indicator on the
instrument cluster display goes off.
When the function is active, turning
the key in the ignition switch back to
MAR (ON)position deactivates the
system.Front Domelights
The front domelight includes a central
and two reading lights.
The central light automatically turns
on when one of the doors is opened
and turns off when the door is closed
(timed switching off). The light may be
switched on manually by pressing the
central button.
The reading lights are controlled by
the respective side buttons.
If they are turned on by pressing the
button, both central and reading lights
will stay on for about 15 minutes afterturning the engine off, and will then
turn off gradually.
When the exterior lights are switched
on, the two night LEDs fitted on the
side of the lateral buttons will light up
to facilitate use of the transmission
shift lever and the central console
controls.
In the event of a collision causing the
inertia switch activation, the
domelights turn on automatically for
approx. 15 minutes.
If one or more doors are opened, the
front and rear domelights will turn on
for approx. 3 minutes. If the door is
closed before this time, the lights will
dim and subsequently switch off after
about 10 seconds.
Upon removing the key from the
ignition switch and activating the
centralized door locking system with
the remote control buttons, the
Understanding the Vehicle
3
88
Page 102 of 286
The trunk is the most suitable place to
load bulky and heavy objects onboard
the vehicle.
To load your vehicle properly, store
heavier items below and be sure you
distribute their weight as evenly as
possible.
Stow all loose items securely before
start driving as they could move during
the trip.HomeLink®(for
versions/markets, where
provided)
HomeLink®replaces up to three
hand-held transmitters operating the
automatic devices that open garage
doors and gates, enable/disable the
lighting or security systems. The
HomeLink
®unit is powered by your
vehicle's 12 Volt battery. The
HomeLink
®buttons that are located in
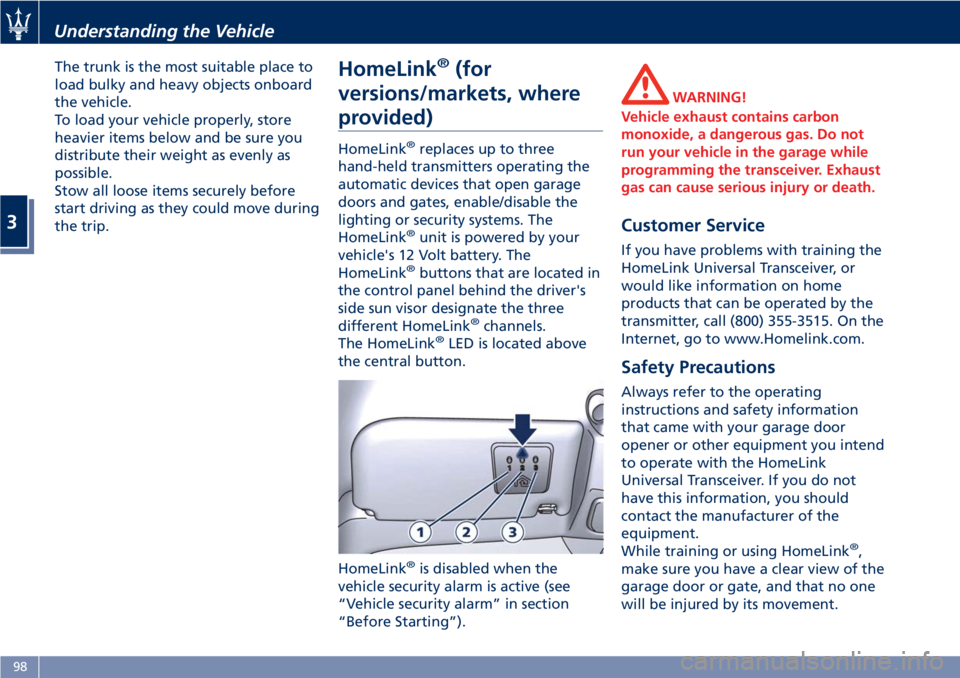
the control panel behind the driver's
side sun visor designate the three
different HomeLink
®channels.
The HomeLink®LED is located above
the central button.
HomeLink
®is disabled when the
vehicle security alarm is active (see
“Vehicle security alarm” in section
“Before Starting”).
WARNING!
Vehicle exhaust contains carbon
monoxide, a dangerous gas. Do not
run your vehicle in the garage while
programming the transceiver. Exhaust
gas can cause serious injury or death.
Customer Service
If you have problems with training the
HomeLink Universal Transceiver, or
would like information on home
products that can be operated by the
transmitter, call (800) 355-3515. On the
Internet, go to www.Homelink.com.
Safety Precautions
Always refer to the operating
instructions and safety information
that came with your garage door
opener or other equipment you intend
to operate with the HomeLink
Universal Transceiver. If you do not
have this information, you should
contact the manufacturer of the
equipment.
While training or using HomeLink
®,
make sure you have a clear view of the
garage door or gate, and that no one
will be injured by its movement.
Understanding the Vehicle
3
98
Page 103 of 286
General Information
While programming HomeLink®,itis
advisable to disconnect the drive
motor of the gate/door to be remote
controlled, since the numerous driving
pulses launched for this operation
might damage it.
If the battery fails or is disconnected,
the stored settings are not deleted.
If the gate/door was manufactured
prior to April 1982 (not equipped with
safety systems or automatic stop in the
event of an obstacle in the range of
action), the gate/door cannot be
controlled by HomeLink
®.
If you have questions, call (800)
355-3515.
WARNING!
California Proposition 65
Operating, servicing and maintaining
a passenger vehicle or off-road vehicle
can expose you to chemicals including
such as, engine exhaust, carbon
monoxide, phthalates and lead, that
which are know to the State of
California to cause cancer and birth
defects or other reproductive harm. To
minimize exposure, avoid breathing
exhaust, do not idle the engine except
as necessary, service your vehicle in awell-ventilated area and wear gloves
or wash your hands frequently when
servicing your vehicle. For more
information go to:
www.P65Warnings.ca.gov/passenger-
vehicle
Programming
• Press and hold buttons "1" and "3".
• After about 20 seconds, the LED
starts flashing.
• Release the buttons.
• Hold the remote control for the
device to be controlled close to the
HomeLink
®control panel (0-30 cm/
0-12 in).
• Simultaneously press and hold the
button on the hand-held remote
control and one of the three
HomeLink
®buttons "1", "2" or "3".
• Successful programming is signaled
by the LED flashing faster.
• Release the buttons.
To program the other buttons, repeat
the operations skipping the first three
steps.
Use
• When the signal of the device to be
activated reaches its operatingrange, press the dedicated
HomeLink
®button.
• The LED remains on while the signal
is being transmitted.
The devices controlled through the
HomeLink
®function can always be
activated using the original remote
controls.
Should the so programmed
HomeLink
®not activate the system to
be controlled, this may be due to the
fact that this system is controlled by a
remote control with a rolling code.
A rolling activation code can be
recognized in the following ways:
• consulting the instruction manual
provided with the device to be
controlled;
• despite the fact that the HomeLink
®
programming procedure has been
carried out correctly, the HomeLink®
function does not activate the
device;
• holding the dedicated HomeLink
®
button pressed down, the LED
briefly flashes fast and then remains
on for 2 seconds; this sequence is
repeated for about 20 seconds.
Understanding the Vehicle
3
99
Page 104 of 286
Programming Devices
Controlled by Rolling Code
• Locate the specific setting button by
consulting the user manual of the
system to be controlled. This button
is normally located on the motor
which drives the device.
• Press the button and, in normal
conditions, a LED will illuminate.
NOTE:
Normally, after this operation you
have 30 seconds to start the next one.
• Briefly press the HomeLink
®button
you have chosen to control the
device.
• Press it a second time; when it is
released the operation should be
completed. For some types of
motors, the button might have to be
pressed a third time.
Reprogramming an Individual
Button
If you wish to program activation of a
new system on an already used
HomeLink
®button, proceed as
follows:
• press and hold the HomeLink
®
button selected;• after about 20 seconds, the LED
starts flashing; hold the button
down;
• hold the original remote control of
the device to be controlled close to
the HomeLink
®control panel (0-30
cm/0-12 in);
• press and hold the button on the
original remote control;
• successful programming is signaled
by the LED flashing faster;
• release both buttons.
The system previously programmed on
HomeLink
®has thus been replaced
with the new programming and is
ready to be used.
This operation has no impact on the
other HomeLink
®buttons.
Deleting the Programmed
Buttons
Unlike programming, which is
performed for each individual button,
all three buttons are deleted
simultaneously.
To delete proceed as follows:
• press and hold buttons "1" and "3";
• after about 20 seconds, the LED
starts flashing;
• release the buttons.NOTE:
It is advisable to perform the
HomeLink
®deletion procedure when
selling the vehicle.
Regulations Compliance
This device complies with Part 15 of
the FCC rules (US) and Canada
Standard RSS-210 (Canada). Operation
is subject to the following two
conditions:
• This device may not cause harmful
interference.
• This device must accept any
interference received, including
interference that may cause
undesired operation.
Changes or modifications not expressly
approved by the party responsible for
compliance could void the user’s
authority to operate the equipment.
Understanding the Vehicle
3
100
Page 118 of 286
TFT Display: Menus and
Settings
The TFT display performs the following
functions:
• provides general information while
driving;
• signals failures and warnings.
The user can interact with the system
by setting the parameters for the
information that can be recalled.
The screen page displayed following
the initial check cycle, in normal
operating conditions, (standard screen
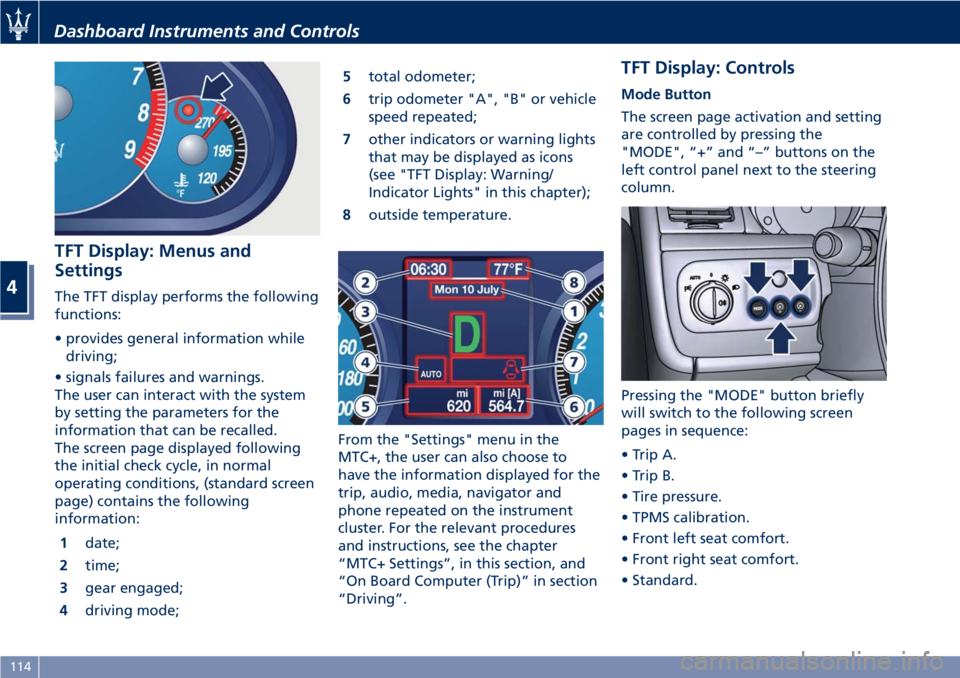
page) contains the following
information:
1date;
2time;
3gear engaged;
4driving mode;5total odometer;
6trip odometer "A", "B" or vehicle
speed repeated;
7other indicators or warning lights
that may be displayed as icons
(see "TFT Display: Warning/
Indicator Lights" in this chapter);
8outside temperature.
From the "Settings" menu in the
MTC+, the user can also choose to
have the information displayed for the
trip, audio, media, navigator and
phone repeated on the instrument
cluster. For the relevant procedures
and instructions, see the chapter
“MTC+ Settings”, in this section, and
“On Board Computer (Trip)” in section
“Driving”.
TFT Display: Controls
Mode Button
The screen page activation and setting
are controlled by pressing the
"MODE", “+” and “–” buttons on the
left control panel next to the steering
column.
Pressing the "MODE" button briefly
will switch to the following screen
pages in sequence:
• Trip A.
• Trip B.
• Tire pressure.
• TPMS calibration.
• Front left seat comfort.
• Front right seat comfort.
• Standard.
Dashboard Instruments and Controls
4
114
Page 119 of 286
“+“ and “–” Buttons
By means of the “+ “ and “–” buttons,
the user can adjust the instrument
cluster brightness.
When a screen page is viewed, these
buttons can be used to select the
available options (see paragraph "TFT
Display: Screen Pages" in this chapter).
TFT Display: Screen Pages
Trip Screen Page
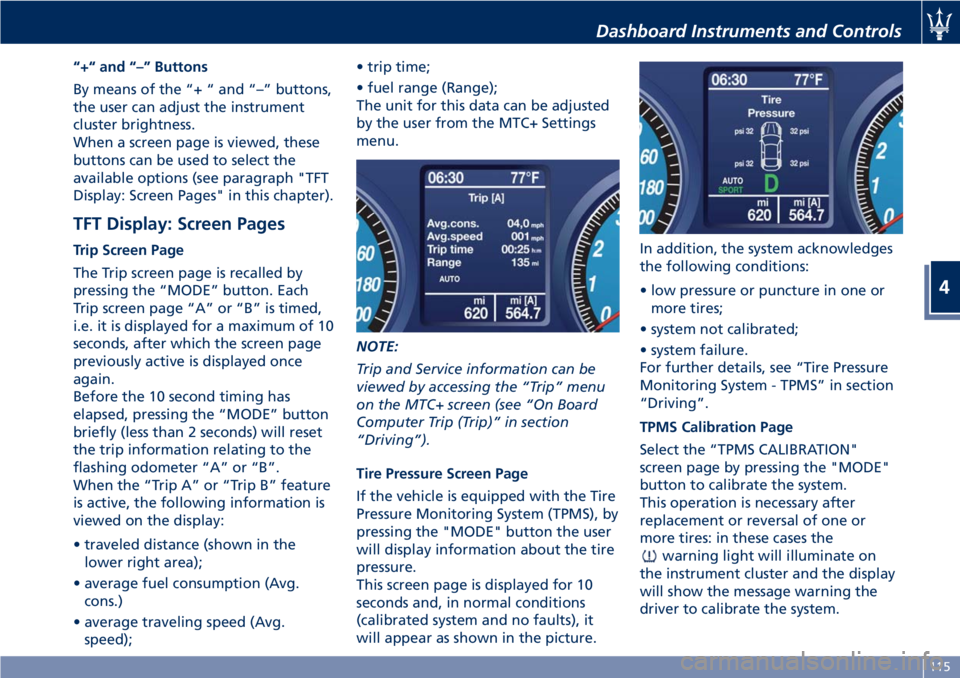
The Trip screen page is recalled by
pressing the “MODE” button. Each
Trip screen page “A” or “B” is timed,
i.e. it is displayed for a maximum of 10
seconds, after which the screen page
previously active is displayed once
again.
Before the 10 second timing has
elapsed, pressing the “MODE” button
briefly (less than 2 seconds) will reset
the trip information relating to the
flashing odometer “A” or “B”.
When the “Trip A” or “Trip B” feature
is active, the following information is
viewed on the display:
• traveled distance (shown in the
lower right area);
• average fuel consumption (Avg.
cons.)
• average traveling speed (Avg.
speed);• trip time;
• fuel range (Range);
The unit for this data can be adjusted
by the user from the MTC+ Settings
menu.
NOTE:
Trip and Service information can be
viewed by accessing the “Trip” menu
on the MTC+ screen (see “On Board
Computer Trip (Trip)” in section
“Driving”).
Tire Pressure Screen Page
If the vehicle is equipped with the Tire
Pressure Monitoring System (TPMS), by
pressing the "MODE" button the user
will display information about the tire
pressure.
This screen page is displayed for 10
seconds and, in normal conditions
(calibrated system and no faults), it
will appear as shown in the picture.In addition, the system acknowledges
the following conditions:
• low pressure or puncture in one or
more tires;
• system not calibrated;
• system failure.
For further details, see “Tire Pressure
Monitoring System - TPMS” in section
“Driving”.
TPMS Calibration Page
Select the “TPMS CALIBRATION"
screen page by pressing the "MODE"
button to calibrate the system.
This operation is necessary after
replacement or reversal of one or
more tires: in these cases the
warning light will illuminate on
the instrument cluster and the display
will show the message warning the
driver to calibrate the system.
Dashboard Instruments and Controls
4
115
Page 132 of 286
Audio Controls
The vehicle is equipped with audio
controls that allow both driver and
front passenger to operate the audio
system. These controls can be used to
adjust audio volume, change radio
station/channel or mode (FM, AM,
USB, etc).
Steering Wheel Audio Controls
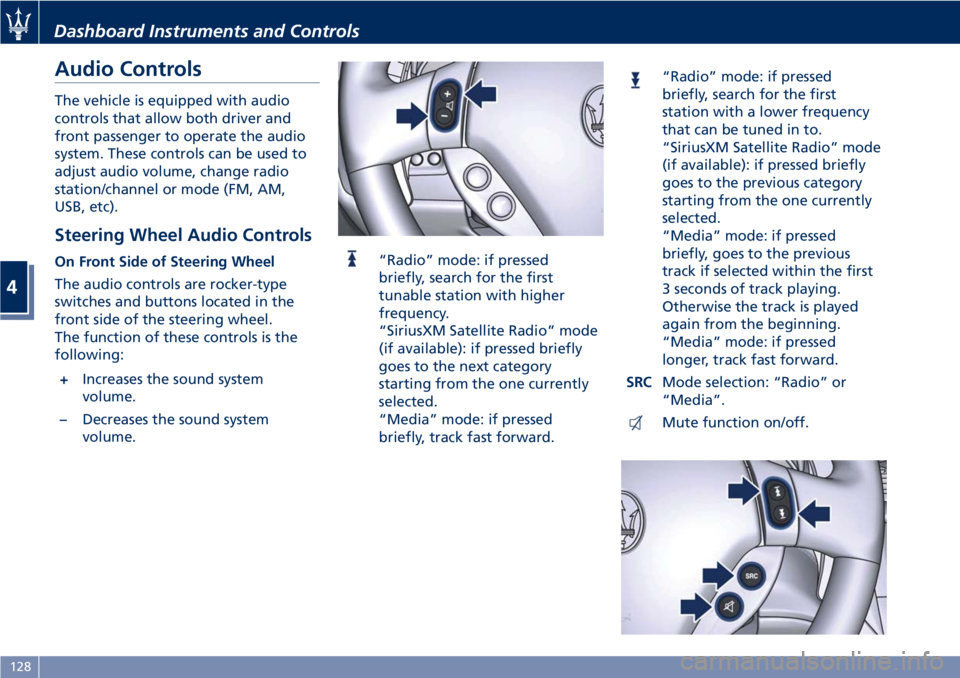
On Front Side of Steering Wheel
The audio controls are rocker-type
switches and buttons located in the
front side of the steering wheel.
The function of these controls is the
following:
+Increases the sound system
volume.
–Decreases the sound system
volume.“Radio” mode: if pressed
briefly, search for the first
tunable station with higher
frequency.
“SiriusXM Satellite Radio” mode
(if available): if pressed briefly
goes to the next category
starting from the one currently
selected.
“Media” mode: if pressed
briefly, track fast forward.
“Radio” mode: if pressed
briefly, search for the first
station with a lower frequency
that can be tuned in to.
“SiriusXM Satellite Radio” mode
(if available): if pressed briefly
goes to the previous category
starting from the one currently
selected.
“Media” mode: if pressed
briefly, goes to the previous
track if selected within the first
3 seconds of track playing.
Otherwise the track is played
again from the beginning.
“Media” mode: if pressed
longer, track fast forward.
SRCMode selection: “Radio” or
“Media”.
Mute function on/off.
Dashboard Instruments and Controls
4
128
Page 133 of 286
NOTE:
“SiriusXM Satellite Radio” is the US
service only available in the 48
Continental United States and
Canadian markets. Subscription is
required. For further details refer to
the Maserati Touch Controls Plus
(MTC+) guide.
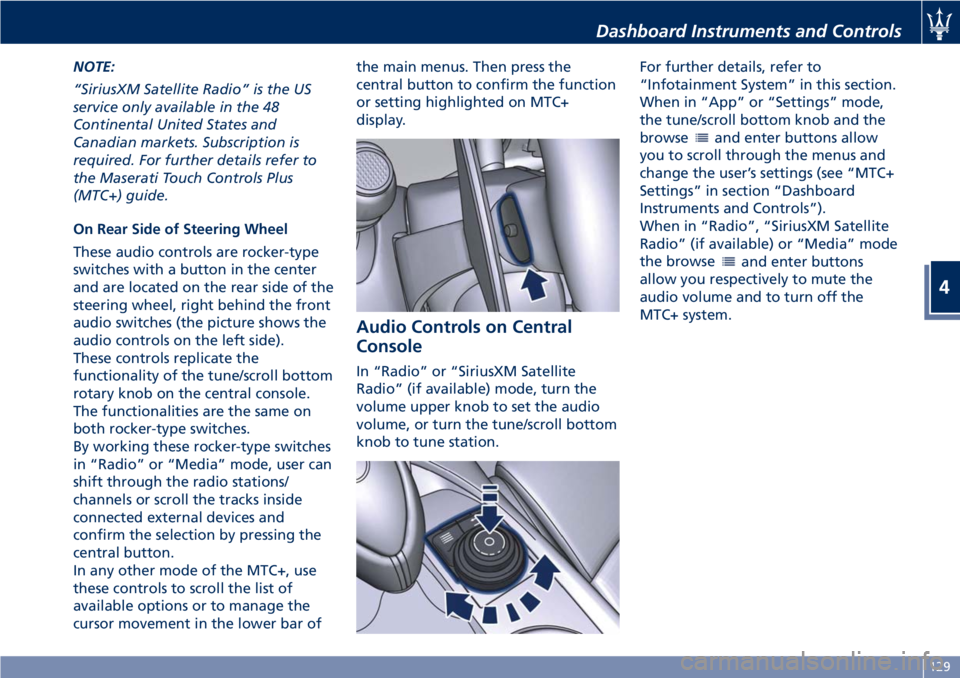
On Rear Side of Steering Wheel
These audio controls are rocker-type
switches with a button in the center
and are located on the rear side of the
steering wheel, right behind the front
audio switches (the picture shows the
audio controls on the left side).
These controls replicate the
functionality of the tune/scroll bottom
rotary knob on the central console.
The functionalities are the same on
both rocker-type switches.
By working these rocker-type switches
in “Radio” or “Media” mode, user can
shift through the radio stations/
channels or scroll the tracks inside
connected external devices and
confirm the selection by pressing the
central button.
In any other mode of the MTC+, use
these controls to scroll the list of
available options or to manage the
cursor movement in the lower bar ofthe main menus. Then press the
central button to confirm the function
or setting highlighted on MTC+
display.
Audio Controls on Central
Console
In “Radio” or “SiriusXM Satellite
Radio” (if available) mode, turn the
volume upper knob to set the audio
volume, or turn the tune/scroll bottom
knob to tune station.For further details, refer to
“Infotainment System” in this section.
When in “App” or “Settings” mode,
the tune/scroll bottom knob and the
browse
and enter buttons allow
you to scroll through the menus and
change the user’s settings (see “MTC+
Settings” in section “Dashboard
Instruments and Controls”).
When in “Radio”, “SiriusXM Satellite
Radio” (if available) or “Media” mode
the browse
and enter buttons
allow you respectively to mute the
audio volume and to turn off the
MTC+ system.
Dashboard Instruments and Controls
4
129