2020 MASERATI GRANTURISMO instrument
[x] Cancel search: instrumentPage 226 of 286

Scheduled Maintenance
Service
Correct maintenance is clearly the best
way to guarantee vehicle performance
and safety features, ensure respect for
the environment and low operating
costs.
NOTE:
Also remember that the scrupulous
observance of the maintenance
procedures is essential for keeping
your vehicle operating properly. Not
adhering to the “Scheduled Service
Plan” can impact your vehicle’s
warranty.
Interval Running Coupons
Maserati has therefore provided for a
series of checks and maintenance
operations involving the 1
stservice
when the vehicle mileage reaches
12500 mi (20000 km) or after 2 years of
the vehicle's life, and subsequently
every 12500 mi (20000 km) or every 2
years.
After the 12
thservice, maintenance
must be restarted with the operations
scheduled for the 1
st,2ndand 3rd
service.
CAUTION!
The Scheduled Maintenance services
are prescribed by the Manufacturer.
Failure to have the services carried out
can affect your warranty.
The Scheduled Maintenance service is
provided by the wholeAuthorized
Maserati Dealer. In the event that,
when a service is performed, further
replacements or repairs are found to
be necessary in addition to the
scheduled operations, these can be
carried out only with the specific
consent of the Customer.
CAUTION!
You are advised to notify the
Authorized Maserati Dealerof any
minor operating problem, without
waiting for the next scheduled service.
NOTE:
•Change your vehicle's oil if it has
been 2 years since your last oil
change.
•Change your engine oil more often if
you drive your vehicle off-road for an
extended period of time or shorttrips without reaching operation
temperature.
•Under no circumstances should oil
change intervals exceed 12500 mi
(20000 km) or at least after 2 years.
CAUTION!
Failure to perform the required
maintenance items may result in
damage to the vehicle.
Scheduled Maintenance
(Service) Indicator
When the deadlines for maintenance
Scheduled Maintenance services are
approaching, a message on the
instrument cluster display indicates
that service is due. The deadline may
be expressed in miles/Km or days,
whichever comes first.
The message is displayed only once,
upon activating the instrument cluster,
at decreasing intervals expressed in
mi/km (100, 50...... 1800, 1600,) or in
days (27, 24, ....... 6, 3), accompanied
by the
specific symbol.
Maintenance and Care
7
222
Page 227 of 286

Once the set limit in kilometers or the
expiry date is reached, every time the
instrument cluster is turned on
thereafter, the message “Service
coupon expired” will be displayed.Selecting the function “Service” in the
“Trip” menu of the MTC+, you can
display the next service deadline (see
“Onboard Computer (Trip)” in section
"Driving"). The residual mileage left
to the service deadline is always
indicated. The days remaining before
the scheduled service date instead, are
only indicated starting from the 511th
day (approximately 17 months).
NOTE:
Every time the battery is disconnected,
the date and time must be set (see
"MTC+ Settings" in section
"Dashboard Instruments and
Controls").
CAUTION!
• Failure to reset the system may cause
it to malfunction and indicate wrong
maintenance service intervals.
• If you incorrectly set a date earlier
than the last service coupon, the
system updates the indication
“Scheduled service within... days”
automatically entering a later date
considering the maximum number of
days allowable for the next service
coupon.
Maintenance and Care
7
223
Page 232 of 286
recommended on the “Scheduled
Service Plan”:
• check front disc brake pad conditions
and wear;
• check cleanliness of hood and trunk
locks, cleanliness and lubrication of
linkage;
• visually inspect conditions of: engine,
transmission, pipes and hoses
(exhaust - fuel system - brakes) and
rubber elements (trunks - sleeves -
bushes - etc.);
• check battery charge;
• visually inspect condition of the
accessory drive belts;
• check and, if necessary, change
engine oil and replace oil filter;
• check and, if necessary, replace
pollen filter of the A/C system;
• check and, if necessary, replace air
cleaner filter.
CAUTION!
All maintenance operations for the
vehicle must be carried out by the
Authorized Maserati Dealer. For
routine and minor maintenance
operations which you can carry out
yourself, make sure that you have the
necessary experience and always usesuitable equipment, originalMaserati
spare parts (or equivalent) and the
prescribed fluids. Shall this not be the
case, do not carry any operation on
your own and contact anAuthorized
Maserati Dealer.
Onboard Diagnostic System
Your vehicle is equipped with a
sophisticated onboard diagnostic
system. This system monitors the
performance of the emissions, engine,
and automatic transmission control
systems. When these systems are
operating properly, your vehicle will
provide excellent performance and
fuel economy, as well as engine
emissions suited to current
government regulations.
If any of these systems require service,
the system will turn on the
Malfunction Indicator Light on the
instrument cluster display (refer to
“Instrument Cluster” in section
“Dashboard Instruments and
Controls”). The system stores as well
diagnostic codes and other
information to assist your service
technician by performing repairs.
Although the vehicle will be driveable
and will not need towing, contact anAuthorized Maserati Dealerfor service
as soon as possible.
CAUTION!
• Prolonged driving with the
MIL
on could cause further damage to
the emissions control system. It could
also affect fuel economy and
drivability. The vehicle must be
serviced before any emissions tests
can be performed.
•Ifthe
MIL is flashing while the
engine is running, severe catalytic
converter damage and power loss
will soon occur. Immediate service at
theAuthorized Maserati Dealeris
required.
Spare Parts
Use of genuine parts for normal or
scheduled maintenance and repairs is
highly recommended to ensure
excellent performance.
Damage or failures caused by
non-genuine spare parts used for
maintenance and repairs will not be
covered by the manufacturer's
warranty.
Maintenance and Care
7
228
Page 242 of 286
(Continued)
quick coupling from the negative
pole (–) of the battery.
If the battery needs to be removed
from its compartment, you must first
detach the terminal clamp from
negative pole (–) and then the other
terminal clamp from positive pole (+),
after removing the protective cover.
Battery poles are marked positive (+)
and negative (–) and are identified on
the battery case.
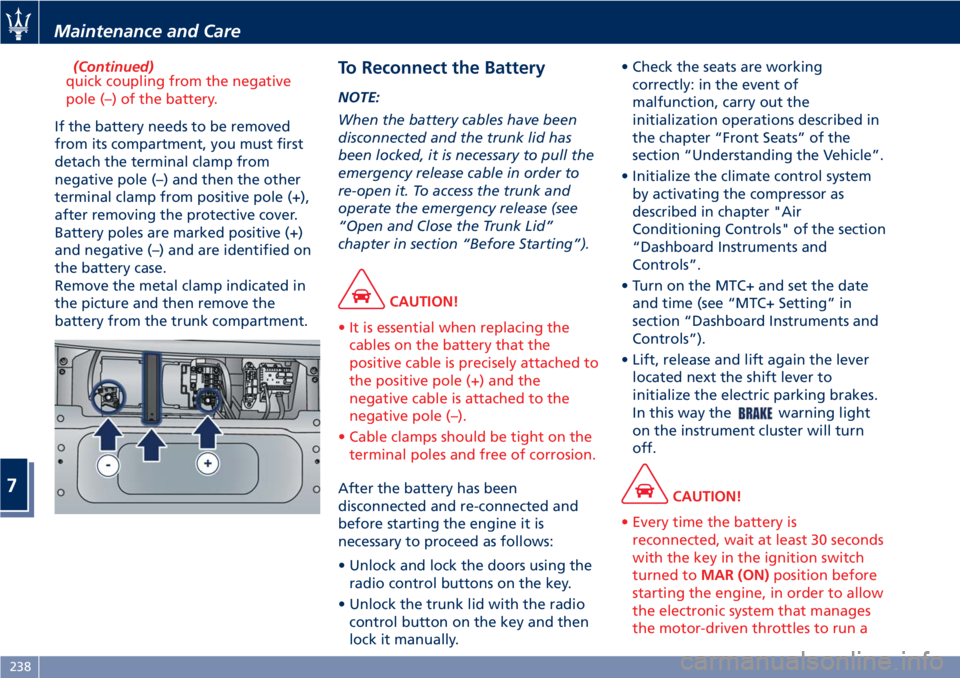
Remove the metal clamp indicated in
the picture and then remove the
battery from the trunk compartment.
To Reconnect the Battery
NOTE:
When the battery cables have been
disconnected and the trunk lid has
been locked, it is necessary to pull the
emergency release cable in order to
re-open it. To access the trunk and
operate the emergency release (see
“Open and Close the Trunk Lid”
chapter in section “Before Starting”).
CAUTION!
• It is essential when replacing the
cables on the battery that the
positive cable is precisely attached to
the positive pole (+) and the
negative cable is attached to the
negative pole (–).
• Cable clamps should be tight on the
terminal poles and free of corrosion.
After the battery has been
disconnected and re-connected and
before starting the engine it is
necessary to proceed as follows:
• Unlock and lock the doors using the
radio control buttons on the key.
• Unlock the trunk lid with the radio
control button on the key and then
lock it manually.• Check the seats are working
correctly: in the event of
malfunction, carry out the
initialization operations described in
the chapter “Front Seats” of the
section “Understanding the Vehicle”.
• Initialize the climate control system
by activating the compressor as
described in chapter "Air
Conditioning Controls" of the section
“Dashboard Instruments and
Controls”.
• Turn on the MTC+ and set the date
and time (see “MTC+ Setting” in
section “Dashboard Instruments and
Controls”).
• Lift, release and lift again the lever
located next the shift lever to
initialize the electric parking brakes.
In this way the
warning light
on the instrument cluster will turn
off.
CAUTION!
• Every time the battery is
reconnected, wait at least 30 seconds
with the key in the ignition switch
turned toMAR (ON)position before
starting the engine, in order to allow
the electronic system that manages
the motor-driven throttles to run a
Maintenance and Care
7
238
Page 249 of 286

Passenger Compartment Fuses
Pos. Amp. –
ColorSystem / Component
F12 15 A –
BlueRight-hand low
beam
F13 15 A –
BlueLeft-hand low beam
F31 7.5 A –
BrownA/C unit, NBC (Body
Computer Node),
high beam relay
F32 10 A –
RedDomelights, step
lights, CAV, driver-
and passenger-side
footwell lights,
outside mirror lights
F33 30 A –
GreenDriver’s seat
(movement)
F34 30 A –
GreenPassenger’s seat
(movement)
F35 7.5 A –
BrownACC, FN and LF relay
coil
F36 10 A –
RedNQS
F37 10 A –
RedNQS (Instrument
Cluster Node), CPP,
CPD
F38 15 A –
BlueRear lid lock
Pos. Amp. –
ColorSystem / Component
F39 15 A –
BlueNIM (Inside Roof
Node), NCL (Air
conditioning and
heating system
node), OBD socket,
CSA (Alarm system
siren ECU), CAV
(Motion sensing
alarm ECU), radio,
NAVTRAK
F40 30 A –
GreenHeated rear window
F41 - Not used
F42 7.5 A –
BrownPower supply for
control panel on roof
F43 30 A –
GreenWindshield
wiper/washer
(Connected Devices
Relay INT/A)
F44 20 A –
YellowFront and rear power
outlets (INT/A device
relay) front seat
heating (passenger
side)
F45 - Not used
F46 20 A –
YellowNPG/NPP locksPos. Amp. –
ColorSystem / Component
F47 30 A –
GreenNPG (Driver’s door
node)
F48 30 A –
GreenNPP (Passenger’s
door node)
F49 7.5 A –
BrownNVO (Steering wheel
node), CSG (Power
steering ECU), CSP
(Twilight/rain sensor
ECU), NIM (Inside
Roof Node), NCL,
Radio, CEM, CRP,
domelight molding,
windshield wiper
controls, NAVTRAK
F50 7.5 A –
BrownAir bag system
F51 7.5 A –
BrownNCA (Automatic
Gearbox Node)
F52 15 A –
BlueFront seat heating
(driver side) (INT/A
device relay)
F53 10 A –
RedRear fog lights
Maintenance and Care
7
245
Page 251 of 286
Pos. Amp. –
ColorSystem / Component
F64 - Not used
F65 10 A –
RedKey-Lock solenoid
F66 20 A –
YellowFuel pumps
F67 - Not used
F68 - Not used
F69 - Not used
F77 - Not used
F78 20 A –
YellowPower outlet
F79 - Not used
F80 25 A –
WhiteBass boxBulb Replacement
The signal failure of an external light
(turn signal, low beam and high beam,
license plate light, reverse light, brake
light and rear fog light) is
communicated to the instrument
cluster that displays on the TFT screen
the
oramber warning light
and a text message indicating which
light is faulty.
Front Headlights
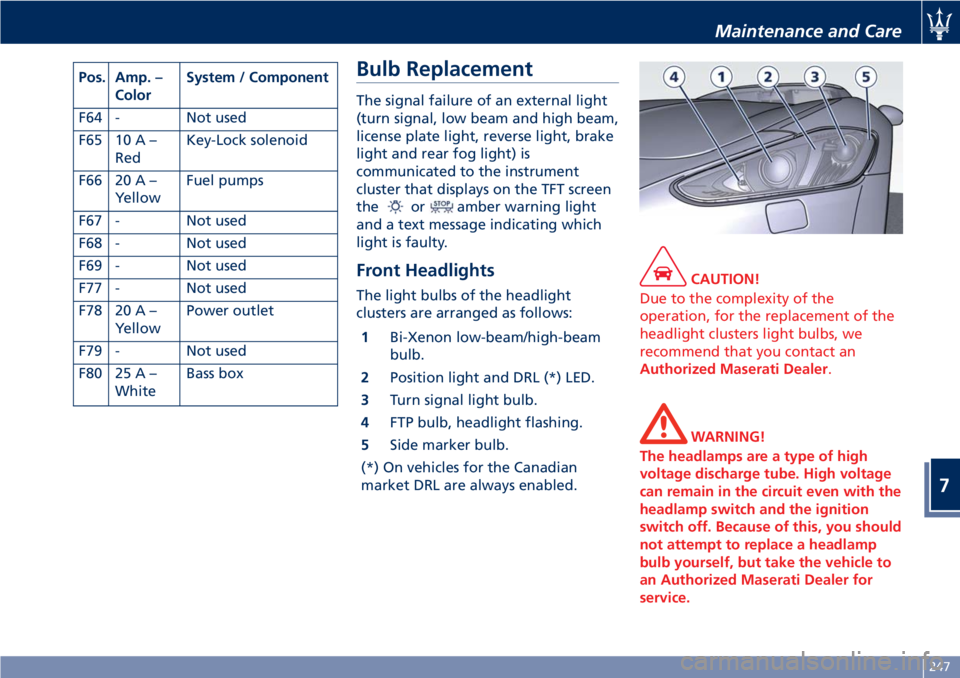
The light bulbs of the headlight
clusters are arranged as follows:
1Bi-Xenon low-beam/high-beam
bulb.
2Position light and DRL (*) LED.
3Turn signal light bulb.
4FTP bulb, headlight flashing.
5Side marker bulb.
(*) On vehicles for the Canadian
market DRL are always enabled.
CAUTION!
Due to the complexity of the
operation, for the replacement of the
headlight clusters light bulbs, we
recommend that you contact an
Authorized Maserati Dealer.
WARNING!
The headlamps are a type of high
voltage discharge tube. High voltage
can remain in the circuit even with the
headlamp switch and the ignition
switch off. Because of this, you should
not attempt to replace a headlamp
bulb yourself, but take the vehicle to
an Authorized Maserati Dealer for
service.
Maintenance and Care
7
247
Page 261 of 286
External plastic parts must be cleaned
with the same procedure followed for
the normal washing of the bodywork.
Avoid, as far as possible, parking the
vehicle under trees; the resinous
substances that very often drop from
the trees give the paint a dull
appearance and increase the
possibility of originating corrosive
processes.
It is important that the drain holes in
the lower sides of the doors, rocker
panels, and trunk bottom be kept
clear and open.
CAUTION!
• Bird droppings must be washed off
immediately and thoroughly, since
their acidity is particularly corrosive.
• To provide better protection for the
paint, polish the vehicle at intervals
with a suitable product leaving a
protective film on the paint.
• If the vehicle is washed using
high-pressure water jets or cleaners,
it is important that the nozzle of the
jet be kept at a distance of at least
16 in (40 cm) from the bodywork to
avoid damaging it.
• If you are washing the vehicle with
roller brushes, you must protect theedges of the rear, lateral brand
symbol with tape, to prevent it from
being detached by the revolving
brushes.
Glass Surfaces
All glass surfaces should be cleaned on
a regular basis with any commercial
household-type glass cleaner.
Never use an abrasive type cleaner.
Use caution when cleaning the inside
rear window equipped with electric
defrosters. Do not use scrapers or
other sharp instrument that may
scratch the electric elements.
When cleaning the rearview mirror,
spray cleaner on the towel or rag that
you are using. Do not spray cleaner
directly on the mirror.
Labels can be peeled off after soaking
with warm water.
Keep all objects a safe distance from
the window.
Cleaning Headlights
Your vehicle has plastic headlights that
are lighter and less susceptible to
stone breakage than glass headlights.
Plastic is not as scratch resistant as
glass and therefore different lens
cleaning procedures must be followed.
To minimize the possibility of
scratching the lenses and reducinglight output, avoid wiping with a dry
cloth. To remove road dirt, wash with
a mild soap solution followed by
rinsing.
Do not use abrasive cleaning
components, solvents, steel wool or
other aggressive material to clean the
lenses.
Moldings and Aluminum Trims
• For cleaning moldings and aluminum
trims, avoid the use of acidic or
alkaline cleaning agents that can
destroy the protecting surface
treatment.
• After washing aluminum trim with
warm water, apply the cleaning
agent with a clean tissue or a soft
sponge on the surface. Do not use
any other equipment such as
brushes, steel wool, abrasives or any
other equipment for cleaning.
• After cleaning, please rinse the
aluminum trim with a lot of clear
water.
• While cleaning in the car, please
make sure that the moldings and
aluminum trims only get in contact
with soft brushes or textiles.
Engine Compartment
At the end of each winter season,
carefully wash the engine
Maintenance and Care
7
257
Page 262 of 286
compartment, remembering to avoid
directing the jet of water for too long
on the ECUs and other electric parts.
To perform this operation, you must
contact anAuthorized Maserati
Dealer.Interior Maintenance and
Care
Interior trim should be cleaned
starting with a damp cloth. Do not use
harsh cleaners.
The leather upholstery can be best
preserved by regular cleaning with a
damp soft cloth. Small particles of dirt
can act as an abrasive and damage the
leather upholstery and should be
removed promptly with a damp cloth.
Stubborn soils stains can be removed
easily with a soft cloth and
appropriate products. Avoid soaking
the leather upholstery with any liquid.
Please do not use polishes, oils,
cleaning fluids, solvents, detergents, or
ammonia-based cleaners to clean your
leather upholstery.
Application of a leather conditioner is
not required to maintain the original
condition.
Check at regular intervals that there is
no water trapped under the mats (due
to drips off shoes, umbrellas etc.)
which may cause the metal parts to
oxidize.
CAUTION!
Do not use alcohol, petrol or solvents
to clean the instrument cluster'stransparent dome, the MTC+ display,
the analog clock and the leather
upholstery. We recommended the use
of “Car Care” products approved by
Maserati for the maintenance and care
of the interior.
Leather Upholstery Treatment
Have the leather upholstery only
treated, as provided in the Scheduled
Service Plan, by anAuthorized
Maserati Dealerwhich has the
required specific products.
Parts in Premium Quality Wood
Remove any dirt with a buckskin
leather or damp cloth.
NOTE:
TheAuthorized Maserati Dealercan
provide you with any information
about the Maserati approved “Car
Care” products, available in the
“Genuine Accessories” range.
WARNING!
California Proposition 65
Operating, servicing and maintaining
a passenger vehicle or off-road vehicle
can expose you to chemicals including
Maintenance and Care
7
258