2020 MASERATI GRANTURISMO CONVERTIBLE engine
[x] Cancel search: enginePage 94 of 296

(Continued)
damaged if the wiper control is left
in any position other than “OFF”.
• In cold weather, always turn off the
wiper switch and allow the wipers to
return to the park position before
turning off the engine. If the wiper
switch is left on and the wipers
freeze to the windshield, the wiper
motor may be damaged when the
vehicle is restarted.
• Always remove any buildup of snow
that prevents the windshield wiper
blades from returning to the off
position. If the windshield wiper
control is turned off and the blades
cannot return to the off position, the
wiper motor may be damaged.
Rain Sensing Wipers
This feature detects moisture on the
windshield through an inside rearview
mirror integrated sensor.
The rain sensor adapts the frequency
of the windshield wiper strokes (in the
intermittent operation mode) to the
intensity of the rain.
All the other functions controlled by
the right-hand multifunction lever
(windshield wipers off, in continuous
slow and fast operation mode and intemporary fast operation mode)
remain the same.
The rain sensor is activated
automatically by moving the
right-hand multifunction lever to
"AUTO" position. The sensor has a
setting range that varies progressively:
from the windshield wiper stationary
position - when the windshield is dry -
to the windshield wiper second speed -
in conditions of pouring rain.
To regulate the frequency of
intermittent operation, with the
right-hand multifunction lever in
"AUTO" position, turn the end section
of the lever.
Rotating the end section clockwise,
intermittent operation varies from fast
intermittent wipe (max.) to slow
intermittent wipe (min).
If the engine is turned off during
automatic windshield wiper operation,with the right-hand multifunction
lever in "AUTO" position, to reactivate
the function the next time the engine
is started, the lever must be moved to
"OFF" (stop position) then back to
"AUTO" position.
CAUTION!
• The rain sensing feature may not
function properly by ice or dried salt
water on the windshield.
• Use on the windshield of RainX
®or
products containing wax or silicone
may reduce rain sensor performance.
Rain Sensor Failure
When the rain sensor is activated, in
the event that it is malfunctioning, the
windshield wiper will be switched on
in intermittent operation mode and
the sensing range will be set by the
user, regardless of whether or not
there is rain on the windshield.
The
symbol appears on the
instrument cluster display.
In this case, we recommend that you
cut-out the rain sensor and turn on the
wiper, if necessary, in continuous
mode. Contact theAuthorized
Maserati Dealeras soon as possible.
Understanding the Vehicle
3
90
Page 95 of 296
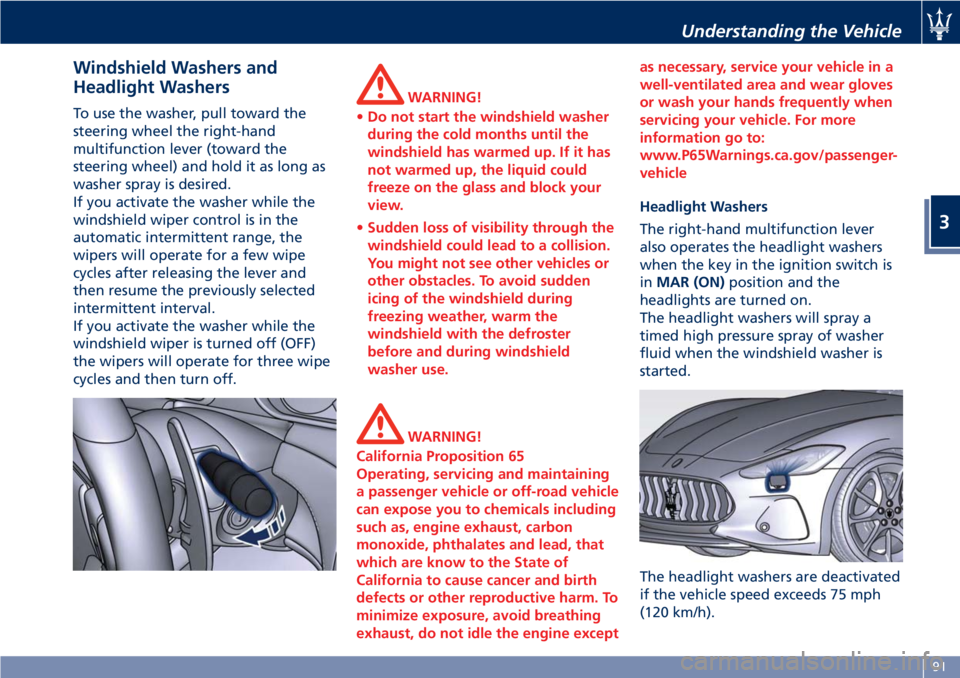
Windshield Washers and
Headlight Washers
To use the washer, pull toward the
steering wheel the right-hand
multifunction lever (toward the
steering wheel) and hold it as long as
washer spray is desired.
If you activate the washer while the
windshield wiper control is in the
automatic intermittent range, the
wipers will operate for a few wipe
cycles after releasing the lever and
then resume the previously selected
intermittent interval.
If you activate the washer while the
windshield wiper is turned off (OFF)
the wipers will operate for three wipe
cycles and then turn off.WARNING!
•Do not start the windshield washer
during the cold months until the
windshield has warmed up. If it has
not warmed up, the liquid could
freeze on the glass and block your
view.
•Sudden loss of visibility through the
windshield could lead to a collision.
You might not see other vehicles or
other obstacles. To avoid sudden
icing of the windshield during
freezing weather, warm the
windshield with the defroster
before and during windshield
washer use.
WARNING!
California Proposition 65
Operating, servicing and maintaining
a passenger vehicle or off-road vehicle
can expose you to chemicals including
such as, engine exhaust, carbon
monoxide, phthalates and lead, that
which are know to the State of
California to cause cancer and birth
defects or other reproductive harm. To
minimize exposure, avoid breathing
exhaust, do not idle the engine exceptas necessary, service your vehicle in a
well-ventilated area and wear gloves
or wash your hands frequently when
servicing your vehicle. For more
information go to:
www.P65Warnings.ca.gov/passenger-
vehicle
Headlight Washers
The right-hand multifunction lever
also operates the headlight washers
when the key in the ignition switch is
inMAR (ON)position and the
headlights are turned on.
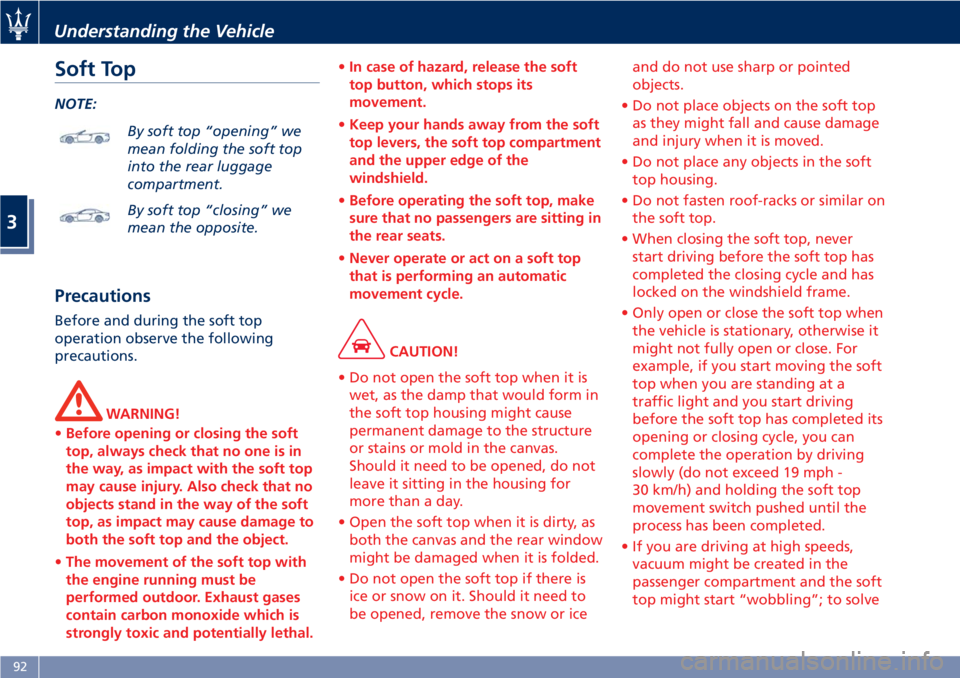
The headlight washers will spray a
timed high pressure spray of washer
fluid when the windshield washer is
started.
The headlight washers are deactivated
if the vehicle speed exceeds 75 mph
(120 km/h).
Understanding the Vehicle
3
91
Page 96 of 296
Soft Top
NOTE:
By soft top “opening” we
mean folding the soft top
into the rear luggage
compartment.
By soft top “closing” we
mean the opposite.
Precautions
Before and during the soft top
operation observe the following
precautions.
WARNING!
•Before opening or closing the soft
top, always check that no one is in
the way, as impact with the soft top
may cause injury. Also check that no
objects stand in the way of the soft
top, as impact may cause damage to
both the soft top and the object.
•The movement of the soft top with
the engine running must be
performed outdoor. Exhaust gases
contain carbon monoxide which is
strongly toxic and potentially lethal.•In case of hazard, release the soft
top button, which stops its
movement.
•Keep your hands away from the soft
top levers, the soft top compartment
and the upper edge of the
windshield.
•Before operating the soft top, make
sure that no passengers are sitting in
the rear seats.
•Never operate or act on a soft top
that is performing an automatic
movement cycle.
CAUTION!
• Do not open the soft top when it is
wet, as the damp that would form in
the soft top housing might cause
permanent damage to the structure
or stains or mold in the canvas.
Should it need to be opened, do not
leave it sitting in the housing for
more than a day.
• Open the soft top when it is dirty, as
both the canvas and the rear window
might be damaged when it is folded.
• Do not open the soft top if there is
ice or snow on it. Should it need to
be opened, remove the snow or iceand do not use sharp or pointed
objects.
• Do not place objects on the soft top
as they might fall and cause damage
and injury when it is moved.
• Do not place any objects in the soft
top housing.
• Do not fasten roof-racks or similar on
the soft top.
• When closing the soft top, never
start driving before the soft top has
completed the closing cycle and has
locked on the windshield frame.
• Only open or close the soft top when
the vehicle is stationary, otherwise it
might not fully open or close. For
example, if you start moving the soft
top when you are standing at a
traffic light and you start driving
before the soft top has completed its
opening or closing cycle, you can
complete the operation by driving
slowly (do not exceed 19 mph -
30 km/h) and holding the soft top
movement switch pushed until the
process has been completed.
• If you are driving at high speeds,
vacuum might be created in the
passenger compartment and the soft
top might start “wobbling”; to solve
Understanding the Vehicle
3
92
Page 97 of 296

this problem let more air into the
passenger compartment.
• It is advisable to close the soft top
when parking the vehicle. This not
only protects the passenger
compartment against weather
agents, but is also a safeguard
against theft.
• If possible, park in the shade as
prolonged exposure to the sun will
alter the canvas fiber and color.
• Before disconnecting the battery,
lower the side windows by about 1.6
- 2 in (4 - 5 cm) to prevent damaging
the soft top strip when the doors are
opened and closed. When the
battery is connected and fully
charged, this operation is performed
automatically whenever the doors
are opened or closed. The windows
must remain lowered until the
recharged battery is reconnected. If
the battery is dead and the windows
are fully up, only open the doors
when strictly necessary and being
extremely careful: do not close them
again until the windows can be
lowered.
• Cover the soft top with a protective
cloth when it is going to be parked
outdoor for a long period of time.• To avoid damaging the soft top, the
vehicle must not be washed with
high-pressure water jet systems, be it
a manual nozzle or an automatic car
wash with turning rollers.
• Organic residues must be
immediately removed, as they may
damage both the soft top fabric and
its strips.
• Do not use solvents, alcohol, petrol
or other generic detergents to clean
the soft top.
"Summer open" Strategy
Using the key inserted in the external
driver's door lock, you can control the
soft top opening/closing strategy
referred to as “Summer open”.
NOTE:
•The opening and closing cycle can be
interrupted at any time, moving the
key back to its initial position.
•The following operations are
performed with the engine off. This
involves an extremely high power
consumption, which causes the
battery to discharge faster.
With the soft topfully closed:
• insert the key in the external driver’s
door lock;• turn the key clockwise until
unlocking the doors and hold it in
this position. The automatic soft top
opening cycle will begin after
approx. 2 seconds;
• do not move the key for the entire
opening cycle.
With the soft topfully open:
• insert the key in the external driver’s
door lock;
• turn the key counterclockwise until
locking the doors and hold it in this
position. The automatic soft top
closing cycle will begin after approx.
2 seconds;
• do not move the key for the entire
closing cycle.
Understanding the Vehicle
3
93
Page 98 of 296
Soft Top Operation
The soft top must be opened and
closed with the vehicle stationary and,
as a rule, with the engine running at
idle speed.
If necessary (e.g. in closed places) the
operation can be performed with the
engine off and the key in the ignition
switch inMAR (ON)position. This
operation involves an extremely high
power consumption, which causes the
battery to discharge faster.
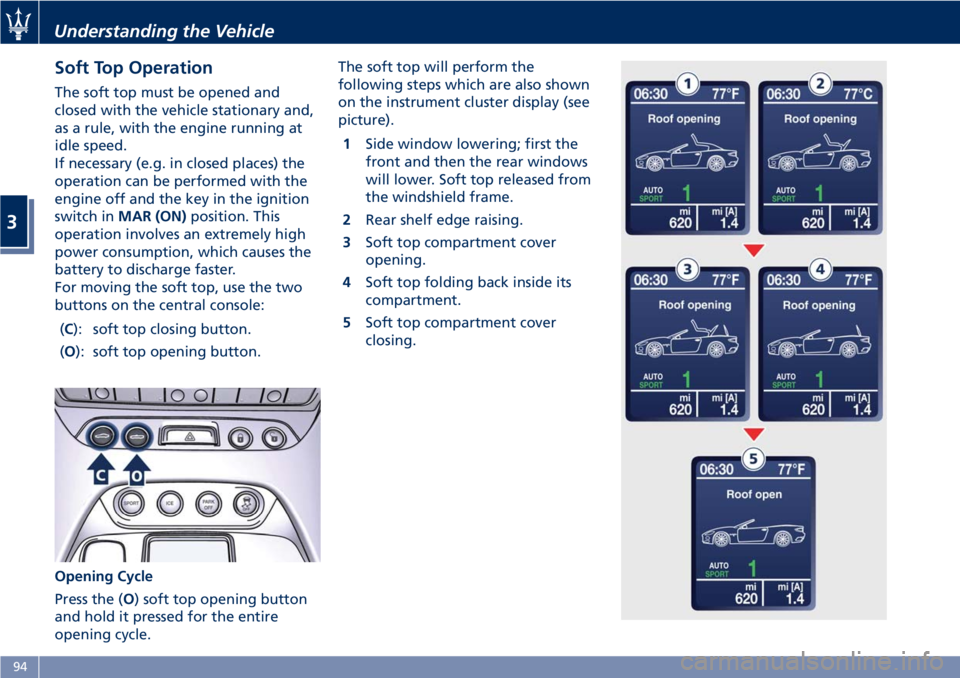
For moving the soft top, use the two
buttons on the central console:
(C): soft top closing button.
(O): soft top opening button.
Opening Cycle
Press the (O) soft top opening button
and hold it pressed for the entire
opening cycle.The soft top will perform the
following steps which are also shown
on the instrument cluster display (see
picture).
1Side window lowering; first the
front and then the rear windows
will lower. Soft top released from
the windshield frame.
2Rear shelf edge raising.
3Soft top compartment cover
opening.
4Soft top folding back inside its
compartment.
5Soft top compartment cover
closing.
Understanding the Vehicle
3
94
Page 106 of 296
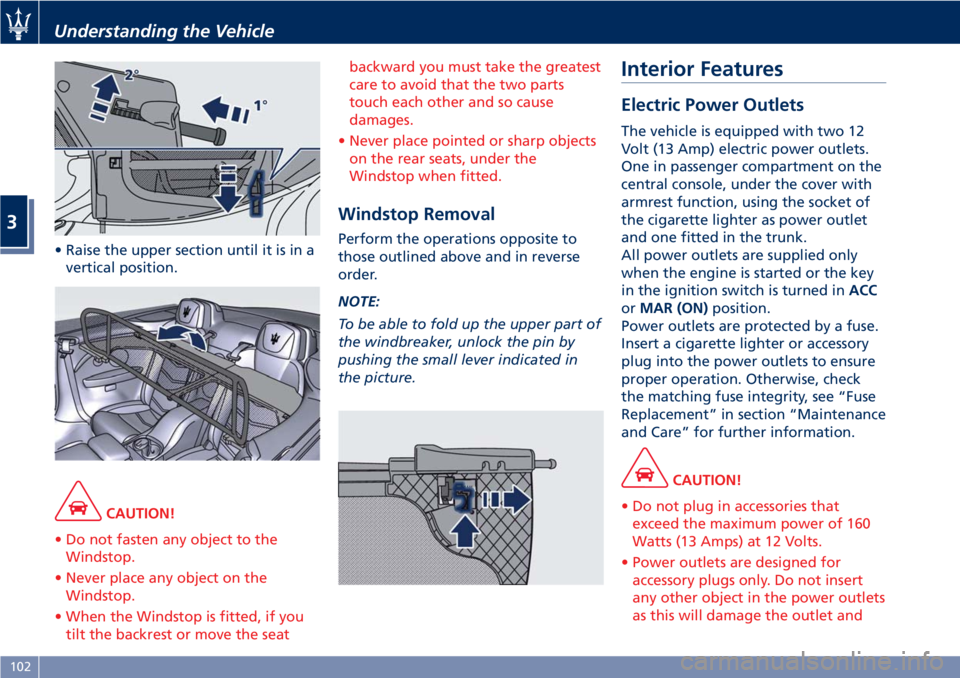
• Raise the upper section until it is in a
vertical position.
CAUTION!
• Do not fasten any object to the
Windstop.
• Never place any object on the
Windstop.
• When the Windstop is fitted, if you
tilt the backrest or move the seatbackward you must take the greatest
care to avoid that the two parts
touch each other and so cause
damages.
• Never place pointed or sharp objects
on the rear seats, under the
Windstop when fitted.
Windstop Removal
Perform the operations opposite to
those outlined above and in reverse
order.
NOTE:
To be able to fold up the upper part of
the windbreaker, unlock the pin by
pushing the small lever indicated in
the picture.
Interior Features
Electric Power Outlets
The vehicle is equipped with two 12
Volt (13 Amp) electric power outlets.
One in passenger compartment on the
central console, under the cover with
armrest function, using the socket of
the cigarette lighter as power outlet
and one fitted in the trunk.
All power outlets are supplied only
when the engine is started or the key
in the ignition switch is turned inACC
orMAR (ON)position.
Power outlets are protected by a fuse.
Insert a cigarette lighter or accessory
plug into the power outlets to ensure
proper operation. Otherwise, check
the matching fuse integrity, see “Fuse
Replacement” in section “Maintenance
and Care” for further information.
CAUTION!
• Do not plug in accessories that
exceed the maximum power of 160
Watts (13 Amps) at 12 Volts.
• Power outlets are designed for
accessory plugs only. Do not insert
any other object in the power outlets
as this will damage the outlet and
Understanding the Vehicle
3
102
Page 107 of 296
blow the fuse. Damages caused by
improper use of the power outlet
are not covered by the New Vehicle
Limited Warranty.
WARNING!
To avoid serious injury or death:
•Only devices designed for use in this
type of outlet should be inserted
into any 12 Volt outlet.
•Replacing the fuses that protect
power outlets with others of higher
amperage, there is the risk of fire.
•Do not touch with wet hands.
•If this outlet is mishandled, it may
cause an electric shock and failure.
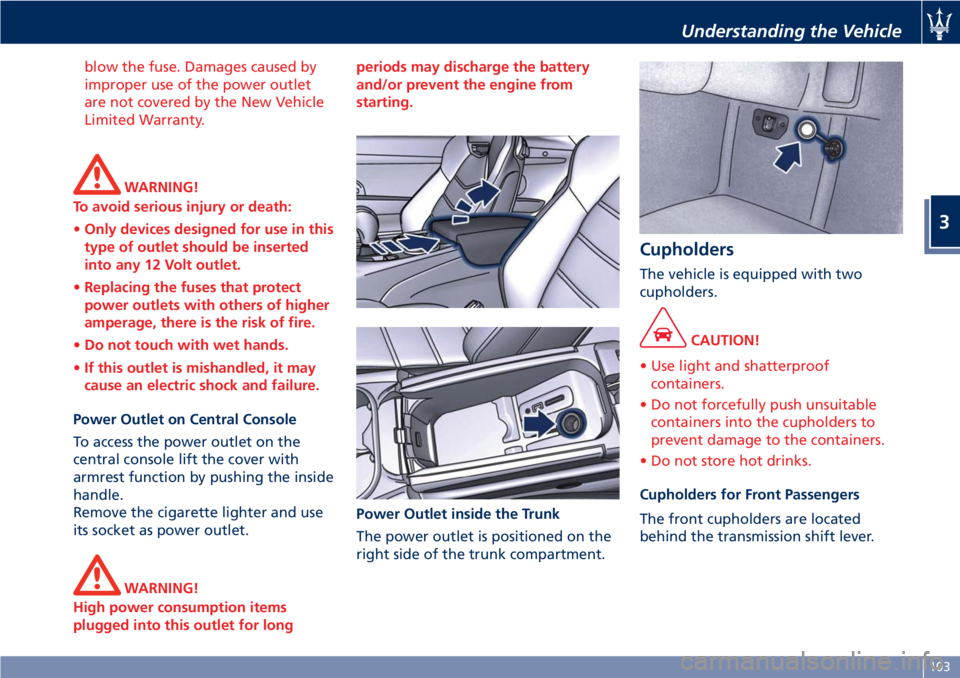
Power Outlet on Central Console
To access the power outlet on the
central console lift the cover with
armrest function by pushing the inside
handle.
Remove the cigarette lighter and use
its socket as power outlet.
WARNING!
High power consumption items
plugged into this outlet for longperiods may discharge the battery
and/or prevent the engine from
starting.
Power Outlet inside the Trunk
The power outlet is positioned on the
right side of the trunk compartment.
Cupholders
The vehicle is equipped with two
cupholders.
CAUTION!
• Use light and shatterproof
containers.
• Do not forcefully push unsuitable
containers into the cupholders to
prevent damage to the containers.
• Do not store hot drinks.
Cupholders for Front Passengers
The front cupholders are located
behind the transmission shift lever.
Understanding the Vehicle
3
103
Page 113 of 296

WARNING!
Vehicle exhaust contains carbon
monoxide, a dangerous gas. Do not
run your vehicle in the garage while
programming the transceiver. Exhaust
gas can cause serious injury or death.
Customer Service
If you have problems with training the
HomeLink Universal Transceiver, or
would like information on home
products that can be operated by the
transmitter, call (800) 355-3515. On the
Internet, go to www.Homelink.com.
Safety Precautions
Always refer to the operating
instructions and safety information
that came with your garage door
opener or other equipment you
intend to operate with the HomeLink
Universal Transceiver. If you do not
have this information, you should
contact the manufacturer of the
equipment.
While training or using HomeLink,
make sure you have a clear view of
the garage door or gate, and that no
one will be injured by its movement.
General Information
While programming HomeLink®,itis
advisable to disconnect the drive
motor of the gate/door to be remote
controlled, since the numerous driving
pulses launched for this operation
might damage it.
If the battery fails or is disconnected,
the stored settings are not deleted.
If the gate/door was manufactured
prior to April 1982 (not equipped with
safety systems or automatic stop in the
event of an obstacle in the range of
action), the gate/door cannot be
controlled by HomeLink
®.
If you have questions, call (800)
355-3515.
WARNING!
California Proposition 65
Operating, servicing and maintaining
a passenger vehicle or off-road vehicle
can expose you to chemicals including
such as, engine exhaust, carbon
monoxide, phthalates and lead, that
which are know to the State of
California to cause cancer and birth
defects or other reproductive harm. To
minimize exposure, avoid breathing
exhaust, do not idle the engine except
as necessary, service your vehicle in awell-ventilated area and wear gloves
or wash your hands frequently when
servicing your vehicle. For more
information go to:
www.P65Warnings.ca.gov/passenger-
vehicle
Programming
• Press and hold buttons "1" and "3".
• After about 20 seconds, the LED
starts flashing.
• Release the buttons.
• Hold the remote control for the
device to be controlled close to the
HomeLink
®control panel (0-30 cm/
0-12 in).
• Simultaneously press and hold the
button on the hand-held remote
control and one of the three
HomeLink
®buttons "1", "2" or "3".
• Successful programming is signaled
by the LED flashing faster.
• Release the buttons.
To program the other buttons, repeat
the operations skipping the first three
steps.
Understanding the Vehicle
3
109