2020 MASERATI GRANTURISMO CONVERTIBLE seats
[x] Cancel search: seatsPage 82 of 296
To recall one of the stored positions
with the door open, press the relative
button “1”, “2” or “3” briefly.
To recall a stored position with the
door closed, press the corresponding
button until hearing a tone that
confirms the seat has stopped.
NOTE:
•To stop the seat, press one of the
buttons - “1”, “2” or “3” -, or one of
the adjustment controls.
•Malfunctioning of the seat control
unit is indicated by a sequence of 5
tones emitted when the key in the
ignition switch is turned toSTOP
(OFF)position. Contact an
Authorized Maserati Dealerto have
the malfunction corrected.
Each system is independent of the
others and can be operated separately
using specific buttons for each seat.
System Initialization Procedure
Following any power cut-out (e.g.
after using the battery master switch
or dead battery), check the seats to
ensure that they are operating
properly when the power supply is
available.
Perform the following procedures on
both seats in the event of a
malfunction.The key in the ignition switch must be
inSTOP (OFF)position and the door on
the side of the seat concerned closed.
Open the door and begin the
following procedure within 5 seconds,
then complete it within 10 seconds:
• forward - STOP;
• backward - STOP;
• forward - STOP;
• backward - STOP;
• tilt the seatback fully forward and
wait until the seat performs two
complete travels (forward and
backward);
• move the seatback to its normal
upright position.
NOTE:
If you need to disconnect the battery,
wait at least 30 seconds from the last
seat movement. If you disconnect the
battery before, you will have to run
the initialization procedure.
Seatback Facilitated Tilt
This function only active when the
door is open, moves the seat forward
automatically when the seatback is
reclined forward to facilitate access to
the rear seat or exiting the vehicle. The
seat returns to their original position
when the seatback is tilted back again.Rear Seats
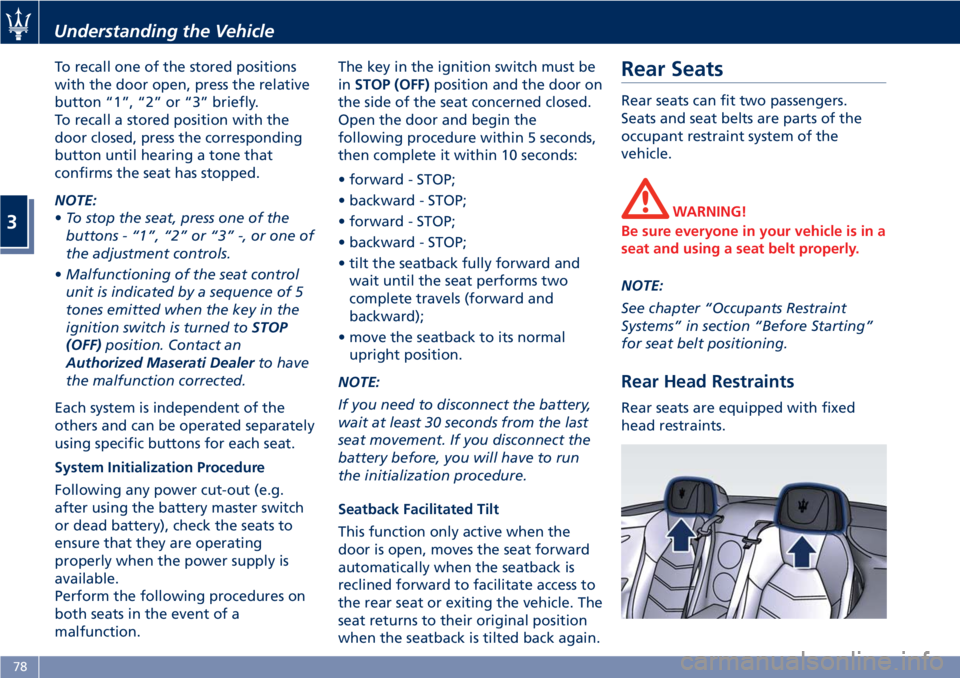
Rear seats can fit two passengers.
Seats and seat belts are parts of the
occupant restraint system of the
vehicle.
WARNING!
Be sure everyone in your vehicle is in a
seat and using a seat belt properly.
NOTE:
See chapter “Occupants Restraint
Systems” in section “Before Starting”
for seat belt positioning.
Rear Head Restraints
Rear seats are equipped with fixed
head restraints.
Understanding the Vehicle
3
78
Page 83 of 296
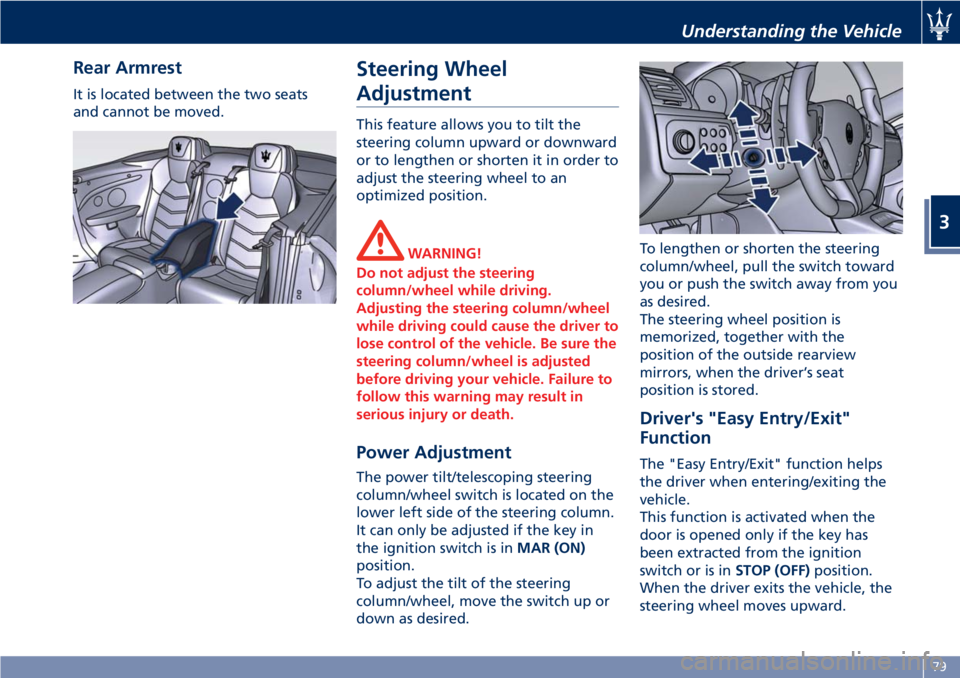
Rear Armrest
It is located between the two seats
and cannot be moved.
Steering Wheel
Adjustment
This feature allows you to tilt the
steering column upward or downward
or to lengthen or shorten it in order to
adjust the steering wheel to an
optimized position.
WARNING!
Do not adjust the steering
column/wheel while driving.
Adjusting the steering column/wheel
while driving could cause the driver to
lose control of the vehicle. Be sure the
steering column/wheel is adjusted
before driving your vehicle. Failure to
follow this warning may result in
serious injury or death.
Power Adjustment
The power tilt/telescoping steering
column/wheel switch is located on the
lower left side of the steering column.
It can only be adjusted if the key in
the ignition switch is inMAR (ON)
position.
To adjust the tilt of the steering
column/wheel, move the switch up or
down as desired.To lengthen or shorten the steering
column/wheel, pull the switch toward
you or push the switch away from you
as desired.
The steering wheel position is
memorized, together with the
position of the outside rearview
mirrors, when the driver’s seat
position is stored.
Driver's "Easy Entry/Exit"
Function
The "Easy Entry/Exit" function helps
the driver when entering/exiting the
vehicle.
This function is activated when the
door is opened only if the key has
been extracted from the ignition
switch or is inSTOP (OFF)position.
When the driver exits the vehicle, the
steering wheel moves upward.
Understanding the Vehicle
3
79
Page 85 of 296
WARNING!
Vehicles and other objects seen in the
outside convex mirror will look
smaller and farther away than they
really are. Relying too much on your
passenger side convex mirror could
cause you to collide with another
vehicle or object. Use the inside mirror
to judge the size or distance of a
vehicle seen in the outside convex
mirror.
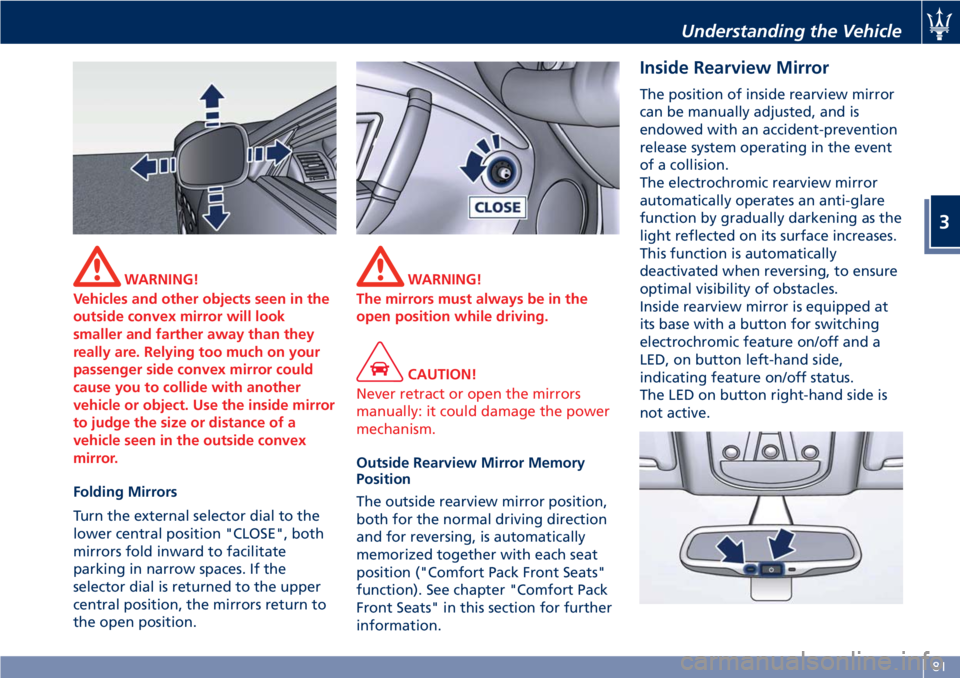
Folding Mirrors
Turn the external selector dial to the
lower central position "CLOSE", both
mirrors fold inward to facilitate
parking in narrow spaces. If the
selector dial is returned to the upper
central position, the mirrors return to
the open position.
WARNING!
The mirrors must always be in the
open position while driving.
CAUTION!
Never retract or open the mirrors
manually: it could damage the power
mechanism.
Outside Rearview Mirror Memory
Position
The outside rearview mirror position,
both for the normal driving direction
and for reversing, is automatically
memorized together with each seat
position ("Comfort Pack Front Seats"
function). See chapter "Comfort Pack
Front Seats" in this section for further
information.
Inside Rearview Mirror
The position of inside rearview mirror
can be manually adjusted, and is
endowed with an accident-prevention
release system operating in the event
of a collision.
The electrochromic rearview mirror
automatically operates an anti-glare
function by gradually darkening as the
light reflected on its surface increases.
This function is automatically
deactivated when reversing, to ensure
optimal visibility of obstacles.
Inside rearview mirror is equipped at
its base with a button for switching
electrochromic feature on/off and a
LED, on button left-hand side,
indicating feature on/off status.
The LED on button right-hand side is
not active.
Understanding the Vehicle
3
81
Page 91 of 296

You can signal another vehicle with
your headlights by lightly pulling the
left-hand multifunction lever toward
you. This will turn on the high beams
headlights until the lever is released.
Flashing occurs also with lights off
(light switch in position “0”) if the key
in the ignition switch is inMAR (ON)
position.
CAUTION!
The high beams can only be switched
on manually by pushing the left-hand
multifunction lever forward.
WARNING!
If the high beams are activated, they
will turn on automatically every time
the low beams are switched on either
manually or automatically. We
recommend therefore that you switch
them off when they are no longer
necessary and every time the twilight
sensor deactivates the external lights.
“Follow me Home” Function
This function allows you to set a
timing for activation of the position
lights and low beams, so that they
may remain on for a set time after
turning off the vehicle.
This function is activated by pushing
the left-hand multifunction lever on
the steering column, used to flash the
headlights.
The position lights and low beams
turn on for 30 seconds, the message
“Follow me” appears on the
instrument cluster display for 20seconds, and the light activation time
is displayed.
When this function is active, every
time the left-hand multifunction lever
for flashing the headlights is
operated, the time the lights remain
on is increased by 30 seconds, with a
maximum total time of 210 seconds.
The display will show the time set.
If the left-hand multifunction lever for
flashing the headlights is operated for
more than 2 seconds, the function is
deactivated, and the indicator on the
instrument cluster display goes off.
When the function is active, turning
the key in the ignition switch back to
MAR (ON)position deactivates the
system.Front Domelights
The front domelight includes a central
and two reading lights.
The central light automatically turns
on together with the two lights on the
sides of the rear seats (see "Rear Side
Interior Lights" in this chapter) when
one of the doors is opened and turns
off when the door is closed (timed
switching off). These lights may be
switched on manually by pressing the
central button
The reading lights are controlled by
the respective side buttons.
Understanding the Vehicle
3
87
Page 96 of 296
Soft Top
NOTE:
By soft top “opening” we
mean folding the soft top
into the rear luggage
compartment.
By soft top “closing” we
mean the opposite.
Precautions
Before and during the soft top
operation observe the following
precautions.
WARNING!
•Before opening or closing the soft
top, always check that no one is in
the way, as impact with the soft top
may cause injury. Also check that no
objects stand in the way of the soft
top, as impact may cause damage to
both the soft top and the object.
•The movement of the soft top with
the engine running must be
performed outdoor. Exhaust gases
contain carbon monoxide which is
strongly toxic and potentially lethal.•In case of hazard, release the soft
top button, which stops its
movement.
•Keep your hands away from the soft
top levers, the soft top compartment
and the upper edge of the
windshield.
•Before operating the soft top, make
sure that no passengers are sitting in
the rear seats.
•Never operate or act on a soft top
that is performing an automatic
movement cycle.
CAUTION!
• Do not open the soft top when it is
wet, as the damp that would form in
the soft top housing might cause
permanent damage to the structure
or stains or mold in the canvas.
Should it need to be opened, do not
leave it sitting in the housing for
more than a day.
• Open the soft top when it is dirty, as
both the canvas and the rear window
might be damaged when it is folded.
• Do not open the soft top if there is
ice or snow on it. Should it need to
be opened, remove the snow or iceand do not use sharp or pointed
objects.
• Do not place objects on the soft top
as they might fall and cause damage
and injury when it is moved.
• Do not place any objects in the soft
top housing.
• Do not fasten roof-racks or similar on
the soft top.
• When closing the soft top, never
start driving before the soft top has
completed the closing cycle and has
locked on the windshield frame.
• Only open or close the soft top when
the vehicle is stationary, otherwise it
might not fully open or close. For
example, if you start moving the soft
top when you are standing at a
traffic light and you start driving
before the soft top has completed its
opening or closing cycle, you can
complete the operation by driving
slowly (do not exceed 19 mph -
30 km/h) and holding the soft top
movement switch pushed until the
process has been completed.
• If you are driving at high speeds,
vacuum might be created in the
passenger compartment and the soft
top might start “wobbling”; to solve
Understanding the Vehicle
3
92
Page 104 of 296

• Turn the wrench clockwise to move
the soft top edge closer to the
windshield, and fasten the fastening
latches inside the locks.
• Remove the unlocking/locking
wrench from the soft top seat and
place it in the tool kit box together
with the screwdriver.Windstop (optional)
The Windstop consists of a panel fitted
behind the front seats, which prevents
the wind from creating turbulence in
the passenger compartment when the
soft top is open. The Windstop can
also be left installed with soft top
closed.
WARNING!
With Windstop installed you can not
carry passengers in the rear seats.
The Windstop is normally stored in a
protective bag inside the trunk
compartment.
This bag is secured inside the
compartment by means of a strap.
CAUTION!
• It is recommended not to place sharp
and pointed objects which may
contact the protective bag in the
trunk compartment, unless they are
firmly secured.
• You should not place objects on the
Windstop protective bag, even if
they are secured, as they maydamage the Windstop with their
weight.
NOTE:
If the vehicle is equipped with spare
wheel (optional), it may not house in
the trunk compartment the Windstop
inside its bag.
Fitting the Windstop
• Take the Windstop out of its bag.
• Turn the lower left-hand part, until it
is fully laid out.
• Join the rear section to the base of
the Windstop.
Understanding the Vehicle
3
100
Page 105 of 296
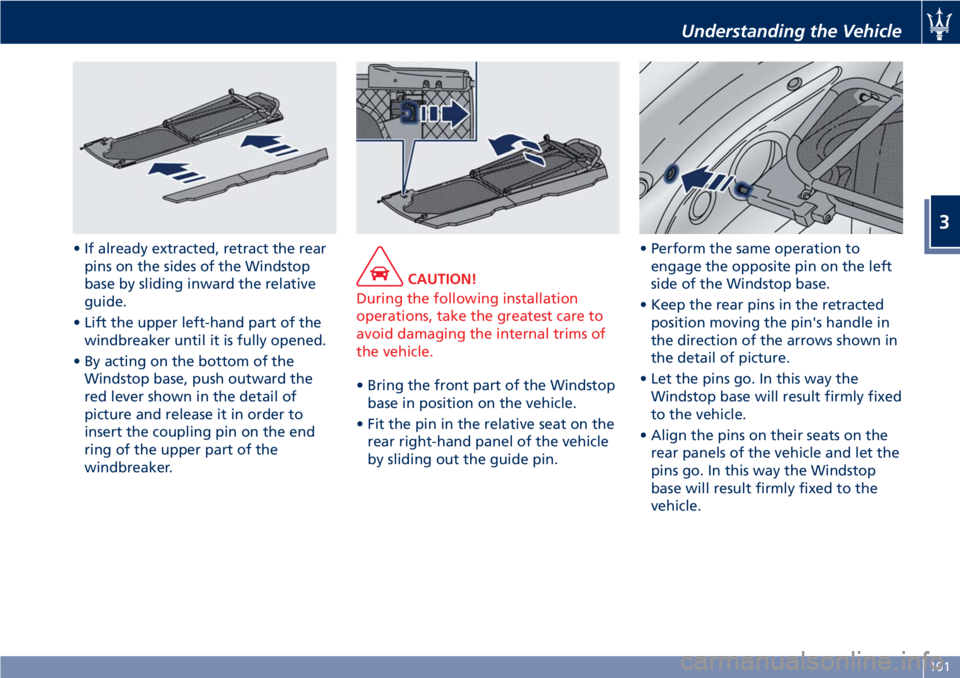
• If already extracted, retract the rear
pins on the sides of the Windstop
base by sliding inward the relative
guide.
• Lift the upper left-hand part of the
windbreaker until it is fully opened.
• By acting on the bottom of the
Windstop base, push outward the
red lever shown in the detail of
picture and release it in order to
insert the coupling pin on the end
ring of the upper part of the
windbreaker.
CAUTION!
During the following installation
operations, take the greatest care to
avoid damaging the internal trims of
the vehicle.
• Bring the front part of the Windstop
base in position on the vehicle.
• Fit the pin in the relative seat on the
rear right-hand panel of the vehicle
by sliding out the guide pin.• Perform the same operation to
engage the opposite pin on the left
side of the Windstop base.
• Keep the rear pins in the retracted
position moving the pin's handle in
the direction of the arrows shown in
the detail of picture.
• Let the pins go. In this way the
Windstop base will result firmly fixed
to the vehicle.
• Align the pins on their seats on the
rear panels of the vehicle and let the
pins go. In this way the Windstop
base will result firmly fixed to the
vehicle.
Understanding the Vehicle
3
101
Page 106 of 296
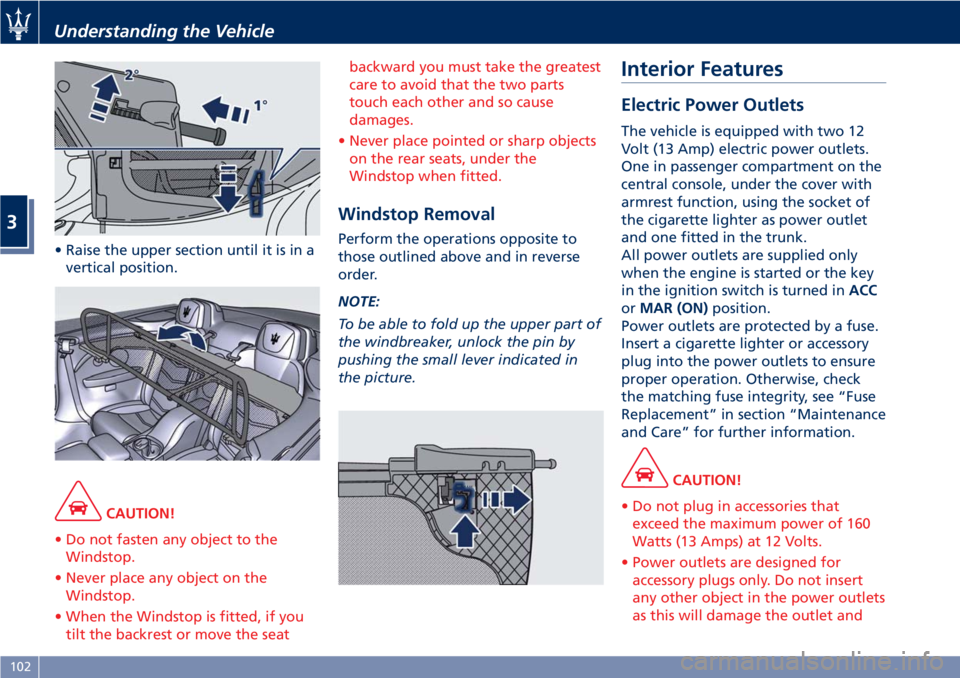
• Raise the upper section until it is in a
vertical position.
CAUTION!
• Do not fasten any object to the
Windstop.
• Never place any object on the
Windstop.
• When the Windstop is fitted, if you
tilt the backrest or move the seatbackward you must take the greatest
care to avoid that the two parts
touch each other and so cause
damages.
• Never place pointed or sharp objects
on the rear seats, under the
Windstop when fitted.
Windstop Removal
Perform the operations opposite to
those outlined above and in reverse
order.
NOTE:
To be able to fold up the upper part of
the windbreaker, unlock the pin by
pushing the small lever indicated in
the picture.
Interior Features
Electric Power Outlets
The vehicle is equipped with two 12
Volt (13 Amp) electric power outlets.
One in passenger compartment on the
central console, under the cover with
armrest function, using the socket of
the cigarette lighter as power outlet
and one fitted in the trunk.
All power outlets are supplied only
when the engine is started or the key
in the ignition switch is turned inACC
orMAR (ON)position.
Power outlets are protected by a fuse.
Insert a cigarette lighter or accessory
plug into the power outlets to ensure
proper operation. Otherwise, check
the matching fuse integrity, see “Fuse
Replacement” in section “Maintenance
and Care” for further information.
CAUTION!
• Do not plug in accessories that
exceed the maximum power of 160
Watts (13 Amps) at 12 Volts.
• Power outlets are designed for
accessory plugs only. Do not insert
any other object in the power outlets
as this will damage the outlet and
Understanding the Vehicle
3
102