2020 MASERATI GRANTURISMO CONVERTIBLE seats
[x] Cancel search: seatsPage 60 of 296
the vehicle’s seat cushion while the
back is against the seatback, they
should use a belt-positioning booster
seat.
The child and belt-positioning booster
seat are fixed to the car by the
lap/shoulder belt.
Children Too Large for Booster
Seats
Children who are large enough to
wear the shoulder belt comfortably
and whose legs are long enough to
bend over the front of the seat when
their back is against the seatback
should use the lap/shoulder belt in a
rear seat.
• Make sure that the child is upright in
the seat.
• The lap portion should be low on the
hips and as snug as possible.
• Check belt fit periodically. A child’s
squirming or slouching can move the
belt out of position.
• If the shoulder belt contacts the face
or neck, move the child closer to the
center of the vehicle. Never allow a
child to put the shoulder belt under
an arm or behind their back.NOTE:
For additional information, refer to
www.seatcheck.org or call
1–866–SEATCHECK. Canadian residents
should refer to Transport Canada’s
website for additional information:
http://www.tc.gc.ca/roadsafety/
safedrivers/childsafety/index.htmWARNING!
•Improper installation can lead to
failure of an infant or child restraint.
It could come loose in a collision. The
child could be badly injured or killed.
Follow the restraint manufacturer’s
directions exactly when installing an
infant or child restraint.
•A rearward-facing child restraint
should only be used in a rear seat. A
rearward-facing child restraint in the
front seat may be struck by a
deploying passenger air bag, which
may cause severe or fatal injury to
the infant.
Here are Some Tips on Getting
the Most Out of Your Child
Restraint
• Before buying any restraint system,
make sure that it has a labelcertifying that it meets all applicable
Safety Standards. Maserati also
recommends that you make sure that
you can install the child restraint in
the vehicle where you will use it
before you buy it.
• The restraint system must be
appropriate for your child’s weight
and height.
• Check the label on the restraint
system for weight and height limits.
• Carefully follow the instructions that
come with the restraint system.
• If installed improperly, it may not
work when needed.
• Fit the child into the seat according
to the child restraint manufacturer’s
directions.
WARNING!
When your child restraint system is
not in use, secure it in the vehicle with
the seat belt or remove it from the
vehicle. Do not leave it loose in the
vehicle. In a sudden stop or accident, it
could strike the occupants or
seatbacks and cause serious personal
injury.
Before Starting
2
56
Page 61 of 296
Installing Child Restraint
Systems using the Vehicle Seat
Belt equipped with ALR
All the passenger seat belts are
equipped with an Automatic Locking
Retractor (ALR) to secure child
protection through a Child Restraint
System (CRS). These types of seat belts
are designed to keep the lap portion
of the seat belt tight around the child
restraint seat avoiding to use a locking
clip.
The ALR will make a ratcheting noise
if the entire belt is pulled out of the
retractor in order to enable the belt to
retract subsequently. For additional
information on ALR, see “Using Seat
Belt in Automatic Locking Retractor
(ALR) Mode” in “Occupants Restraint
Systems” in this section.
To install a Child Restraint System with
ALR, pull enough of the belt out of
the retractor leading it through the
belt path of the protection device.
Slide the latch into the buckle until it
clicks, then remove the entire safety
belt from the retractor in order to
rewound. While rewinding a click will
indicate the safety belt is now in
Automatic Locking mode.
Exert then a traction on the exceeded
lap section of the belt in order totighten it around the child restraint
seat. All seat belts will loosen over
time, it is therefore necessary to check
them periodically and set them
properly.
Lower Anchors and Tether for
Children (LATCH)
Your vehicle's rear outboard seats are
all equipped with the child restraint
anchorage system called LATCH.
The LATCH system allows the child
restraint systems to be fixed without
using the vehicle's seat belts, instead
fixing the child restraint system to the
vehicle structure, using lower
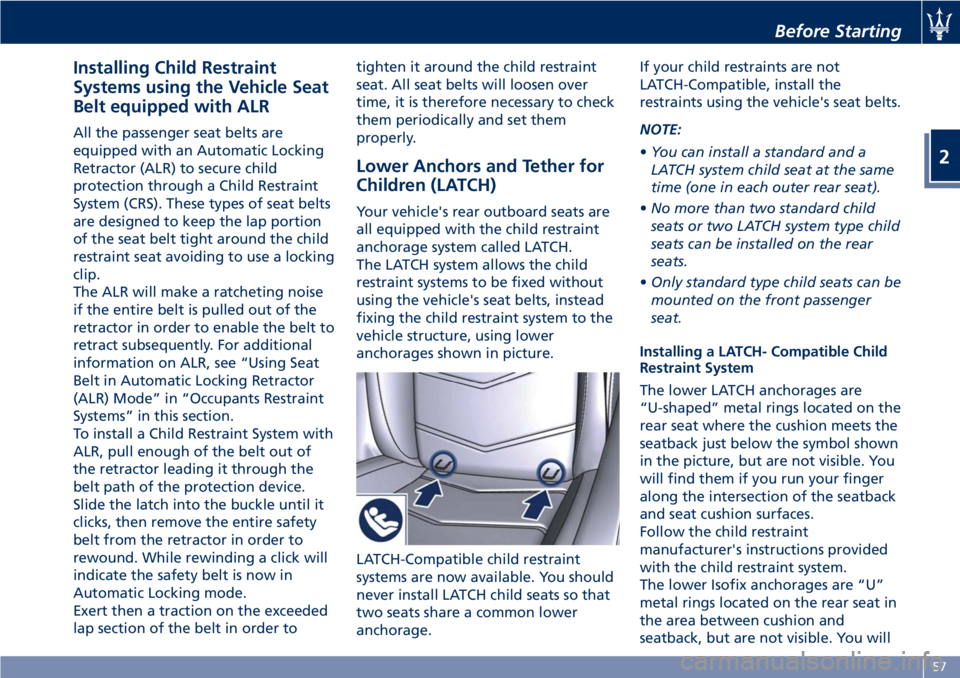
anchorages shown in picture.
LATCH-Compatible child restraint
systems are now available. You should
never install LATCH child seats so that
two seats share a common lower
anchorage.If your child restraints are not
LATCH-Compatible, install the
restraints using the vehicle's seat belts.
NOTE:
•You can install a standard and a
LATCH system child seat at the same
time (one in each outer rear seat).
•No more than two standard child
seats or two LATCH system type child
seats can be installed on the rear
seats.
•Only standard type child seats can be
mounted on the front passenger
seat.
Installing a LATCH- Compatible Child
Restraint System
The lower LATCH anchorages are
“U-shaped” metal rings located on the
rear seat where the cushion meets the
seatback just below the symbol shown
in the picture, but are not visible. You
will find them if you run your finger
along the intersection of the seatback
and seat cushion surfaces.
Follow the child restraint
manufacturer's instructions provided
with the child restraint system.
The lower Isofix anchorages are “U”
metal rings located on the rear seat in
the area between cushion and
seatback, but are not visible. You will
Before Starting
2
57
Page 69 of 296
Safety Tips
Transporting Passengers
WARNING!
•Do not leave children or animals
inside parked vehicles in hot
weather. Interior heat build-up may
cause serious injury.
•Never ride in a cargo area, inside of
a vehicle.
•Do not allow people to ride in any
area of your vehicle that is not
equipped with seats and seat belts.
•Be sure everyone in your vehicle is
in a seat and using a seat belt
properly.
Exhaust Gas
WARNING!
Exhaust gases can injure. They contain
carbon monoxide (CO), which is
colorless and odorless. Breathing it
can make you unconscious and can
eventually poison you. To avoid
breathing (CO), follow these safety
tips:
•Do not run the engine in a closed
garage or in confined areas any
longer than needed to move your
vehicle in or out of the area.
•If it is necessary to sit in a parked
vehicle with the engine running,
adjust your heating or cooling
controls to force outside air into the
vehicle. Set the blower at high
speed.
•If you are required to drive with the
trunk lid open, make sure that all
windows are closed and the climate
control blowers switch is set at high
speed. DO NOT use the recirculation
mode.
The best protection against carbon
monoxide entry into the passenger
compartment is a properly maintained
engine exhaust system.Whenever detecting a change in the
sound of the exhaust system or
eventual exhaust fumes inside the
vehicle have theAuthorized Maserati
Dealerinspect the complete exhaust
system and adjacent body areas for
broken, damaged, deteriorated, or
mispositioned parts.
Open seams or loose connections
could permit exhaust fumes to seep
into the passenger compartment.
WARNING!
California Proposition 65
Operating, servicing and maintaining
a passenger vehicle or off-road vehicle
can expose you to chemicals including
such as, engine exhaust, carbon
monoxide, phthalates and lead, that
which are know to the State of
California to cause cancer and birth
defects or other reproductive harm. To
minimize exposure, avoid breathing
exhaust, do not idle the engine except
as necessary, service your vehicle in a
well-ventilated area and wear gloves
or wash your hands frequently when
servicing your vehicle. For more
information go to:
www.P65Warnings.ca.gov/passenger-
vehicle
Before Starting
2
65
Page 73 of 296
3 – Understanding the Vehicle
Interior Components..................................... 70
Front Seats............................................ 74
Comfort Pack Front Seats.................................. 76
Rear Seats............................................. 78
Steering Wheel Adjustment................................ 79
Rearview Mirrors........................................ 80
Lights................................................ 82
Windshield Wipers and Washers............................ 89
Soft Top............................................... 92
Windstop (optional)..................................... 100
Interior Features....................................... 102
Cargo Area........................................... 107
HomeLink (for versions/markets, where provided).............. 108
Air Conditioning Distribution............................. 112
Sport Skyhook Suspension
(for versions/markets, where provided)..................... 114
69
Page 78 of 296
Front Seats
Seats and seat belts are part of the
Occupant Restraint System of the
vehicle. For further information, see
chapter “Occupant Restraint System”
in Section “Before Starting”.
WARNING!
Be sure everyone in your vehicle is in a
seat and using a seat belt properly.
Seat Adjustments
The seats can only be adjusted with
the key in the ignition switch inMAR
(ON)position.
It is however possible, when the door
is closed, to operate the seat for
approx. 15 seconds after turning the
key toSTOP (OFF)position and then
for other 15 seconds after the last
operation.
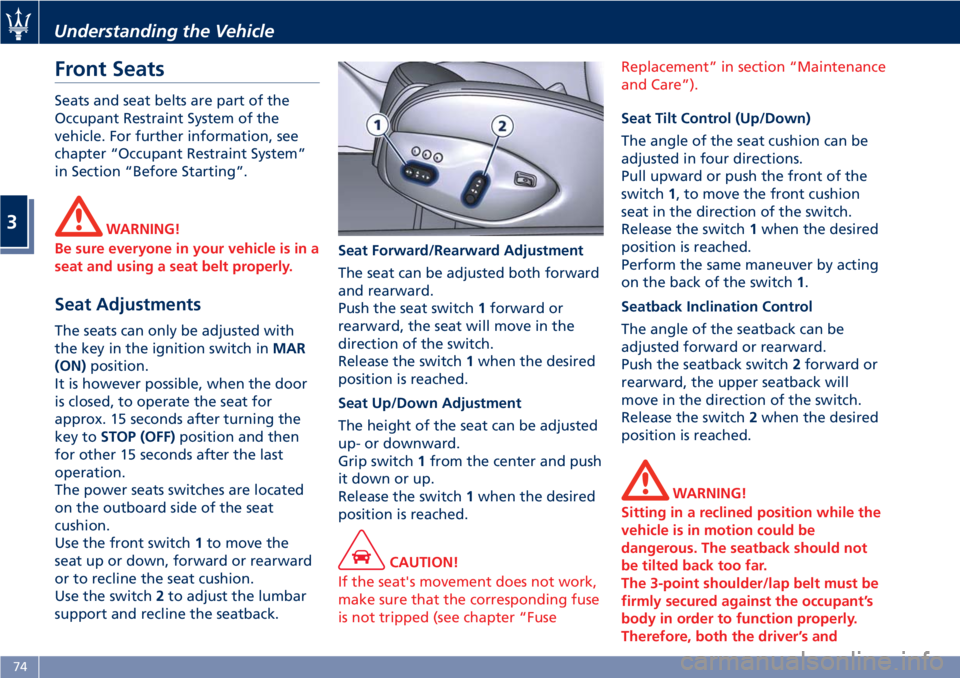
The power seats switches are located
on the outboard side of the seat
cushion.
Use the front switch1to move the
seat up or down, forward or rearward
or to recline the seat cushion.
Use the switch2to adjust the lumbar
support and recline the seatback.Seat Forward/Rearward Adjustment
The seat can be adjusted both forward
and rearward.
Push the seat switch1forward or
rearward, the seat will move in the
direction of the switch.
Release the switch1when the desired
position is reached.
Seat Up/Down Adjustment
The height of the seat can be adjusted
up- or downward.
Grip switch1from the center and push
it down or up.
Release the switch1when the desired
position is reached.
CAUTION!
If the seat's movement does not work,
make sure that the corresponding fuse
is not tripped (see chapter “FuseReplacement” in section “Maintenance
and Care”).
Seat Tilt Control (Up/Down)
The angle of the seat cushion can be
adjusted in four directions.
Pull upward or push the front of the
switch1, to move the front cushion
seat in the direction of the switch.
Release the switch1when the desired
position is reached.
Perform the same maneuver by acting
on the back of the switch1.
Seatback Inclination Control
The angle of the seatback can be
adjusted forward or rearward.
Push the seatback switch2forward or
rearward, the upper seatback will
move in the direction of the switch.
Release the switch2when the desired
position is reached.
WARNING!
Sitting in a reclined position while the
vehicle is in motion could be
dangerous. The seatback should not
be tilted back too far.
The 3-point shoulder/lap belt must be
firmly secured against the occupant’s
body in order to function properly.
Therefore, both the driver’s and
Understanding the Vehicle
3
74
Page 79 of 296
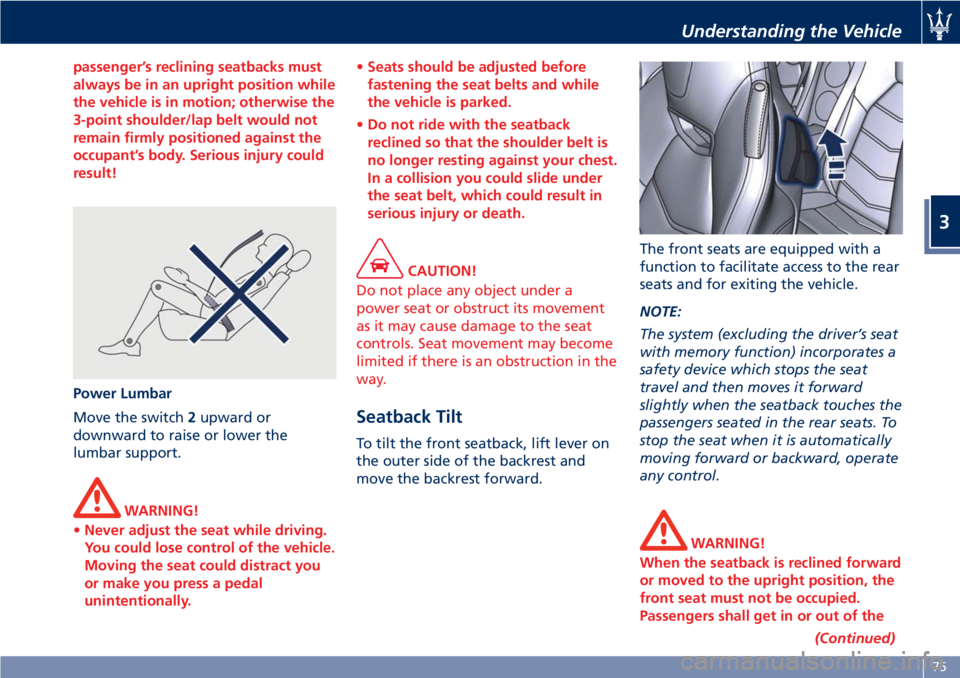
passenger’s reclining seatbacks must
always be in an upright position while
the vehicle is in motion; otherwise the
3-point shoulder/lap belt would not
remain firmly positioned against the
occupant’s body. Serious injury could
result!
Power Lumbar
Move the switch2upward or
downward to raise or lower the
lumbar support.
WARNING!
•Never adjust the seat while driving.
You could lose control of the vehicle.
Moving the seat could distract you
or make you press a pedal
unintentionally.•Seats should be adjusted before
fastening the seat belts and while
the vehicle is parked.
•Do not ride with the seatback
reclined so that the shoulder belt is
no longer resting against your chest.
In a collision you could slide under
the seat belt, which could result in
serious injury or death.
CAUTION!
Do not place any object under a
power seat or obstruct its movement
as it may cause damage to the seat
controls. Seat movement may become
limited if there is an obstruction in the
way.
Seatback Tilt
To tilt the front seatback, lift lever on
the outer side of the backrest and
move the backrest forward.The front seats are equipped with a
function to facilitate access to the rear
seats and for exiting the vehicle.
NOTE:
The system (excluding the driver’s seat
with memory function) incorporates a
safety device which stops the seat
travel and then moves it forward
slightly when the seatback touches the
passengers seated in the rear seats. To
stop the seat when it is automatically
moving forward or backward, operate
any control.
WARNING!
When the seatback is reclined forward
or moved to the upright position, the
front seat must not be occupied.
Passengers shall get in or out of the
(Continued)
Understanding the Vehicle
3
75
Page 80 of 296

(Continued)
rear seats only when the front seat is
stopped. Make sure that passengers in
the rear seats (especially children) do
not touch the seat or any of it's
components when it's moving.Comfort Pack Front Seats
This includes:
• heating of the front seats;
• driver seat, steering wheel and
outside rearview mirrors memory
position (see paragraph "Driver
Memory Seat" in this chapter).
Front Heated Seats
The front seats are equipped with
heaters in both seat cushions and
seatbacks.
WARNING!
•Persons with low skin sensitivity
because of advanced age, chronic
illness, diabetes, spinal cord injury,
medication, alcohol use, exhaustion
or other physical conditions must be
careful when using the seat heater. It
may cause irritation even at low
temperatures, especially if used for
long periods of time.
•Do not place anything on the seat
that insulates against heat, such as a
blanket or cushion. This may cause
the seat heater to overheat.
NOTE:
Seat heating also works with engine
off and key in ignition switch inACC
orMAR (ON)position. To avoid
discharging the battery, it is
recommended to activate the feature
with engine running.
The heating is activated by turning
control on the outer side of the seat
cushion.
When this function is active for one or
more seats, the relative warning light
will illuminate on the display. Using
this control, heating can be adjusted
to 3 different levels.
NOTE:
•Turn off the heating system when
not required, to prevent unnecessary
power wastage.
Understanding the Vehicle
3
76
Page 81 of 296
•Once a heat setting is selected, heat
will be felt within 2 to 5 minutes.
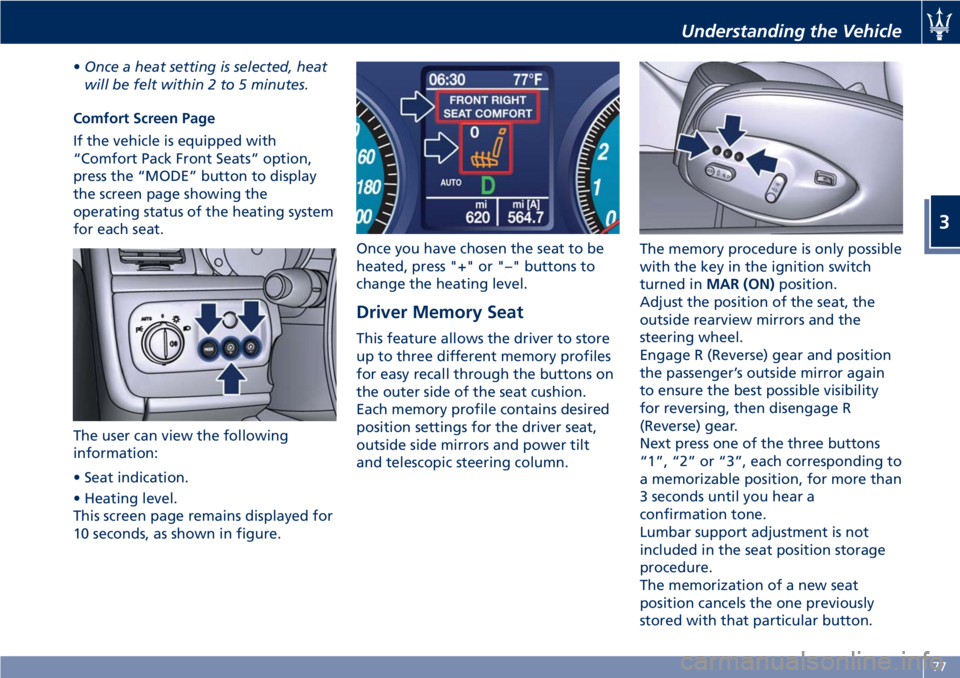
Comfort Screen Page
If the vehicle is equipped with
“Comfort Pack Front Seats” option,
press the “MODE” button to display
the screen page showing the
operating status of the heating system
for each seat.
The user can view the following
information:
• Seat indication.
• Heating level.
This screen page remains displayed for
10 seconds, as shown in figure.Once you have chosen the seat to be
heated, press "+" or "–" buttons to
change the heating level.
Driver Memory Seat
This feature allows the driver to store
up to three different memory profiles
for easy recall through the buttons on
the outer side of the seat cushion.
Each memory profile contains desired
position settings for the driver seat,
outside side mirrors and power tilt
and telescopic steering column.The memory procedure is only possible
with the key in the ignition switch
turned inMAR (ON)position.
Adjust the position of the seat, the
outside rearview mirrors and the
steering wheel.
Engage R (Reverse) gear and position
the passenger’s outside mirror again
to ensure the best possible visibility
for reversing, then disengage R
(Reverse) gear.
Next press one of the three buttons
“1”, “2” or “3”, each corresponding to
a memorizable position, for more than
3 seconds until you hear a
confirmation tone.
Lumbar support adjustment is not
included in the seat position storage
procedure.
The memorization of a new seat
position cancels the one previously
stored with that particular button.
Understanding the Vehicle
3
77