2020 MASERATI GRANTURISMO CONVERTIBLE key
[x] Cancel search: keyPage 55 of 296

Theair bag warning light monitors
the internal circuits and
interconnecting wiring associated with
air bag system electrical components.
WARNING!
Ignoring the
air bag warning light
and message in your instrument
cluster could mean you won't have
the air bags to protect you in a
collision. If the light does not come on
as a bulb check when the ignition is
first turned on, stays on after you
start the engine, or if it comes on as
you drive, have an authorized Service
Centre service the air bag system
immediately.
General Warnings
WARNING!
•When the key in the ignition switch
is turned to the MAR (ON) position,
the
warning light illuminates, but
it must turn off after approx. 5
seconds. If this warning light does
not illuminate, if it remains
permanently on or if it illuminates
while driving, contact an Authorized
Maserati Dealer immediately.
•Always drive keeping your hands on
the steering wheel rim so that, in
the case of activation, the air bag
can deploy without encountering
obstacles which may cause serious
injuries.
•Do not drive with your body bent
forward but keep the seatback in
the upright position and fully
resting your back against it.
•Do not apply stickers or other
objects to the steering wheel or the
passenger’s air bag compartment.
•Do not travel with objects in your
lap, in front of your chest or
especially with a pipe, pencil or
other object held in your mouth; In
the event of a collision with air bagdeployment these objects may cause
serious injuries.
•Do not cover the front seat backs
with clothes or covers.
•Note that with the key in the
ignition switch turned to MAR (ON)
position, even with the engine off,
the air bags may activate even if the
vehicle is stationary, if it is run into
by another vehicle. Therefore, even
with the vehicle stationary, children
must be secured by the specific child
restraint systems installed on the
passenger seat. In addition, the air
bags will not activate in the event of
a collision with the vehicle
stationary and the key removed
from the ignition switch; failure of
the air bags to deploy in these
circumstances is not indicative of a
system malfunction.
•If the vehicle was stolen or its theft
attempted, if it was vandalized or
involved in flooding, contact an
Authorized Maserati Dealer to have
the air bag system checked.
•If incorrect operations are
performed on the electrical system,
the air bag may activate and cause
injuries to anyone in the vicinity.
•The air bags are not a substitute of
(Continued)
Before Starting
2
51
Page 64 of 296

Park Assist
To assist the driver during parking
maneuvers, the vehicle is equipped
with four sensors housed in the rear
bumper and four sensors in the front
bumper.
Besides the use of the sensors available
on the bumpers, the vehicle is also
equipped with a rear parking camera.For more details, see chapter "Rear
Parking Camera" in this section.
During parking maneuvers, the
parking sensors provide the driver with
information on the distance between
obstacles found behind and in front of
the vehicle. The information about the
obstacle distance is given to the driver
by means of acoustic and visual signals.
The acoustic signals generated by the
system add to the driver’s field of
vision, allowing him to avoid hitting
any obstacles during maneuvers.
WARNING!
•However, the driver remains
responsible during parking
maneuvers and in other potentially
dangerous situations. The system
has actually been designed only as a
supplementary aid during parking
maneuvers, since it allows the driver
to detect obstacles outside his field
of vision.
•Extreme caution is required in case
of obstacles whose shape and
volume are susceptible to be
incorrectly detected. When starting
the vehicle after parking, these
obstacles might not be detected if
they are already close to the bumper.Always stop when the acoustic
signal becomes steady.
Stop & Go Feature
This function is enabled by the
manufacturer and it can be disabled by
the MTC+ (see chapter "MTC+
Settings" in section "Dashboard
Instruments and Controls"), select and
tick the “Stop & Go Parking Sensors”
feature.
When vehicle speed is equal to or
lower than 6 mph (10 km/h), this
function helps the driver under special
traffic conditions as it signals that the
vehicle before you is at a min.
distance.
System with Enabled Stop & Go
Feature
When the "Stop & Go" feature is
enabled through the MTC+, all sensors
are automatically enabled with the key
in the ignition switch turned toMAR
(ON)position, but they are not
displayed on the instrument cluster.
When the R (Reverse) gear is engaged
or an obstacle is detected, the
corresponding detection areas are
displayed on the instrument cluster. As
soon as the R (Reverse) gear is
disengaged, all sensors are still active:
Before Starting
2
60
Page 66 of 296

the distance (maximum/average/
minimum) and the position
(front/rear/central/side) of the obstacle
detected.
The color represents the distance,
while the field represents the position.
The green color represents the
maximum distance detected, the
yellow color the medium distance and
the red color the minimum one. The
rear sensors are not shown in the
image on the instrument cluster
display if only the front sensors are
active.
WARNING!
For the system to operate correctly the
sensors positioned on the bumper
must be kept clean (remove any mud,
dirt, snow or ice).
Sensor Range
The sensors allow the system to
monitor the front and rear of the
vehicle; they are positioned so as to
monitor the central and lateral zones
at the front and at the rear of the
vehicle.
In the event of an obstacle located in a
central area, this will be detected at
distances of less than 35 in (0,9 m) at
the front and 59 in (1,50 m) at the rear,
depending on the type of obstacle and
its dimensions.
If the obstacle is located in a lateral
position, it will be detected at
distances of less than 31 in (0,8 m).
Failure Indicators
The system ECU checks all the
components every time R (Reverse)
gear is engaged.
In the event that the parking sensors
fail, the relative
warning light and
message illuminate on the instrument
cluster display.
In the event of a failure signal, stop
the vehicle and turn the key in the
ignition switch toSTOP (OFF)position.
Then try cleaning the sensors or
moving the vehicle away from any
possible ultrasound sources (e.g.
pneumatic truck brakes or pneumatichammers) and rotate the key to the
MAR (ON)position. So, if the
operating failure cause has been
eliminated, system full operation will
be recovered. If however, the failure
beep continues, contact anAuthorized
Maserati Dealerto have the system
checked.
Cleaning the Park Assist
Sensors
When cleaning the sensors, take
special care not to scratch or damage
them; therefore, do not use dry, rough
or hard cloths.
The sensors must be washed with clean
water, possibly adding car shampoo.
Should you need to repaint the
bumper or in case of paint touch-ups
in the sensor area, please contact
exclusively theAuthorized Maserati
Dealer. Incorrect paint application
could affect the parking sensors
operation.
Park Assist System Usage
Precautions
NOTE:
•Jackhammers, large trucks, and other
vibrations could affect the
performance of Park Assist.
Before Starting
2
62
Page 70 of 296

Vehicle Safety Checks
Seat Belts
• Inspect the belt system periodically,
checking for cuts, frays, and loose
parts. Damaged parts must be
replaced immediately.
• Do not disassemble or modify the
system.
• If the belt has been sharply pulled,
for example as the result of an
accident, the safety belt, together
with the anchoring devices, the
anchoring device mounting screws
and the pretensioner must be
completely replaced. Even if the belt
does not present any exterior signs
of wear or damage, it may have lost
its restraining properties.
Air bag Warning Light
The
warning light should illuminate
and remain lit for a few seconds bulb
checking when the key in the ignition
switch is turned inMAR (ON)position
(see “Supplemental Restraint System
(SRS) — Air bags” chapter in this
section).
•Ifthe
warning light does not
illuminate while starting, contact an
Authorized Maserati Dealer.•Ifthe
warning light stays on,
flickers, or comes on while driving,
have the system checked by an
Authorized Maserati Dealer.
Defroster
Check operation by selecting the
defrost mode and place the fan system
on high speed (see “Air Conditioning
Controls” chapter in section
“Dashboard Instruments and
Controls”).
You should be able to feel the air
directed against the windshield and
front side windows. Contact an
Authorized Maserati Dealerfor service
if your defroster is inoperable.
Floor Mat
Always use floor mats designed to fit
the footwell of your vehicle. Use only
floor mats that leave the pedal area
unobstructed and that are firmly
secured so that they cannot slip out of
position and interfere with the pedals
or impair safe operation of your
vehicle.
NOTE:
TheAuthorized Maserati Dealercan
provide you with any information
about the available Maserati floor
mats included in the “Genuine
Accessories” range.
WARNING!
Pedals that cannot move freely can
cause loss of vehicle control and
increase the risk of serious personal
injury.
•Always make sure that floor mats
are properly attached to the proper
fasteners.
•Never place or install floor mats or
other floor coverings in the vehicle
that cannot be properly secured to
prevent them from moving and
interfering with the pedals.
•Never put floor mats or other floor
coverings on top of already installed
floor mats. Additional floor mats and
other coverings will reduce the size
of the pedal area and interfere with
the pedals.
•Check mounting of mats on a regular
basis. Always properly reinstall and
secure floor mats that have been
removed for cleaning.
•Always make sure that objects
cannot fall into the driver footwell
while the vehicle is moving. Objects
can become trapped under the brake
pedal and accelerator pedal causing
a loss of vehicle control.
Before Starting
2
66
Page 78 of 296

Front Seats
Seats and seat belts are part of the
Occupant Restraint System of the
vehicle. For further information, see
chapter “Occupant Restraint System”
in Section “Before Starting”.
WARNING!
Be sure everyone in your vehicle is in a
seat and using a seat belt properly.
Seat Adjustments
The seats can only be adjusted with
the key in the ignition switch inMAR
(ON)position.
It is however possible, when the door
is closed, to operate the seat for
approx. 15 seconds after turning the
key toSTOP (OFF)position and then
for other 15 seconds after the last
operation.
The power seats switches are located
on the outboard side of the seat
cushion.
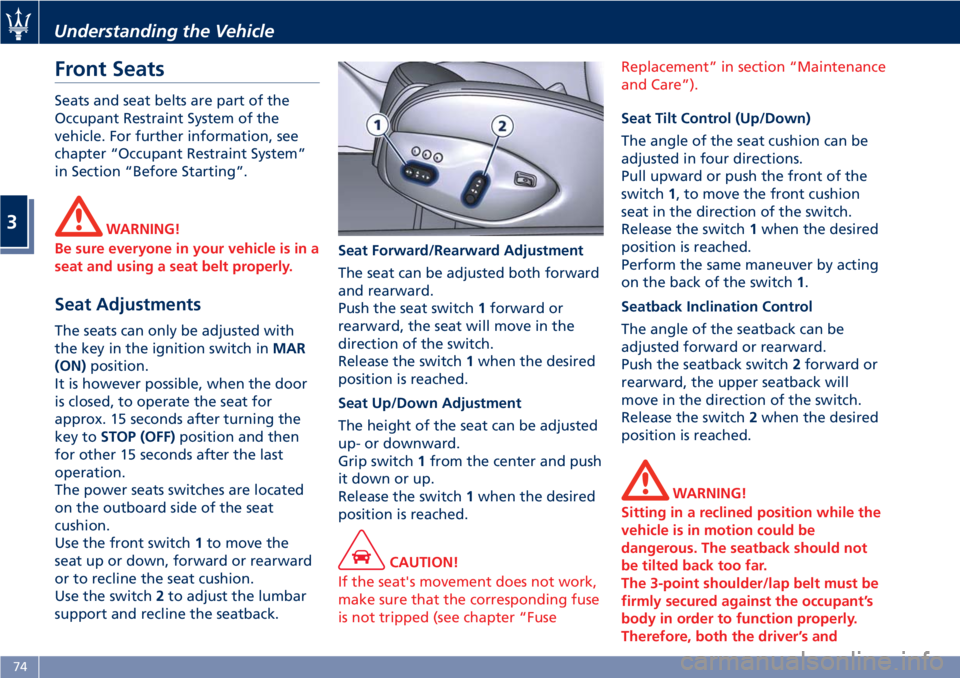
Use the front switch1to move the
seat up or down, forward or rearward
or to recline the seat cushion.
Use the switch2to adjust the lumbar
support and recline the seatback.Seat Forward/Rearward Adjustment
The seat can be adjusted both forward
and rearward.
Push the seat switch1forward or
rearward, the seat will move in the
direction of the switch.
Release the switch1when the desired
position is reached.
Seat Up/Down Adjustment
The height of the seat can be adjusted
up- or downward.
Grip switch1from the center and push
it down or up.
Release the switch1when the desired
position is reached.
CAUTION!
If the seat's movement does not work,
make sure that the corresponding fuse
is not tripped (see chapter “FuseReplacement” in section “Maintenance
and Care”).
Seat Tilt Control (Up/Down)
The angle of the seat cushion can be
adjusted in four directions.
Pull upward or push the front of the
switch1, to move the front cushion
seat in the direction of the switch.
Release the switch1when the desired
position is reached.
Perform the same maneuver by acting
on the back of the switch1.
Seatback Inclination Control
The angle of the seatback can be
adjusted forward or rearward.
Push the seatback switch2forward or
rearward, the upper seatback will
move in the direction of the switch.
Release the switch2when the desired
position is reached.
WARNING!
Sitting in a reclined position while the
vehicle is in motion could be
dangerous. The seatback should not
be tilted back too far.
The 3-point shoulder/lap belt must be
firmly secured against the occupant’s
body in order to function properly.
Therefore, both the driver’s and
Understanding the Vehicle
3
74
Page 80 of 296

(Continued)
rear seats only when the front seat is
stopped. Make sure that passengers in
the rear seats (especially children) do
not touch the seat or any of it's
components when it's moving.Comfort Pack Front Seats
This includes:
• heating of the front seats;
• driver seat, steering wheel and
outside rearview mirrors memory
position (see paragraph "Driver
Memory Seat" in this chapter).
Front Heated Seats
The front seats are equipped with
heaters in both seat cushions and
seatbacks.
WARNING!
•Persons with low skin sensitivity
because of advanced age, chronic
illness, diabetes, spinal cord injury,
medication, alcohol use, exhaustion
or other physical conditions must be
careful when using the seat heater. It
may cause irritation even at low
temperatures, especially if used for
long periods of time.
•Do not place anything on the seat
that insulates against heat, such as a
blanket or cushion. This may cause
the seat heater to overheat.
NOTE:
Seat heating also works with engine
off and key in ignition switch inACC
orMAR (ON)position. To avoid
discharging the battery, it is
recommended to activate the feature
with engine running.
The heating is activated by turning
control on the outer side of the seat
cushion.
When this function is active for one or
more seats, the relative warning light
will illuminate on the display. Using
this control, heating can be adjusted
to 3 different levels.
NOTE:
•Turn off the heating system when
not required, to prevent unnecessary
power wastage.
Understanding the Vehicle
3
76
Page 81 of 296

•Once a heat setting is selected, heat
will be felt within 2 to 5 minutes.
Comfort Screen Page
If the vehicle is equipped with
“Comfort Pack Front Seats” option,
press the “MODE” button to display
the screen page showing the
operating status of the heating system
for each seat.
The user can view the following
information:
• Seat indication.
• Heating level.
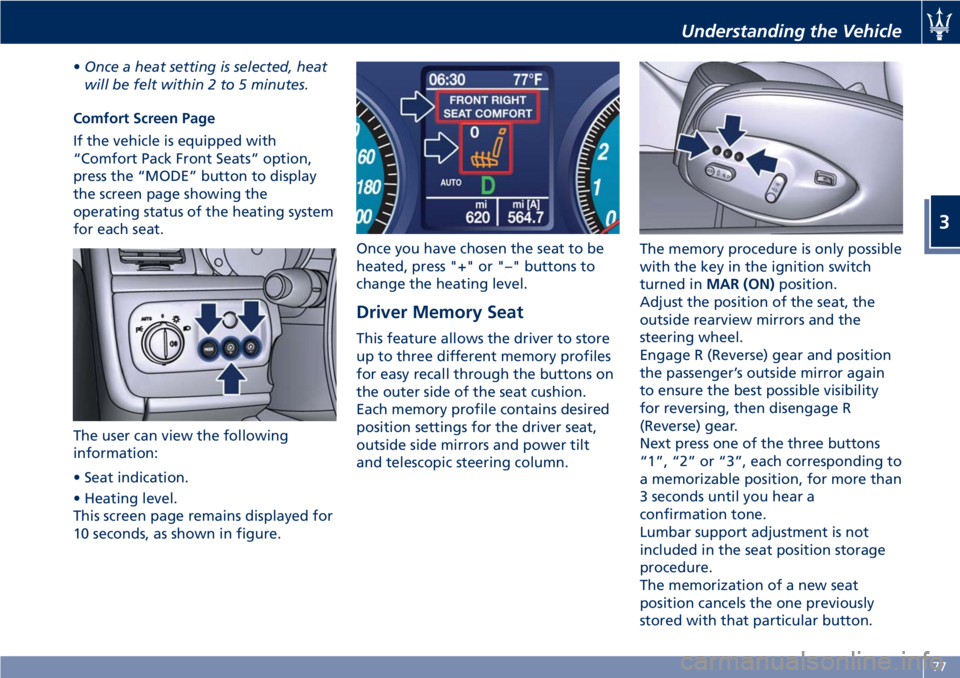
This screen page remains displayed for
10 seconds, as shown in figure.Once you have chosen the seat to be
heated, press "+" or "–" buttons to
change the heating level.
Driver Memory Seat
This feature allows the driver to store
up to three different memory profiles
for easy recall through the buttons on
the outer side of the seat cushion.
Each memory profile contains desired
position settings for the driver seat,
outside side mirrors and power tilt
and telescopic steering column.The memory procedure is only possible
with the key in the ignition switch
turned inMAR (ON)position.
Adjust the position of the seat, the
outside rearview mirrors and the
steering wheel.
Engage R (Reverse) gear and position
the passenger’s outside mirror again
to ensure the best possible visibility
for reversing, then disengage R
(Reverse) gear.
Next press one of the three buttons
“1”, “2” or “3”, each corresponding to
a memorizable position, for more than
3 seconds until you hear a
confirmation tone.
Lumbar support adjustment is not
included in the seat position storage
procedure.
The memorization of a new seat
position cancels the one previously
stored with that particular button.
Understanding the Vehicle
3
77
Page 82 of 296

To recall one of the stored positions
with the door open, press the relative
button “1”, “2” or “3” briefly.
To recall a stored position with the
door closed, press the corresponding
button until hearing a tone that
confirms the seat has stopped.
NOTE:
•To stop the seat, press one of the
buttons - “1”, “2” or “3” -, or one of
the adjustment controls.
•Malfunctioning of the seat control
unit is indicated by a sequence of 5
tones emitted when the key in the
ignition switch is turned toSTOP
(OFF)position. Contact an
Authorized Maserati Dealerto have
the malfunction corrected.
Each system is independent of the
others and can be operated separately
using specific buttons for each seat.
System Initialization Procedure
Following any power cut-out (e.g.
after using the battery master switch
or dead battery), check the seats to
ensure that they are operating
properly when the power supply is
available.
Perform the following procedures on
both seats in the event of a
malfunction.The key in the ignition switch must be
inSTOP (OFF)position and the door on
the side of the seat concerned closed.
Open the door and begin the
following procedure within 5 seconds,
then complete it within 10 seconds:
• forward - STOP;
• backward - STOP;
• forward - STOP;
• backward - STOP;
• tilt the seatback fully forward and
wait until the seat performs two
complete travels (forward and
backward);
• move the seatback to its normal
upright position.
NOTE:
If you need to disconnect the battery,
wait at least 30 seconds from the last
seat movement. If you disconnect the
battery before, you will have to run
the initialization procedure.
Seatback Facilitated Tilt
This function only active when the
door is open, moves the seat forward
automatically when the seatback is
reclined forward to facilitate access to
the rear seat or exiting the vehicle. The
seat returns to their original position
when the seatback is tilted back again.Rear Seats
Rear seats can fit two passengers.
Seats and seat belts are parts of the
occupant restraint system of the
vehicle.
WARNING!
Be sure everyone in your vehicle is in a
seat and using a seat belt properly.
NOTE:
See chapter “Occupants Restraint
Systems” in section “Before Starting”
for seat belt positioning.
Rear Head Restraints
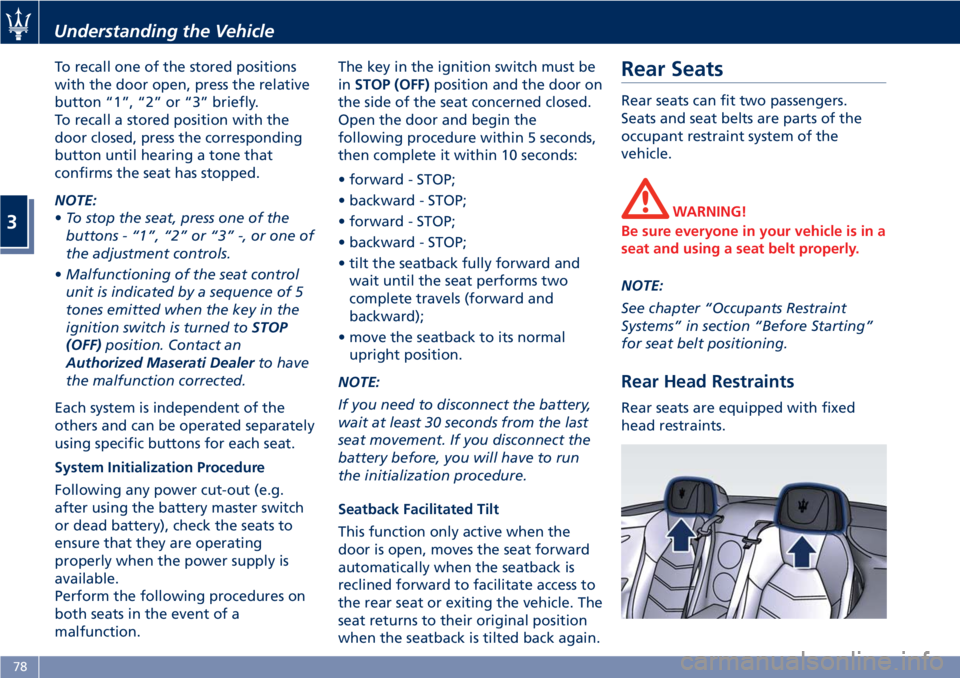
Rear seats are equipped with fixed
head restraints.
Understanding the Vehicle
3
78