2020 MASERATI GRANTURISMO CONVERTIBLE clock
[x] Cancel search: clockPage 225 of 296
Manual Release Procedure
To manually release the parking brake,
you need to use the special tool
provided in the tool kit (see "Tool Kit"
in this section).
Proceed as follows:
• remove any luggage and/or the bag
containing the compact spare wheel
(if equipped) from the trunk
compartment;
• remove the floor panel from the
trunk compartment;
• remove the inside covering panel
from the battery compartment;
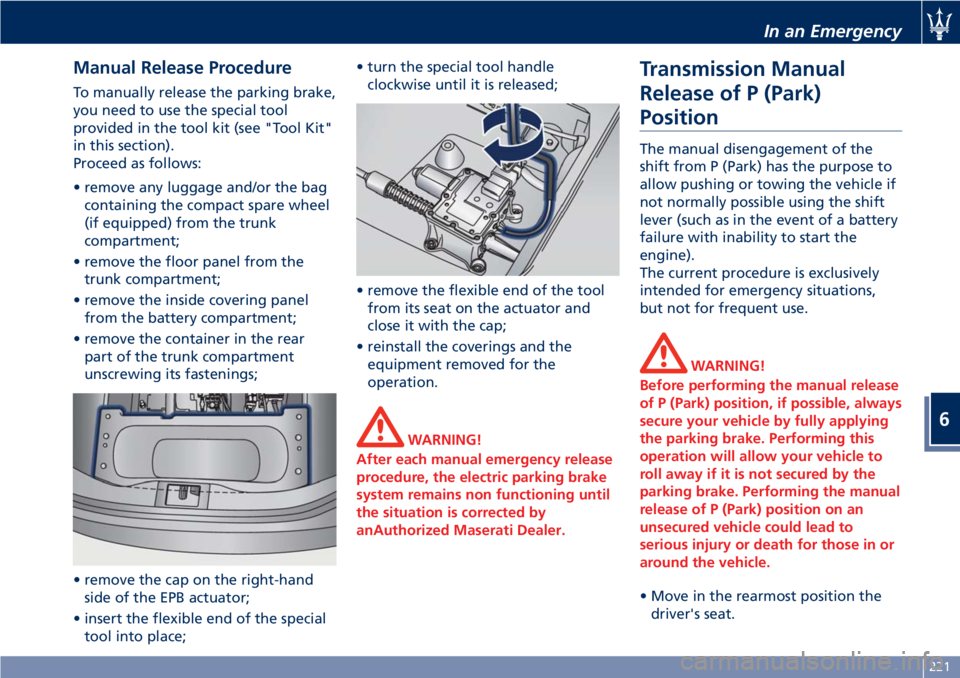
• remove the container in the rear
part of the trunk compartment
unscrewing its fastenings;
• remove the cap on the right-hand
side of the EPB actuator;
• insert the flexible end of the special
tool into place;• turn the special tool handle
clockwise until it is released;
• remove the flexible end of the tool
from its seat on the actuator and
close it with the cap;
• reinstall the coverings and the
equipment removed for the
operation.
WARNING!
After each manual emergency release
procedure, the electric parking brake
system remains non functioning until
the situation is corrected by
anAuthorized Maserati Dealer.
Transmission Manual
Release of P (Park)
Position
The manual disengagement of the
shift from P (Park) has the purpose to
allow pushing or towing the vehicle if
not normally possible using the shift
lever (such as in the event of a battery
failure with inability to start the
engine).
The current procedure is exclusively
intended for emergency situations,
but not for frequent use.
WARNING!
Before performing the manual release
of P (Park) position, if possible, always
secure your vehicle by fully applying
the parking brake. Performing this
operation will allow your vehicle to
roll away if it is not secured by the
parking brake. Performing the manual
release of P (Park) position on an
unsecured vehicle could lead to
serious injury or death for those in or
around the vehicle.
• Move in the rearmost position the
driver's seat.
In an Emergency
6
221
Page 262 of 296
Reverse and Rear Fog Light
To replace a bulb of these lights:
• Lift the trunk compartment lid.
• Remove the panel from the trunk lid.
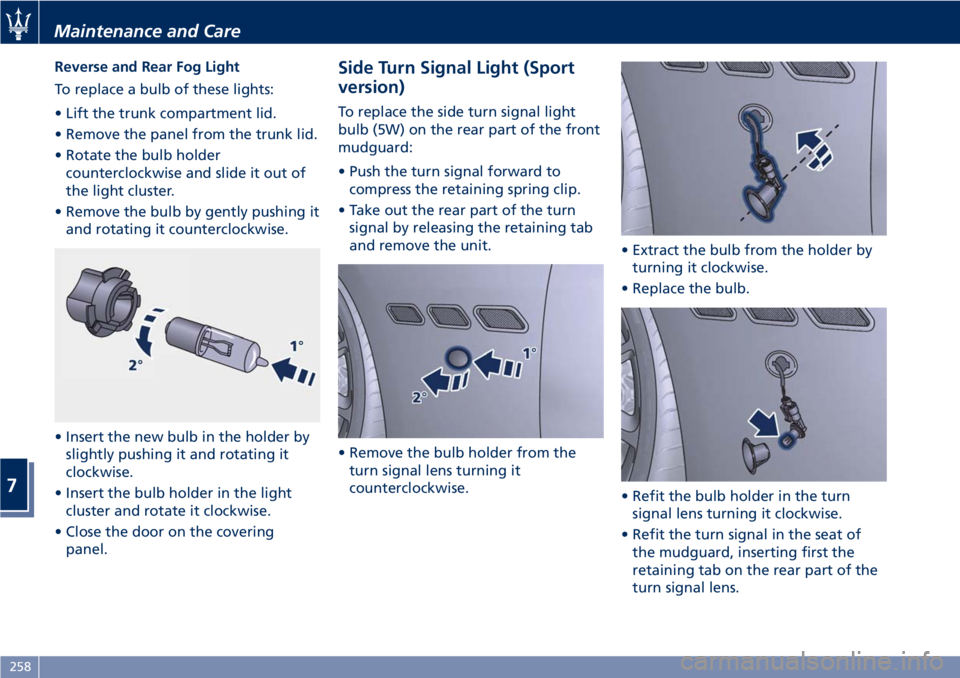
• Rotate the bulb holder
counterclockwise and slide it out of
the light cluster.
• Remove the bulb by gently pushing it
and rotating it counterclockwise.
• Insert the new bulb in the holder by
slightly pushing it and rotating it
clockwise.
• Insert the bulb holder in the light
cluster and rotate it clockwise.
• Close the door on the covering
panel.Side Turn Signal Light (Sport
version)
To replace the side turn signal light
bulb (5W) on the rear part of the front
mudguard:
• Push the turn signal forward to
compress the retaining spring clip.
• Take out the rear part of the turn
signal by releasing the retaining tab
and remove the unit.
• Remove the bulb holder from the
turn signal lens turning it
counterclockwise.• Extract the bulb from the holder by
turning it clockwise.
• Replace the bulb.
• Refit the bulb holder in the turn
signal lens turning it clockwise.
• Refit the turn signal in the seat of
the mudguard, inserting first the
retaining tab on the rear part of the
turn signal lens.
Maintenance and Care
7
258
Page 263 of 296
• Press the front part of the turn
signal lens until hearing the spring
clip click into position.
CAUTION!
Proceed with care when removing the
side turn signal light to avoid
damaging to the vehicle body or the
turn signal itself.
Side Turn Signal Lights (MC
version)
To replace side turn signal light bulb
(5W) on the rear part of the front
mudguard:
• Gently pry the turn signal light off
the vehicle body by levering with a
non-metal tool under the rubber
part.
CAUTION!
Proceed with care when removing side
turn signal light to avoid damaging
the vehicle body or to the turn signal
itself.
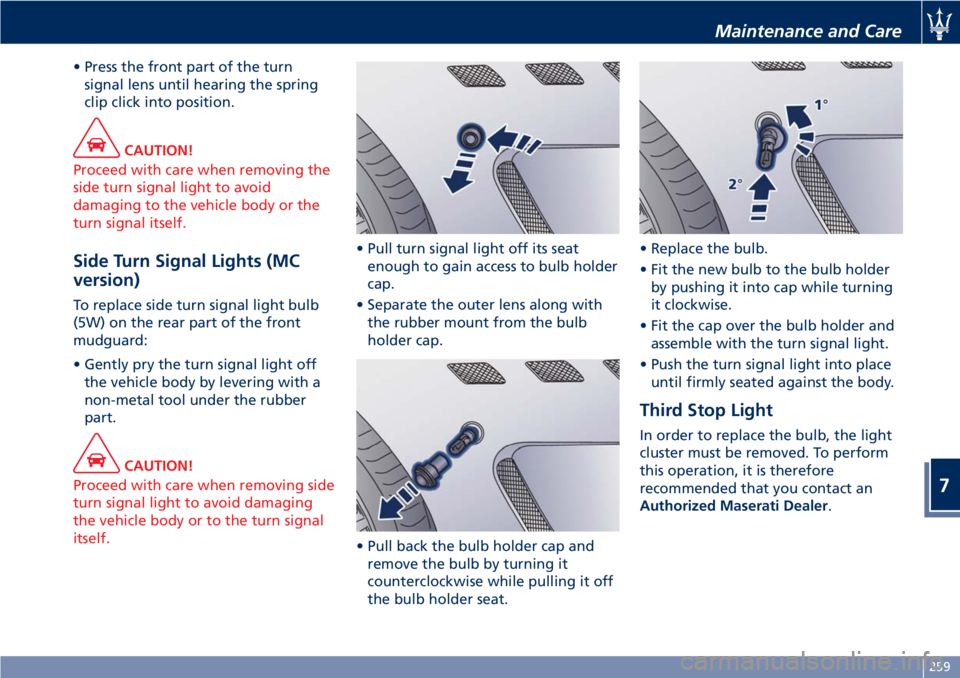
• Pull turn signal light off its seat
enough to gain access to bulb holder
cap.
• Separate the outer lens along with
the rubber mount from the bulb
holder cap.
• Pull back the bulb holder cap and
remove the bulb by turning it
counterclockwise while pulling it off
the bulb holder seat.• Replace the bulb.
• Fit the new bulb to the bulb holder
by pushing it into cap while turning
it clockwise.
• Fit the cap over the bulb holder and
assemble with the turn signal light.
• Push the turn signal light into place
until firmly seated against the body.
Third Stop Light
In order to replace the bulb, the light
cluster must be removed. To perform
this operation, it is therefore
recommended that you contact an
Authorized Maserati Dealer.
Maintenance and Care
7
259
Page 272 of 296
Interior Maintenance and
Care
Interior trim should be cleaned
starting with a damp cloth. Do not use
harsh cleaners.
The leather upholstery can be best
preserved by regular cleaning with a
damp soft cloth. Small particles of dirt
can act as an abrasive and damage the
leather upholstery and should be
removed promptly with a damp cloth.
Stubborn soils stains can be removed
easily with a soft cloth and
appropriate products. Avoid soaking
the leather upholstery with any liquid.
Please do not use polishes, oils,
cleaning fluids, solvents, detergents, or
ammonia-based cleaners to clean your
leather upholstery.
Application of a leather conditioner is
not required to maintain the original
condition.
Check at regular intervals that there is
no water trapped under the mats (due
to drips off shoes, umbrellas etc.)
which may cause the metal parts to
oxidize.
CAUTION!
Do not use alcohol, petrol or solvents
to clean the instrument cluster'stransparent dome, the MTC+ display,
the analog clock and the leather
upholstery. We recommended the use
of “Car Care” products approved by
Maserati for the maintenance and care
of the interior.
Leather Upholstery Treatment
Have the leather upholstery only
treated, as provided in the Scheduled
Service Plan, by anAuthorized
Maserati Dealerwhich has the
required specific products.
Parts in Premium Quality Wood
Remove any dirt with a buckskin
leather or damp cloth.
NOTE:
TheAuthorized Maserati Dealercan
provide you with any information
about the Maserati approved “Car
Care” products, available in the
“Genuine Accessories” range.
WARNING!
California Proposition 65
Operating, servicing and maintaining
a passenger vehicle or off-road vehicle
can expose you to chemicals including
such as, engine exhaust, carbonmonoxide, phthalates and lead, that
which are know to the State of
California to cause cancer and birth
defects or other reproductive harm. To
minimize exposure, avoid breathing
exhaust, do not idle the engine except
as necessary, service your vehicle in a
well-ventilated area and wear gloves
or wash your hands frequently when
servicing your vehicle. For more
information go to:
www.P65Warnings.ca.gov/passenger-
vehicle
Maintenance and Care
7
268
Page 290 of 296

Abbreviations.................7
ABS (Anti-lock Braking System) . . .179
A/C Air Filter Replacement.......263
Accessories
Aftermarket Parts and Accessories
Statement.................11
Accident, in the event of........213
A/C System Maintenance........262
Airbag.....................46
Air bag System Components.....46
Air bag Warning Light.........66
Passenger Air bag Labels.......18
Supplemental Restraint System
(SRS).....................46
Air Conditioning Controls.......151
Air Conditioning Distribution.....112
Alarm, Vehicle Security..........26
ALR (Automatic Locking Retractor) . .43
Assistance....................9
Assistance, if you need.........9
Audio Controls...............138
Steering Wheel Audio Controls . .138
Audio, Customer Setting........147
Audio System................140
Automatic Transmission........160
Automatic Transmission Range . .162
AUX, USB and SD Memory Card
Ports.....................132
Battery....................247
Access the Battery...........226
Jump Start Procedure........226
Maintenance - Free Battery. . . .247To Reconnect the Battery......248
Bluetooth, Customer settings.....147
Bodywork Maintenance and Care . .265
Protection from Atmospheric
Agents..................265
Useful Advice to Keep the
Bodywork in Good Condition . . .265
Brakes
Brake and Stability Control
System...................177
Brake Fluid Level Check.......242
Brake Overheating..........182
Parking Brake..............174
Parking Brake - Manual
Release..................220
Using the Brakes............181
Bulb Replacement............257
Cargo Area.................107
Child Restraint Systems
Children too large for Booster
Seats.....................56
Infants and Child Restraints.....55
Lower Anchors and Tether for
Children (LATCH)............57
Older Children and Child
Restraints.................55
Tips on getting the most out of
your child restraint...........56
Clock, analog................144
Comfort Pack Front Seats........76
Driver Memory Seat..........77
Front Heated Seats...........76Console
Central Console Components....73
Front Dome Console
Components...............71
Cruise Control...............185
Cupholders
Front Seats Cupholders.......103
Rear Seats Cupholders........104
Dashboard Components.........70
Data, Technical..............279
Defroster...................66
Doors Components.............72
Drive Mode, Controls..........169
Driving Conditions
Before the Trip.............204
Driving at Night............204
Driving in Fog..............205
Driving in the Mountains......205
Driving in the Rain..........204
Driving on Snow or Ice........206
Driving through Flooded
Sections..................206
Safe Driving...............204
DRL (Daytime Running Light)......83
Easy Entry/Exit function.........79
EDR (Event Data Recorder).......52
Emergency
Emergency Fuel Filler Door
Release..................203
Hazard Warning Flasher.......88
In the Event of an Accident. . . .213
Index
9
286