2020 MASERATI GRANTURISMO CONVERTIBLE air condition
[x] Cancel search: air conditionPage 156 of 296

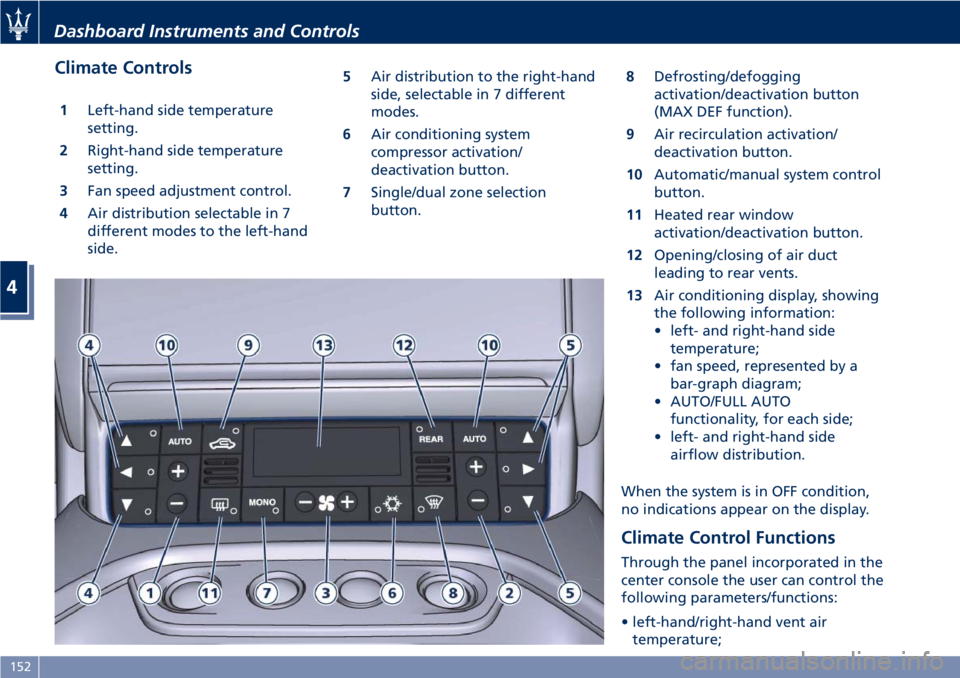
Climate Controls
1Left-hand side temperature
setting.
2Right-hand side temperature
setting.
3Fan speed adjustment control.
4Air distribution selectable in 7
different modes to the left-hand
side.5Air distribution to the right-hand
side, selectable in 7 different
modes.
6Air conditioning system
compressor activation/
deactivation button.
7Single/dual zone selection
button.8Defrosting/defogging
activation/deactivation button
(MAX DEF function).
9Air recirculation activation/
deactivation button.
10Automatic/manual system control
button.
11Heated rear window
activation/deactivation button.
12Opening/closing of air duct
leading to rear vents.
13Air conditioning display, showing
the following information:
• left- and right-hand side
temperature;
• fan speed, represented by a
bar-graph diagram;
• AUTO/FULL AUTO
functionality, for each side;
• left- and right-hand side
airflow distribution.
When the system is in OFF condition,
no indications appear on the display.
Climate Control Functions
Through the panel incorporated in the
center console the user can control the
following parameters/functions:
• left-hand/right-hand vent air
temperature;
Dashboard Instruments and Controls
4
152
Page 157 of 296

• left-hand/right-hand vent air
distribution;
• fan speed (stepless change);
• compressor activation;
• air recirculation.
All the functions listed above can be
modified manually, i.e. the user can
select one or more of these functions
as desired, using the control panel.
The manual selections always have
priority over the automatic ones and
are memorized until the user chooses
the automatic control again.
When a function has been set
manually, the other automatic
functions will not be affected.
The following parameters/functions
can be set/modified manually:
• left-hand/right-hand side air
temperature;
• fan speed;
• air distribution on 7 positions
(left-hand/ right-hand);
• compressor activation;
• single/dual-zone distribution
priority;
• defrosting/defogging function (MAX
DEF);
• air recirculation;
• automatic/manual control of the
system;• heated rear window;
• system deactivation;
• opening/closing of air duct leading
to rear vents.
Activation
The system can be started up in a
number of ways. It is however
advisable to begin by pressing one of
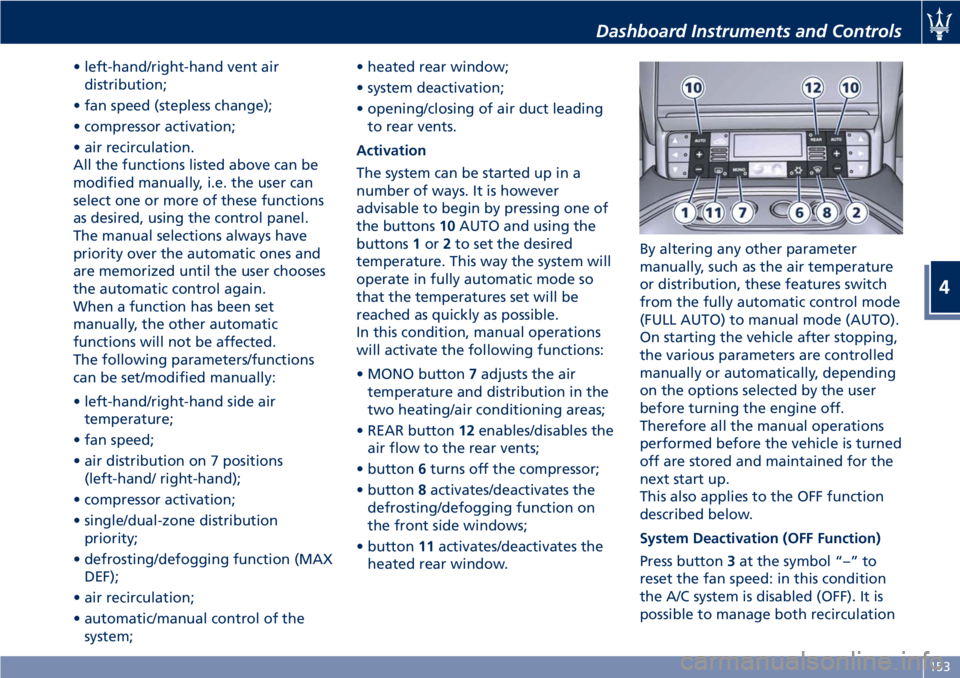
the buttons10AUTO and using the
buttons1or2to set the desired
temperature. This way the system will
operate in fully automatic mode so
that the temperatures set will be
reached as quickly as possible.
In this condition, manual operations
will activate the following functions:
• MONO button7adjusts the air
temperature and distribution in the
two heating/air conditioning areas;
• REAR button12enables/disables the
air flow to the rear vents;
• button6turns off the compressor;
• button8activates/deactivates the
defrosting/defogging function on
the front side windows;
• button11activates/deactivates the
heated rear window.By altering any other parameter
manually, such as the air temperature
or distribution, these features switch
from the fully automatic control mode
(FULL AUTO) to manual mode (AUTO).
On starting the vehicle after stopping,
the various parameters are controlled
manually or automatically, depending
on the options selected by the user
before turning the engine off.
Therefore all the manual operations
performed before the vehicle is turned
off are stored and maintained for the
next start up.
This also applies to the OFF function
described below.
System Deactivation (OFF Function)
Press button3at the symbol “–” to
reset the fan speed: in this condition
the A/C system is disabled (OFF). It is
possible to manage both recirculation
Dashboard Instruments and Controls
4
153
Page 160 of 296

commands can be invalidated when
speaking too quickly or too loudly.
WARNING!
Any voice-controlled system should be
used only in safe driving conditions
following all applicable regulations.
Full attention should be kept on
driving. Failure to do so may result in
a collision causing serious injury or
death.
Phone Mode
By using the Phone buttonon the
steering wheel it is possible to: activate
the phone mode, start a call, show
recent incoming and outgoing calls,
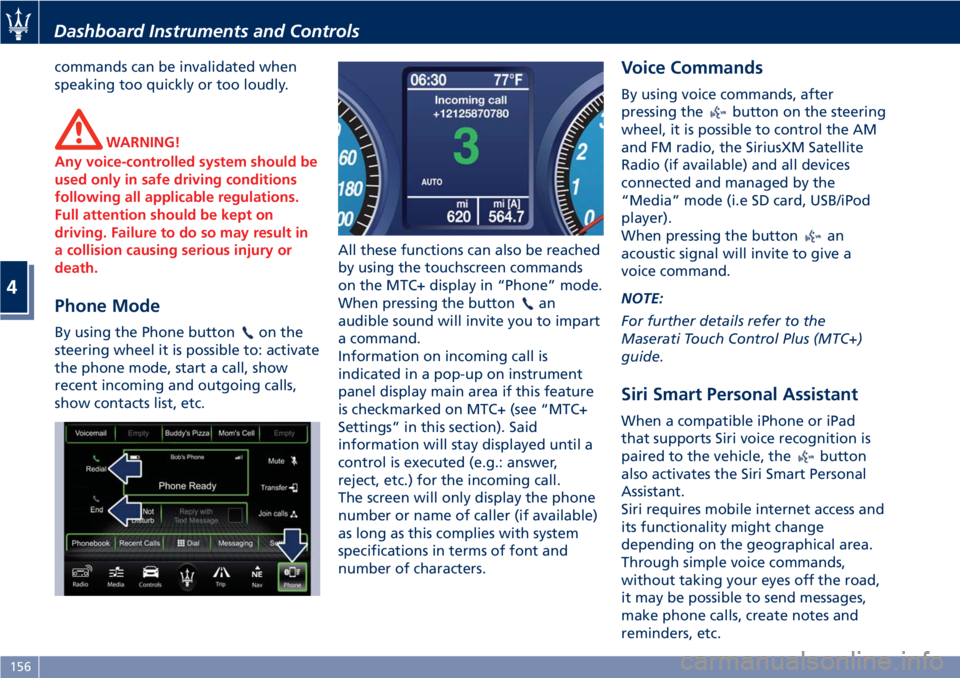
show contacts list, etc.All these functions can also be reached
by using the touchscreen commands
on the MTC+ display in “Phone” mode.
When pressing the button
an
audible sound will invite you to impart
a command.
Information on incoming call is
indicated in a pop-up on instrument
panel display main area if this feature
is checkmarked on MTC+ (see “MTC+
Settings” in this section). Said
information will stay displayed until a
control is executed (e.g.: answer,
reject, etc.) for the incoming call.
The screen will only display the phone
number or name of caller (if available)
as long as this complies with system
specifications in terms of font and
number of characters.
Voice Commands
By using voice commands, after
pressing the
button on the steering
wheel, it is possible to control the AM
and FM radio, the SiriusXM Satellite
Radio (if available) and all devices
connected and managed by the
“Media” mode (i.e SD card, USB/iPod
player).
When pressing the button
an
acoustic signal will invite to give a
voice command.
NOTE:
For further details refer to the
Maserati Touch Control Plus (MTC+)
guide.
Siri Smart Personal Assistant
When a compatible iPhone or iPad
that supports Siri voice recognition is
paired to the vehicle, the
button
also activates the Siri Smart Personal
Assistant.
Siri requires mobile internet access and
its functionality might change
depending on the geographical area.
Through simple voice commands,
without taking your eyes off the road,
it may be possible to send messages,
make phone calls, create notes and
reminders, etc.
Dashboard Instruments and Controls
4
156
Page 162 of 296

Normal Starting of the
Engine
WARNING!
It is dangerous to run the engine in an
enclosed area. The engine consumes
oxygen and discharges carbon
dioxide, carbon monoxide and other
toxic gases in the atmosphere.
WARNING!
California Proposition 65
Operating, servicing and maintaining
a passenger vehicle or off-road vehicle
can expose you to chemicals including
such as, engine exhaust, carbon
monoxide, phthalates and lead, that
which are know to the State of
California to cause cancer and birth
defects or other reproductive harm. To
minimize exposure, avoid breathing
exhaust, do not idle the engine except
as necessary, service your vehicle in a
well-ventilated area and wear gloves
or wash your hands frequently when
servicing your vehicle. For more
information go to:www.P65Warnings.ca.gov/passenger-
vehicle
When you open a door to get into the
car, the instrument cluster turns on.
The TFT displays the complete
odometer, time, outside temperature
and the
open doors indicator.
Before starting the engine, close the
doors, adjust your seat, the inside and
outside mirrors, fasten your seat belt
and instruct all other occupants to
buckle their seat belts.
Make sure that the Electric Parking
Brake (EPB) is applied.
The shift lever must be in P (Park) or N
(Neutral) position before you can start
the engine. Apply the brakes before
shifting into any driving gear (see
“Automatic Transmission” in this
section).
CAUTION!
• Before starting the engine, switch off
the electrical devices with a high
power consumption (air-conditioning
and heating system, heated rear
window, headlights, etc.).
• Do not start the engine if the fuel
level in the tank is low.
Press the brake pedal and turn the key
in the ignition switch toMAR (ON)
position.
Instrument cluster displays the initial
sequence with warning light and
analog instruments test routine.
Turn the key intoAVVposition and
release it when the engine starts. The
key will return toMAR (ON)position
automatically.
Do not hold the key inAVVposition
for a long time.
If the engine fails to start, the starter
will disengage automatically after 10
seconds. If you wish to stop the
cranking of the engine prior to
starting it, turn the key toSTOP (OFF)
position.
If the engine does not start, turn the
key toSTOP (OFF)position and wait
for the gear display to go off. Then
repeat the entire procedure.
NOTE:
Normal starting of either a cold or a
warm engine is obtained without
pumping or pressing the accelerator
pedal.
Driving
5
158
Page 175 of 296

can be activated at any time and the
system limits the engine speed rate to
3000 rpm in all gears except for the
6th, unrequested gearshifts could take
place.
In any case, it is advisable to
deactivate SPORT mode before
selecting ICE (low-grip) mode.
When sequential manual gearshifting
is active, regardless of the mode set
(NORMAL / SPORT / ICE), the
transmission will automatically upshift
or downshift when reaching the
minimum and maximum rpm. This is
to prevent engine overrevving or
underrevving.
(ESC Off) Mode
The ESC system is designed to
automatically activate every time the
engine is started and can be
deactivated by pressing
(ESC Off)
button on the central console for
about 2 seconds. The
(ESC Off)
amber warning light illuminates on
the instrument cluster as well as on
the display, where it is accompanied
by a specific message.
The ESC (Electronic Stability Control)
antiyawing system incorporates all of
the vehicle control systems: ABS, EBD,
ASR and MSR (see "Brake and StabilityControl System" in this section for
further information).
The system is fitted with a unit that
predicts the vehicle behavior with
extreme accuracy. The system can
detect when the driver is about to lose
control of the vehicle. In this case, it
can activate the brake calipers
individually and engine control, in
order to create a torque sufficient to
resist the vehicle’s yawing moment.
Press
(ESC Off) button again to
reactivate the system.
The
(ESC On) amber warning light
on the instrument cluster flashes
during all the operating phases.
, the system is automatically disabled
and cannot be re-activated. While
driving, this condition is signaled by
the
(ESC On) amber warning light,
that illuminates both on the
instrument cluster as well as on the
multi-function display, where it is
accompanied by the message “ESC
unavailable go to dealer”.
When the engine is started, the system
malfunction is indicated by the
illumination of the
(ESC On) amber
warning light.
CAUTION!
• In the event of a fault, and with the
ESC system disabled (
(ESC Off)
button pressed), the vehicle behaves
as if it were not equipped with this
system: however, we recommend
you contact theAuthorized Maserati
Dealeras soon as possible to have
the system checked.
• If you have to tow the vehicle with 2
wheels raised, make sure the key in
the ignition switch is in theSTOP
(OFF)position. Otherwise, with the
ESC system active (
(ESC Off)
button not pressed), the control unit
will store a malfunction with
consequent illumination of the
(ESC On) amber warning lights on
the instrument cluster and on the
display. Should this occur, contact
theAuthorized Maserati Dealerto
have the system repaired.
• In low- and medium-grip conditions
(e.g., rain, snow, ice, sand, etc.) it is
advisable not to activate SPORT
mode, even with the ESC system
active (
(ESC Off) button not
pressed).
Driving
5
171
Page 185 of 296

nearest Centre of the Authorized
Maserati Dealer.
•The
warning light illuminates
when the engine is running to
indicate an EBD system malfunction.
In this case, sharp braking may
cause an early locking of the rear
wheels, and the vehicle may skid.
Drive with the greatest care and
have the system immediately
checked by the nearest Centre of the
Authorized Maserati Dealer.
Hydraulic Brake Assistance
(HBA)
HBA completes the ABS system by
optimizing the vehicle braking
capacity during emergency braking.
In the event of a critical situation,
where the vehicle must stop in the
shortest possible distance, the driver
usually depresses the brake pedal
quickly, but often not strongly
enough: this increases the braking
distance. HBA has been designed to
solve this problem and acts by
applying the maximum braking force
during emergency braking, in order to
stop the vehicle in the shortest
possible distance.
HBA recognizes the emergency
condition by analyzing someparameters, such as the pressure on
the brake servo, the wheel speed and
activation of the third stop. The ABS
control unit cross-checks this data and
substitutes the driver by activating the
braking system’s full power and so
ensures optimal braking performance
in the shortest possible distance.
Brake Override System (BOS)
To complete the range of systems that
assist braking, the vehicle is equipped
withBOS, which is designed to stop
the vehicle even when it is being
accelerated. If the brake pedal is
depressed together with the
accelerator, the engine power should
be automatically reduced and, if the
driver continues to depress the
accelerator, the system may even cause
the vehicle to come to a complete
stop.
Additionally, if the brake pedal is
released when the accelerator is still
depressed, the corresponding engine
torque can be reached gradually.
Using the Brakes
CAUTION!
To obtain a good performance of
brake pads and discs, avoid sudden
braking during the first 190 mi
(300 km).
The pad wear limit is indicated by the
illumination of the
warning light,
on the instrument cluster display.
In this event, please contact an
Authorized Maserati Dealer.
WARNING!
•Riding the brakes can lead to brake
failure and possibly an accident.
Driving with your foot resting or
riding on the brake pedal can result
in abnormally high brake
temperatures, excessive lining wear,
and possible brake damage. In an
emergency full braking capacity may
be impaired.
•If the
red warning light
illuminates when the engine is
running with the message that
indicates an insufficient brake fluid
level, stop the vehicle and check the
(Continued)
Driving
5
181
Page 195 of 296

WARNING!
•Improperly inflated tires can be
dangerous.
•Under-inflation increases tire flexing
and can result in tire overheating.
•Over-inflation reduces a tire's ability
to cushion shock. Objects on the
road and potholes can cause
damage that results in tire failure.
•Over-inflated or under-inflated tires
can affect vehicle handling and can
fail suddenly, resulting in loss of
vehicle control.
•Unequal tire pressures can cause
steering problems.
•Unequal tire pressures from one side
of the vehicle to the other can cause
the vehicle to drift to the right or
left.
•Always drive with each tire inflated
to the recommended cold tire
inflation pressure.
Economy
Improper inflation pressures may
cause uneven wear patterns to
develop across the tire tread. These
abnormal wear patterns will reduce
tread life resulting in a need for
earlier tire replacement. Under-inflation also increases tire rolling
resistance resulting in higher fuel
consumption.
Ride comfort and vehicle stability
Proper tire inflation contributes to a
comfortable ride. Over-inflation
produces a jarring and uncomfortable
ride.
Tire Pressure Checkup
The proper cold tire inflation pressure
is indicated on the driver's side rear
door pillar and on the table “Tire
Inflation Pressure” in section
“Features and Specifications”.
Inflation pressure specified on the
table always refers to “cold tire
inflation pressure”. Cold tire inflation
pressure is defined as the tire pressure
after the vehicle has not been driven
for at least three hours, or driven less
than 1 mi (1,6 km) after a three hour
period.
Check tire pressures more often in
case of significant outside
temperature changes, as tire pressure
varies according to temperature
changes.
The pressure should be checked and if
necessary adjusted; tire wear and
overall conditions should also be
checked monthly. Tire pressureschange by approximately 1 PSI (0,07
bar) per 12°F (7°C) of air temperature
change. Keep this in mind when
checking tire pressure inside a garage,
especially in winter.
Example: If garage temperature = 68°F
(20°C) and the outside temperature =
32°F (0°C) then the cold tire inflation
pressure should be increased by 3 PSI
(0,21 bar) for every 12°F (7°C) for this
outside temperature condition.
Tire pressure may increase from 2 to 6
PSI (0,13 to 0,4 bar) during operation.
DO NOT reduce this normal pressure
build-up or your tire pressure will be
too low. After inspecting or adjusting
the tire pressure, always reinstall the
valve stem cap. This will prevent
moisture and dirt from entering the
valve stem, which could damage the
valve stem and the TPMS sensor
connected to it.
Tread Wear Indicators
Tread wear indicators are in the
original equipment tires to help you
determine when your tires should be
replaced.
These indicators are molded into the
bottom of the tread grooves.
When the tread is worn to one of the
tread wear indicators, the tire should
be replaced.
Driving
5
191
Page 196 of 296

WARNING!
The wet performance (aquaplaning
resistance) will decrease
proportionally to the thickness of the
tread.
Tires Durability
The service life of a tire depends on
various factors including, but not
limited to:
• driving style;
• tire pressure;
• distance driven.
WARNING!
Tires and the spare tire (if equipped)
should be replaced after six years,
regardless of the remaining tread.
Failure to follow this warning could
result in tire failure.
Replacement Tires
NOTE:
In order to maintain high performance
and safety level under all driving
conditions, Maserati strongly
recommends to use tires equivalent to
the originals in size, quality and
performance when replacement is
needed.
For the size designation of your tire
see the label on the driver's side rear
door pillar or see table “Wheels” in
section “Features and Specifications”.
The “Load Index” and “Speed Symbol”
for your tire will be found on the
original equipment tire sidewall.
It is recommended to replace the two
front tires or two rear tires as a pair.
Replacing just one tire can seriously
affect your vehicle’s handling.
If you ever replace a wheel assembly,
make sure that the wheel’s
specifications (valve, TPMS sensor and
tire) match those of the original
wheels. Failure to use equivalent
replacement tires may adversely affect
the safety, handling, and ride of your
vehicle.
YourAuthorized Maserati Dealeris
available to provide suggestions as tothe types of tires most suited to the
use foreseen by the Customer.
WARNING!
•Do not use a tire, wheel size or
rating other than that specified for
your vehicle. Some combinations of
unapproved tires and wheels may
change suspension dimensions and
performance characteristics,
resulting in altered steering,
handling, and braking operations of
the vehicle. This can cause
unpredictable handling and stress to
steering and suspension
components. Use only the tire and
wheel sizes with load ratings
appointed for your vehicle.
•Never use a tire with a smaller load
index or capacity, other than what
was originally equipped on your
vehicle. Using a tire with a smaller
load index could result in tire
overloading and failure.
•Always check the maximum speed
rating on the tire sidewall on any
tire on the vehicle.
Driving
5
192