Page 70 of 296

Vehicle Safety Checks
Seat Belts
• Inspect the belt system periodically,
checking for cuts, frays, and loose
parts. Damaged parts must be
replaced immediately.
• Do not disassemble or modify the
system.
• If the belt has been sharply pulled,
for example as the result of an
accident, the safety belt, together
with the anchoring devices, the
anchoring device mounting screws
and the pretensioner must be
completely replaced. Even if the belt
does not present any exterior signs
of wear or damage, it may have lost
its restraining properties.
Air bag Warning Light
The
warning light should illuminate
and remain lit for a few seconds bulb
checking when the key in the ignition
switch is turned inMAR (ON)position
(see “Supplemental Restraint System
(SRS) — Air bags” chapter in this
section).
•Ifthe
warning light does not
illuminate while starting, contact an
Authorized Maserati Dealer.•Ifthe
warning light stays on,
flickers, or comes on while driving,
have the system checked by an
Authorized Maserati Dealer.
Defroster
Check operation by selecting the
defrost mode and place the fan system
on high speed (see “Air Conditioning
Controls” chapter in section
“Dashboard Instruments and
Controls”).
You should be able to feel the air
directed against the windshield and
front side windows. Contact an
Authorized Maserati Dealerfor service
if your defroster is inoperable.
Floor Mat
Always use floor mats designed to fit
the footwell of your vehicle. Use only
floor mats that leave the pedal area
unobstructed and that are firmly
secured so that they cannot slip out of
position and interfere with the pedals
or impair safe operation of your
vehicle.
NOTE:
TheAuthorized Maserati Dealercan
provide you with any information
about the available Maserati floor
mats included in the “Genuine
Accessories” range.
WARNING!
Pedals that cannot move freely can
cause loss of vehicle control and
increase the risk of serious personal
injury.
•Always make sure that floor mats
are properly attached to the proper
fasteners.
•Never place or install floor mats or
other floor coverings in the vehicle
that cannot be properly secured to
prevent them from moving and
interfering with the pedals.
•Never put floor mats or other floor
coverings on top of already installed
floor mats. Additional floor mats and
other coverings will reduce the size
of the pedal area and interfere with
the pedals.
•Check mounting of mats on a regular
basis. Always properly reinstall and
secure floor mats that have been
removed for cleaning.
•Always make sure that objects
cannot fall into the driver footwell
while the vehicle is moving. Objects
can become trapped under the brake
pedal and accelerator pedal causing
a loss of vehicle control.
Before Starting
2
66
Page 73 of 296
3 – Understanding the Vehicle
Interior Components..................................... 70
Front Seats............................................ 74
Comfort Pack Front Seats.................................. 76
Rear Seats............................................. 78
Steering Wheel Adjustment................................ 79
Rearview Mirrors........................................ 80
Lights................................................ 82
Windshield Wipers and Washers............................ 89
Soft Top............................................... 92
Windstop (optional)..................................... 100
Interior Features....................................... 102
Cargo Area........................................... 107
HomeLink (for versions/markets, where provided).............. 108
Air Conditioning Distribution............................. 112
Sport Skyhook Suspension
(for versions/markets, where provided)..................... 114
69
Page 77 of 296
Central Console Components
1SPORT mode button.
2ICE low-grip mode button.
3
ESC OFF System
deactivation button.
4PARK OFF function button.
5Air conditioning controls.6Hazard button.
7Centralized locking
button.
8Centralized unlocking
button.
9Gear display.
10Electric parking brake
engagement/disengagement
lever.11Automatic transmission shift
lever.
12Rotary selectors and buttons
for the multimedia navigation.
13Handle to lift front armrest.
14Glove compartment cover (with
armrest function).
15Front passengers cupholder.
16Air conditioning rear vents.
17Rear passengers cupholder
(with removable ashtray
inserted).
18USB ports for charging of
connected device.
19Soft top closing button.
20Soft top opening button.
Understanding the Vehicle
3
73
Page 101 of 296

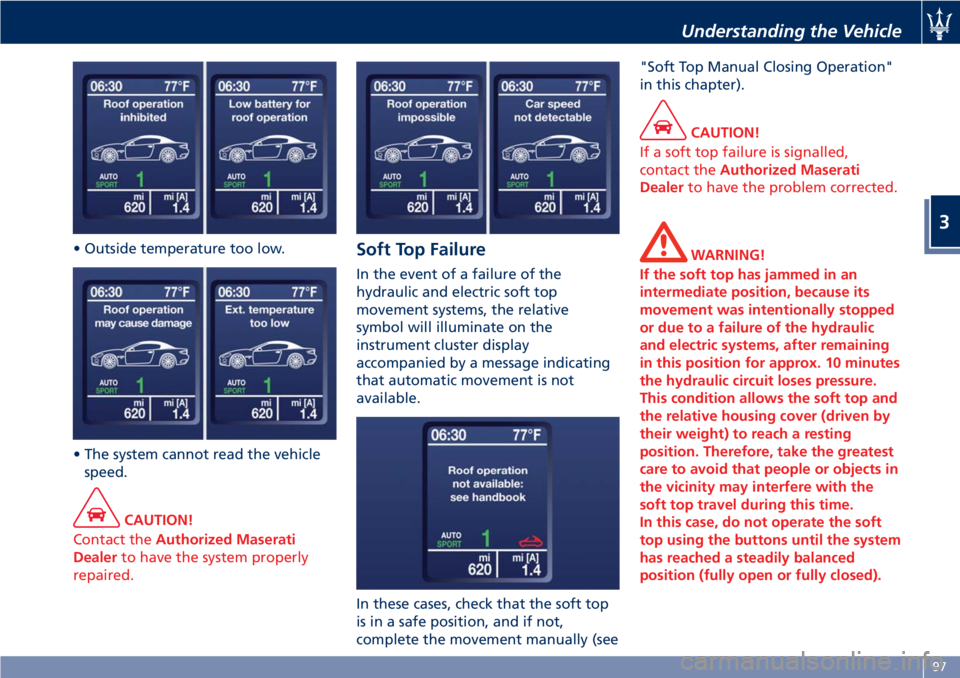
• Outside temperature too low.
• The system cannot read the vehicle
speed.
CAUTION!
Contact theAuthorized Maserati
Dealerto have the system properly
repaired.
Soft Top Failure
In the event of a failure of the
hydraulic and electric soft top
movement systems, the relative
symbol will illuminate on the
instrument cluster display
accompanied by a message indicating
that automatic movement is not
available.
In these cases, check that the soft top
is in a safe position, and if not,
complete the movement manually (see"Soft Top Manual Closing Operation"
in this chapter).
CAUTION!
If a soft top failure is signalled,
contact theAuthorized Maserati
Dealerto have the problem corrected.
WARNING!
If the soft top has jammed in an
intermediate position, because its
movement was intentionally stopped
or due to a failure of the hydraulic
and electric systems, after remaining
in this position for approx. 10 minutes
the hydraulic circuit loses pressure.
This condition allows the soft top and
the relative housing cover (driven by
their weight) to reach a resting
position. Therefore, take the greatest
care to avoid that people or objects in
the vicinity may interfere with the
soft top travel during this time.
In this case, do not operate the soft
top using the buttons until the system
has reached a steadily balanced
position (fully open or fully closed).
Understanding the Vehicle
3
97
Page 116 of 296
Air Conditioning Distribution
Understanding the Vehicle
3
112
Page 117 of 296

Adjustable and fixed air vents allow
passengers to achieve the optimal
comfort conditions.
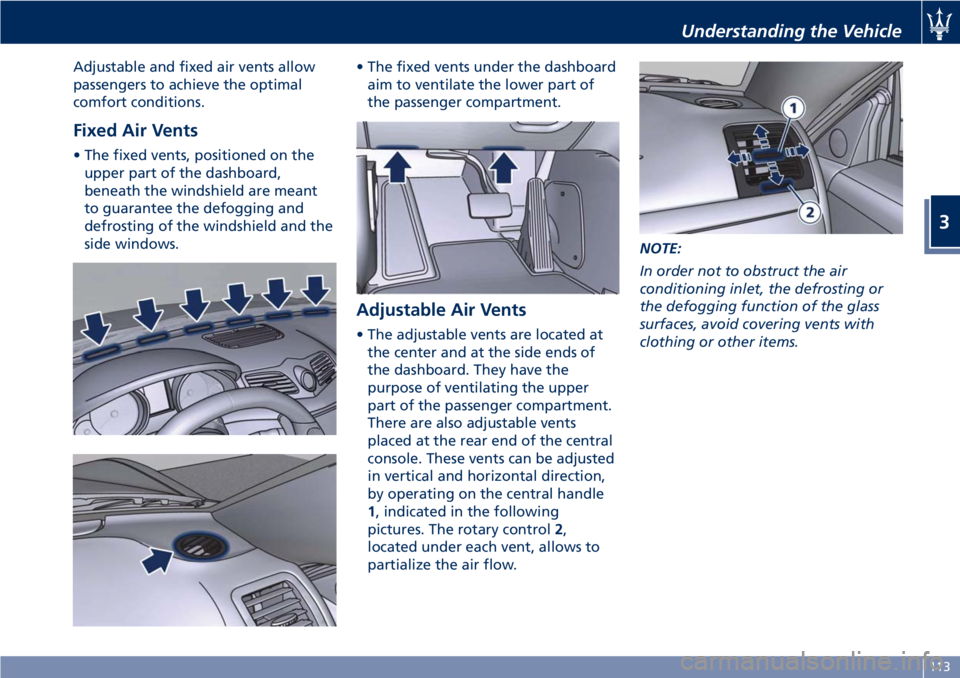
Fixed Air Vents
• The fixed vents, positioned on the
upper part of the dashboard,
beneath the windshield are meant
to guarantee the defogging and
defrosting of the windshield and the
side windows.• The fixed vents under the dashboard
aim to ventilate the lower part of
the passenger compartment.
Adjustable Air Vents
• The adjustable vents are located at
the center and at the side ends of
the dashboard. They have the
purpose of ventilating the upper
part of the passenger compartment.
There are also adjustable vents
placed at the rear end of the central
console. These vents can be adjusted
in vertical and horizontal direction,
by operating on the central handle
1, indicated in the following
pictures. The rotary control2,
located under each vent, allows to
partialize the air flow.NOTE:
In order not to obstruct the air
conditioning inlet, the defrosting or
the defogging function of the glass
surfaces, avoid covering vents with
clothing or other items.
Understanding the Vehicle
3
113
Page 121 of 296
4 – Dashboard Instruments and Controls
Instrument Cluster...................................... 118
Infotainment System.................................... 130
Audio Controls......................................... 138
Audio System.......................................... 140
MTC+ “Controls” Screen................................. 141
MTC+ Settings......................................... 141
Glove Compartments.................................... 149
Analog Clock.......................................... 150
Air Conditioning Controls................................ 151
Phone and Voice Controls on Steering Wheel................. 155
117
Page 155 of 296

Air Conditioning Controls
The vehicle is equipped with an
automatic dual-zone air conditioning
system that allows to adjust separately
the air temperature and the airflow
distribution in the left and in the right
zone of the passenger compartment,
according to the requests of the driver
and the front passenger.
A humidity sensor, positioned on the
inner surface of the windshield, over
the rearview mirror, allows the A/C
system to prevent/ eliminate fogging
of the windshield and side windows.
The best efficacy in preventing
fogging is obtained by selecting the
AUTO function, described later.
A dual zone solar sensor, positioned
on the center of the dashboard upper
surface, helps to achieve the best
comfort in presence of solar radiation.
CAUTION!
To ensure proper functioning of the
solar sensor, do not apply adhesive
parking stickers, etc. in the checking
area between the sensor and the
windshield. Therefore, keep the
windshield and the sensor clean toprevent accumulation of dust or other
impurities.
Dashboard Instruments and Controls
4
151