2020 MASERATI GRANTURISMO CONVERTIBLE mirror
[x] Cancel search: mirrorPage 94 of 296

(Continued)
damaged if the wiper control is left
in any position other than “OFF”.
• In cold weather, always turn off the
wiper switch and allow the wipers to
return to the park position before
turning off the engine. If the wiper
switch is left on and the wipers
freeze to the windshield, the wiper
motor may be damaged when the
vehicle is restarted.
• Always remove any buildup of snow
that prevents the windshield wiper
blades from returning to the off
position. If the windshield wiper
control is turned off and the blades
cannot return to the off position, the
wiper motor may be damaged.
Rain Sensing Wipers
This feature detects moisture on the
windshield through an inside rearview
mirror integrated sensor.
The rain sensor adapts the frequency
of the windshield wiper strokes (in the
intermittent operation mode) to the
intensity of the rain.
All the other functions controlled by
the right-hand multifunction lever
(windshield wipers off, in continuous
slow and fast operation mode and intemporary fast operation mode)
remain the same.
The rain sensor is activated
automatically by moving the
right-hand multifunction lever to
"AUTO" position. The sensor has a
setting range that varies progressively:
from the windshield wiper stationary
position - when the windshield is dry -
to the windshield wiper second speed -
in conditions of pouring rain.
To regulate the frequency of
intermittent operation, with the
right-hand multifunction lever in
"AUTO" position, turn the end section
of the lever.
Rotating the end section clockwise,
intermittent operation varies from fast
intermittent wipe (max.) to slow
intermittent wipe (min).
If the engine is turned off during
automatic windshield wiper operation,with the right-hand multifunction
lever in "AUTO" position, to reactivate
the function the next time the engine
is started, the lever must be moved to
"OFF" (stop position) then back to
"AUTO" position.
CAUTION!
• The rain sensing feature may not
function properly by ice or dried salt
water on the windshield.
• Use on the windshield of RainX
®or
products containing wax or silicone
may reduce rain sensor performance.
Rain Sensor Failure
When the rain sensor is activated, in
the event that it is malfunctioning, the
windshield wiper will be switched on
in intermittent operation mode and
the sensing range will be set by the
user, regardless of whether or not
there is rain on the windshield.
The
symbol appears on the
instrument cluster display.
In this case, we recommend that you
cut-out the rain sensor and turn on the
wiper, if necessary, in continuous
mode. Contact theAuthorized
Maserati Dealeras soon as possible.
Understanding the Vehicle
3
90
Page 109 of 296

the slot, to extract it press lightly on
the card.
Other two USB ports are present for
rear seat passengers, on the rear part
of the central console.
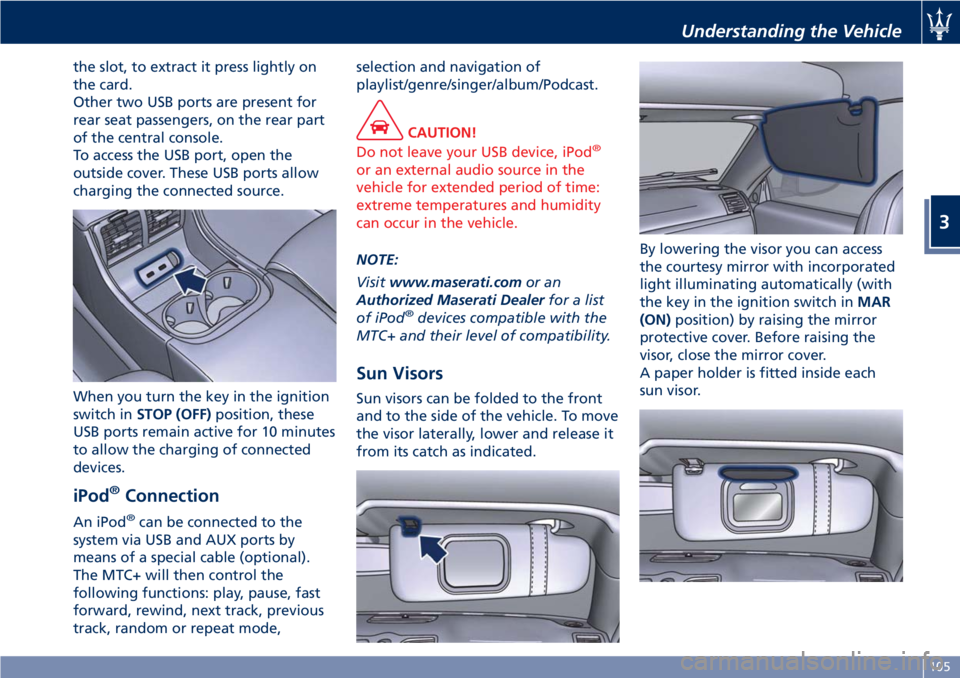
To access the USB port, open the
outside cover. These USB ports allow
charging the connected source.
When you turn the key in the ignition
switch inSTOP (OFF)position, these
USB ports remain active for 10 minutes
to allow the charging of connected
devices.
iPod®Connection
An iPod®can be connected to the
system via USB and AUX ports by
means of a special cable (optional).
The MTC+ will then control the
following functions: play, pause, fast
forward, rewind, next track, previous
track, random or repeat mode,selection and navigation of
playlist/genre/singer/album/Podcast.
CAUTION!
Do not leave your USB device, iPod®
or an external audio source in the
vehicle for extended period of time:
extreme temperatures and humidity
can occur in the vehicle.
NOTE:
Visitwww.maserati.comor an
Authorized Maserati Dealerfor a list
of iPod
®devices compatible with the
MTC+ and their level of compatibility.
Sun Visors
Sun visors can be folded to the front
and to the side of the vehicle. To move
the visor laterally, lower and release it
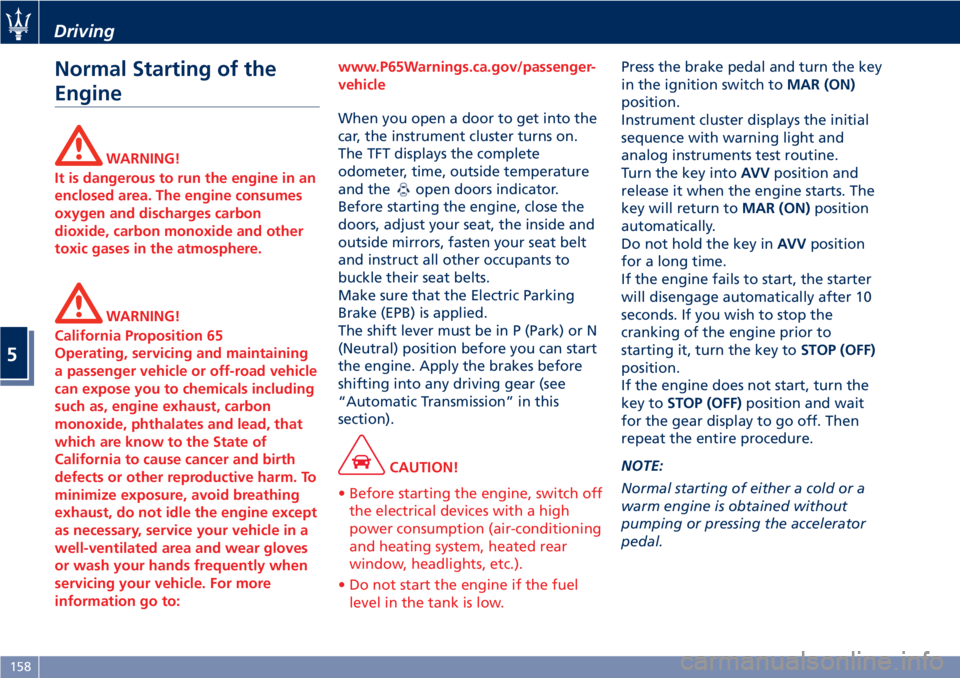
from its catch as indicated.By lowering the visor you can access
the courtesy mirror with incorporated
light illuminating automatically (with
the key in the ignition switch inMAR
(ON)position) by raising the mirror
protective cover. Before raising the
visor, close the mirror cover.
A paper holder is fitted inside each
sun visor.
Understanding the Vehicle
3
105
Page 144 of 296

Audio System
The vehicle is equipped with an audio
system that offers superior sound
quality, higher sound pressure levels
and reduced energy consumption.
The system maximizes the amplifier
and speaker technology delivering
substantially higher components and
system efficiency.
Premium System
The vehicle is equipped with a
“Premium” sound system which
features 9 speakers and can develop a
sound output of 900 W.
System Components
The "Premium" system includes:
1One 3.1 in (80 mm) Centerfill
positioned centrally on the
dashboard.
2Two 1 in (25 mm) Tweeter
positioned in the passenger
compartment, near the outside
rearview mirrors.
3Two 6.5 in (165 mm) Mid-Woofer
on each of the door panels.4One Sub-Woofer powered by
two amplifiers and housed in a
central position between the two
rear seats.
5Two 6.5 in (165 mm) Mid-Woofer
on the side panels of the rear
seats.
6Two 1 in (25 mm) Tweeter on the
side panels of the rear seats.
712-Channel located on inner
left-hand side of trunk
compartment.
Dashboard Instruments and Controls
4
140
Page 150 of 296

and rearview mirror position
storage).
The volume can be set to 7 levels
identified by numbers from "1" to
"7" by pressing the "+" or "–"
softkey.
•Light Sensor
This feature allows to adjust the
sensitivity of the twilight sensor for
turning on the lights.
The feature can be set to 3 levels:
"Low", "Medium" (default setting)
and "High".
•Speed Limit
This feature allows to set a speed
limit and activate an alarm signal
which will sound when themaximum speed limit set is
exceeded.
Checkmarked the softkey to enable
the feature.
Press then the "+" or "–" softkey to
increase or decrease the speed limit.
Each touch increases/decreases the
value by 5 units.
Lights
Press the “Lights” softkey to set the
following modes.
•Daytime Lights(DRL, for
versions/markets where provided)
If activated, this feature allows the
automatic switching on of the DRL
upon switching off of the position
lights and vice versa. When the
position lights switch on, the DRL
switch off.
See “Lights” in section
“Understanding the Vehicle” for
further information.
Doors & Locks
Press the “Doors & Locks” softkey to
set the following modes.
•Auto Door Locks(Autoclose)
When this feature is selected, all
doors will automatically lock whenthe vehicle is in motion. The feature
can be set to “On” or “Off”.
•Independent Trunk Lid Unlocking
When this feature is selected and
checkmarked, only the trunk
compartment lid remains unlocked
and can be opened by pressing the
button between the license plate
lights.
When there is not checkmark, the
trunk lid unlocking follows the logic
of the doors.
•Key Fob Unlocks
By selecting this feature you may set
up only the driver's door or all doors
mode will unlock on the first press
of the
button on the radio
control case (key fob). When "Driver
Door" is selected, you must press the
key fob
button twice to unlock
also the passenger’s door. When
Dashboard Instruments and Controls
4
146
Page 155 of 296

Air Conditioning Controls
The vehicle is equipped with an
automatic dual-zone air conditioning
system that allows to adjust separately
the air temperature and the airflow
distribution in the left and in the right
zone of the passenger compartment,
according to the requests of the driver
and the front passenger.
A humidity sensor, positioned on the
inner surface of the windshield, over
the rearview mirror, allows the A/C
system to prevent/ eliminate fogging
of the windshield and side windows.
The best efficacy in preventing
fogging is obtained by selecting the
AUTO function, described later.
A dual zone solar sensor, positioned
on the center of the dashboard upper
surface, helps to achieve the best
comfort in presence of solar radiation.
CAUTION!
To ensure proper functioning of the
solar sensor, do not apply adhesive
parking stickers, etc. in the checking
area between the sensor and the
windshield. Therefore, keep the
windshield and the sensor clean toprevent accumulation of dust or other
impurities.
Dashboard Instruments and Controls
4
151
Page 162 of 296

Normal Starting of the
Engine
WARNING!
It is dangerous to run the engine in an
enclosed area. The engine consumes
oxygen and discharges carbon
dioxide, carbon monoxide and other
toxic gases in the atmosphere.
WARNING!
California Proposition 65
Operating, servicing and maintaining
a passenger vehicle or off-road vehicle
can expose you to chemicals including
such as, engine exhaust, carbon
monoxide, phthalates and lead, that
which are know to the State of
California to cause cancer and birth
defects or other reproductive harm. To
minimize exposure, avoid breathing
exhaust, do not idle the engine except
as necessary, service your vehicle in a
well-ventilated area and wear gloves
or wash your hands frequently when
servicing your vehicle. For more
information go to:www.P65Warnings.ca.gov/passenger-
vehicle
When you open a door to get into the
car, the instrument cluster turns on.
The TFT displays the complete
odometer, time, outside temperature
and the
open doors indicator.
Before starting the engine, close the
doors, adjust your seat, the inside and
outside mirrors, fasten your seat belt
and instruct all other occupants to
buckle their seat belts.
Make sure that the Electric Parking
Brake (EPB) is applied.
The shift lever must be in P (Park) or N
(Neutral) position before you can start
the engine. Apply the brakes before
shifting into any driving gear (see
“Automatic Transmission” in this
section).
CAUTION!
• Before starting the engine, switch off
the electrical devices with a high
power consumption (air-conditioning
and heating system, heated rear
window, headlights, etc.).
• Do not start the engine if the fuel
level in the tank is low.
Press the brake pedal and turn the key
in the ignition switch toMAR (ON)
position.
Instrument cluster displays the initial
sequence with warning light and
analog instruments test routine.
Turn the key intoAVVposition and
release it when the engine starts. The
key will return toMAR (ON)position
automatically.
Do not hold the key inAVVposition
for a long time.
If the engine fails to start, the starter
will disengage automatically after 10
seconds. If you wish to stop the
cranking of the engine prior to
starting it, turn the key toSTOP (OFF)
position.
If the engine does not start, turn the
key toSTOP (OFF)position and wait
for the gear display to go off. Then
repeat the entire procedure.
NOTE:
Normal starting of either a cold or a
warm engine is obtained without
pumping or pressing the accelerator
pedal.
Driving
5
158
Page 208 of 296

Driving Conditions
Before the Trip
Check the following at regular
intervals and always before long trips:
• tire pressure and condition;
• levels of fluids and lubricants;
• conditions of the windshield wiper
blades;
• clean the glass on the external light
and all other glass surfaces;
• proper operation of the indicator
lights and of the external lights.
CAUTION!
It is however advisable to perform
these checks at least every 500 mi
(800 km) and always following the
maintenance schedule reported in
section “Maintenance and Care”.
Before you drive:
• adjust seat position, steering wheel
and rearview mirrors in order to have
the best driving position;
• ensure that nothing (mat covers, etc.)
is obstructing the pedals movement;
• carefully arrange and secure any
objects in the trunk, to prevent themfrom moving forward in case of
sudden stops;
• avoid heavy meals before a trip. A
light snack helps keep your reflexes
sharp. In particular, avoid drinking
alcohol.
WARNING!
Beyond being prohibited by law, it is
extremely dangerous to ride inside the
trunk or on the hood. In the event of
an accident, passengers sitting here
are more exposed to the risk of
serious injury. Passengers must only
travel seated in the vehicle seats, with
the seat belts fastened. Always check
that the driver and all passengers
have the seat belts correctly fastened.
Safe Driving
Although the vehicle is equipped with
active and passive safety devices, the
driver's conduct is always a decisive
factor for road safety.
Some simple rules for traveling safely
in different conditions are listed
below. Some of them will probably
already sound familiar but, in any case,
it would be useful to read them
carefully.Driving at Night
The main guidelines to follow when
driving at night are set out below.
• Drive carefully. Night conditions
demand more focus and attention.
• Reduce your speed, especially on
roads with no streetlights.
• Stop at early signs of drowsiness.
Continuing to drive would be a risk
for yourself and for others. Have a
rest before continuing your trip.
• Keep the vehicle at a greater
distance from vehicles in front of you
than you would during the day: it is
difficult to assess the speed of other
vehicles when you only see the lights.
• Use the high beams only outside of
densely-populated areas and when
you are sure that they will not
disturb other drivers.
• When another vehicle is
approaching, switch from high
beams (if on) to low beams.
• Keep lights and headlights clean.
• Outside of densely-populated areas,
beware of animals crossing the road.
Driving in the Rain
Rain and wet roads are dangerous. On
a wet road all maneuvers are more
difficult since wheel grip on the
Driving
5
204
Page 258 of 296

Pos.Amp. –
ColorSystem /
Component
F107 - Not used
Fuses in Passenger
Compartment
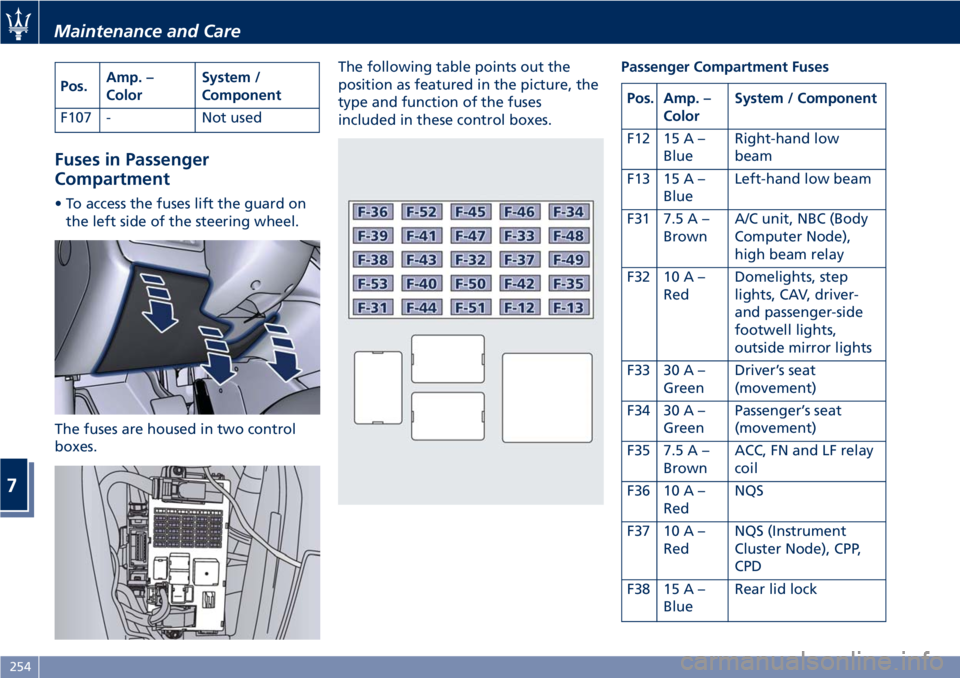
• To access the fuses lift the guard on
the left side of the steering wheel.
The fuses are housed in two control
boxes.The following table points out the
position as featured in the picture, the
type and function of the fuses
included in these control boxes.Passenger Compartment Fuses
Pos. Amp. –
ColorSystem / Component
F12 15 A –
BlueRight-hand low
beam
F13 15 A –
BlueLeft-hand low beam
F31 7.5 A –
BrownA/C unit, NBC (Body
Computer Node),
high beam relay
F32 10 A –
RedDomelights, step
lights, CAV, driver-
and passenger-side
footwell lights,
outside mirror lights
F33 30 A –
GreenDriver’s seat
(movement)
F34 30 A –
GreenPassenger’s seat
(movement)
F35 7.5 A –
BrownACC, FN and LF relay
coil
F36 10 A –
RedNQS
F37 10 A –
RedNQS (Instrument
Cluster Node), CPP,
CPD
F38 15 A –
BlueRear lid lock
Maintenance and Care
7
254