2020 LINCOLN CORSAIR ECO mode
[x] Cancel search: ECO modePage 76 of 591
Number of MyKeys
Indicates the number of MyKeys you have
programmed to your vehicle. Use this feature
to detect how many MyKeys you have for
your vehicle and determine when you have
deleted all MyKeys.
Number of Admin Keys
Indicates how many admin keys you have
programmed to your vehicle. Use this feature
to determine how many admin keys you have
for your vehicle, and detect if an additional
MyKey has been programmed.
USING MYKEY WITH REMOTE
START SYSTEMS
MyKey is not compatible with non
Lincoln-approved, aftermarket remote start
systems. If you choose to install a remote
start system, see an authorized dealer for a
Lincoln-approved remote start system.
MYKEY – TROUBLESHOOTING Potential causes
Condition
· The key or transmitter used to start the vehicle does not have admin
privileges.
I cannot create a MyKey.
· Vehicles with keyless start: Make sure you place the transmitter into
the backup slot. See Starting a Gasoline Engine (page 184).
· The key or transmitter used to start the vehicle is the only admin key.
There always has to be at least one admin key.
· SecuriLock passive anti-theft system is disabled or in unlimited mode.
· The key or transmitter used to start the vehicle does not have admin
privileges.
I cannot program the configurable settings.
73
Corsair (CTF) Canada/United States of America, enUSA, Edition date: 201906, Second-Printing MyKey™
Page 78 of 591
LOCKING AND UNLOCKING
You can use the power door lock or the
remote control to lock and unlock your
vehicle.
Power Door Locks
The power door lock is on the driver and
front passenger door panels.
Unlock
A
LockB Door Lock Indicator
An LED on each door window trim lights
when you lock the door. It remains on for up
to five minutes after you switch the ignition
off.
Switch Inhibitor
When you electronically lock your vehicle,
the power door lock and interior luggage
compartment release switch will no longer
operate after 20 seconds. You must unlock
your vehicle with the remote control,
intelligent access or keyless keypad, or
switch the ignition on, to restore function to
these switches. You can switch this feature
on or off from the touchscreen. See Settings
(page 478).
Remote Control
You can use the remote control at any time.
The luggage compartment release button
only works when your vehicle speed is less
than
3 mph (5 km/h). Unlocking the Doors (Two-Stage Unlock) Press the button to unlock the
driver door. Press the button again
within three seconds to unlock all
doors. The direction indicators will flash.
Press and hold both the lock and unlock
buttons on the remote control for four
seconds to disable or enable two-stage
unlocking. Disabling two-stage unlocking
allows all vehicle doors to unlock with one
press of the button. The direction indicators
will flash twice to indicate a change to the
unlocking mode. The unlocking mode
applies to the remote control, keyless entry
keypad and intelligent access.
Intelligent access at the driver door will
unlock all doors when you disable two-stage
unlocking.
Locking the Doors Press the button to lock all the
doors. The direction indicators will
flash.
75
Corsair (CTF) Canada/United States of America, enUSA, Edition date: 201906, Second-Printing Doors and LocksE309203 E138629 E138623
Page 82 of 591
Battery Saver
If you leave the courtesy lamps or dome
lamps on and switch the ignition off, this
feature turns them off after some time.
Accessory Mode Battery Saver for
Intelligent Access Keys
If you leave your vehicle with the ignition on,
it will turn off 30 minutes after you close all
of the doors.
Welcome Lighting
This feature lights select exterior lighting as
you approach your vehicle. You must have
an intelligent access key with you. The
feature turns off when you open a door,
liftgate, or unlock your vehicle. Welcome
lighting remains on for 25 seconds or until
you start your vehicle.
The feature is active when:
•
The feature is configured from the
touchscreen. See Welcome Lighting
(page 103).
• The ignition is off. •
All doors and the liftgate are closed.
• You lock your vehicle.
The feature is disabled when:
• Your vehicle detects the intelligent
access key is inside.
• The intelligent access key is in close
range of the vehicle for more than two
minutes.
• The anti-theft alarm triggers.
• You do not start your vehicle for more
than five days.
• The vehicle battery charge is low.
• You approach the vehicle to trigger the
welcome lighting feature 10 or more
times without switching the ignition on.
Note: When this feature is disabled, you
must switch the ignition on to reset it.
Note: This feature may not correctly operate
if the intelligent access key is stored within
8–15 ft (2.4–4.6 m)
of your vehicle while not
in use.
Note: Welcome Lighting will not function if
disabled from the touchscreen. KEYLESS ENTRY
SECURICODE™ KEYLESS ENTRY
KEYPAD
The keypad is located near the driver
window. It is invisible until touched and then
it lights up so you can see and touch the
appropriate buttons.
Note:
If you enter your entry code too fast
on the keypad, the unlock function may not
work. Re-enter your entry code more slowly.
79
Corsair (CTF) Canada/United States of America, enUSA, Edition date: 201906, Second-Printing Doors and Locks
Page 83 of 591
You can use the keypad to do the following:
•
Lock or unlock the doors.
• Program and erase user codes.
• Arm and disarm the anti-theft alarm.
You can operate the keypad with the
factory-set five-digit entry code. The code is
located on the owner’ s wallet card in the
glove box and is available from an authorized
dealer. You can also create up to five of your
own five-digit personal entry codes. The Keyless Entry Keypad only works if the
driver door is closed and transmission is in
park (P).
Programming a Personal Entry Code
To create your own personal entry code:
1. Enter the factory-set code
2. Press 1•2 on the keypad within five
seconds.
3. Enter your personal five-digit code. You
must enter each number within five
seconds of each other.
4. Press 1•2 on the keypad to save personal
code 1.
The doors lock and then unlock to confirm
that programming was successful.
To program additional personal entry codes,
repeat Steps 1-3, then for Step 4:
• Press
3•4 to save personal code 2.
• Press
5•6 to save personal code 3.
• Press
7•8 to save personal code 4.
• Press
9•0 to save personal code 5. Tips:
•
Do not set a code that uses five of the
same number.
• Do not use five numbers in sequential
order.
• The factory-set code works even if you
have set your own personal code.
Erasing a Personal Code
1. Enter the factory-set five-digit code.
2. Press and release
1•2 on the keypad
within five seconds.
3. Press and hold 1•2 for two seconds. You
must do this within five seconds of
completing Step 2.
All personal codes erase and only the
factory-set five-digit code works.
Anti-Scan Feature
The keypad goes into an anti-scan mode if
you enter the wrong code seven times (35
consecutive button presses). This mode
disables the keypad for one minute and the
keypad lamp flashes.
80
Corsair (CTF) Canada/United States of America, enUSA, Edition date: 201906, Second-Printing Doors and LocksE138637
Page 94 of 591
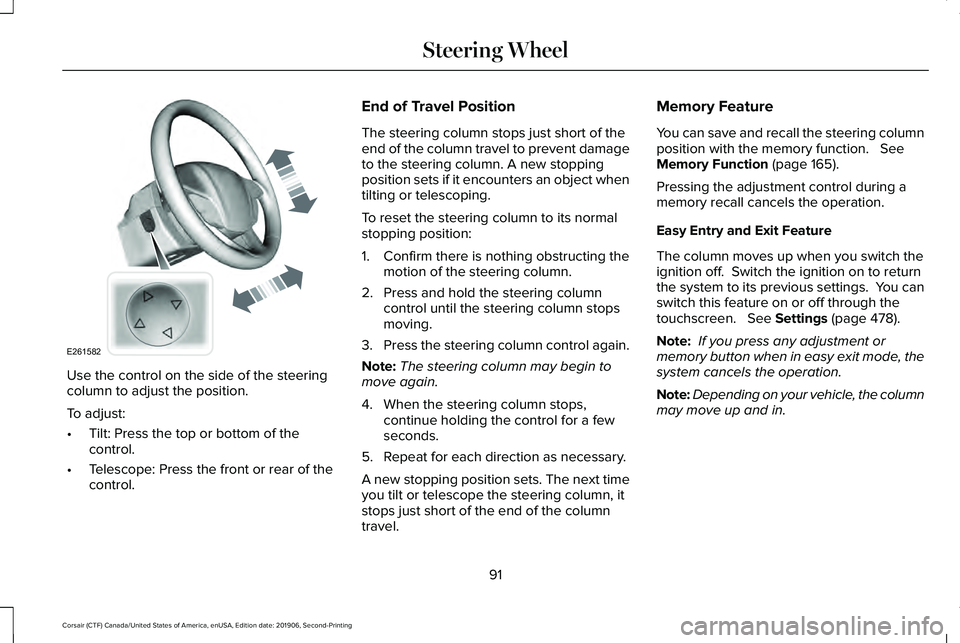
Use the control on the side of the steering
column to adjust the position.
To adjust:
•
Tilt: Press the top or bottom of the
control.
• Telescope: Press the front or rear of the
control. End of Travel Position
The steering column stops just short of the
end of the column travel to prevent damage
to the steering column. A new stopping
position sets if it encounters an object when
tilting or telescoping.
To reset the steering column to its normal
stopping position:
1. Confirm there is nothing obstructing the
motion of the steering column.
2. Press and hold the steering column control until the steering column stops
moving.
3. Press the steering column control again.
Note: The steering column may begin to
move again.
4. When the steering column stops, continue holding the control for a few
seconds.
5. Repeat for each direction as necessary.
A new stopping position sets. The next time
you tilt or telescope the steering column, it
stops just short of the end of the column
travel. Memory Feature
You can save and recall the steering column
position with the memory function. See
Memory Function (page 165).
Pressing the adjustment control during a
memory recall cancels the operation.
Easy Entry and Exit Feature
The column moves up when you switch the
ignition off. Switch the ignition on to return
the system to its previous settings. You can
switch this feature on or off through the
touchscreen.
See Settings (page 478).
Note: If you press any adjustment or
memory button when in easy exit mode, the
system cancels the operation.
Note: Depending on your vehicle, the column
may move up and in.
91
Corsair (CTF) Canada/United States of America, enUSA, Edition date: 201906, Second-Printing Steering WheelE261582
Page 95 of 591
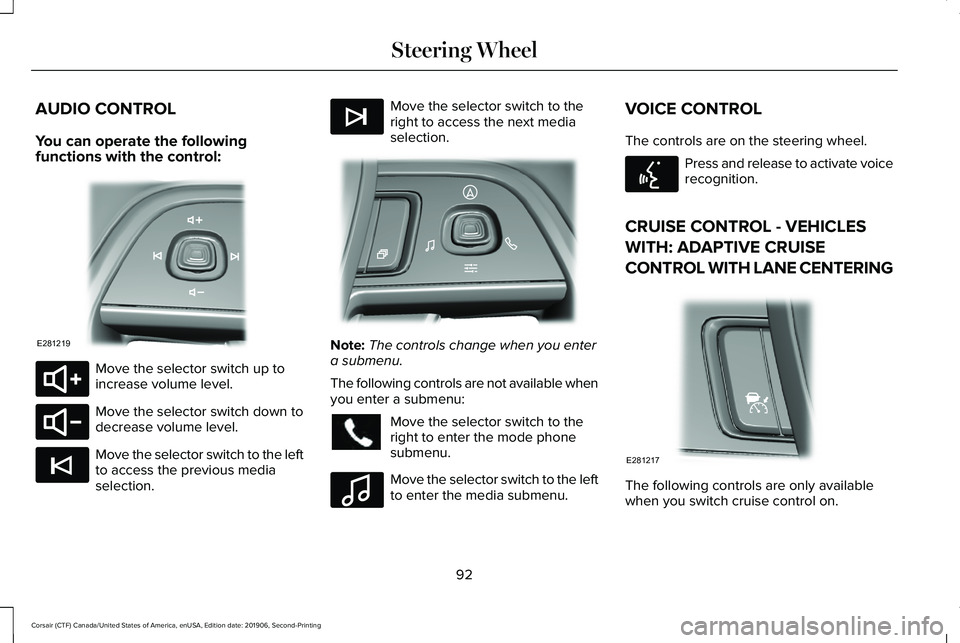
AUDIO CONTROL
You can operate the following
functions with the control:
Move the selector switch up to
increase volume level.
Move the selector switch down to
decrease volume level.
Move the selector switch to the left
to access the previous media
selection. Move the selector switch to the
right to access the next media
selection.
Note:
The controls change when you enter
a submenu.
The following controls are not available when
you enter a submenu: Move the selector switch to the
right to enter the mode phone
submenu.
Move the selector switch to the left
to enter the media submenu.VOICE CONTROL
The controls are on the steering wheel. Press and release to activate voice
recognition.
CRUISE CONTROL - VEHICLES
WITH: ADAPTIVE CRUISE
CONTROL WITH LANE CENTERING The following controls are only available
when you switch cruise control on.
92
Corsair (CTF) Canada/United States of America, enUSA, Edition date: 201906, Second-Printing Steering WheelE281219 E280803 E280802 E265045 E265044 E281220 E100027 E142599 E281217
Page 99 of 591
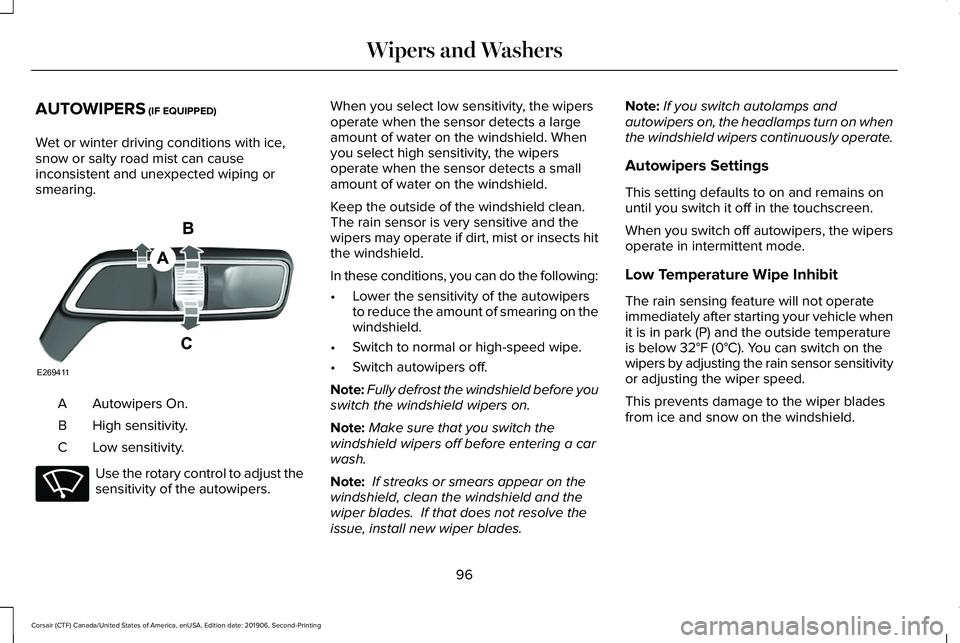
AUTOWIPERS (IF EQUIPPED)
Wet or winter driving conditions with ice,
snow or salty road mist can cause
inconsistent and unexpected wiping or
smearing. Autowipers On.
A
High sensitivity.
B
Low sensitivity.
C Use the rotary control to adjust the
sensitivity of the autowipers. When you select low sensitivity, the wipers
operate when the sensor detects a large
amount of water on the windshield. When
you select high sensitivity, the wipers
operate when the sensor detects a small
amount of water on the windshield.
Keep the outside of the windshield clean.
The rain sensor is very sensitive and the
wipers may operate if dirt, mist or insects hit
the windshield.
In these conditions, you can do the following:
•
Lower the sensitivity of the autowipers
to reduce the amount of smearing on the
windshield.
• Switch to normal or high-speed wipe.
• Switch autowipers off.
Note: Fully defrost the windshield before you
switch the windshield wipers on.
Note: Make sure that you switch the
windshield wipers off before entering a car
wash.
Note: If streaks or smears appear on the
windshield, clean the windshield and the
wiper blades. If that does not resolve the
issue, install new wiper blades. Note:
If you switch autolamps and
autowipers on, the headlamps turn on when
the windshield wipers continuously operate.
Autowipers Settings
This setting defaults to on and remains on
until you switch it off in the touchscreen.
When you switch off autowipers, the wipers
operate in intermittent mode.
Low Temperature Wipe Inhibit
The rain sensing feature will not operate
immediately after starting your vehicle when
it is in park (P) and the outside temperature
is below
32°F (0°C). You can switch on the
wipers by adjusting the rain sensor sensitivity
or adjusting the wiper speed.
This prevents damage to the wiper blades
from ice and snow on the windshield.
96
Corsair (CTF) Canada/United States of America, enUSA, Edition date: 201906, Second-Printing Wipers and WashersE269411 E270969
Page 102 of 591
Push the lever away from you to
switch the high beam on.
Push the lever forward again or pull the lever
toward you to switch the high beams off.
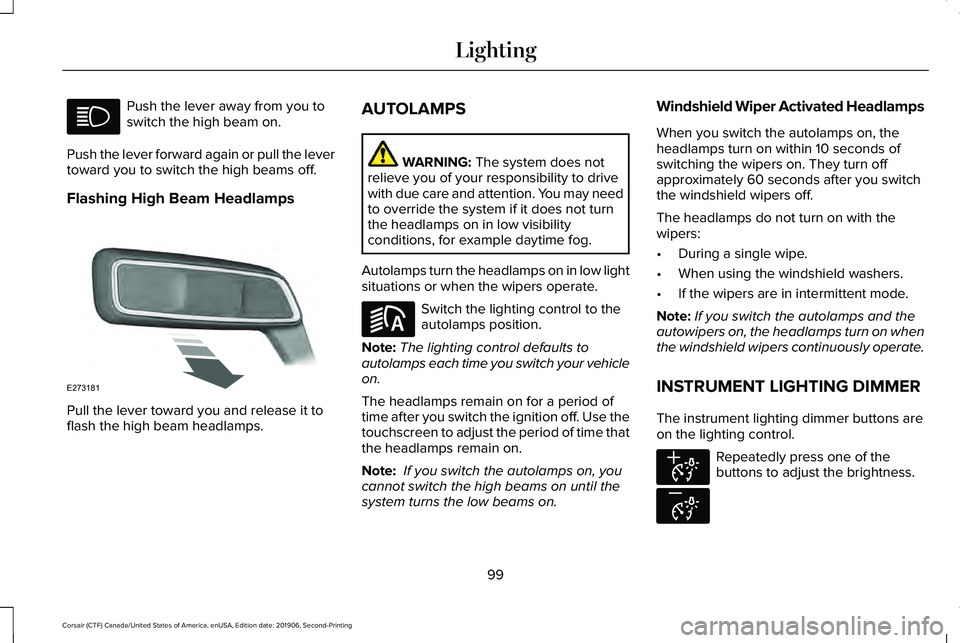
Flashing High Beam Headlamps Pull the lever toward you and release it to
flash the high beam headlamps. AUTOLAMPS WARNING: The system does not
relieve you of your responsibility to drive
with due care and attention. You may need
to override the system if it does not turn
the headlamps on in low visibility
conditions, for example daytime fog.
Autolamps turn the headlamps on in low light
situations or when the wipers operate. Switch the lighting control to the
autolamps position.
Note: The lighting control defaults to
autolamps each time you switch your vehicle
on.
The headlamps remain on for a period of
time after you switch the ignition off. Use the
touchscreen to adjust the period of time that
the headlamps remain on.
Note: If you switch the autolamps on, you
cannot switch the high beams on until the
system turns the low beams on. Windshield Wiper Activated Headlamps
When you switch the autolamps on, the
headlamps turn on within 10 seconds of
switching the wipers on. They turn off
approximately 60 seconds after you switch
the windshield wipers off.
The headlamps do not turn on with the
wipers:
•
During a single wipe.
• When using the windshield washers.
• If the wipers are in intermittent mode.
Note: If you switch the autolamps and the
autowipers on, the headlamps turn on when
the windshield wipers continuously operate.
INSTRUMENT LIGHTING DIMMER
The instrument lighting dimmer buttons are
on the lighting control. Repeatedly press one of the
buttons to adjust the brightness.
99
Corsair (CTF) Canada/United States of America, enUSA, Edition date: 201906, Second-Printing Lighting E273181 E281240 E291299 E296433