2020 LINCOLN CONTINENTAL oil capacities
[x] Cancel search: oil capacitiesPage 8 of 609

Fuses
Fuse Specification Chart
...........................300
Changing a Fuse ..........................................
315
Maintenance
General Information .....................................
318
Opening and Closing the Hood ...............
318
Under Hood Overview - 2.7L/3.0L ..........
320
Under Hood Overview - 3.7L ...................
322
Engine Oil Dipstick - 2.7L/3.0L .................
324
Engine Oil Dipstick - 3.7L ..........................
324
Engine Oil Check .........................................
324
Oil Change Indicator Reset ......................
325
Changing the Engine Air Filter - 3.7L ......
326
Changing the Engine Air Filter - 2.7L/3.0L ......................................................................
327
Engine Coolant Check ...............................
328
Automatic Transmission Fluid Check ......
333
Brake Fluid Check .......................................
333
Power Steering Fluid Check .....................
334
Changing the 12V Battery .........................
334
Adjusting the Headlamps ..........................
337
Washer Fluid Check ....................................
338Fuel Filter - 2.7L/3.7L
..................................
339
Fuel Filter - 3.0L ...........................................
339
Checking the Wiper Blades ......................
339
Changing the Wiper Blades .....................
339
Changing a Bulb ..........................................
340
Vehicle Care
General Information .....................................
341
Cleaning Products ........................................
341
Cleaning the Exterior .................................
342
Waxing ............................................................
343
Cleaning the Engine ...................................
344
Cleaning the Windows and Wiper Blades ......................................................................
344
Cleaning the Interior ...................................
345
Cleaning the Instrument Panel and Instrument Cluster Lens ........................
347
Cleaning Leather Seats ..............................
347
Repairing Minor Paint Damage ................
348
Cleaning the Wheels ..................................
348
Vehicle Storage ...........................................
349
Body Styling Kits ...........................................
351Wheels and Tires
General Information
....................................
352
Tire Care ........................................................
352
Using Summer Tires ...................................
366
Using Snow Chains ....................................
366
Tire Pressure Monitoring System ............
367
Changing a Road Wheel ............................
372
Technical Specifications ............................
379
Capacities and Specifications
Engine Specifications - 2.7L ......................
381
Engine Specifications - 3.0L .....................
382
Engine Specifications - 3.7L ......................
384
Motorcraft Parts - 2.7L ................................
385
Motorcraft Parts - 3.0L ...............................
386
Motorcraft Parts - 3.7L ................................
387
Vehicle Identification Number .................
389
Vehicle Certification Label ........................
389
Transmission Code Designation .............
390
Capacities and Specifications - 2.7L .......
391
Capacities and Specifications - 3.0L ......
402
Capacities and Specifications - 3.7L ........
413
Bulb Specification Chart ............................
424
5
Continental (CPL) Canada/United States of America, enUSA, Edition date: 201907, Second-Printing Table of Contents
Page 327 of 609

ENGINE OIL DIPSTICK - 2.7L/3.0L
Minimum.
A
Nominal.
B
Maximum.
C ENGINE OIL DIPSTICK - 3.7L MINA
MAXB
ENGINE OIL CHECK
To check the engine oil level consistently
and accurately, do the following:
1. Make sure the parking brake is on. Make
sure the transmission is in park (P) or
neutral (N). 2. Run the engine until it reaches normal
operating temperature.
3. Make sure that your vehicle is on level ground.
4. Switch the engine off and wait 15 minutes
for the oil to drain into the oil pan.
Checking the engine oil level too soon
after you switch the engine off may result
in an inaccurate reading.
5. Open the hood. See Opening and
Closing the Hood (page 318).
6. Remove the dipstick and wipe it with a clean, lint-free cloth.
See Under Hood
Overview (page 322).
7. Reinstall the dipstick and remove it again
to check the oil level.
See Engine Oil
Dipstick (page 324).
8. Make sure that the oil level is between the maximum and minimum marks. If the
oil level is at the minimum mark, add oil
immediately.
See Capacities and
Specifications (page 391).
9. If the oil level is correct, replace the dipstick and make sure it is fully seated.
324
Continental (CPL) Canada/United States of America, enUSA, Edition date: 201907, Second-Printing MaintenanceE250320 E146429
Page 328 of 609

Note:
Do not remove the dipstick when the
engine is running.
Note: If the oil level is between the
maximum and minimum marks, the oil level
is acceptable. Do not add oil.
Note: The oil consumption of new engines
reaches its normal level after approximately
3,000 mi (5,000 km).
Adding Engine Oil WARNING:
Do not remove the filler
cap when the engine is running.
Do not use supplemental engine oil additives
because they are unnecessary and could
lead to engine damage that may not be
covered by the vehicle Warranty. Only use oils certified for gasoline engines
by the American Petroleum Institute (API).
An oil with this trademark symbol conforms
to the current engine and emission system
protection standards and fuel economy
requirements of the International Lubricants
Specification Advisory Committee (ILSAC).
To top up the engine oil level do the
following:
1. Clean the area surrounding the engine
oil filler cap before you remove it.
2. Remove the engine oil filler cap.
See
Under Hood Overview (page 322). Turn
it counterclockwise and remove it. 3. Add engine oil that meets our
specifications.
See Capacities and
Specifications (page 391). You may have
to use a funnel to pour the engine oil into
the opening.
4. Recheck the oil level.
5. If the oil level is correct, replace the dipstick and make sure it is fully seated.
6. Replace the engine oil filler cap. Turn it clockwise until you feel a strong
resistance.
Note: Do not add oil further than the
maximum mark. Oil levels above the
maximum mark may cause engine damage.
Note: Make sure you install the oil filler cap
correctly.
Note: Soak up any spillage with an
absorbent cloth immediately.
OIL CHANGE INDICATOR RESET
Use the information display controls on the
steering wheel to reset the oil change
indicator.
325
Continental (CPL) Canada/United States of America, enUSA, Edition date: 201907, Second-Printing MaintenanceE142732
Page 329 of 609

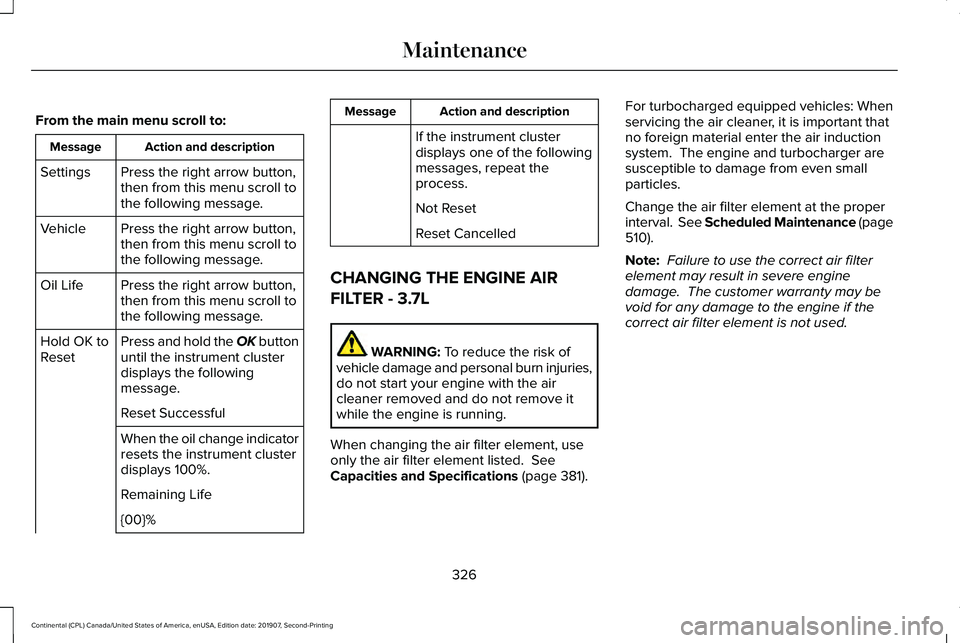
From the main menu scroll to:
Action and description
Message
Press the right arrow button,
then from this menu scroll to
the following message.
Settings
Press the right arrow button,
then from this menu scroll to
the following message.
Vehicle
Press the right arrow button,
then from this menu scroll to
the following message.
Oil Life
Press and hold the OK button
until the instrument cluster
displays the following
message.
Hold OK to
Reset
Reset Successful
When the oil change indicator
resets the instrument cluster
displays 100%.
Remaining Life
{00}% Action and description
Message
If the instrument cluster
displays one of the following
messages, repeat the
process.
Not Reset
Reset Cancelled
CHANGING THE ENGINE AIR
FILTER - 3.7L WARNING: To reduce the risk of
vehicle damage and personal burn injuries,
do not start your engine with the air
cleaner removed and do not remove it
while the engine is running.
When changing the air filter element, use
only the air filter element listed.
See
Capacities and Specifications (page 381). For turbocharged equipped vehicles: When
servicing the air cleaner, it is important that
no foreign material enter the air induction
system. The engine and turbocharger are
susceptible to damage from even small
particles.
Change the air filter element at the proper
interval. See Scheduled Maintenance (page
510
).
Note: Failure to use the correct air filter
element may result in severe engine
damage. The customer warranty may be
void for any damage to the engine if the
correct air filter element is not used.
326
Continental (CPL) Canada/United States of America, enUSA, Edition date: 201907, Second-Printing Maintenance
Page 384 of 609

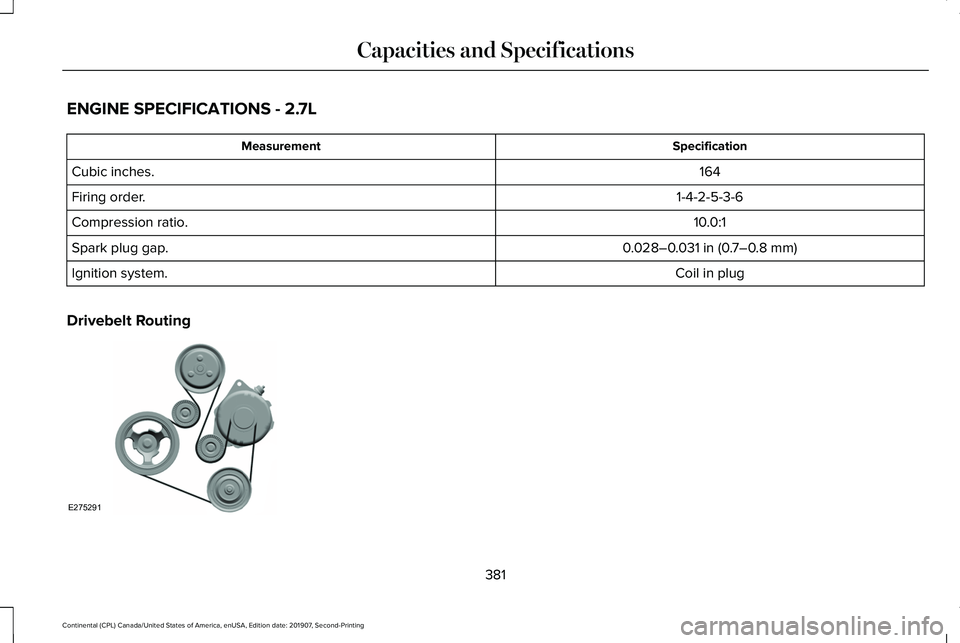
ENGINE SPECIFICATIONS - 2.7L
Specification
Measurement
164
Cubic inches.
1-4-2-5-3-6
Firing order.
10.0:1
Compression ratio.
0.028–0.031 in (0.7–0.8 mm)
Spark plug gap.
Coil in plug
Ignition system.
Drivebelt Routing 381
Continental (CPL) Canada/United States of America, enUSA, Edition date: 201907, Second-Printing Capacities and SpecificationsE275291
Page 385 of 609

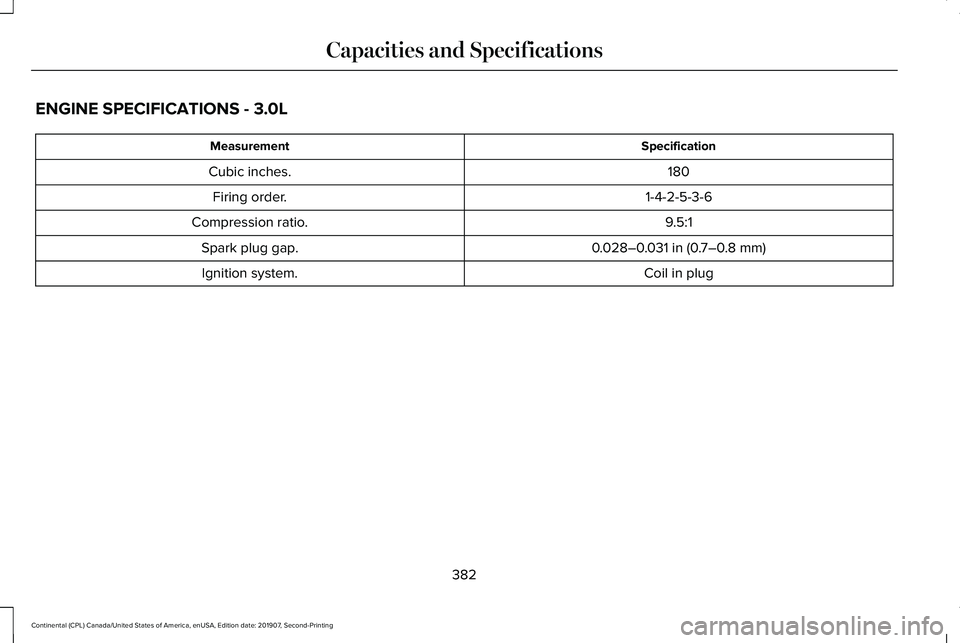
ENGINE SPECIFICATIONS - 3.0L
Specification
Measurement
180
Cubic inches.
1-4-2-5-3-6
Firing order.
9.5:1
Compression ratio.
0.028–0.031 in (0.7–0.8 mm)
Spark plug gap.
Coil in plug
Ignition system.
382
Continental (CPL) Canada/United States of America, enUSA, Edition date: 201907, Second-Printing Capacities and Specifications
Page 387 of 609

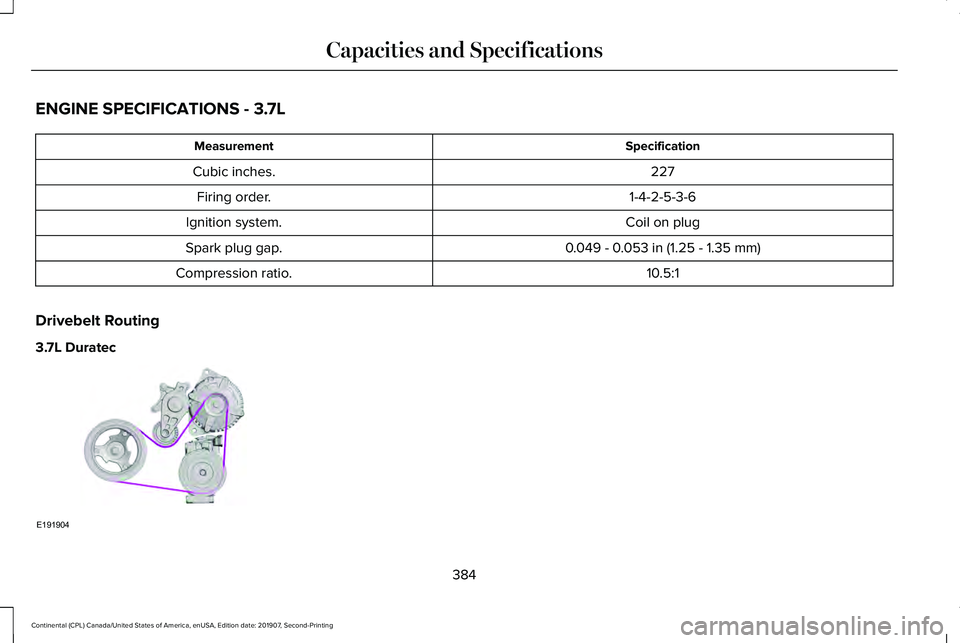
ENGINE SPECIFICATIONS - 3.7L
Specification
Measurement
227
Cubic inches.
1-4-2-5-3-6
Firing order.
Coil on plug
Ignition system.
0.049 - 0.053 in (1.25 - 1.35 mm)
Spark plug gap.
10.5:1
Compression ratio.
Drivebelt Routing
3.7L Duratec 384
Continental (CPL) Canada/United States of America, enUSA, Edition date: 201907, Second-Printing Capacities and SpecificationsE191904
Page 388 of 609

MOTORCRAFT PARTS - 2.7L
Motorcraft Part number
Component
FA-1912A
Air filter element.
BAGM-94RH7-800
Battery.
FP-80
Cabin air filter.
FL-2062
Engine oil filter. 1
SP-578
Spark plug. 2
WW-2431 (driver side)
Windshield wiper blade.
WW-2050 (passenger side)
1 If a Motorcraft® oil filter is not available, use an oil filter that meets industry performance specification SAE/USCAR-36.
2 For spark plug replacement, contact your authorized dealer. Replace the spark plugs at the recommended intervals. See Scheduled
Maintenance Record (page 522).
385
Continental (CPL) Canada/United States of America, enUSA, Edition date: 201907, Second-Printing Capacities and Specifications