Page 555 of 777
5546-5. Using the other interior features
RX350/RX350L_U
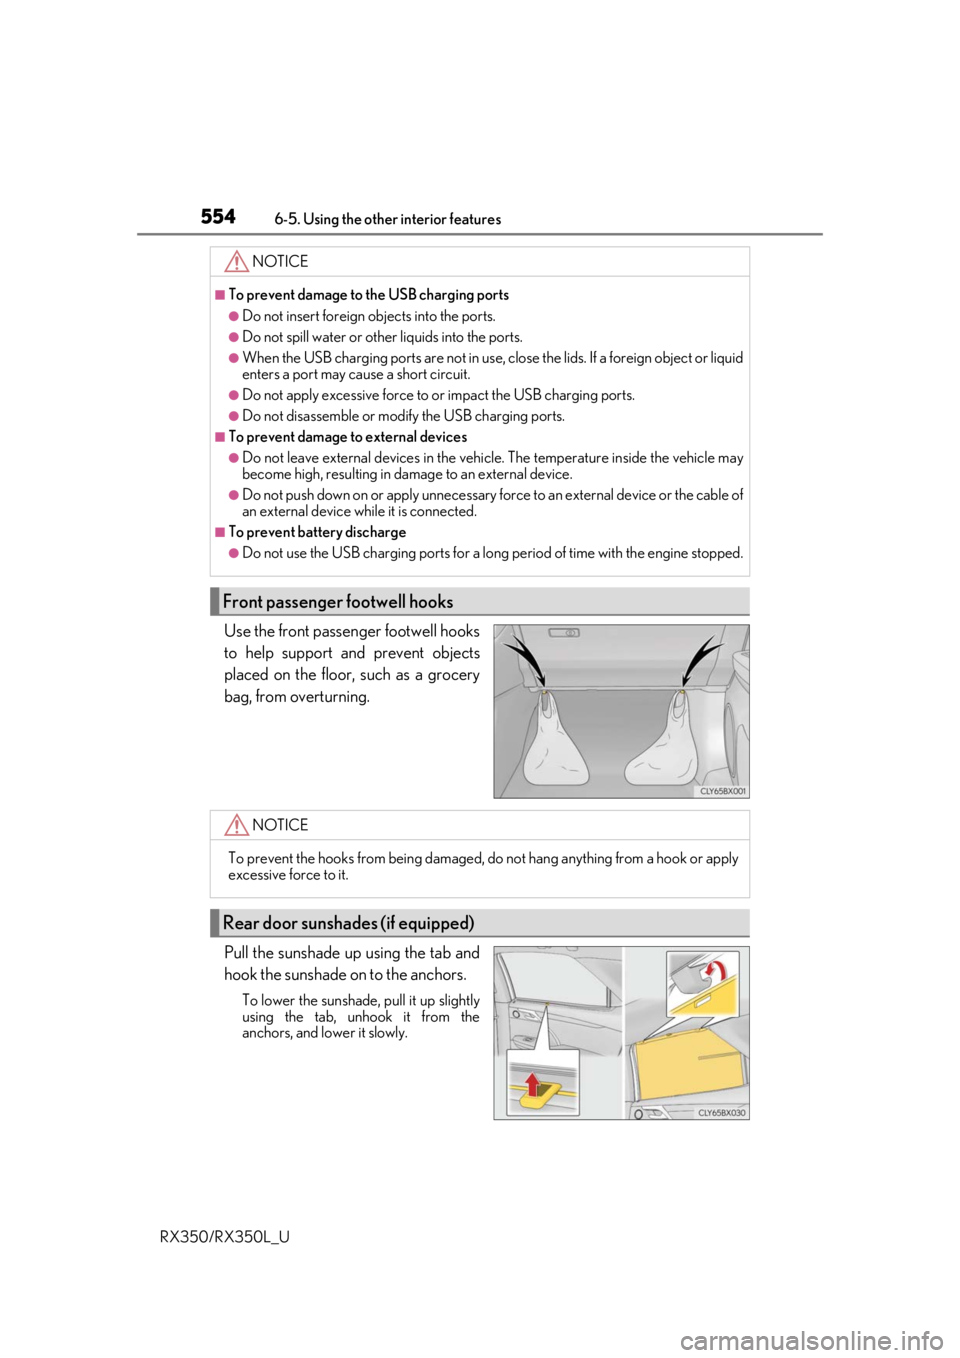
Use the front passenger footwell hooks
to help support and prevent objects
placed on the floor, such as a grocery
bag, from overturning.
Pull the sunshade up using the tab and
hook the sunshade on to the anchors.
To lower the sunshade, pull it up slightly
using the tab, unhook it from the
anchors, and lower it slowly.
NOTICE
■To prevent damage to the USB charging ports
●Do not insert foreign objects into the ports.
●Do not spill water or othe r liquids into the ports.
●When the USB charging ports are not in use, close the lids. If a foreign object or liquid
enters a port may cause a short circuit.
●Do not apply excessive force to or impact the USB charging ports.
●Do not disassemble or modify the USB charging ports.
■To prevent damage to external devices
●Do not leave external devices in the vehicle. The temperature inside the vehicle may
become high, resulting in damage to an external device.
●Do not push down on or appl y unnecessary force to an exte rnal device or the cable of
an external device while it is connected.
■To prevent battery discharge
●Do not use the USB charging ports for a long period of time with the engine stopped.
Front passenger footwell hooks
NOTICE
To prevent the hooks from being damaged, do not hang anything from a hook or apply
excessive force to it.
Rear door sunshades (if equipped)
Page 558 of 777
5576-5. Using the other interior features
6
Interior features
RX350/RX350L_U
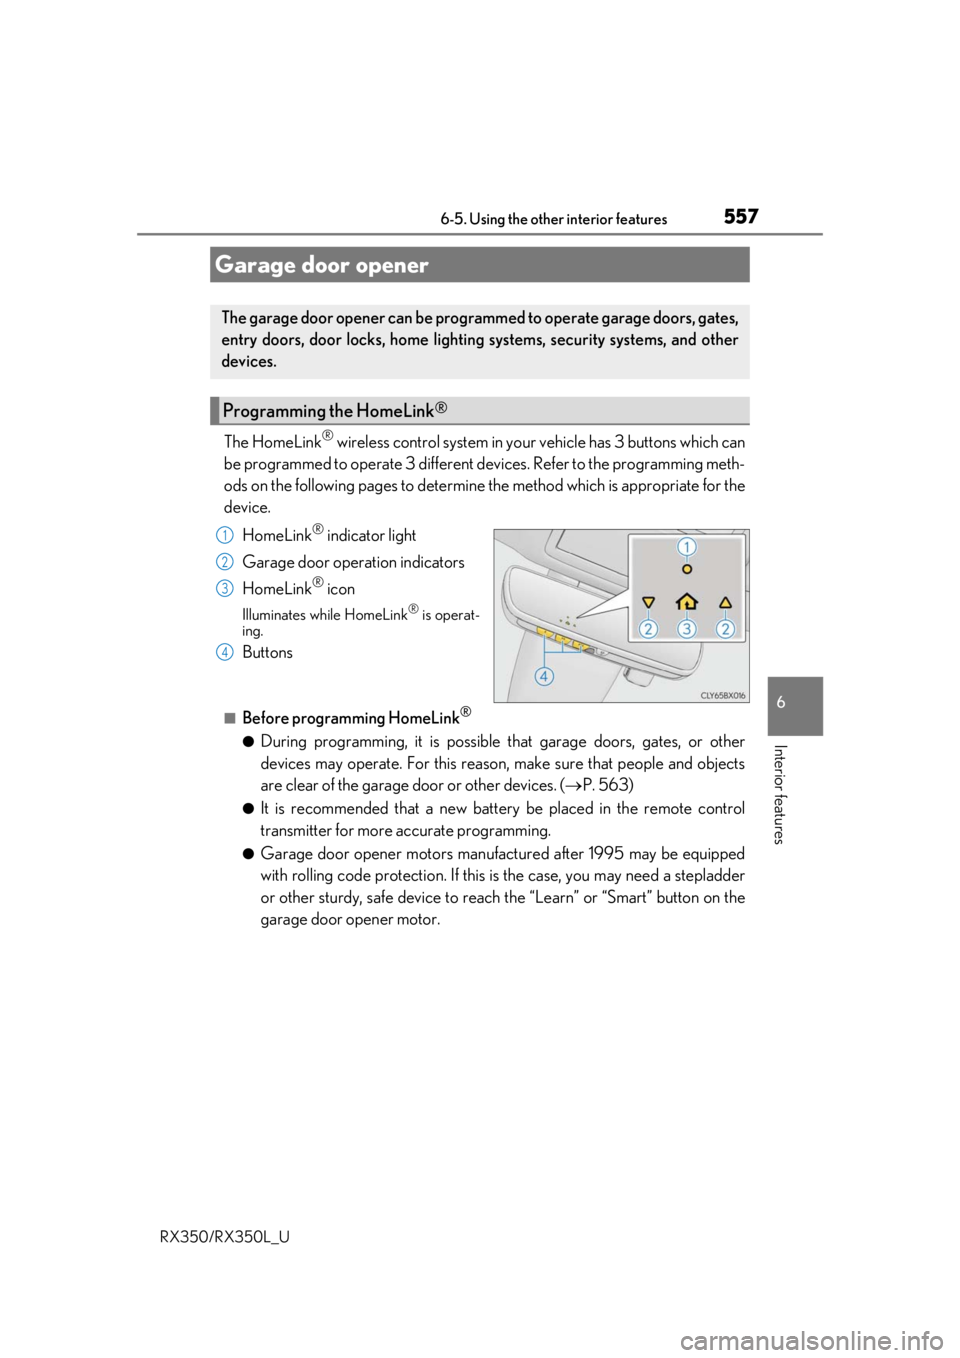
The HomeLink® wireless control system in your vehicle has 3 buttons which can
be programmed to operate 3 different de vices. Refer to the programming meth-
ods on the following pages to determine the method which is appropriate for the
device.
HomeLink
® indicator light
Garage door operation indicators
HomeLink
® icon
Illuminates while HomeLink® is operat-
ing.
Buttons
■Before programming HomeLink®
●During programming, it is possible that garage doors, gates, or other
devices may operate. For this reason, make sure that people and objects
are clear of the garage door or other devices. ( P. 563)
●It is recommended that a new batter y be placed in the remote control
transmitter for more accurate programming.
●Garage door opener motors manufa ctured after 1995 may be equipped
with rolling code protection. If this is the case, you may need a stepladder
or other sturdy, safe device to reach the “Learn” or “Smart” button on the
garage door opener motor.
Garage door opener
The garage door opener can be programmed to operate garage doors, gates,
entry doors, door locks, home lightin g systems, security systems, and other
devices.
Programming the HomeLink®
1
2
3
4
Page 559 of 777
5586-5. Using the other interior features
RX350/RX350L_U
■Programming HomeLink®
Steps through must be performed within 60 seconds, otherwise the
indicator light will stop flashing and pr ogramming will not be able to be com-
pleted.
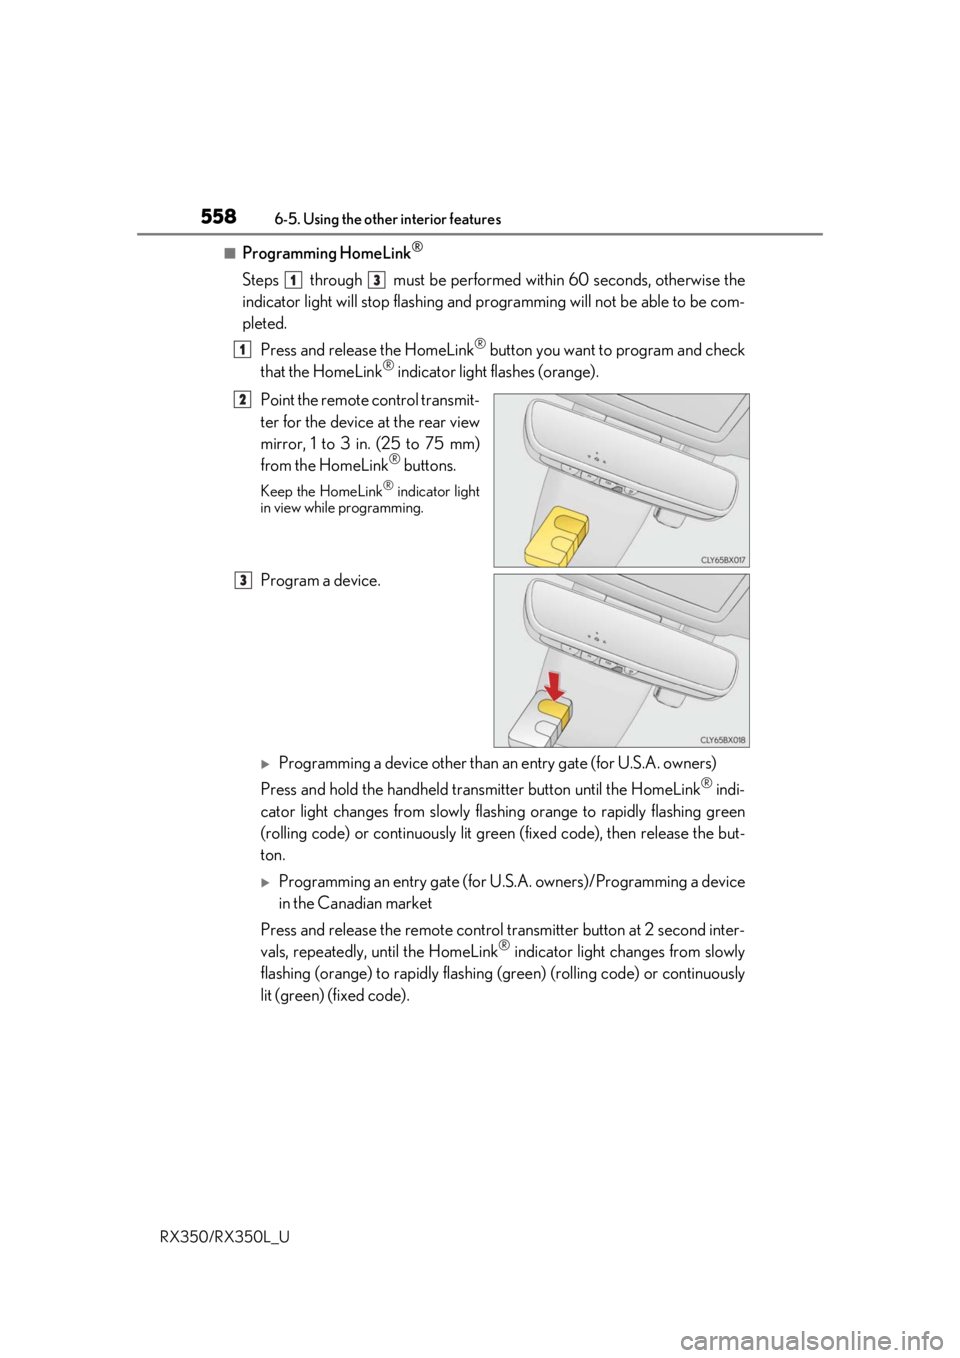
Press and release the HomeLink
® button you want to program and check
that the HomeLink® indicator light flashes (orange).
Point the remote control transmit-
ter for the device at the rear view
mirror, 1 to 3 in. (25 to 75 mm)
from the HomeLink
® buttons.
Keep the HomeLink® indicator light
in view while programming.
Program a device.
Programming a device other than an entry gate (for U.S.A. owners)
Press and hold the handheld transmitter button until the HomeLink
® indi-
cator light changes from slowly flashi ng orange to rapidly flashing green
(rolling code) or continuously lit green (fixed code), then release the but-
ton.
Programming an entry gate (for U. S.A. owners)/Programming a device
in the Canadian market
Press and release the remote control transm itter button at 2 second inter-
vals, repeatedly, until the HomeLink
® indicator light changes from slowly
flashing (orange) to rapidly flashing (green) (rolling code) or continuously
lit (green) (fixed code).
13
1
2
3
Page 560 of 777
5596-5. Using the other interior features
6
Interior features
RX350/RX350L_U
Test the HomeLink® operation by pressing the newly programmed button
and observing the indicator light:
●Indicator light illuminates: Programming of a fixed code device has com-
pleted. The garage door or other de vice should operate when a Home-
Link
® button is pressed and released.
●Indicator light flashes rapidly: The garage door opener motor or other
device is equipped with a rolling co de. To complete programming, firmly
press and hold the HomeLink
® button for 2 seconds then release it.
●If the garage door or other device does not operate, proceed to “Pro-
gramming a rollin g code system”.
Repeat the steps above to program anot her device for any of the remaining
HomeLink
® buttons.
■Programming a rolling code system
2 or more people may be necessary to complete rolling code programming.
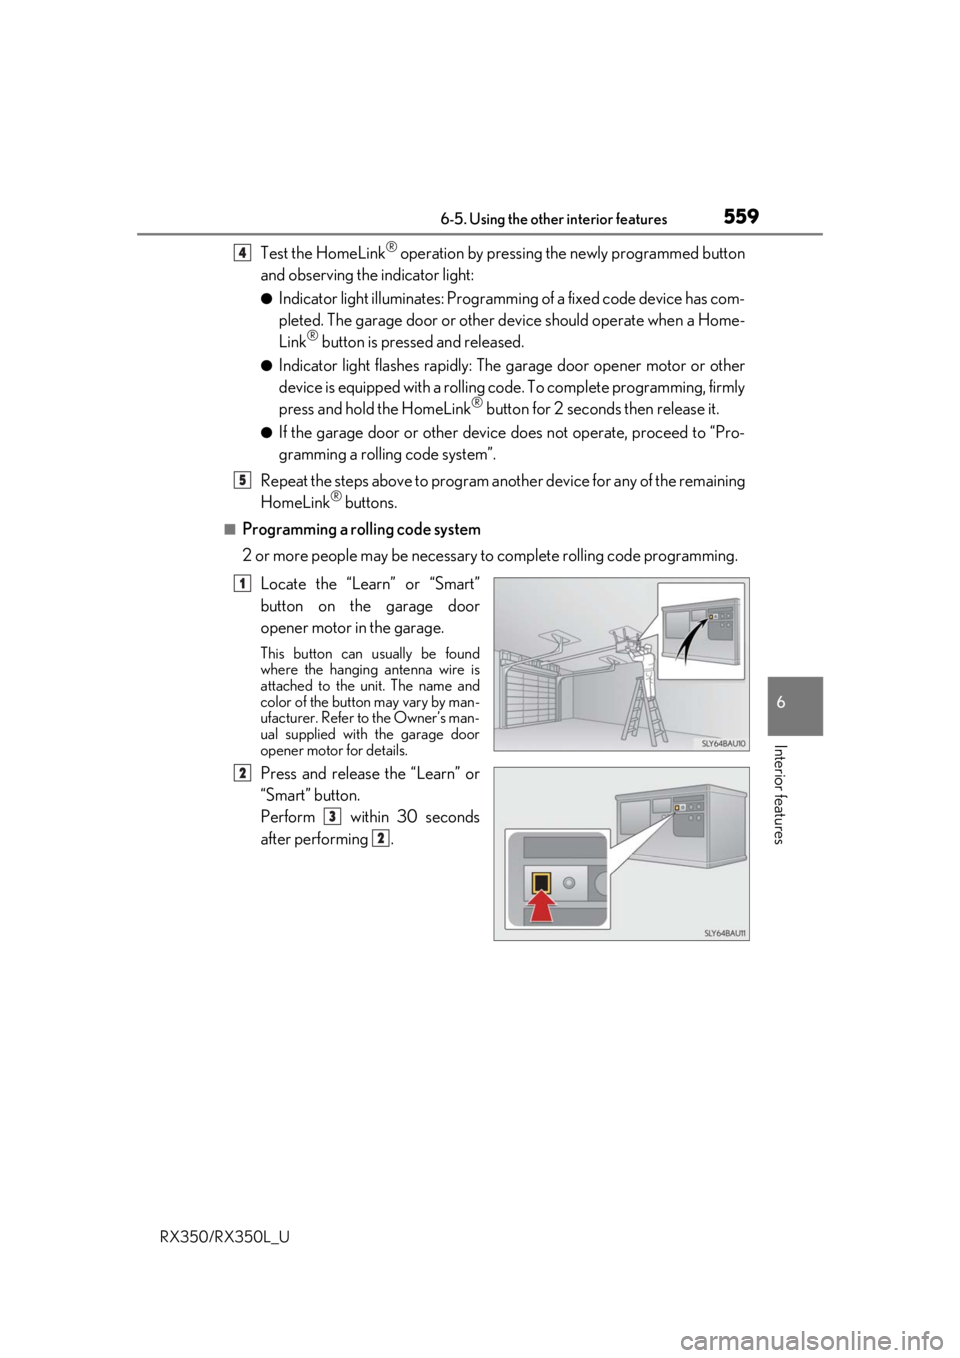
Locate the “Learn” or “Smart”
button on the garage door
opener motor in the garage.
This button can usually be found
where the hanging antenna wire is
attached to the unit. The name and
color of the button may vary by man-
ufacturer. Refer to the Owner’s man-
ual supplied with the garage door
opener motor for details.
Press and release the “Learn” or
“Smart” button.
Perform within 30 seconds
after performing .
4
5
1
2
3
2
Page 561 of 777
5606-5. Using the other interior features
RX350/RX350L_U
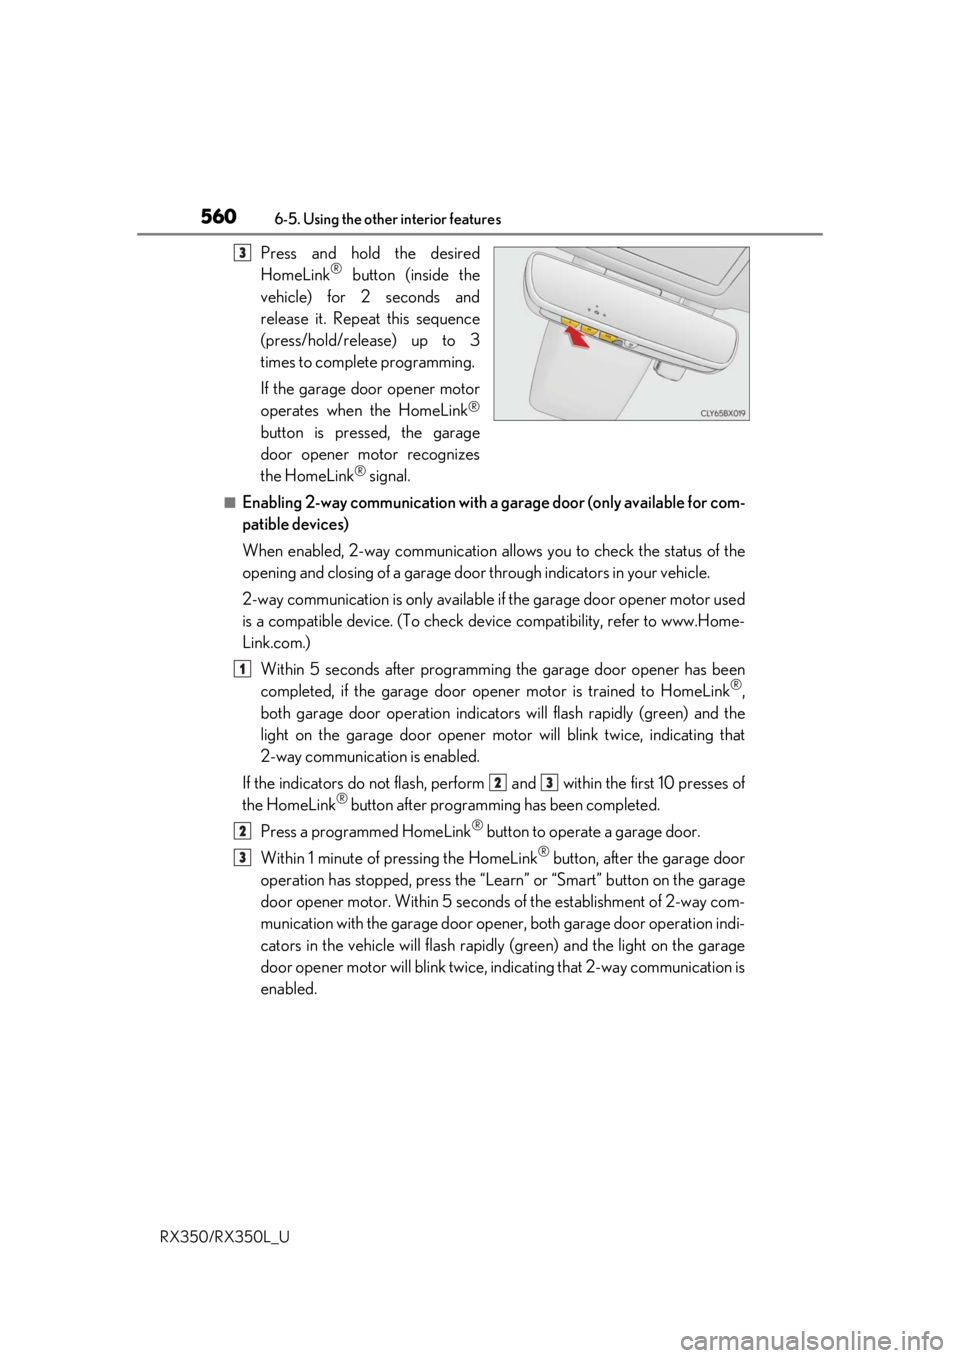
Press and hold the desired
HomeLink® button (inside the
vehicle) for 2 seconds and
release it. Repeat this sequence
(press/hold/release) up to 3
times to complete programming.
If the garage door opener motor
operates when the HomeLink
®
button is pressed, the garage
door opener motor recognizes
the HomeLink
® signal.
■Enabling 2-way communication with a garage door (only available for com-
patible devices)
When enabled, 2-way communication allo ws you to check the status of the
opening and closing of a garage door through indicators in your vehicle.
2-way communication is only available if the garage door opener motor used
is a compatible device. (To check devi ce compatibility, refer to www.Home-
Link.com.)
Within 5 seconds after programming the garage door opener has been
completed, if the garage door op ener motor is trained to HomeLink
®,
both garage door operation indicator s will flash rapidly (green) and the
light on the garage door opener motor will blink twice, indicating that
2-way communication is enabled.
If the indicators do not flash, perform and within the first 10 presses of
the HomeLink
® button after programming has been completed.
Press a programmed HomeLink
® button to operate a garage door.
Within 1 minute of pressing the HomeLink
® button, after the garage door
operation has stopped, press the “Learn” or “Smart” button on the garage
door opener motor. Within 5 seconds of the establishment of 2-way com-
munication with the garage door opener, both garage door operation indi-
cators in the vehicle will flash rapidly (green) and the light on the garage
door opener motor will blink twice, indicating that 2-way communication is
enabled.
3
1
23
2
3
Page 562 of 777

5616-5. Using the other interior features
6
Interior features
RX350/RX350L_U
■Reprogramming a single HomeLink® button
When the following procedure is performed, buttons which already have
devices registered to them can be overwritten: With one hand, press and hold the desired HomeLink
® button.
When the HomeLink
® indicator starts flashing (orange), continue to hold
the HomeLink® button and perform “Programming HomeLink®” (it
takes 20 seconds for the HomeLink® indicator to start flashing).
Press the appropriate HomeLink
® button. The HomeLink® indicator light
should turn on.
The status of the opening and closing of
a garage door is shown by the indica-
tors.
Opening
Closing
This function is only available if the
garage door opener motor used is a
compatible device. (To check device
compatibility, refer to www.Home-
Link.com.)
The indicators can operate wi thin approximately 820 ft. (250 m) of the garage
door. However, if there are obstructions between the garage door and the vehi-
cle, such as houses and trees, feedback signals from the garage door may not be
received.
To recall the previous door operation status, press and release either Home-
Link
® buttons and or and simultaneously. The
last recorded status will be displayed for 3 seconds.
Operating HomeLink®
Garage door operation indicators
1
2
1
1
2
ColorStatus
Orange (flashing)Currently opening/closing
GreenOpening/closing has completed
Red (flashing)Feedback signals cannot be received
Page 563 of 777
5626-5. Using the other interior features
RX350/RX350L_U
Press and hold the 2 outside buttons for
10 seconds until the HomeLink® indi-
cator light changes from continuously
lit (orange) to rapidly flashing (green).
If you sell your vehicle, be sure to erase
the programs stored in the HomeLink®
memory.
■Codes stored in the HomeLink® memory
●The registered codes are not erased even if the battery cable is disconnected.
●If learning failed when registerin g a different code to a HomeLink® button that already
has a code registered to it, the alread y registered code will not be erased.
■Before programming
●Install a new battery in the transmitter.
●The battery side of the transmitter must be pointed away from the HomeLink®.
■Certification for the garage door opener
For vehicles sold in the U.S.A.
Erasing the entire HomeLink® memory (all three codes)
Page 569 of 777
5686-5. Using the other interior features
RX350/RX350L_U
Microphone
“SOS” button
LED light indicators
LEXUS Enform Safety Connect
: If equipped
Safety Connect is a subscription-based telematics service that uses Global
Positioning System (GPS) data and embe dded cellular technology to provide
safety and security features to subscribers. Safety Connect is supported by
Lexus’ designated response center, wh ich operates 24 hours per day, 7 days
per week.
Safety Connect service is available by su bscription on select, telematics hard-
ware-equipped vehicles.
By using the Safety Connect service, you are agreeing to be bound by the
Telematics Subscription Service Agre ement and its Terms and Conditions, as
in effect and amended from time to time, a current copy of which is available
at Lexus.com. All use of the Safety Co nnect service is subject to such then-
applicable Terms and Conditions.
System components
1
2
3