Page 650 of 777
6498-2. Steps to take in an emergency
8
When trouble arises
RX350/RX350L_U
Take out the towing eyelet. (P. 667)
Remove the eyelet cover.
Insert the towing eyelet into the hole
and tighten partially by hand.
Tighten down the towing eyelet
securely using a wheel nut wrench
or hard metal bar.
Securely attach cables or chains to the towing eyelet.
Take care not to damage the vehicle body.
Enter the vehicle being towed and start the engine.
If the engine does not start, turn th e engine switch to IGNITION ON mode.
Shift the shift lever to N and release the parking brake.
When the shift lever cannot be shifted: P. 239, 244
Emergency towing procedure (vehicles with a towing eyelet)
1
2
3
4
5
6
7
Page 651 of 777

6508-2. Steps to take in an emergency
RX350/RX350L_U
■While towing
If the engine is not running, the power assist for the brakes and steering will not function,
marking steering and braking more difficult.
■Wheel nut wrench
Wheel nut wrench is installe d in luggage compartment. ( P. 667)
WARNING
Observe the following precautions.
Failure to do so may result in death or serious injury.
■When towing the vehicle
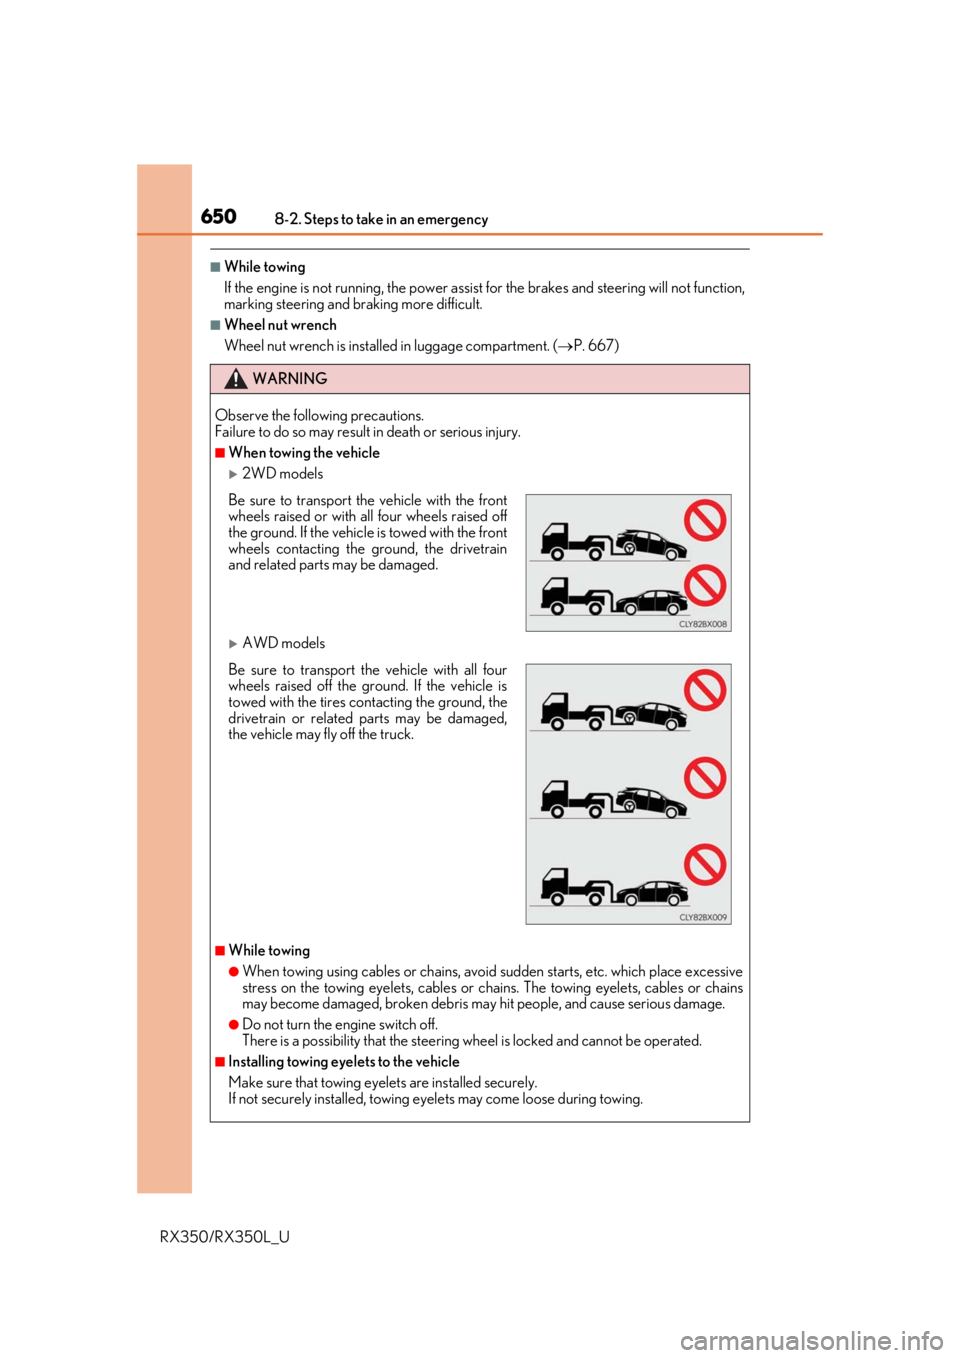
2WD models
AWD models
■While towing
●When towing using cables or chains, avoid sudden starts, etc. which place excessive
stress on the towing eyelets, cables or chains. The towing eyelets, cables or chains
may become damaged, broken debris ma y hit people, and cause serious damage.
●Do not turn the engine switch off.
There is a possibility that the steering wheel is locked and cannot be operated.
■Installing towing eyelets to the vehicle
Make sure that towing eyel ets are installed securely.
If not securely installed, towing ey elets may come loose during towing.
Be sure to transport the vehicle with the front
wheels raised or with all four wheels raised off
the ground. If the vehicle is towed with the front
wheels contacting the ground, the drivetrain
and related parts may be damaged.
Be sure to transport the vehicle with all four
wheels raised off the ground. If the vehicle is
towed with the tires contacting the ground, the
drivetrain or related parts may be damaged,
the vehicle may fly off the truck.
Page 652 of 777
6518-2. Steps to take in an emergency
8
When trouble arises
RX350/RX350L_U
NOTICE
■To prevent damage to the vehicle when towing using a wheel-lift type truck
●Do not tow the vehicle from the rear when the engine switch is off. The steering lock
mechanism is not strong enough to hold the front wheels straight.
●When raising the vehicle, ensure adequate ground cleara nce for towing at the oppo-
site end of the raised vehicle. Without ad equate clearance, the vehicle could be dam-
aged while being towed.
■To prevent damage to the vehicle wh en towing with a sling-type truck
Do not tow with a sling-type truck, either from the front or rear.
■To prevent damage to the ve hicle during emergency towing
Do not secure cables or chains to the suspension components.
■Recreational towing (behind motor home, etc)
Never dinghy tow your vehicle to prevent caus-
ing serious damage to the Dynamic Torque
Control AWD system (AWD models) and
transmission. ( P. 230)
Page 668 of 777
6678-2. Steps to take in an emergency
8
When trouble arises
RX350/RX350L_U
RX350
*: Documentation relating to the wheel lock key, such as the registration and I.D. card, is
inside the glove box.
Location of the spare tire, jack and tools
Jack handle
Wheel nut wrench
Spare tire Jack
Towing eyelet (if equipped)
Wheel lock key* (if equipped)1
2
3
4
5
6
Page 669 of 777

6688-2. Steps to take in an emergency
RX350/RX350L_U
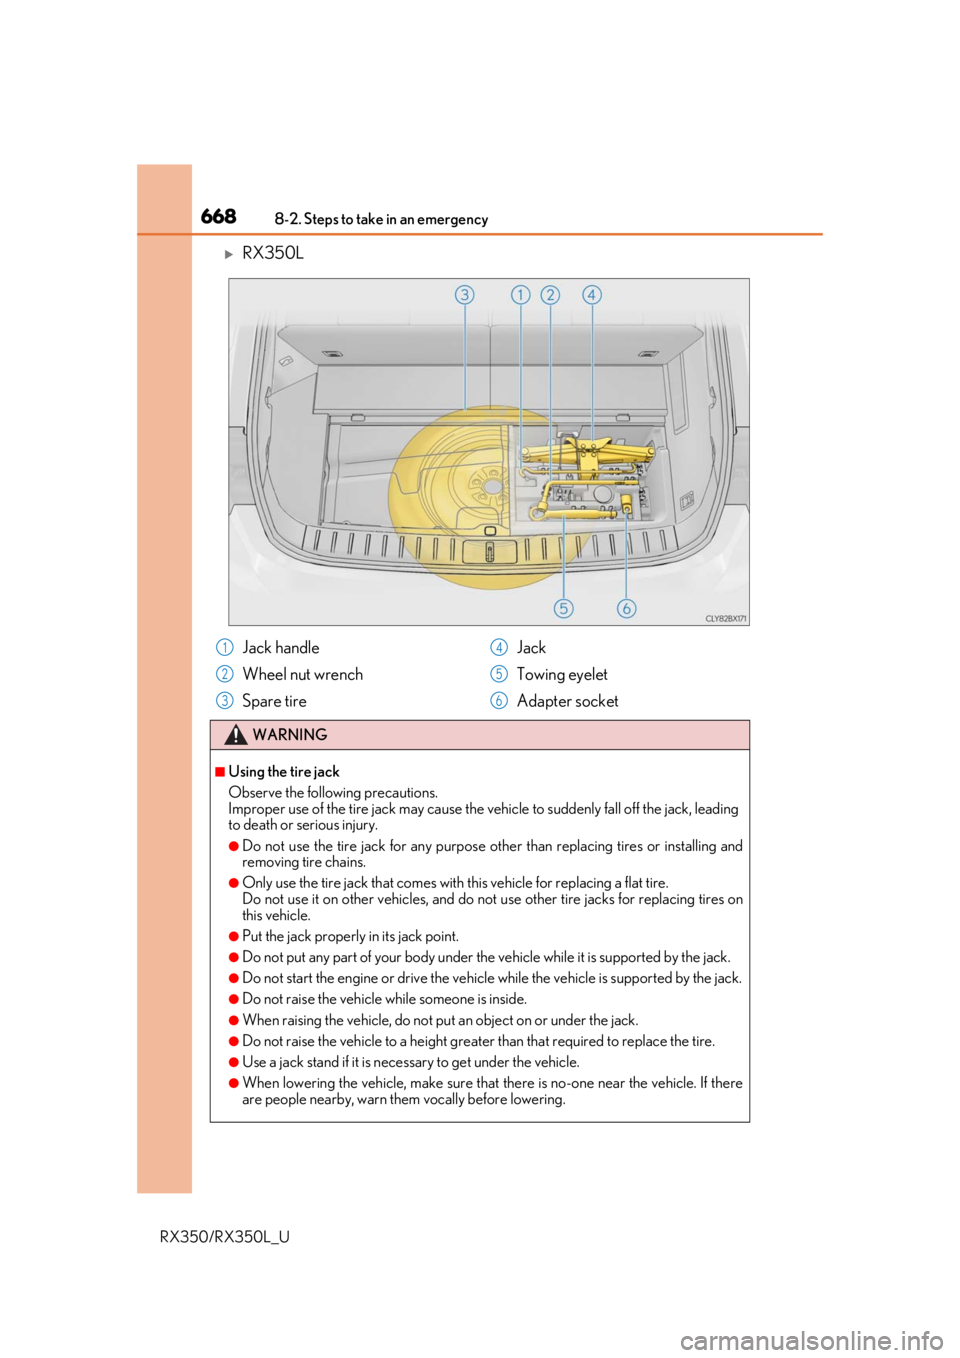
RX350L
Jack handle
Wheel nut wrench
Spare tireJack
Towing eyelet
Adapter socket
WARNING
■Using the tire jack
Observe the following precautions.
Improper use of the tire jack may cause the ve
hicle to suddenly fall off the jack, leading
to death or serious injury.
●Do not use the tire jack for any purpose ot her than replacing tires or installing and
removing tire chains.
●Only use the tire jack that comes with this vehicle for replacing a flat tire.
Do not use it on other vehicles, and do no t use other tire jacks for replacing tires on
this vehicle.
●Put the jack properly in its jack point.
●Do not put any part of your body under the vehicle while it is supported by the jack.
●Do not start the engine or drive the vehicle while the vehicle is supported by the jack.
●Do not raise the vehicle while someone is inside.
●When raising the vehicle, do not put an object on or under the jack.
●Do not raise the vehicle to a height greater than that required to replace the tire.
●Use a jack stand if it is necessary to get under the vehicle.
●When lowering the vehicle, make sure that there is no-one near the vehicle. If there
are people nearby, warn them vocally before lowering.
1
2
3
4
5
6
Page 675 of 777
6748-2. Steps to take in an emergency
RX350/RX350L_U
Raise the vehicle until the tire is
slightly raised off the ground.
Remove all the wheel nuts and the
tire.
When resting the tire on the ground,
place the tire so that the wheel design
faces up to avoid scratching the wheel
surface.
■If the spare tire cannot be lowered (RX350L)
If the spare tire cannot be lowered, it may not have been stowed properly. Perform the
following procedure:
If the spare tire still cannot be lowered, the wire cable may be severed. Have the vehicle
inspected by your Lexus dealer.
4
5
Fully tighten the spare tire clamp bolt by turn-
ing the jack handle clockwise until two clicks
are heard and the jack handle skips.
Turn the jack handle counterclockwise to
lower the spare tire.
If the spare tire still cannot be lowered,
attempt to fully tighten the spare tire clamp
bolt again by turning the jack handle clock-
wise. Then turn it counterclockwise at least 2
turns to lower the spare tire.1
2
Page 677 of 777
6768-2. Steps to take in an emergency
RX350/RX350L_U
Remove any dirt or foreign matter
from the wheel contact surface.
If foreign matter is on the wheel contact
surface, the wheel nuts may loosen
while the vehicle is in motion, causing
the tire to come off.
Install the spare tire and loosely
tighten each wheel nut by hand by
approximately the same amount.
Tighten the wheel nuts until the tapered
portion comes into loose contact with
the disc wheel seat.
Lower the vehicle.
Firmly tighten each wheel nut two or
three times in the order shown in the
illustration.
For vehicles with wheel lock nuts,
tighten the wheel lock nut last.
Tightening torque:
76 ft•lbf (103 N•m, 10.5 kgf•m)
RX350: Stow the flat tire, tire jack and all tools.
RX350L: P. 677
Installing the spare tire
1
Disc wheel
seat
Tapered portion2
3
4
5
Page 678 of 777
6778-2. Steps to take in an emergency
8
When trouble arises
RX350/RX350L_U
Remove the center wheel ornament by pushing from the reverse side.
Be careful not to lose the wheel ornament.
Stand the tire against the bumper
with the inner surface facing toward
you. Pass the hoist assembly and
holding bracket through the
wheel opening.
Fully depress the secondary latch and install the bracket to the
hoist assembly .
WARNING
■Stowing the flat tire
Failure to follow steps listed under stowing the tire may result in damage to the spare
tire carrier and loss of the tire, which co uld result in serious injury or death.
Stowing the flat tire, jack and all tools (RX350L)
1
2
C
B
3
AB
C