2020 LEXUS RX350 wheel lock key
[x] Cancel search: wheel lock keyPage 2 of 516

2TABLE OF CONTENTS
For your information ......................................6
Reading this manual .................................... 10
How to search ................................................. 11
Pictorial index ................................................. 12
1-1. For safe use Before driving .................................... 24
For safe driving.................................. 25
Seat belts ............................................. 26
SRS airbags ....................................... 30
Front passenger occupant classifi- cation system ................................. 39
Exhaust gas precautions .............. 44
1-2. Child safety Riding with children........................ 45
Child restraint systems ................. 45
1-3. Lexus Enform Lexus Enform Safety Connect .. 60
1-4. Theft deterrent system Engine immobilizer system ......... 64
Alarm.................................................... 67
2-1. Instrument cluster Warning lights and indicators .... 70
Gauges and meters ....................... 75
Multi-information display............. 79
Head-up display .............................. 86
Fuel consumption information ... 903-1. Key information
Keys ....................................................... 94
3-2. Opening, closing and locking the doors
Side doors ........................................... 97
Power back door ........................... 101
Smart access system with push-but- ton start ............................................ 113
3-3. Adjusting the seats Front seats......................................... 122
Rear seats.......................................... 123
Driving position memory ............ 134
Head restraints ............................... 137
3-4. Adjusting the steering wheel and mirrors
Steering wheel ............................... 140
Inside rear view mirror ................. 141
Outside rear view mirrors.......... 142
3-5. Opening, closing the windows and moon roof
Power windows ............................. 145
Moon roof ......................................... 147
Panoramic moon roof ................. 150
4-1. Before driving Driving the vehicle........................ 156
Cargo and luggage........................ 161
Vehicle load limits......................... 164
Trailer towing (vehicles without towing package)......................... 165
1For safety and security
2Vehicle status information and
indicators
3Before driving
4Driving
Page 93 of 516
93
3
3
Before driving
Before driving
.3-1. Key informationKeys ................................................... 94
3-2. Opening, closing and locking the doors
Side doors ....................................... 97
Power back door......................... 101
Smart access system with push-button start ...................... 113
3-3. Adjusting the seats Front seats ..................................... 122
Rear seats ...................................... 123
Driving position memory ........ 134
Head restraints............................ 137
3-4. Adjusting the steering wheel and mirrors
Steering wheel............................. 140
Inside rear view mirror.............. 141
Outside rear view mirrors ...... 142
3-5. Opening, closing the windows and moon roof
Power windows........................... 145
Moon roof ..................................... 147
Panoramic moon roof .............. 150
Page 136 of 516

1363-3. Adjusting the seats
3Press one of the buttons for the
driving position you want to recall
until the buzzer sounds.
■To stop the position recall operation
part-way through
Perform any of the fo llowing operations:
●Press the “SET” button.
●Press button “1”, “2” or “3”.
●Operate any of the seat adjustment
switches (only cancels seat position
recall).
●Operate the tilt and telescopic steering
control switch (only cancels steering
wheel position recall).
■Operating the driving position memory
after turning the engine switch off
Recorded seat positions can be activated
up to 180 seconds after the driver’s door is
opened and another 60 seconds after it is
closed again.
■Registering procedure
Record your driving position to button
“1”, “2” or “3” before performing the
following:
Carry only the key you want to register,
and then close the driver’s door. If 2 or more keys are in the vehicle, the
driving position cannot be recorded
properly.
1
Check that the shift lever is in P.
2 Turn the engine switch to IGNI-
TION ON mode.
3 Recall the driving position that you
want to record.
4 While pressing the recalled button,
press and hold the door lock switch
(either lock or unlock) until the
buzzer sounds.
If the button could not be registered, the
buzzer sounds continuously for approxi-
mately 3 seconds.
■Cancelation procedure
Carry only the key you want to cancel
and then close the driver’s door.
If 2 or more keys are in the vehicle, the
driving position cannot be canceled
properly.
1 Turn the engine switch to IGNI-
TION ON mode.
2 While pressing the “SET” button,
press and hold the door lock switch
(either lock or unlock) until the
buzzer sounds twice.
If it button could not be canceled, the
buzzer sounds continuously for approxi-
mately 3 seconds.
Registering/canceling/recall a
driving position to an electronic
key (memory recall function)
(driver’s side only)
Page 137 of 516

1373-3. Adjusting the seats
3
Before driving
■Recall procedure
1 Make sure that the doors are
locked before recalling the driving
position. Carry the electronic key
that has been registered to the driv-
ing position, and then unlock and
open the driver’s door using the
smart access system with push-but-
ton start or wireless remote control.
The driving position will move to the
recorded position (not including the steer-
ing wheel and head-up display [if
equipped]). However, the seat will move to
a position slightly behind the recorded
position in order to make entering the vehi-
cle easier.
If the driving position is in a position that
has already been recorded, the seat and
outside rear view mirrors will not move.
2Turn the engine switch to ACCES-
SORY mode or IGNITION ON
mode, or fasten a seat belt.
The seat, steering wheel and head-up dis-
play (if equipped) will move to the
recorded position.
■Recalling the driving position using the
memory recall function
●Different driving positions can be regis-
tered for each electronic key. Therefore,
the driving position that is recalled may
be different depending on the key being
carried.
●If a door other than the driver’s door is
unlocked with the smart access system
with push-button start, the driving posi-
tion cannot be recalled. In this case, press
the driving position button which has
been set.
■Customization
Some functions can be customized.
( P.470)
■Front seats
1 Up
Pull the head restraints up.
2Down
Push the head restra int down while press-
ing the lock release button .
Head restraints
Head restraints are provided for all
seats.
WARNING
■Head restraint precautions
Observe the following precautions
regarding the head re straints. Failure to
do so may result in death or serious
injury.
●Use the head restraints designed for
each respective seat.
●Adjust the head restraints to the cor-
rect position at all times.
●After adjusting the head restraints,
push down on them and make sure
they are locked in position.
●Do not drive with the head restraints
removed.
Adjusting a head restraint verti-
cally
A
Page 156 of 516

1564-1. Before driving
4-1.Before driving
■Starting the engine
P.176
■Driving
1 With the brake pedal depressed,
shift the shift lever to D. ( P.180)
2 Release the parking brake.
(P.185)
If the parking brake is in automatic mode,
the parking brake is released automatically
when shifting the shift lever to any position
other than P. ( P.186)
3 Gradually release the brake pedal
and gently depress the accelerator
pedal to accelerate the vehicle.
■Stopping
1 With the shift lever in D, depress the
brake pedal.
2 If necessary, set the parking brake.
(P.185)
If the vehicle is to be stopped for an
extended period of time, shift the shift lever
to P or N. ( P.180)
■Parking the vehicle
1 With the shift lever in D, depress the
brake pedal.
2 Set the parking brake ( P.185),
and shift the shift lever to P
( P.180).
3 Press the engine switch to stop the
engine. 4
Lock the door, making sure that you
have the electronic key on your
person.
If parking on a hill, block the wheels as
needed.
■Starting off on a steep uphill
1 With the brake pedal depressed,
shift the shift lever to D. ( P.181)
2 Pull the parking brake switch and
parking brake is set manually.
(P.185)
3 Release the brake pedal and gently
depress the accelerator pedal to
accelerate the vehicle.
4 Press the parking brake switch and
parking brake is released manually.
■When starting off on a uphill
The hill-start assist control will activate.
( P.278)
■Driving in the rain
●Drive carefully when it is raining, because
visibility will be reduced, the windows
may become fogged-up, and the road
will be slippery.
●Drive carefully when it starts to rain,
because the road surface will be espe-
cially slippery.
●Refrain from high speeds when driving on
an expressway in the rain, because there
may be a layer of wa ter between the tires
and the road surface, preventing the
steering and brakes from operating prop-
erly.
■Engine speed while driving
In the following conditions, the engine
speed may become high while driving. This
is due to automatic up-shifting control or
down-shifting implementation to meet driv-
ing conditions. It does not indicate sudden
acceleration.
●The vehicle is judged to be driving uphill
or downhill
Driving the vehicle
The following procedures should be
observed to ensure safe driving:
Driving procedure
Page 176 of 516

1764-2. Driving procedures
4-2.Driving procedures
1Check that the parking brake is set.
2 Check that the shift lever is in P.
3 Firmly depress the brake pedal.
and a message will be displayed on
the multi-information display.
If it is not displayed, the engine cannot be
started.
4 Press the engine switch shortly and
firmly.
When operating the engine switch, one
short, firm press is enough. It is not neces-
sary to press and hold the switch.
The engine will crank until it starts or for up
to 30 seconds, whichever is less.
Continue depressing the brake pedal until
the engine is completely started.
The engine can be started from any engine
switch mode.
■Engine switch illumination
According to the situation, the engine
switch illumination operates as follows.
●When a door is opened, or the engine
switch mode is changed from ACCES-
SORY or IGNITION ON mode to off,
the engine switch illumination slowly
blinks.
●When depressing the brake pedal with
carrying the electronic key on your per-
son, the engine switch illumination rapidly
blinks.
●When the engine sw itch is in ACCES-
SORY or IGNITION ON mode, the
engine switch illumination illuminates.
■If the engine does not start
●The engine immobilizer system may not
have been deactivated. ( P.64)
Contact your Lexus dealer.
●Check that the shift leve r is securely set in
P. The engine may not start if the shift
lever is displaced out of P. “To Start Vehi-
cle, Put Shift Lever into P” will be dis-
played on the multi-information display.
■Electronic key battery depletion
P.94
■Conditions affecting operation
P.114
■Note for the entry function
P.115
■Steering lock function
●After turning the engine switch off and
opening and closing the doors, the steer-
ing wheel will be lock ed due to the steer-
ing lock function. Operating the engine
switch again automatically cancels the
steering lock.
●When the steering lock cannot be
released, “Steering Wheel Lock Press
Engine Switch while Turning Wheel” will
be displayed on the multi-information dis-
play.
Check that the shift lever is in P. Press the
engine switch shortly and firmly while
turning the steering wheel left and right.
Engine (ignition) switch
Performing the following opera-
tions when carryin g the electronic
key on your person starts the
engine or changes engine switch
modes.
Starting the engine
Page 350 of 516
3506-1. Maintenance and care
6-1.Maintenance and care
Working from top to bottom, liber-
ally apply water to the vehicle body,
wheel wells and underside of the
vehicle to remove any dirt and dust.
Wash the vehicle body using a
sponge or soft cloth, such as a
chamois.
For hard-to-remove marks, use car
wash soap and rinse thoroughly with
water.
Wipe away any water.
Wax the vehicle when the water-
proof coating deteriorates.
If water does not bead on a clean surface,
apply wax when the vehicle body is cool.
■Self-restoring coat
The vehicle body has a self-restoring coat-
ing that is resistant to small surface
scratches caused in a car wash etc.
●The coating lasts for 5 to 8 years from
when the vehicle is delivered from the
plant.
●The restoration time differs depending on
the depth of the scratch and outside tem-
perature.
The restoration time may become
shorter when the coating is warmed by
applying warm water.
●Deep scratches caused by keys, coins,
etc. cannot be restored.
●Do not use wax that contains abrasives.
■Automatic car washes
●Before washing the vehicle:
• Fold the mirrors
• Turn off the power back door
Start washing from the front of the vehicle.
Extend the mirrors before driving.
●Brushes used in automatic car washes
may scratch the vehicl e surface and harm
your vehicle’s paint.
●Rear spoiler may not be washable in
some automatic car washes. There may
also be an increased risk of damage to
vehicle.
■High pressure car washes
As water may enter the cabin, do not bring
the nozzle tip near the gaps around the
doors or perimeter of the windows, or spray
these areas continuously.
■When using a car wash
If the door handle becomes wet while the
electronic key is within the effective range,
the door may lock and unlock repeatedly. In
that case, follow the following correction
procedures to wash the vehicle:
●Place the key in a position 6 ft. (2 m) or
more separate from the vehicle while the
vehicle is being wash ed. (Take care to
ensure that the key is not stolen.)
●Set the electronic key to battery-saving
mode to disable the smart access system
with push-button start. ( P.114)
■Aluminum wheels
●Remove any dirt immediately by using a
neutral detergent.
●Wash detergent off with water immedi-
ately after use.
●To protect the paint from damage, make
sure to observe the following precau-
tions.
• Do not use acidic, alkaline or abrasive detergent
• Do not use hard brushes
• Do not use detergent on the wheels when they are hot, such as after driving or park-
ing in hot weather
■Bumpers
Do not scrub with abrasive cleaners.
Cleaning and protecting the
vehicle exterior
Perform cleaning in a manner
appropriate to each component
and its material.
Cleaning instructions
Page 427 of 516
4277-2. Steps to take in an emergency
7
When trouble arises
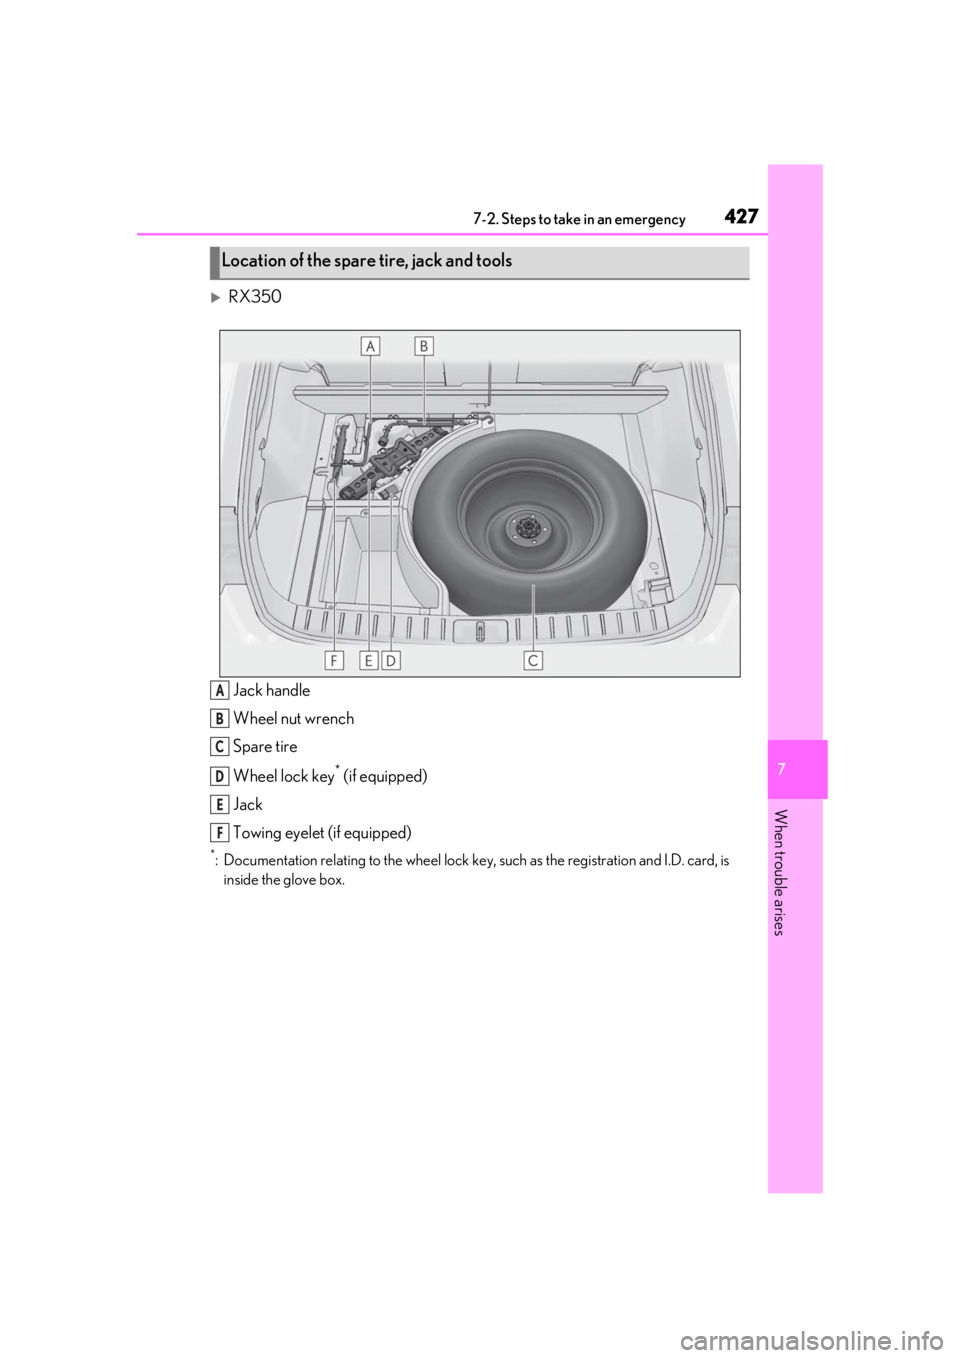
RX350Jack handle
Wheel nut wrench
Spare tire
Wheel lock key
* (if equipped)
Jack
Towing eyelet (if equipped)
*: Documentation relating to the wheel lock key, such as the registration and I.D. card, is
inside the glove box.
Location of the spare tire, jack and tools
A
B
C
D
E
F