2020 LEXUS RX350 rear view mirror
[x] Cancel search: rear view mirrorPage 255 of 516

2554-5. Using the driving support systems
4
Driving
Additionally, the function may not operate
normally when driving in extremely hot or
cold environments.■Rear side radar sensors
P.242
■Operation of the RCTA function
The RCTA function uses rear side radar sensors to detect vehicles approaching
from the right or left at the rear of the vehicle and alerts the driver of the presence
of such vehicles by flashing the outside rear view mirror indi cators and sounding a
buzzer.
Approaching vehicles
Detection areas of approaching vehicles
■RCTA icon display
When a vehicle approaching from the
right or left at the rear of the vehicle is
detected, the following will be dis-
played on the Center Display.
Example (Lexus parking assist mon-
itor) (if equipped): Vehicles are
approaching from both sides of the
vehicle
Example (Panoramic view monitor)
(if equipped): Vehicles are
approaching from both sides of the
vehicle
RCTA function
A
B
Page 296 of 516

2965-3. Using the air conditioning system and defogger
5-3.Using the air conditioning system and defogger
RX350Left-hand side temperature control switch
Automatic mode switch
Off switch
Fan speed decreases switch
Fan speed increases switch
DUAL switch
Right-hand side temp erature control switch
Outside/recirculated air mode switch
Air flow mode switch
Rear window defogger and outside rear view mirror defoggers switch
Windshield defogger switch
Front automatic air conditioning system
Air outlets and fan speed are automati cally adjusted according to the tem-
perature setting.
Press the “MENU” button on the Remote Touch, then select to display the
air conditioning control screen.
Vehicles with a 12.3-inch display: The air conditioning system can be displayed
and operated on the side display.
Air conditioning controls
A
B
C
D
E
F
G
H
I
J
K
Page 297 of 516

2975-3. Using the air conditioning system and defogger
5
Interior features
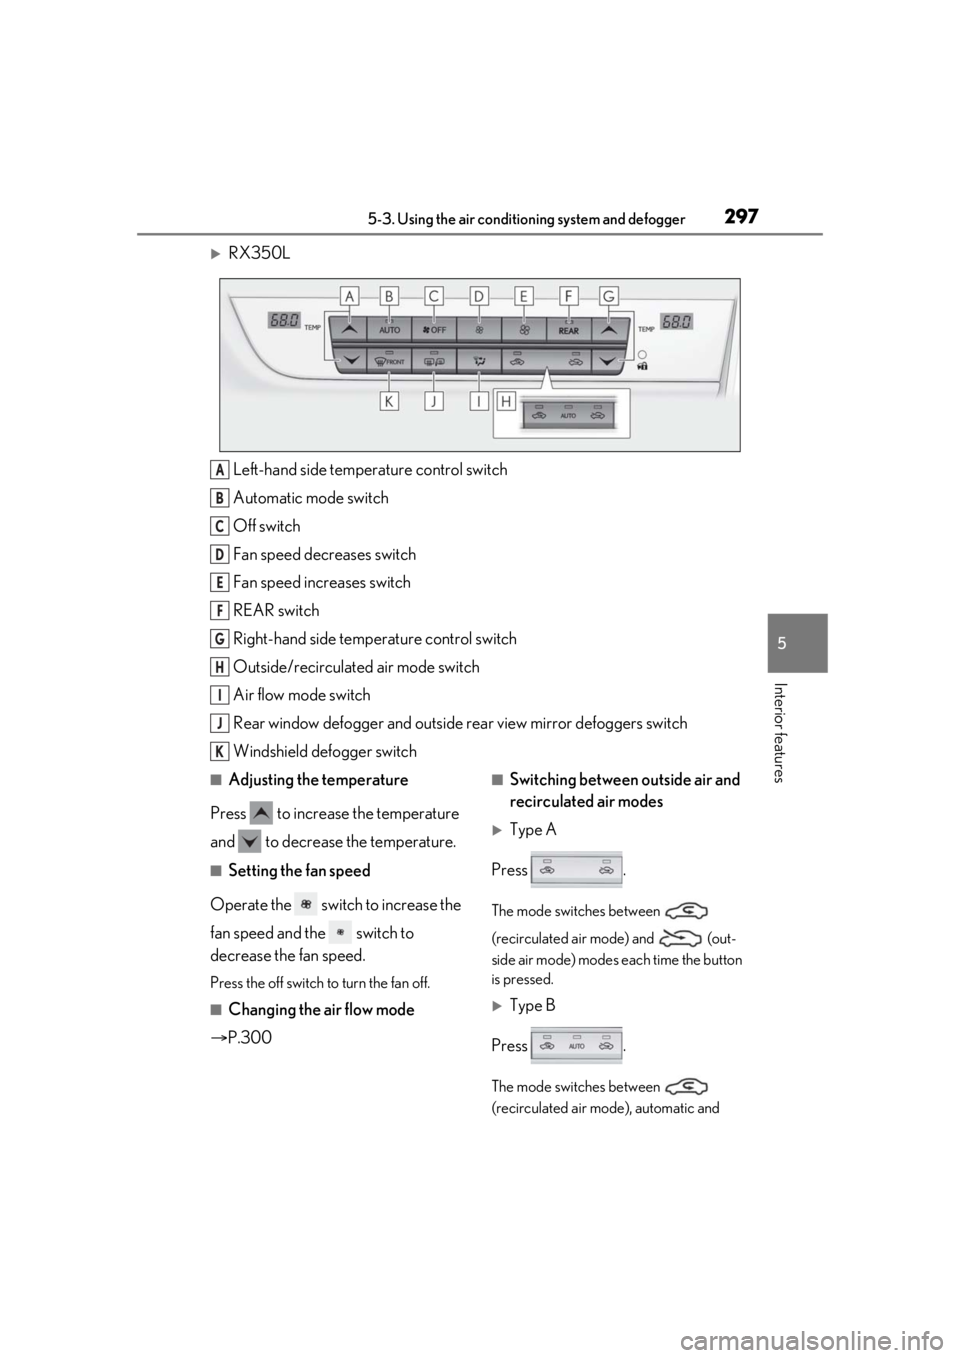
RX350L
Left-hand side temperature control switch
Automatic mode switch
Off switch
Fan speed decreases switch
Fan speed increases switch
REAR switch
Right-hand side temp erature control switch
Outside/recirculated air mode switch
Air flow mode switch
Rear window defogger and outside rear view mirror defoggers switch
Windshield defogger switch
■Adjusting the temperature
Press to increase the temperature
and to decrease the temperature.
■Setting the fan speed
Operate the switch to increase the
fan speed and the switch to
decrease the fan speed.
Press the off switch to turn the fan off.
■Changing the air flow mode
P.300
■Switching between outside air and
recirculated air modes
Type A
Press .
The mode switches between
(recirculated air mode) and (out-
side air mode) modes each time the button
is pressed.
Type B
Press .
The mode switches between
(recirculated air mode), automatic and
A
B
C
D
E
F
G
H
I
J
K
Page 298 of 516

2985-3. Using the air conditioning system and defogger
(outside air mode) modes each
time the button is pressed.
When the system is switched to automatic
mode, the air conditioning system operates
automatically.
■Defogging the windshield
Defoggers are used to defog the wind-
shield and front side windows.
Press the windshield defogger switch.
Set the outside/recirc ulated air mode but-
ton to outside air mode if the recirculated
air mode is used. (It may switch automati-
cally.)
To defog the windshield and the side win-
dows early, turn the air flow and tempera-
ture up.
To return to the previous mode, press the
windshield defogger switch again when the
windshield is defogged.
■Defogging the rear window and
outside rear view mirrors
Defoggers are used to defog the rear
window, and to remove raindrops, dew
and frost from the outside rear view
mirrors.
Press the rear window and outside rear
view mirror defoggers switch.
The defoggers will automatically turn off
after a period of time.
■Windshield wiper de-icer (if
equipped)
P.303
■When the outside temperature exceeds
75°F (24°C) and the air conditioning
system is on
●In order to reduce the air conditioning
power consumption, the air conditioning
system may switch to recirculated air mode automatically. This may also
reduce fuel consumption.
●Recirculated air mode is selected as a
default mode when the engine switch is
turned to IGNITION ON mode.
●It is possible to switch to outside air mode
at any time by pressing the outside/recir-
culated air mode switch.
■Fogging up of the windows
The windows will easily fog up when the
humidity in the vehicle is high. Selecting
“A/C” on will dehumidify the air from the
outlets and defog the windshield effectively.
●If you turn “A/C” off, the windows may fog
up more easily.
●The windows may fog up if the recircu-
lated air mode is used.
■When driving on dusty roads
Close all windows. If dust thrown up by the
vehicle is still drawn into the vehicle after
closing the windows, it is recommended
that the air intake mode be set to outside air
mode and the fan speed to any setting
except off.
■Outside/recirculated air mode
●Setting to the recirculated air mode tem-
porarily is recommended in preventing
dirty air from entering the vehicle interior
and helping to cool the vehicle when the
outside air temperature is high.
●Outside/recirculated air mode may auto-
matically switch depending on the tem-
perature setting or the inside
temperature.
■Registering air conditioning settings to
electronic keys (vehicles with driving
position memory)
●Unlocking the vehicle using an electronic
key and turning the engine switch to
IGNITION ON mode will recall that
key’s registered air conditioning settings.
●When the engine switch is turned off, the
current air conditioning settings will auto-
matically be registered to the electronic
key that was used to unlock the vehicle.
●The system may not operate correctly if
more than one electr onic key is in the
vicinity or if the smart access system with
Page 300 of 516

3005-3. Using the air conditioning system and defogger
■Main control screen
Using the touchpad of the Remote
Touch, select the button on the screen.
This system can also be operated by
the touch screen.
Vehicles with DUAL-ZONE climate
control
Sub menu
Selecting the sub menu item to switch the
main screen. : Display the air co nditioning control
screen
: Display the option control screen
Adjust the left side seat tempera-
ture setting
Adjust the fan speed setting
Select the air flow mode
: Air flows to the upper body
: Air flows to the upper body and feet
: Air flows to the feet
: Air flows to the feet and the wind-
shield defogger operates
Adjust the right side seat tempera-
ture setting
Function on/off indicators
When the function is on, the indicator illu-
minates on the control screen.
Sub function menu
When the sub function button on the
WARNING
■To prevent the windshield from fog-
ging up
Do not use the windshield defogger
switch during cool air operation in
extremely humid weather. The difference
between the temperature of the outside
air and that of the windshield can cause
the outer surface of the windshield to fog
up, blocking your vision.
■When the outside rear view mirror
defoggers are operating
Do not touch the outside rear view mir-
ror surfaces, as they can become very
hot and burn you.
NOTICE
■To prevent battery discharge
Do not leave the air conditioning system
on longer than necessary when the
engine is off.
■When repairing/replacing parts of
the air conditioning system
Have repair/replace ment performed by
your Lexus dealer.
When a part of the air conditioning sys-
tem, such as the evaporator, is to be
replaced, it must be replaced with a new
one.
Air conditioning control screen
A
B
C
D
E
F
G
Page 342 of 516

3425-6. Using the other interior features
■Before programming HomeLink®
During programming, it is possible
that garage doors, gates, or other
devices may operate. For this rea-
son, make sure that people and
objects are clear of the garage door
or other devices to prevent injury or
other potential harm.
It is recommended that a new bat-
tery be placed in the remote control
transmitter for more accurate pro-
gramming.
Garage door opener motors manu-
factured after 1995 may be
equipped with rolling code protec-
tion. If this is the case, you may need
a stepladder or other sturdy, safe
device to reach the “Learn” or
“Smart” button on the garage door
opener motor.
■Programming HomeLink®
Steps 1 through 3 must be performed
within 60 seconds, otherwise the indi-
cator light will stop flashing and pro-
gramming will not be able to be
completed.
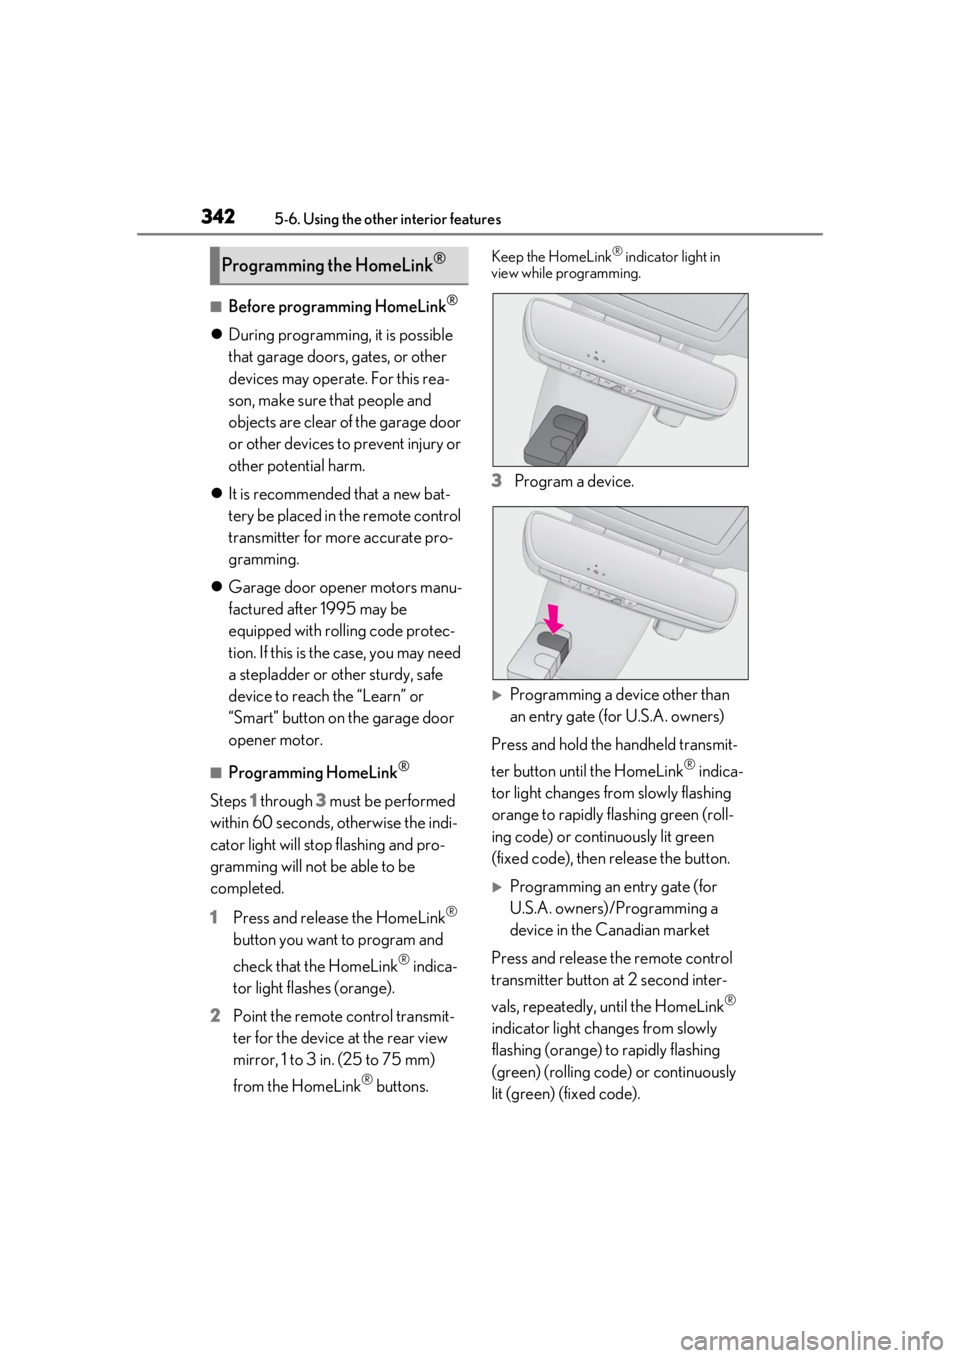
1 Press and release the HomeLink
®
button you want to program and
check that the HomeLink
® indica-
tor light flashes (orange).
2 Point the remote control transmit-
ter for the device at the rear view
mirror, 1 to 3 in. (25 to 75 mm)
from the HomeLink
® buttons.
Keep the HomeLink® indicator light in
view while programming.
3 Program a device.
Programming a device other than
an entry gate (for U.S.A. owners)
Press and hold the handheld transmit-
ter button until the HomeLink
® indica-
tor light changes from slowly flashing
orange to rapidly flashing green (roll-
ing code) or continuously lit green
(fixed code), then release the button.
Programming an entry gate (for
U.S.A. owners)/Programming a
device in the Canadian market
Press and release the remote control
transmitter button at 2 second inter-
vals, repeatedly, until the HomeLink
®
indicator light changes from slowly
flashing (orange) to rapidly flashing
(green) (rolling code) or continuously
lit (green) (fixed code).
Programming the HomeLink®
Page 346 of 516

3465-6. Using the other interior features
*:If equipped
To turn the compass on or off, press
and hold the switch for 3 seconds.
Directions are displayed as follows:
■Conditions unfavorable to correct
operation
The compass may not show the correct
direction in the following conditions:
●The vehicle is stopped immediately after
turning.
●The vehicle is on an inclined surface.
●The vehicle is in a place where the earth’s
magnetic field is subject to interference
by artificial magnetic fields (under-
ground car park/parking lot, under a
steel tower, between buildings, roof car
park/parking lot, near an intersection,
near a large vehicle, etc.).
●The vehicle has become magnetized.
(There is a magnet or metal object near
the inside rear view mirror.)
●The battery has been disconnected.
●A door is open.
Compass*
The compass on the inside rear
view mirror indicates the direction
in which the vehicle is heading.
Operation and displays
DisplayDirection
“N”North
“NE”Northeast
“E”East
“SE”Southeast
“S”South
“SW”Southwest
“W”West
“NW”Northwest
WARNING
■While driving the vehicle
Do not adjust the display. Adjust the dis-
play only when the vehicle is stopped.
NOTICE
■To avoid compass malfunctions
Do not place magnets or any metal
objects near the inside rear view mirror.
Doing this may cause the compass sen-
sor to malfunction.
■To ensure normal operation of the
compass
●Do not perform a circling calibration of
the compass in a place where the
earth’s magnetic field is subject to
interference by artificial magnetic
fields.
●During calibration, do not operate
electric systems (moon roof, pan-
oramic moon roof, power windows,
etc.) as they may interfere with the cal-
ibration.
Page 476 of 516

4768-2. Customization
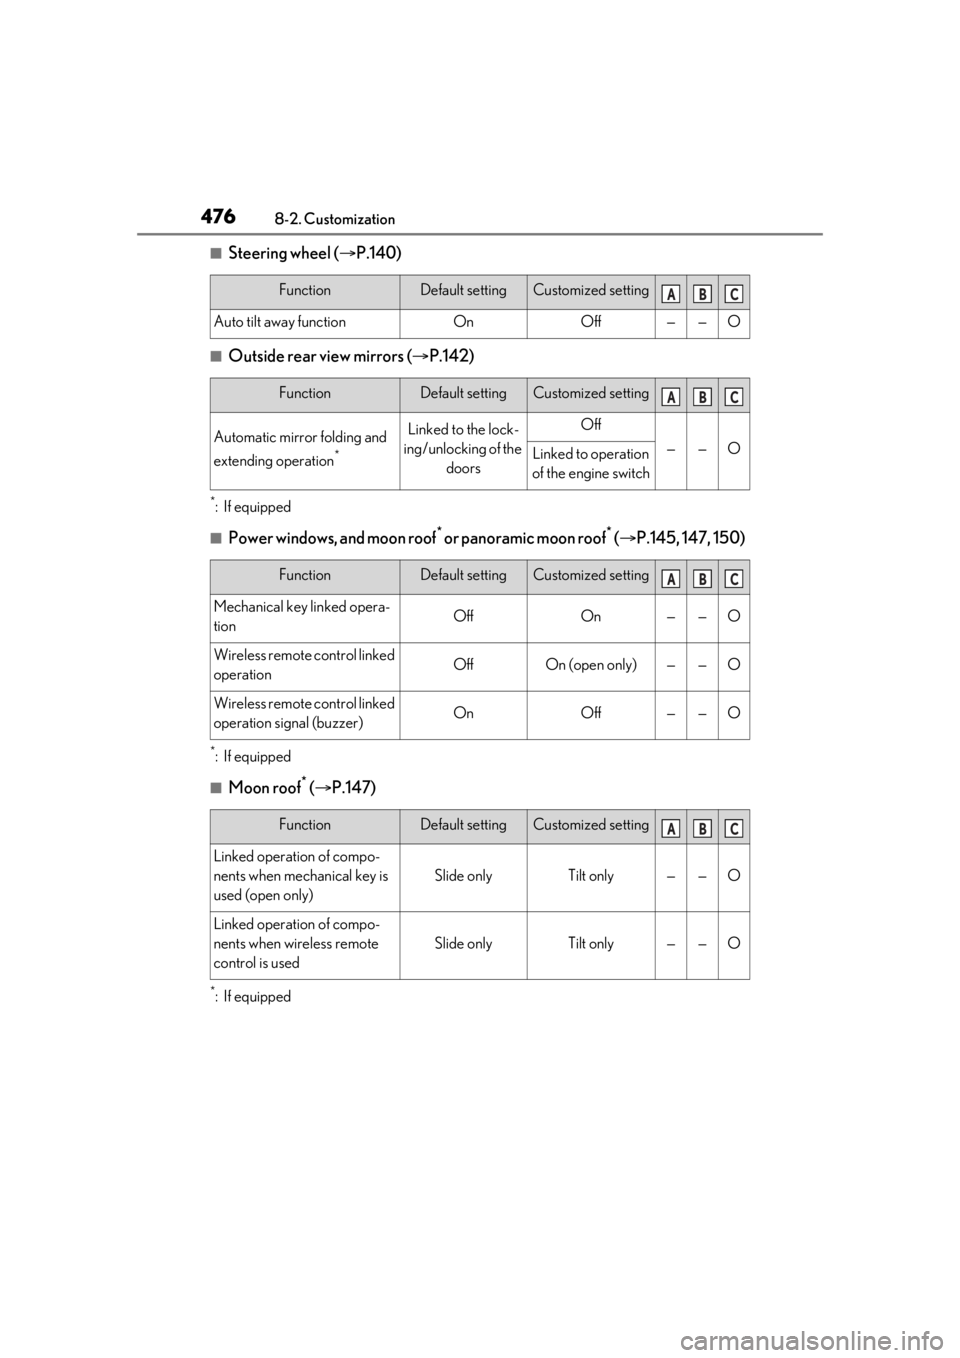
■Steering wheel (P.140)
■Outside rear view mirrors ( P.142)
*:If equipped
■Power windows, and moon roof* or panoramic moon roof* ( P.145, 147, 150)
*:If equipped
■Moon roof* ( P.147)
*:If equipped
FunctionDefault settingCustomized setting
Auto tilt away functionOnOff——O
FunctionDefault settingCustomized setting
Automatic mirror folding and
extending operation
*
Linked to the lock-
ing/unlocking of the doorsOff
——OLinked to operation
of the engine switch
FunctionDefault settingCustomized setting
Mechanical key linked opera-
tionOffOn——O
Wireless remote control linked
operationOffOn (open only)——O
Wireless remote control linked
operation signal (buzzer)OnOff——O
FunctionDefault settingCustomized setting
Linked operation of compo-
nents when mechanical key is
used (open only)
Slide onlyTilt only——O
Linked operation of compo-
nents when wireless remote
control is used
Slide onlyTilt only——O
ABC
ABC
ABC
ABC