2020 LEXUS RX350 ABS
[x] Cancel search: ABSPage 368 of 516
![LEXUS RX350 2020 Owners Manual 3686-3. Do-it-yourself maintenance
water. (Minimum temperature: -31°F
[-35°C])
Canada:
“Toyota Super Long Life Coolant” is a mix-
ture of 55% coolant and 45% deionized
water. (Minimum temperat LEXUS RX350 2020 Owners Manual 3686-3. Do-it-yourself maintenance
water. (Minimum temperature: -31°F
[-35°C])
Canada:
“Toyota Super Long Life Coolant” is a mix-
ture of 55% coolant and 45% deionized
water. (Minimum temperat](/manual-img/36/58031/w960_58031-367.png)
3686-3. Do-it-yourself maintenance
water. (Minimum temperature: -31°F
[-35°C])
Canada:
“Toyota Super Long Life Coolant” is a mix-
ture of 55% coolant and 45% deionized
water. (Minimum temperature: -44°F
[-42°C])
For more details about coolant, contact
your Lexus dealer.
■If the coolant level drops within a short
time of replenishing
Visually check the radiator, hoses, engine
coolant reservoir cap, drain cock and water
pump.
If you cannot find a leak, have your Lexus
dealer test the cap and check for leaks in
the cooling system.
Check the radiator and condenser and
clear away any foreign objects. If either of the above parts is extremely
dirty or you are not sure of their condi-
tion, have your vehicle inspected by
your Lexus dealer.
■Checking fluid level
The brake fluid level should be
between the “MAX” and “MIN” lines
on the tank.
■Adding fluid
Make sure to check the fluid type and
prepare the necessary item.
Fluid type
FMVSS No.116 DOT 3 or SAE J1703
brake fluid
Item
Clean funnel
■Brake fluid can absorb moisture from
the air
Excess moisture in the brake fluid can cause
a dangerous loss of braking efficiency. Use
WARNING
■When the engine is hot
Do not remove the engine coolant reser-
voir cap and radiator cap.
The cooling system may be under pres-
sure and may spray hot coolant if the cap
is removed, causing serious injuries, such
as burns.
NOTICE
■When adding coolant
Coolant is neither plain water nor
straight antifreeze. The correct mixture
of water and antifreeze must be used to
provide proper lubrication, corrosion
protection and cooling. Be sure to read
the antifreeze or coolant label.
■If you spill coolant
Be sure to wash it off with water to pre-
vent it from damagi ng parts or paint.
Checking the radiator and con-
denser
WARNING
■When the engine is hot
Do not touch the radiator or condenser
as they may be hot and cause serious
injuries, such as burns.
Checking and adding the brake
fluid
Page 400 of 516

4006-3. Do-it-yourself maintenance
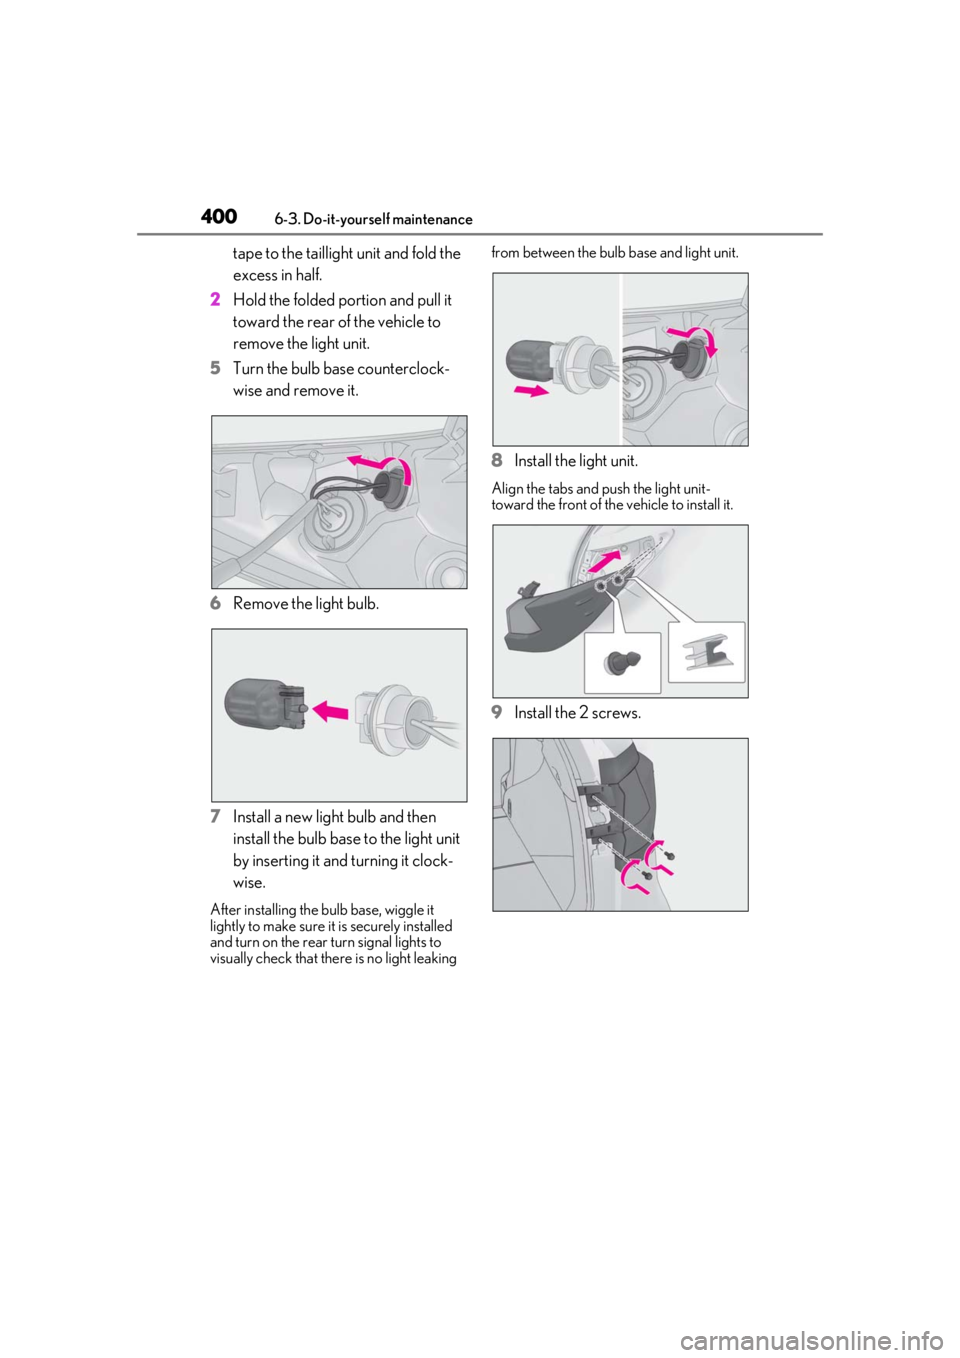
tape to the taillight unit and fold the
excess in half.
2 Hold the folded portion and pull it
toward the rear of the vehicle to
remove the light unit.
5 Turn the bulb base counterclock-
wise and remove it.
6 Remove the light bulb.
7 Install a new light bulb and then
install the bulb base to the light unit
by inserting it and turning it clock-
wise.
After installing the bulb base, wiggle it
lightly to make sure it is securely installed
and turn on the rear turn signal lights to
visually check that ther e is no light leaking from between the bulb
base and light unit.
8Install the light unit.
Align the tabs and push the light unit-
toward the front of the vehicle to install it.
9Install the 2 screws.
Page 401 of 516

4016-3. Do-it-yourself maintenance
6
Maintenance and care
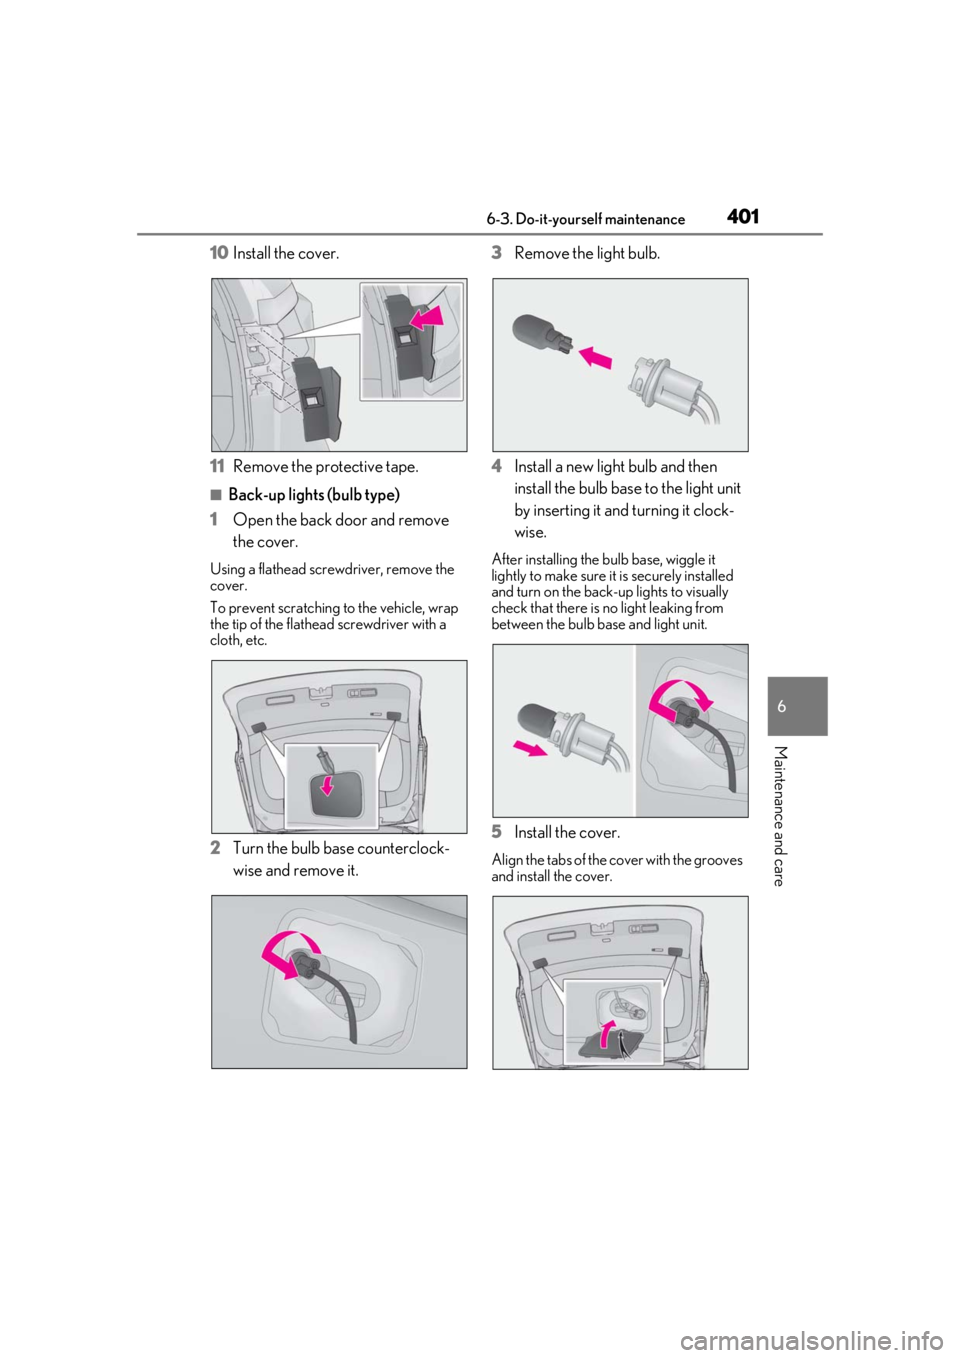
10Install the cover.
11 Remove the protective tape.
■Back-up lights (bulb type)
1 Open the back door and remove
the cover.
Using a flathead screwdriver, remove the
cover.
To prevent scratching to the vehicle, wrap
the tip of the flathead screwdriver with a
cloth, etc.
2 Turn the bulb base counterclock-
wise and remove it. 3
Remove the light bulb.
4 Install a new light bulb and then
install the bulb base to the light unit
by inserting it and turning it clock-
wise.
After installing the bulb base, wiggle it
lightly to make sure it is securely installed
and turn on the back-up lights to visually
check that there is no light leaking from
between the bulb ba se and light unit.
5Install the cover.
Align the tabs of the cover with the grooves
and install the cover.
Page 415 of 516

4157-2. Steps to take in an emergency
7
When trouble arises
■ABS warning light
■Brake Override System warning light/Drive-Start Control warning light*
(warning buzzer)
*: This light illuminates on the multi-information display.
■Electric power steering system warning light (warning buzzer)
Warning lightDetails/Actions
(U.S.A.)
or
(Canada)
Indicates a malfunction in:
The ABS; or
The brake assist system
Have the vehicle inspected by your Lexus dealer immediately.
Warning lightDetails/Actions
When a buzzer sounds:
Brake Override System is malfunctioning;
Drive-Start Control is operating;
Drive-Start Control is malfunctioning; or
PKSB (Parking Support Brake) (if equipped) is operating
Follow the instructions displayed on the multi-information display.
When a buzzer does not sound:
Brake Override System is operating
Release the accelerator pedal and depress the brake pedal.
Warning lightDetails/Actions
(red)
or
(yellow)
Indicates a malfunction in the EPS (Electric Power Steering) system
Have the vehicle inspected by your Lexus dealer immediately.
Page 420 of 516

4207-2. Steps to take in an emergency
The light will go off after several driving
trips.
If the light does not go off even after several
trips, contact your Lexus dealer as soon as
possible.
■Electric power steering system warning
light (warning buzzer)
When the battery charge becomes insuffi-
cient or the voltage temporarily drops, the
electric power steeri ng system warning
light may come on and the warning buzzer
may sound.
■When the tire pressure warning light
comes on
Inspect the tires to check if a tire is punc-
tured.
If a tire is punctured: P.426
If none of the tires are punctured:
Turn the engine switch off then turn it to
IGNITION ON mode. Check if the tire
pressure warning light comes on or blinks.
If the tire pressure wa rning light blinks for
1 minute then stays on
There may be a malfunction in the tire
pressure warning syst em. Have the vehicle
inspected by your Lexus dealer immedi-
ately.
If the tire pressure warning light comes
on
1 After the temperature of the tires has
lowered sufficiently, check the inflation
pressure of each tire and adjust them to
the specified level.
2 If the warning light does not turn off
even after several minutes have
elapsed, check that the inflation pres-
sure of each tire is at the specified level
and perform initialization. ( P.381)
If the warning light does not turn off several
minutes after the initia lization has been per-
formed, have the vehicle inspected by your
Lexus dealer immediately.
■The tire pressure warning light may
come on due to natural causes
The tire pressure wa rning light may come
on due to natural causes such as natural air
leaks and tire inflation pressure changes
caused by temperature. In this case, adjust-ing the tire inflation pressure will turn off the
warning light (after a few minutes).
■When a tire is replaced with a spare tire
The compact spare tire is not equipped with
a tire pressure warning valve and transmit-
ter. If a tire goes flat , the tire pressure warn-
ing light will not turn off even though the flat
tire has been replaced with the spare tire.
Replace the spare tire with the repaired tire
and adjust the tire inflation pressure. The
tire pressure warning light will go off after a
few minutes.
■Conditions that the tire pressure warn-
ing system may not function properly
P.374
■Customization
Some functions can be customized.
( P.470)
WARNING
■If both the ABS and the brake system
warning lights remain on
Stop your vehicle in a safe place immedi-
ately and contact your Lexus dealer.
The vehicle will become extremely
unstable during br aking, and the ABS
system may fail, which could cause an
accident resulting in death or serious
injury.
■When the electric power steering
system warning light comes on
When the light comes on yellow, the
assist to the power st eering is restricted.
When the light comes on red, the assist
to the power steering is lost and handling
operations of the steering wheel become
extremely heavy.
When steering wheel operations are
heavier than usual, grip the steering
wheel firmly and operate it using more
force than usual.
Page 436 of 516

4367-2. Steps to take in an emergency
7Confirm it is not loose after tighten-
ing:
1 Push and pull the tire
2 Try rotating
Visually check to ensure tire is not hung on
surrounding parts.
If looseness or misassembly exists, repeat
steps 2 to 7.
8 Repeat step 7, any time the tire is
lowered or disturbed.
9 Stow the jack and all tools.
■The compact spare tire
●The compact spare tire is identified by the
label “TEMPORARY USE ONLY” on
the tire sidewall. Use the compact spare
tire temporarily, and only in an emer-
gency.
●Make sure to check the tire inflation pres-
sure of the compact spare tire. ( P.457)
■When using the compact spare tire
As the compact spare tire is not equipped
with a tire pressure warning valve and trans-
mitter, low inflation pressure of the spare
tire will not be indicated by the tire pressure
warning system. Also, if you replace the
compact spare tire after the tire pressure
warning light comes on, the light remains
on.
■When the compact spare tire is
equipped
When driving with the compact spare tire
installed, the vehicle he ight will be different
than when driving with standard tires.
■If you have a flat front tire on a road cov-
ered with snow or ice
Install the compact spare tire on one of the
rear wheels of the vehicle. Perform the fol-
lowing steps and fit tire chains to the front
tires:
1 Replace a rear tire with the compact
spare tire.
2 Replace the flat front tire with the tire
removed from the rear of the vehicle.
3 Fit tire chains to the front tires.
WARNING
■When using the compact spare tire
●Remember that the compact spare tire
provided is specific ally designed for
use with your vehicle. Do not use your
compact spare tire on another vehicle.
●Do not use more than one compact
spare tire simultaneously.
●Replace the compact spare tire with a
standard tire as soon as possible.
●Avoid sudden acceleration, abrupt
steering, sudden br aking and shifting
operations that cause sudden engine
braking.
■When the compact spare tire is
attached
The vehicle speed may not be correctly
detected, and the following systems may
not operate correctly:
• ABS & Brake assist
•VSC
•TRAC
• Trailer Sway Control
•EPS
•VDIM (if equipped)
• Adaptive Variable Suspension System (if equipped)
• Dynamic radar cruise control with full-speed range
Page 487 of 516

4879-1. For owners
9
For owners
■Traitement des ceintures de sécu-
rité
Nettoyez avec un chiffon ou une
éponge humidifiés avec de l'eau savon-
neuse tiède. Vérifiez régulièrement
que les ceintures ne sont pas usées,
effilochées ou entaillées excessive-
ment.
Entretien et soin
WARNING
■Détérioration et usure des ceintures
de sécurité
Inspectez le système de ceintures de
sécurité régulière ment. Contrôlez
l'absence de coupures, d'effilochages et
de pièces desserrées. N'utilisez pas une
ceinture de sécurité endommagée avant
qu'elle ne soit remplacée. Une ceinture
de sécurité endommagée ne permet pas
de protéger un occupant de blessures
graves ou mortelles.
Page 503 of 516

503Alphabetical Index
Alphabetical Index
A
A/CAir conditioning filter ...............................386
Front automatic air conditioning system......................................................................... 296
Micro dust and pollen filter...................303
Rear automatic air conditioning system ......................................................................... 307
ABS (Anti-lock Brake System)...............277 Warning light .................................................415
ACA (Active Cornering Assist) ........... 278
Active Cornering Assist (ACA) ........... 278
Adaptive Front-lighting System (AFS) .192
Adaptive Variable Suspension System278
AFS (Adaptive Front-lighting System) .192
Air conditioning filter ................................. 386
Air conditioning system Air conditioning filter ...............................386
Front automatic air conditioning system......................................................................... 296
Micro dust and pollen filter...................303
Rear automatic air conditioning system ......................................................................... 307
Airbags Airbag operating conditions................... 33
Airbag precautions for your child ........ 36
Correct driving posture ............................ 25
Curtain shield airbag operating condi- tions .................................................................. 33
Curtain shield airbag precautions ....... 36
Front passenger occupant classification system ............................................................. 39
General airbag precautions ................... 36
Locations of airbags.................................... 30
Modification and disposal of airbags . 38
Side airbag operating conditions ......... 33
Side airbag precautions ............................ 36
Side and curtain shield airbags operating conditions...................................................... 33
Side and curtain shield airbags precau- tions .................................................................. 36 SRS airbags......................................................30
SRS warning light.........................................414
Alarm ....................................................................67 Warning buzzer ...........................................413
Anchor brackets ..................................... 46, 57
Antennas (smart acc ess system with
push-button start)........................................ 113
Anti-lock Brake System (ABS)...............277 Warning light ................................................ 415
Approach warning...................................... 235
Armrest............................................................ 335
Assist grips ..................................................... 335
Audio system-linked display ...................... 83
Automatic headlight leveling system ..... 191
Automatic High Beam ................................193
Automatic light control system............... 190
Automatic transmission ............................. 180 M mode ........................................................... 183
Paddle shift switches .......................182, 183
Auxiliary boxes ................................... 321, 324
Average fuel economy................................. 80
Average vehicle speed ................................ 80
AWD Control....................................................81
B
Back door .......................................................... 101
Back-up light Wattage ......................................................... 458
Back-up lights Replacing light bulbs .....................395, 401
Battery Battery checking ....................................... 369
If the battery is discharged .................... 443
Preparing and checking before winter..........................................................................283
Warning light .................................................414
Blind Spot Monitor (BSM)....................... 239
Bottle holders ................................................ 320
Brake Brake hold ......................................................188
Fluid...................................................... 368, 457
Parking brake ............................................... 185