2020 LEXUS LS500 light
[x] Cancel search: lightPage 349 of 516

3495-6. Using the other interior features
5
Interior features
■The power outlet can be used when
●12 V
The engine switch is in ACCESSORY or
IGNITION ON mode.
●120 VAC
The engine switch is in IGNITION ON
mode.
NOTICE
■To avoid damaging the power outlet
Close the power outlet lid when the
power outlet is not in use.
Foreign objects or liquids that enter the
power outlet may cause a short circuit.
■To prevent the fuse from being blown
●12 V
Do not use an accessory that uses more
than 12 V 10 A.
●120 VAC
Do not use a 120 VAC appliance that
requires more than 100 W. If a 120 VAC
appliance that consumes more than 100
W is used, the protection circuit will cut
the power supply.
■To prevent incorrect operation of the
vehicle
When turning the engine switch off,
make sure to disc onnect accessories
designed for charging , such as portable
chargers, power banks, etc. from the
power outlets.
If such an accessory is left connected, the
following may occur:
●The doors cannot be locked using the
smart access system with push-button
start or wireless remote control.
●The opening screen will be displayed
on the multi-information display.
●The interior lights, instrument panel
lights, etc. will illuminate.
■To prevent the battery from being dis-
charged
Do not use the power outlet longer than
necessary when the engine is not run-
ning.
■Appliances that may not operate
properly (120 VAC)
The following 120 VAC appliances may
not operate properly even if their power
consumption is under 100 W.
●Appliances with high initial peak watt-
age
●Measuring devices that process pre-
cise data
●Other appliances that require an
extremely stable power supply
Page 350 of 516

3505-6. Using the other interior features
1To set the visor in the forward posi-
tion, flip it down.
2
To set the visor in the side position,
flip down, unhook, and swing it to
the side.
3
To use the side extender, place the
visor in the side position, then slide
it backward.
Front
Slide the cover to open.
The vanity light turns on.
Rear
Press the button to open.
The vanity light turns on.
■To prevent battery discharge
If the vanity lights remain on when the
engine switch is turned off, the lights will go
off automatically after 20 minutes.
The rear door/rear quarter sunshades
can be extended and retracted using
the driver’s power window switch and
Rear Multi Operation Panel.
■From driver’s seat
Operate the driver’s power window
switch.
Sun visors
Vanity mirrors
NOTICE
■When not in use
Keep the rear vanity mirror closed.
■To prevent the battery from being dis-
charged
Do not leave the vanity lights on for
extended periods while the engine is
stopped.
Rear door/rear quarter sun-
shades (if equipped)
Page 351 of 516

3515-6. Using the other interior features
5
Interior features
Rear quarter sunshade (if
equipped)
Rear door sunshade
1 Extend
2 Retract
*
*: If the driver’s power window switch is
operated when a rear door sun-
shade/rear quarter sunshade is
retracted or being retracted, the rear
window will open.
■From rear seat
The rear seat power window switches
cannot be used to extend the rear door
sunshades/rear quarter sunshades.
Rear shade/lamp control screen
1 Display the home screen and then
touch “Shade/Lamp”. ( P.312)
2 To fully extend/retract a rear
door/rear quarter sunshade, touch
the respective button.
Shortcut screen
To fully extend/retract a rear door/rear
quarter sunshade, touch the respective
button.
■Operating conditions
●The engine switch is in IGNITION ON
mode.
●The rear side window s are fully closed.
■Operation of rear door sunshades/rear
quarter sunshades when extended
If a rear door power window switch is oper-
ated when the rear door sunshade/rear
quarter sunshade is extended, the rear door
sunshade/rear quarter sunshade will retract
while the rear window is opening.
■Operating the rear door/rear quarter
sunshades after turning the engine
switch off
The rear door/rear quarter sunshades can
be operated for a while even after the
engine switch is turned to ACCESSORY
mode or off.
However, they cannot be operated using
the driver’s power window switch after
either front door is opened.
■Jam protection function
If an object becomes caught between a rear
door sunshade and the window frame, the
rear door sunshade will stop and then
extend/retract slightly.
■When reconnecting the battery
The rear door/rear quarter sunshades will
always be retracted the first time the button
is pressed.
A
B
Page 354 of 516

3545-6. Using the other interior features
The HomeLink® wireless control sys-
tem in your vehicle has 3 buttons which
can be programmed to operate 3 dif-
ferent devices. Refer to the program-
ming methods on the following pages
to determine the method which is
appropriate for the device. HomeLink
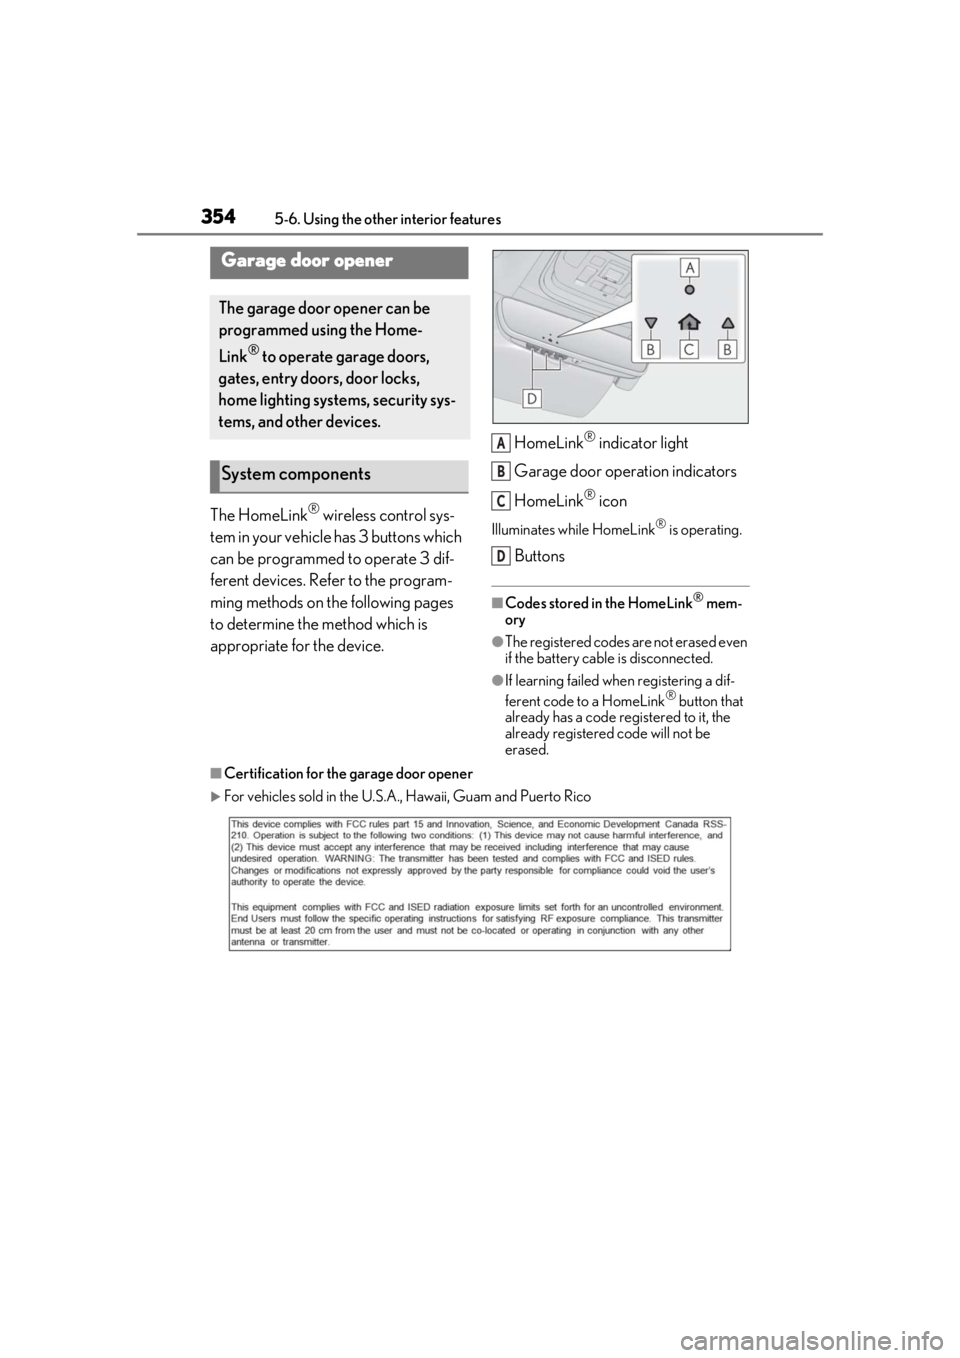
® indicator light
Garage door operation indicators
HomeLink
® icon
Illuminates while HomeLink® is operating.
Buttons
■Codes stored in the HomeLink® mem-
ory
●The registered codes are not erased even
if the battery cable is disconnected.
●If learning failed when registering a dif-
ferent code to a HomeLink® button that
already has a code registered to it, the
already registered code will not be
erased.
■Certification for the garage door opener
For vehicles sold in the U.S.A. , Hawaii, Guam and Puerto Rico
Garage door opener
The garage door opener can be
programmed using the Home-
Link
® to operate garage doors,
gates, entry doors, door locks,
home lighting systems, security sys-
tems, and other devices.
System components
A
B
C
D
Page 356 of 516

3565-6. Using the other interior features
a stepladder or other sturdy, safe
device to reach the “Learn” or
“Smart” button on the garage door
opener motor.
■Programming HomeLink®
Steps 1 through 3 must be performed
within 60 seconds, otherwise the indi-
cator light will stop flashing and pro-
gramming will not be able to be
completed.
1 Press and release the HomeLink
®
button you want to program and
check that the HomeLink
® indica-
tor light flashes (orange).
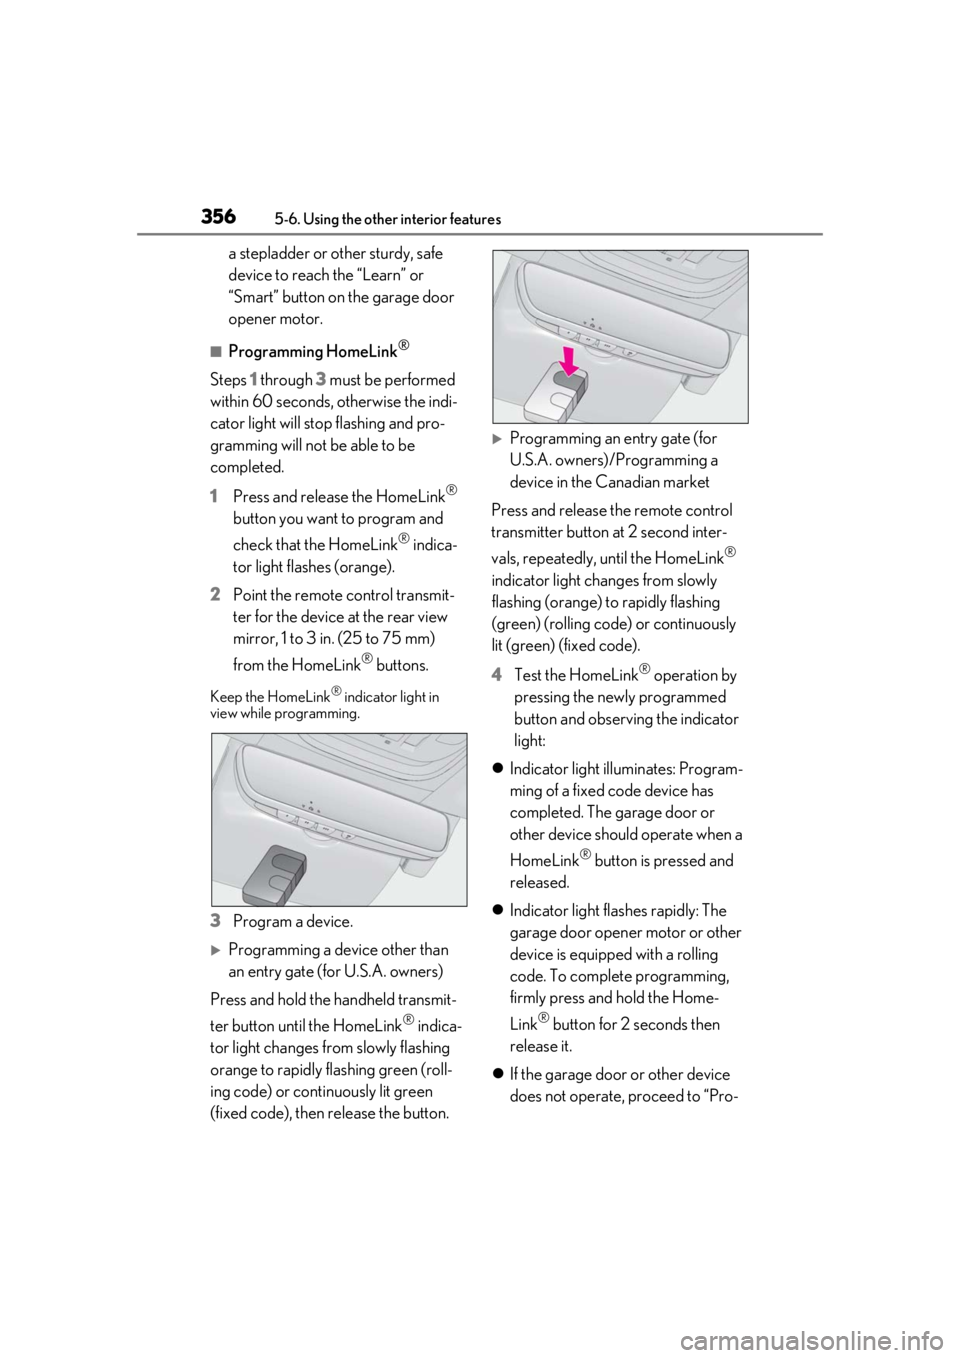
2 Point the remote control transmit-
ter for the device at the rear view
mirror, 1 to 3 in. (25 to 75 mm)
from the HomeLink
® buttons.
Keep the HomeLink® indicator light in
view while programming.
3 Program a device.
Programming a device other than
an entry gate (for U.S.A. owners)
Press and hold the handheld transmit-
ter button until the HomeLink
® indica-
tor light changes from slowly flashing
orange to rapidly flashing green (roll-
ing code) or continuously lit green
(fixed code), then release the button.
Programming an entry gate (for
U.S.A. owners)/Programming a
device in the Canadian market
Press and release the remote control
transmitter button at 2 second inter-
vals, repeatedly, until the HomeLink
®
indicator light changes from slowly
flashing (orange) to rapidly flashing
(green) (rolling code) or continuously
lit (green) (fixed code).
4 Test the HomeLink
® operation by
pressing the newly programmed
button and observing the indicator
light:
Indicator light illuminates: Program-
ming of a fixed code device has
completed. The garage door or
other device should operate when a
HomeLink
® button is pressed and
released.
Indicator light flashes rapidly: The
garage door opener motor or other
device is equipped with a rolling
code. To complete programming,
firmly press and hold the Home-
Link
® button for 2 seconds then
release it.
If the garage door or other device
does not operate, proceed to “Pro-
Page 357 of 516

3575-6. Using the other interior features
5
Interior features
gramming a rolling code system”.
5 Repeat the steps above to program
another device for any of the
remaining HomeLink
® buttons.
■Programming a rolling code sys-
tem
2 or more people may be necessary to
complete rolling code programming.
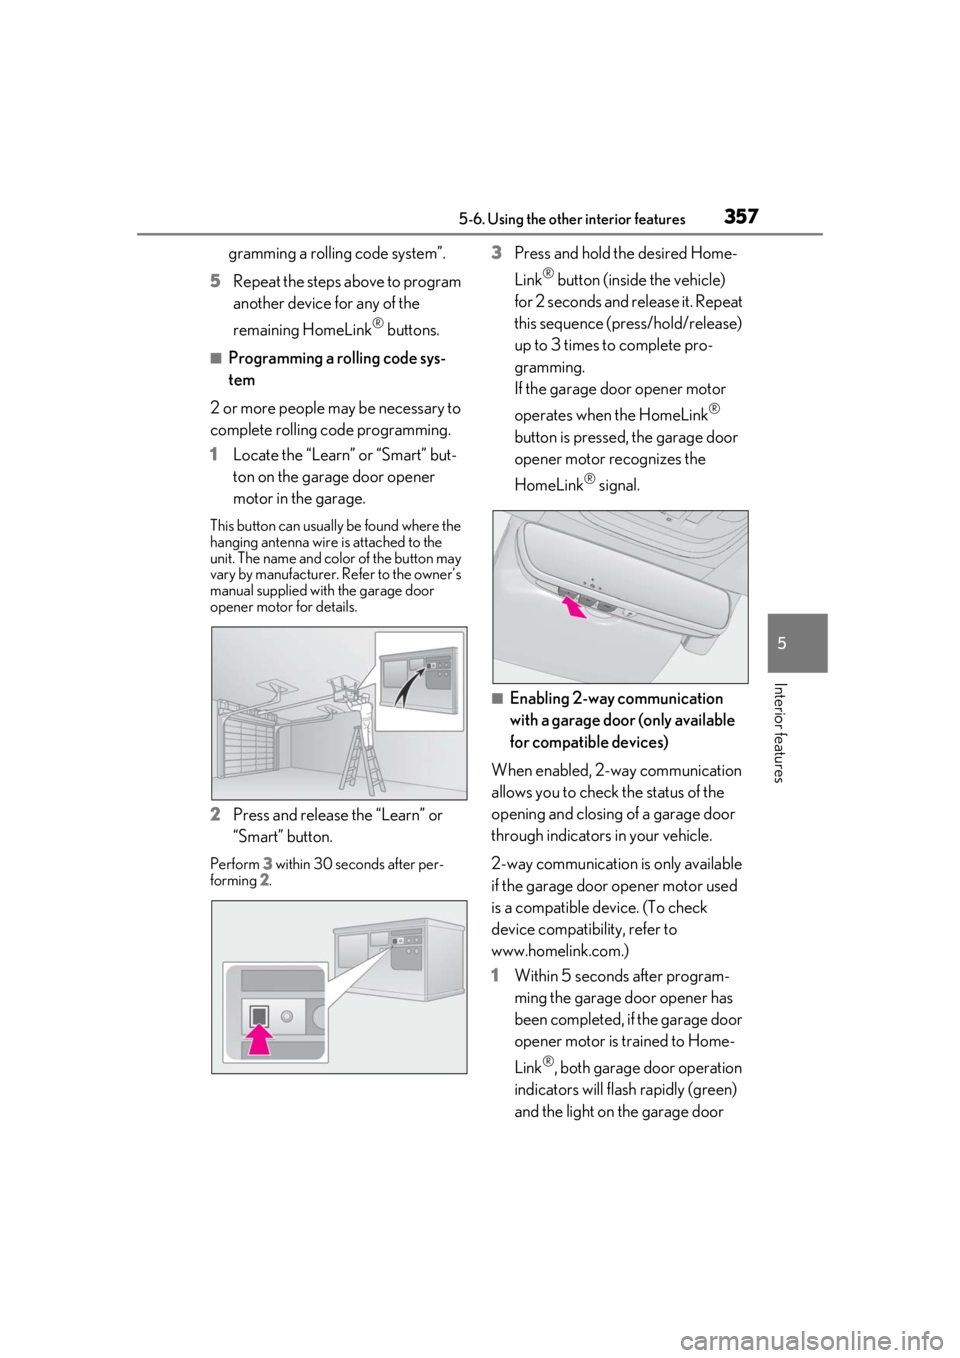
1 Locate the “Learn” or “Smart” but-
ton on the garage door opener
motor in the garage.
This button can usuall y be found where the
hanging antenna wire is attached to the
unit. The name and color of the button may
vary by manufacturer. Refer to the owner’s
manual supplied with the garage door
opener motor for details.
2 Press and release the “Learn” or
“Smart” button.
Perform 3 within 30 seconds after per-
forming 2.
3 Press and hold the desired Home-
Link
® button (inside the vehicle)
for 2 seconds and release it. Repeat
this sequence (press/hold/release)
up to 3 times to complete pro-
gramming.
If the garage door opener motor
operates when the HomeLink
®
button is pressed, the garage door
opener motor recognizes the
HomeLink
® signal.
■Enabling 2-way communication
with a garage door (only available
for compatible devices)
When enabled, 2-way communication
allows you to check the status of the
opening and closing of a garage door
through indicators in your vehicle.
2-way communication is only available
if the garage door opener motor used
is a compatible device. (To check
device compatibility, refer to
www.homelink.com.)
1 Within 5 seconds after program-
ming the garage door opener has
been completed, if the garage door
opener motor is trained to Home-
Link
®, both garage door operation
indicators will flash rapidly (green)
and the light on the garage door
Page 358 of 516

3585-6. Using the other interior features
opener motor will blink twice, indi-
cating that 2-way communication is
enabled.
If the indicators do not flash, perform 2 and
3 within the first 10 presses of the Home-
Link
® button after programming has been
completed.
2 Press a programmed HomeLink®
button to operate a garage door.
3 Within 1 minute of pressing the
HomeLink
® button, after the
garage door operation has
stopped, press the “Learn” or
“Smart” button on the garage door
opener motor. Within 5 seconds of
the establishment of 2-way com-
munication with the garage door
opener, both garage door opera-
tion indicators in the vehicle will
flash rapidly (green) and the light
on the garage door opener motor
will blink twice, indicating that
2-way communication is enabled.
■Reprogramming a single Home-
Link
® button
When the following procedure is per-
formed, buttons which already have
devices registered to them can be
overwritten:
1 With one hand, press and hold the
desired HomeLink
® button.
2 When the HomeLink
® indicator
starts flashing (orange), continue to
hold the HomeLink
® button and
perform “Programming Home-
Link
®” 1 (it takes 20 seconds for the HomeLink
® indicator to start
flashing).
■Before programming
●Install a new battery in the transmitter.
●The battery side of the transmitter must
be pointed away from the HomeLink®.
Press the appropriate HomeLink®
button. The HomeLink
® indicator light
should turn on.
The status of the opening and closing
of a garage door is shown by the indi-
cators.
Opening
Closing
This function is only available if the garage
door opener motor used is a compatible
device. (To check device compatibility,
refer to www.homelink.com.)
Operating HomeLink®
ColorStatus
Orange (flashing)Currently open- ing/closing
GreenOpening/closing has completed
Red (flashing)Feedback signals
cannot be received
A
B
Page 359 of 516

3595-6. Using the other interior features
5
Interior features
The indicators can operate within
approximately 820 ft. (250 m) of the
garage door. However, if there are
obstructions between the garage door
and the vehicle, such as houses and
trees, feedback signals from the
garage door may not be received.
To recall the previous door operation
status, press and release either Home-
Link
® buttons and or and simultaneously. The
last recorded status will be displayed
for 3 seconds.
Press and hold the 2 outside buttons
for 10 seconds until the HomeLink
®
indicator light changes from continu-
ously lit (orange) to rapidly flashing
(green).
If you sell your vehicle, be sure to erase the
programs stored in the HomeLink
® mem-
ory.
Erasing the entire HomeLink®
memory (all three codes)