Page 9 of 94
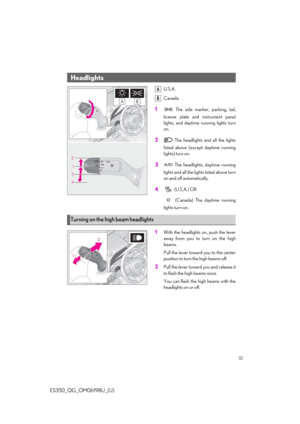
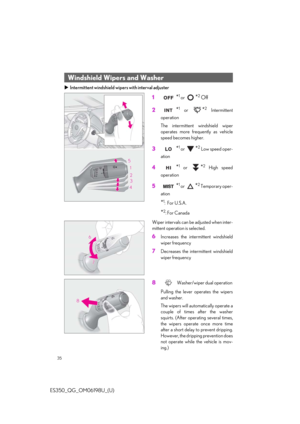
9
ES350_QG_OM06198U_(U)
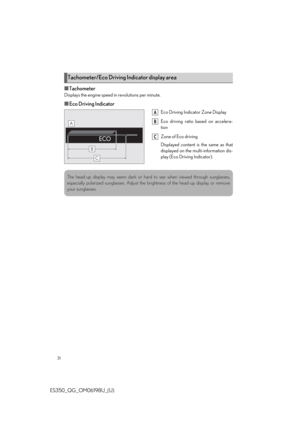
■Interior
SRS airbags*
Floor mats ..................................................................................................................... .P.11
Front seats ................................................................................................................... P .15
Head restraints
*
Seat belts*
Inside lock buttons ................................................................................................... P.82
Console box
*
Cup holder*
Assist grips*
*
: Refer to the “OWNER’S MANUAL”.
A
B
C
D
E
F
G
H
I
Page 10 of 94
10
ES350_QG_OM06198U_(U)
■Ceiling
Interior lights*1
Personal lights*1
Moon roof switches*1, 2
Panoramic moon roof switches*1, 2
“SOS” button*2.........................................................................................................P.77
Door-linked interior light switch
*1
Vanity mirrors*1
Sun visors*1
Inside rear view mirror*1
Garage door opener buttons................................................................................ P.73
*1: Refer to the “OWNER’S MANUAL”.
*2: If equipped
A
B
C
D
E
F
G
H
I
Page 11 of 94
11
ES350_QG_OM06198U_(U)
1Insert the retaining hooks (clips) into
the floor mat eyelets.
2Turn the upper knob of each retaining
hook (clip) to secure the floor mats in
place.
Always align the marks .
The shape of the retaining hooks (clips) may di ffer from that shown in the illustration.
Floor Mat Installation
Use only floor mats designed specifically for vehicles of the same model and model year
as your vehicle. Fix them securely in place onto the carpet.
A
Page 12 of 94
12
ES350_QG_OM06198U_(U)
●Smart access system with push-button
start ( P.13)
● Wireless remote control
To take out the mechanical key, push the
release button and take the key out.
The mechanical key can only be inserted in
one direction, as the key only has grooves
on one side. If the key cannot be inserted in
a lock cylinder, turn it over and re-attempt
to insert it.
After using the mechani cal key, store it in
the electronic key. Carry the mechanical
key together with the electronic key. If the
electronic key battery is depleted or the
entry function does not operate properly,
you will need the mechanical key.
Locks the doors
Unlocks the doors
Opens the windows and moon roof (if
equipped) or panora mic moon roof (if
equipped) (press and hold)
*
Opens the trunk
Sounds the alarm
*: This setting must be customized at your
Lexus dealer.
Keys
Electronic key
Mechanical key
Wireless remote control
A
B
C
D
E
Page 13 of 94
13
ES350_QG_OM06198U_(U)
1Grip the driver’s door handle to unlock
the door. Holding the driver’s door
handle for approximately 2 seconds
unlocks all the doors. Grip the passen-
ger’s door handle to unlock all the
doors.
*
Make sure to touch the sensor on the
back of the handle.
The doors cannot be unlocked for
3 seconds after the doors are locked.
*: The door unlock settings can be
changed.
2Touch the lock sensor (the indentation on the upper part of the door handle) to lock all
the doors.
Check that the door is securely locked.
Smart Access System with Push-button Start
The following operations can be performed simply by carrying the electronic key on your
person, for example in your pocket. The driver should always carry the electronic key.
For details on starting the engine, see page 16.
Unlocking and locking the doors from the outside
Page 14 of 94
 14
ES350_QG_OM06198U_(U)
■Using the outside button
Press the button.
When all the doors are unlocked using one
of the following methods, the trunk can be
opened without the electronic key:
•Entry")
14
ES350_QG_OM06198U_(U)
■Using the outside button
Press the button.
When all the doors are unlocked using one
of the following methods, the trunk can be
opened without the electronic key:
•Entry function
• Wireless remote control
• Door lock switches
• Automatic door unlocking system
• Mechanical key
■Using the Hands Free Power Trunk Lid (vehicles with power trunk lid)
1
While carrying an electronic ke y, stand within the smart access system with push-but-
ton start operation range, approximately 11.8 to 19.7 in. (30 to 50 cm) from the rear
bumper.
Kick sensor
Hands Free Power Trunk Lid operation
detection area
Smart access system with push-button
start operation detection area
2Perform a kick operation by moving your foot to within approximately 3.9 in. (10 cm) of
the rear bumper and then pulling it back.
Kick sensor
Hands Free Power Trunk Lid operation
detection area
3When the kick sensor detects that your foot is pulled back, a buzzer will sound and the
trunk will automatically fully open.
Opening the trunk
A
B
C
A
B
For details on what to do when the electronic key does not operate properly, see page 89.
Page 15 of 94
15
ES350_QG_OM06198U_(U)
Seat position adjustment
Seatback angle adjustment
Seat cushion (front) angle adjustment
Vertical height adjustment
Lumbar support adjustment
Pelvic support adjustment (if
equipped)
Seat cushion length adjustment (if
equipped)
Front Seats
Adjustment procedure
A
B
C
D
E
F
G
Page 16 of 94
16
ES350_QG_OM06198U_(U)
1Press the parking brake switch to
check that the parking brake is set.
( P.23)
Parking brake indicator will come on.
2Check that the shif t lever is in P
3Firmly depress the brake pedal.
and a message will be dis-
played on the multi-information dis-
play. If it is not displayed, the engine
cannot be started.
4Press the engine switch shortly and firmly.
When operating the engine switch, one short, firm press is enough. It is not necessary
to press and ho ld the switch.
The engine will crank until it starts or for up to 30 seconds, whichever is less. Continue
depressing the brake pedal until the engine is completely started.
The engine can be started from any engine switch mode.
Engine (Ignition) Switch
Performing the following operations when carrying the electronic key on your person
starts the engine or changes engine switch modes.
Starting the engine


 9
ES350_QG_OM06198U_(U)
■Interior
SRS airbags*
Floor mats ..................................................................................................................... .P.11
Front seats ....")
 10
ES350_QG_OM06198U_(U)
■Ceiling
Interior lights*1
Personal lights*1
Moon roof switches*1, 2
Panoramic moon roof switches*1, 2
“SOS” button*2....................................................")
 11
ES350_QG_OM06198U_(U)
1Insert the retaining hooks (clips) into
the floor mat eyelets.
2Turn the upper knob of each retaining
hook (clip) to secure the floor mats in
place.
Always align the marks")
 12
ES350_QG_OM06198U_(U)
●Smart access system with push-button
start ( P.13)
● Wireless remote control
To take out the mechanical key, push the
release button and take the key out.
The mechanic")
 13
ES350_QG_OM06198U_(U)
1Grip the driver’s door handle to unlock
the door. Holding the driver’s door
handle for approximately 2 seconds
unlocks all the doors. Grip the passen-
ger’s door handle")
 15
ES350_QG_OM06198U_(U)
Seat position adjustment
Seatback angle adjustment
Seat cushion (front) angle adjustment
Vertical height adjustment
Lumbar support adjustment
Pelvic support adjustment (if
equ")
 16
ES350_QG_OM06198U_(U)
1Press the parking brake switch to
check that the parking brake is set.
( P.23)
Parking brake indicator will come on.
2Check that the shif t lever is in P
3Firmly depress t")