Page 41 of 52

39ALWAYS CHECK THE OWNER’S MANUAL FOR COMPLETE OPER ATING INFORMATION AND SAFET Y WARNINGS *IF EQUIPPED †LEGAL DISCL AIMERS ON BACK INSIDE COVER
OTHER KEY FEATURES
Map/Room LampsPanoramic Sunroof Operation
with Power Sunshade*Automatic turn off function*
The interior lights automatically turn off approximately 30
seconds after the ignition or Engine Start /Stop button* is OFF
Map Lamp/Room Lamp Operation
Push the lens A to turn the map lamp ON/OFF This light
produces a spot beam for convenient use as a map lamp or
as a personal lamp for the driver or the front passenger
Front/Rear Room Lamps Button – Press button B
to turn the front and rear room lamps on and off
Door Mode Button – Press button C, to enable or disable
Door Mode In Door Mode, the map and room lamps turn on
when any door is opened When all doors are locked or the
ignition is on, the map and room lamp will turn off immediately
Rear Room Lamps – Press the button D to turn the rear
passenger lamp ON/OFF
The sunroof operation is controlled through a
multidirectional switch/lever The ignition or Engine
Start /Stop button* needs to be in the
ON position to operate the sunroof
To slide the sunshade and sunroof:
• Auto Open: Slide the lever E backward to
the farthest position and release
• Auto Close (sunroof only): Slide the lever E
forward to the farthest position and release
To slide the sunshade only:
• Open: Slide the lever E partially backward
to the first detent position and release
• Auto Close: Slide the lever E partially forward to
the first detent position and release
To slide the sunroof (with sunshade open):
• Open: Slide the lever E backward to the first detent position and release
• Close: Slide the lever E forward to the first detent position and release to close
sunroof glass only Slide the lever backward to the farthest position
and release to close sunroof glass and sunshade
To tilt the sunroof:
• Raise: Push lever E upward
• Lower: Push lever E forward
• When doors are unlocked by the Smart Key, the lamp turns ON for approximately 30 seconds
• If your vehicle is equipped with the theft alarm system, the interior lights automatically turn off approximately 3 seconds after the system is in armed stage
• Using interior lights for an extended period of time may cause battery discharge
QUICK TIP
To stop the sunroof/sunshade at any position, push or pull the sunroof control lever in any direction
QUICK TIP
REMINDERS:
• Sunshade needs to remain OPEN while sunroof is open
• Sunshade cannot slide when the sunroof is in the tilt position or tilt while in an open or slide position
• Do not adjust the sunroof or sunshade while driving This could result in loss of control of the vehicle
AA
BCE
D
( Type B)
Sunroof Operation Video
To view a video on your mobile device, snap this QR Code or visit the listed website
Refer to page 2 for more information
www.youtube.com/KiaFeatureVideos
QR CODE
( Type A )
Page 42 of 52

40SPORTAGE FEATURES & FUNCTIONS GUIDE*IF EQUIPPED †LEGAL DISCL AIMERS ON BACK INSIDE COVER
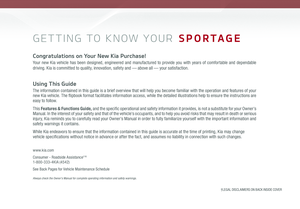
Opening from Outside the Vehicle:
To open Power Liftgate automatically, press the Rear Hatch Release button A
(next page) on exterior of the Liftgate
Automatically close by pressing the Power Liftgate Close button B
Opening from Inside the Vehicle:
Press and hold the Power Liftgate Open/Close button C to automatically open/
close the Liftgate
Smart Key:
To open the Power Liftgate, press and hold the Liftgate button D until the Liftgate
begins opening Press again to close
REMINDER: Pulling the Rear Hatch upward by the handle or pressing the button a second time will interrupt the automatic opening of the Power Liftgate
Power Liftgate Opening Height Adjustment
Adjust the liftgate height opening to suit user's preference The height setting
of a fully opened liftgate can be adjusted by the following steps:
1 Position the liftgate manually to the preferred height
2 Press Power Liftgate Close button B more than 3 seconds
3 A system beep will sound twice indicating the height setting has been saved
The liftgate will then open to the set height To change setting again, repeat
steps 1-3
REMINDER: Ensure objects and people are out of the way when operating the power liftgate
HOLD
C
D
OTHER KEY FEATURES
Power Liftgate*†1 6
(Located on Liftgate inside lip near latch)
(Buttons located on Driver's Panel)
Power Liftgate Opening Height Adjustment Video
To view a video on your mobile device, snap this QR Code or visit the listed website
Refer to page 2 for more information
www.youtube.com/KiaFeatureVideos
QR CODE
B
Page 43 of 52

41
OTHER KEY FEATURES
ALWAYS CHECK THE OWNER’S MANUAL FOR COMPLETE OPER ATING INFORMATION AND SAFET Y WARNINGS *IF EQUIPPED †LEGAL DISCL AIMERS ON BACK INSIDE COVER
REMINDERS:
•All doors are closed and locked after about 15 seconds
•The Smart Power Liftgate feature will not operate when:
- The doors are recently closed and locked, and the Smart Key is still detected after 15 seconds near the vehicle or within 60 inches of the door handles
- A door is not locked or closed
- The Smart Key is in the vehicle
•
Press any button on the Smart Key fob during the Detect and Alert stage to deactivate the Smart Power Liftgate function
•Ensure obstacles and people are out of the way of the liftgate
Smart Power Liftgate Video
To view a video on your mobile device, snap this QR Code or visit the listed website
Refer to page 2 for more information
www.youtube.com/KiaFeatureVideos
QR CODE
• During the Smart Power Liftgate alert, the Smart Power Liftgate can be deactivated with the Smart Key by pressing any button on the key fob
• The open height can be adjusted For information on how to set open height, see your Owner's Manual
QUICK TIPS
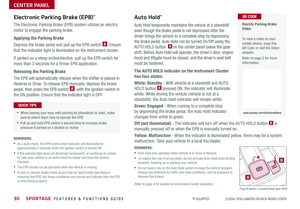
HOLD
A
Liftgate Release Button
(for manual liftgate)
Smart Power Liftgate*†1 6
Located underneath the rear liftgate hatch With
liftgate unlocked, press the Liftgate Release Button B and pull the liftgate up by the handle to open
• The liftgate must be unlocked before it can be opened by the Liftgate Release Button
• The liftgate unlocks automatically and can then be opened, when the Smart Key fob* is within close proximity to the vehicle
QUICK TIPS
HOLD
(Liftgate release button)
When the Smart Key fob is on your person and you are near the
back of the vehicle, within close proximity, the hazard lights will
blink and a chime will sound for about 3 seconds as an alert that
the Smart Power Liftgate is about to open Then the alert system
will blink and chime two
additional times before
opening the Smart Power
Liftgate
The Smart Power Liftgate
feature is off by default To
enable the Smart Power
Liftgate, go to User Settings
in the LCD Instrument
Cluster modes
B
Page 44 of 52
*†7
The DAW system is designed to")
42SPORTAGE FEATURES & FUNCTIONS GUIDE
OTHER KEY FEATURES
*IF EQUIPPED †LEGAL DISCL AIMERS ON BACK INSIDE COVER
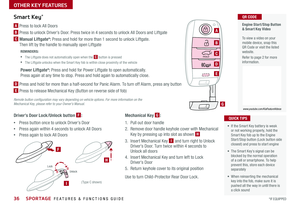
Driver Attention Warning (DAW)*†7
The DAW system is designed to alert the driver if it detects inattentive driving practices and, in certain
situations, can give a warning signal to take a break
The DAW System is set to OFF by default To turn the DAW System ON, turn the ignition on and then
select User Settings in the LCD Display on the Instrument Cluster Then go to Driving Assist and select
Driver Attention Warning Set the DAW System to Normal or High Sensitivity
Driver Attention Warning (DAW) System modes:
OFF: The Driver Attention Warning system is deactivated A
Normal Sensitivity: The Driver Attention Warning system alerts the driver of his/her inattentive
driving practices
High Sensitivity: The Driver Attention Warning system alerts the driver of his/her inattentive
driving practices faster than Normal mode
If the DAW System is activated, the DAW information will appear on the LCD Display B when you select
the ASSIST mode
A message, “Consider taking a break,” appears on the LCD display and a warning sounds to suggest the
driver to take a break when the driver’s attention level is below one bar C
REMINDERS:
•The set-up of the DAW System will be maintained, as selected, when the ignition is cycled
•
When activated, the DAW System does not display “Consider taking a break” message when the total trip driving time is less than 10 minutes
•
The DAW System will enter a standby mode if the camera does not detect the lanes and/or the driving speed remains under 40 mph
Attention Alert
System Off
Last Break ——:——Attention Level
LOW HIGH
Last Break 05:27 Attention Level
LOW
HIGH
Level Time 05:27
Consider taking a break
22.4
°C4025km
Attention Alert System Off
Last Break ——:——Attention Level
LOW HIGH
Last Break 05:27
Attention Level
LOWHIGH
Level Time 05:27
Consider taking a break
22.4
°C4025km
Attention Alert System Off
Last Break ——:—— Attention Level
LOW
HIGH
Last Break 05:27
Attention Level
LOWHIGH
Level Time 05:27
Consider taking a break
22.4
°C4025km
BCA
Driver Attention Warning is not a substitute for safe driving and may not detect all instances of inattentive driving practices. Failure to pay attention to travel conditions and vehicle operation could result in loss of vehicle control. Always drive safely and use caution.
Page 45 of 52

*IF EQUIPPED 43ALWAYS CHECK THE OWNER’S MANUAL FOR COMPLETE OPER ATING INFORMATION AND SAFET Y WARNINGS
OTHER KEY FEATURES
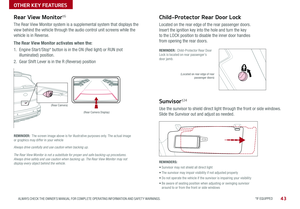
Child-Protector Rear Door Lock
Located on the rear edge of the rear passenger doors
Insert the ignition key into the hole and turn the key
to the LOCK position to disable the inner door handles
from opening the rear doors
REMINDER: Child-Protector Rear Door Lock is located on rear passenger’s door jamb
Sunvisor†24
Use the sunvisor to shield direct light through the front or side windows
Slide the Sunvisor out and adjust as needed
(Located on rear edge of rear passenger doors)
REMINDERS:
• Sunvisor may not shield all direct light
• The sunvisor may impair visibility if not adjusted properly
• Do not operate the vehicle if the sunvisor is impairing your visibility
• Be aware of seating position when adjusting or swinging sunvisor around to or from the front or side windows
REMINDER: The screen image above is for illustrative purposes only The actual image or graphics may differ in your vehicle
(Rear Camera)
(Rear Camera Display)
P
R
N
DSHIFTL OCK
RELEASE
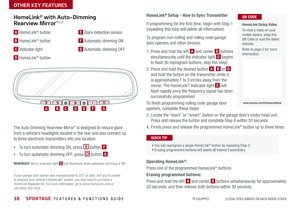
Rear View Monitor†6
The Rear View Monitor system is a supplemental system that displays the
view behind the vehicle through the audio control unit screens while the
vehicle is in Reverse
The Rear View Monitor activates when the:
1 Engine Start /Stop* button is in the ON (Red light) or RUN (not
illuminated) position
2
Gear Shift Lever is in the R (Reverse) position
Always drive carefully and use caution when backing up.
The Rear View Monitor is not a substitute for proper and safe backing-up procedures. Always drive safely and use caution when backing up. The Rear View Monitor may not display every object behind the vehicle.
Page 46 of 52

SAFETY FEATURES
44SPORTAGE FEATURES & FUNCTIONS GUIDE*IF EQUIPPED †LEGAL DISCL AIMERS ON BACK INSIDE COVER
OTHER KEY FEATURES
Opening the Hood:
1 Pull the Hood Release Lever A to unlatch the Hood
2 In the front of the vehicle, lift the Hood slightly, push
the secondary Latch B to the front inside of the
Hood’s center and lift the Hood
Closing the Hood:
Lower the Hood by pressing the front center of the
Hood Then, press down to securely lock in place
Hood Release Lever and Latch
A
B
REMINDERS:
• While lowering and closing, keep hands away from under the Hood
• Open the Hood only after turning the engine off, on a flat surface, with the gear shift in P (Park) position and setting the parking brake
• Make sure the hood is securely closed before driving
REMINDERS:
• The Tire Mobility Kit requires the use of the 12V/15A /180W Power Outlet, which is located on the right side of the outlet port area
• After tire is properly sealed, drive cautiously at a maximum speed of 50 mph for no longer than a maximum distance of 120 miles
C
D
•The Tire Mobility Kit is a temporary fix and is to be used for one tire only; the tire should be inspected as soon as possible •The kit should only be used for sealing/inflating passenger car tires; do not use for inflating any other type of tires •Some damaged tires cannot be sealed completely; do not use the kit if it appears a tire is damaged beyond repair
Tire Mobility Kit*
The Tire Mobility Kit is designed to temporarily seal
certain types of tire damage
For operational information, please refer to the
Owner’s Manual
C Sealant Bottle
D Compressor
Tire Mobility Kit Video To view a video on your mobile device, snap this QR Code or visit the listed website
Refer to page 2 for more information
QR CODE
QUICK TIPS
www.youtube.com/KiaFeatureVideos
Page 47 of 52

45ALWAYS CHECK THE OWNER’S MANUAL FOR COMPLETE OPER ATING INFORMATION AND SAFET Y WARNINGS
SAFETY FEATURES
ODS is designed to detect the presence of the front passenger and
adjusts or turns off airbag deployment accordingly
Depending on the situation and type of accident, the system may:
•Deploy airbag (Adult)
•Not deploy the airbag (Unoccupied)
If the system determines that the airbag should not be deployed, the
“PASSENGER AIR BAG OFF” indicator will illuminate
Occupant Detection System (ODS)†15 /
Passenger Airbag Off Indicator†2To properly fasten your seat belts:
1
Insert the belt tongue plate A into the buckle B until it clicks
2
Position the lap portion of the belt across your lap as LOW ON THE
HIPS as possible C Adjust the belt to a SNUG FIT by pulling up on the
shoulder portion D
B
D
C
A
Seat Belts†2 ,19
Seat Belt Retractor Locks
Retractor locks allow lap/shoulder seat belts to remain unlocked during
normal vehicle operation for freedom of movement and increased comfort
During a STRONG STOP, SUDDEN TURN OR CERTAIN COLLISIONS, seat
belt retractors will automatically lock the belts to reduce the risk of injury
REMINDER: For maximum protection, always wear your seat belt
REMINDERS:
• Do not allow an adult passenger to ride in the front seat when the Passenger Airbag Indicator is illuminated OFF because the airbag will not deploy in the event of a crash The driver must instruct the passenger to reposition her/himself in the seat
• For more information about the seat belts and airbags in the vehicle, please refer to the Owner’s Manual
The Seat Belt warning chime operates for driver’s seat only
QUICK TIP
( Type B)
Page 48 of 52

46SPORTAGE FEATURES & FUNCTIONS GUIDE
SPORTAGE NORMAL MAINTENANCE SCHEDULE TURBO P=Perform • R=Replace • I=InspectB
‡ If equipped A See the Owner’s Manual for complete maintenance schedule These are approximate estimated intervals Refer to vehicle mileage for maintenance item schedule B And, if necessary, adjust, correct, clean or replace C If TOP TIER detergent gasoline is not available, one bottle of additive is recommended Additives are available from your authorized Kia dealer along with information on how to use them Do not mix other additives D Both the fuel filter & fuel tank air filter are generally considered to be maintenance free,
depending on fuel quality being used However, periodic inspection is recommended If your vehicle is having issues like fuel flow restriction, power surging, loss of power, difficulty starting, etc , replace the fuel filter immediately and consult an authorized Kia dealer for service E Transfer case oil should be changed anytime it has been submerged in water F
Inspect for excessive tappet noise and/or engine vibration and adjust if necessary G The drive belt should be replaced when cracks occur or tension is reduced excessively See your Owner’s Manual for more details and complete maintenance information, including severe maintenance schedule. Warranty may be voided if maintenance schedule is not followed.
Check your Maintenance Schedule or schedule an appointment with a dealer using your UVO link account by logging into the Kia Access with UVO link app ( Vehicles equipped with UVO link only – See page 21 for setup information)
QUICK TIP
(up to 60,000 miles)A For Non-Turbo maintenance, see back coverMAINTENANCE INTERVALS (MILES)
MAINTENANCE ITEMS - TURBO6,00012,00018,00024,00030,00036,00042,00048,00054,00060,000Add fuel additiveCPPPPPPPPPPRotate tiresPPPPPPPPPPEngine Oil & FilterRRRRRRRRRRClimate control air filterRRRRRRRRRRBattery conditionIIIIIIIIIIBrake lines, hoses and connectionsIIIIIIIIIIDisc brakes and padsIIIIIIIIIIVacuum hoseIIIIIIIIIISteering gear rack, linkage & bootsIIIIIIIIIIDrive shafts and bootsIIIIIIIIIISuspension mounting jointsIIIIIIIIIIAir conditioner compressor/refrigerantIIIIIIIIIIPropeller shaftIIIIIIIIIIExhaust pipe and mufflerIIIIIIIIIIIntercooler, in/out hose, air intake hoseIIIIIIIIIIAir cleaner filterIRIRIBrake fluidIIIIIFuel tank air filter