Page 561 of 604
Maintenance
78
7
9. Install the socket in the assembly
by aligning the tabs on the socket
with the slots in the assembly.
Push the socket into the assembly
and turn the socket clockwise.
10. Connect the rear combination lamp connector.
11. Install the rear combination lamp assembly to the body of the vehi-
cle.
12. Install the service cover.Side marker (rear) (Bulb type)
bulb replacement (Rear combi-
nation lamp Type A)
1. Open the liftgate.
2. Remove the service cover. 3. Loosen the light assembly retain-
ing screws with a cross-tip screw-
driver.
4. Remove the rear combination lamp assembly from the body of
the vehicle.
5. Disconnect the rear combination lamp connector.
OYP074021K
OYP074022K
Page 562 of 604
779
Maintenance
6. Remove the socket from theassembly by turning the socket
counterclockwise until the tabs on
the socket align with the slots on
the assembly.
7. Remove the bulb from bulb-socket by pulling it out.
8. Insert a new bulb by inserting it into the bulb-socket.
9. Install the socket in the assembly by aligning the tabs on the socket
with the slots in the assembly.
Push the socket into the assembly
and turn the socket clockwise. 10. Connect the rear combination
lamp connector.
11. Install the rear combination lamp assembly to the body of the vehi-
cle.
12. Install the service cover.
Tail lamp (inside) (Bulb type)
bulb replacement (Rear combi-
nation lamp Type A)
1. Open the liftgate.
2. Remove the service cover.
OYP078126N
OYP074026K
Page 563 of 604
Maintenance
80
7
3. Remove the socket from the
assembly by turning the socket
counterclockwise until the tabs on
the socket align with the slots on
the assembly.
4. Remove the bulb from the socket by pressing it in and rotating it
counter clockwise until the tabs on
the bulb align with the slots in the
socket. Pull the bulb out of the
socket.
5. Insert a new bulb by inserting it into the socket and rotating it until
it locks into place. 6. Install the socket in the assembly
by aligning the tabs on the socket
with the slots in the assembly.
Push the socket into the assembly
and turn the socket clockwise.
7. Install the service cover by putting it into the service hole.
Back-up lamp bulb replace-
ment (Rear combination lamp
Type A)
1. Open the liftgate.
2. Remove the service cover.
OYP078127N
OYP074026K
Page 564 of 604

781
Maintenance
3. Remove the socket from theassembly by turning the socket
counterclockwise until the tabs on
the socket align with the slots on
the assembly.
4. Remove the bulb from bulb-socket by pulling it out.
5. Insert a new bulb by inserting it into the bulb-socket.
6. Install the socket in the assembly by aligning the tabs on the socket
with the slots in the assembly.
Push the socket into the assembly
and turn the socket clockwise.
7. Install the service cover by putting it into the service hole.
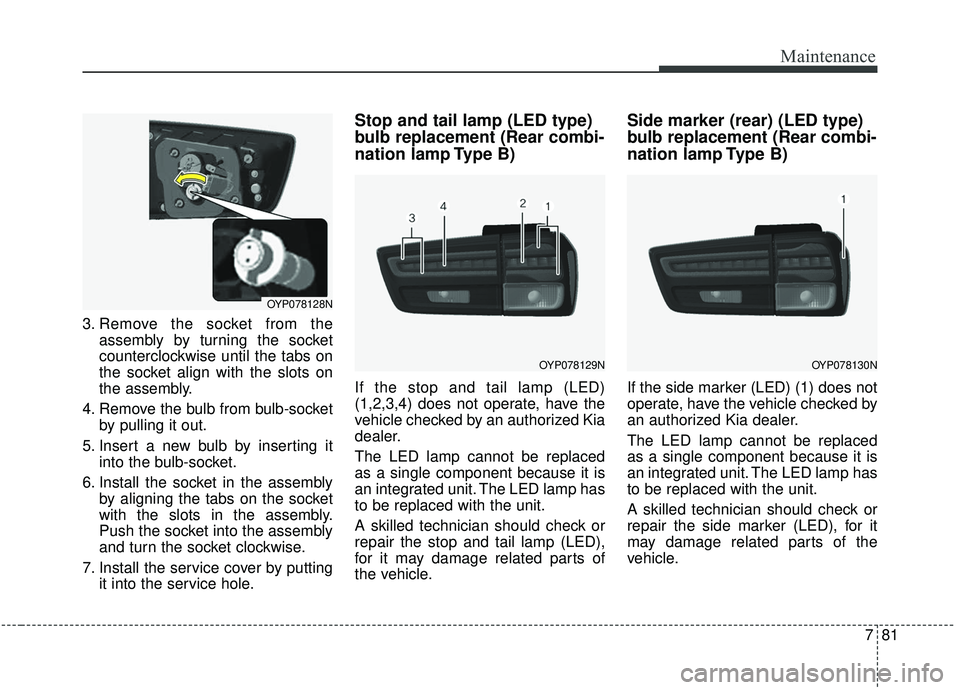
Stop and tail lamp (LED type)
bulb replacement (Rear combi-
nation lamp Type B)
If the stop and tail lamp (LED)
(1,2,3,4) does not operate, have the
vehicle checked by an authorized Kia
dealer.
The LED lamp cannot be replaced
as a single component because it is
an integrated unit. The LED lamp has
to be replaced with the unit.
A skilled technician should check or
repair the stop and tail lamp (LED),
for it may damage related parts of
the vehicle.
Side marker (rear) (LED type)
bulb replacement (Rear combi-
nation lamp Type B)
If the side marker (LED) (1) does not
operate, have the vehicle checked by
an authorized Kia dealer.
The LED lamp cannot be replaced
as a single component because it is
an integrated unit. The LED lamp has
to be replaced with the unit.
A skilled technician should check or
repair the side marker (LED), for it
may damage related parts of the
vehicle.
OYP078128N
OYP078129NOYP078130N
Page 565 of 604
Maintenance
82
7
Rear turn signal lamp (Bulb
type) bulb replacement (Rear
combination lamp Type B)
1. Open the liftgate.
2. Remove the service cover. 3. Loosen the light assembly retain-
ing screws with a cross-tip screw-
driver.
4. Remove the rear combination lamp assembly from the body of
the vehicle.
5. Disconnect the rear combination lamp connector.
6. Remove the socket from theassembly by turning the socket
counterclockwise until the tabs on
the socket align with the slots on
the assembly.
7. Remove the bulb from the socket by pressing it in and rotating it
counter clockwise until the tabs on
the bulb align with the slots in the
socket. Pull the bulb out of the
socket.
8. Insert a new bulb by inserting it into the socket and rotating it until
it locks into place.
OYP074021K
OYP074022K
OYP078131N
Page 566 of 604
783
Maintenance
9. Install the socket in the assemblyby aligning the tabs on the socket
with the slots in the assembly.
Push the socket into the assembly
and turn the socket clockwise.
10. Connect the rear combination lamp connector.
11. Install the rear combination lamp assembly to the body of the vehi-
cle.
12. Install the service cover.Back-up lamp bulb replace-
ment (Rear combination lamp
Type B)
1. Open the liftgate.
2. Remove the service cover. 3. Remove the socket from the
assembly by turning the socket
counterclockwise until the tabs on
the socket align with the slots on
the assembly.
4. Remove the bulb from bulb-socket by pulling it out.
5. Insert a new bulb by inserting it into the bulb-socket.
6. Install the socket in the assembly by aligning the tabs on the socket
with the slots in the assembly.
Push the socket into the assembly
and turn the socket clockwise.
7. Install the service cover by putting it into the service hole.
OYP074026K
OYP078132N
Page 575 of 604

Maintenance
92
7
Underbody maintenance
Road salt and other corrosive chem-
icals are used in cold weather states
to melt snow and prevent ice accu-
mulation. If these chemicals are not
regularly removed, they will corrode
the vehicle underbody and over time
damage fuel lines, the fuel tank
retention system, the vehicle sus-
pension, the exhaust system, and
even the body frame.
Wash the undercarriage of your
vehicle regularly during the winter
and whenever your vehicle has
been exposed to such salts or
chemicals.
Do a thorough washing of the undercarriage at the end of the
winter.
Use professional service techni- cians or governmental inspection
stations to annually inspect for cor-
rosion. Immediately seek an inspection of
your vehicle if you become visually
aware of corrosion flaking or scal-
ing or if you become aware of a
change in vehicle performance,
such as soft or spongy brakes, flu-
ids leaking, impairment of direc-
tional control, suspension noises
or rattling metal straps.
Aluminum wheel maintenance
The aluminum wheels are coated
with a clear protective finish.
Do not use any abrasive cleaner,polishing compound, solvent, or
wire brushes on aluminum wheels.
They may scratch the finish.
Clean the wheel when it has cooled.
Use only a mild soap or neutral detergent, and rinse thoroughly
with water. Also, be sure to clean
the wheels after driving on salted
roads. This helps prevent corrosion.
Avoid washing the wheels with highspeed vehicle wash brushes.
Do not use any alkaline or acid detergents It may damage and cor-
rode the aluminum wheels coated
with a clear protective finish.
Page 595 of 604

Index
2I
Active ECO system........................................................5-82Active ECO operation ................................................5-82
Limitation of Active ECO operation ..........................5-82
When Active ECO is activated ..................................5-82
Air bag - advanced supplemental restraint system (SRS) ........................................................................\
..3-65Adding equipment to or modifying your air bag-equipped vehicle ..........................................3-93
Air bag warning label ................................................3-93
Air bag warning light ..................................................3-68
Curtain air bag ............................................................3-85
Driver's and passenger's front air bag ........................3-80
How does the air bag system operate ........................3-66
Occupant Detection System (ODS) ............................3-72
Side air bag ................................................................3-83
SRS Care ....................................................................3-92\
SRS components and functions ..................................3-69
Air cleaner ....................................................................7-28\
Filter replacement ......................................................7-28
Air conditioning system ..................................................8-5
Appearance care ............................................................7-89 Exterior care ................................................................7-89
Interior care ................................................................7-95 Audio system ..............................................................4-216
Antenna ....................................................................4-21\
6
AUX, USB port ........................................................4-216
How vehicle radio works ..........................................4-217
Automatic climate control system ..............................4-172 Automatic heating and air conditioning ..................4-173
Checking the amount of air conditioner refrigerant and compressor lubricant ..............................................4-189
Climate control air filter ..........................................4-188
Manual heating and air conditioning ........................4-174
Outside thermometer ................................................4-178
Rear climate control ..................................................4-183
System operation ......................................................4-186
Automatic transmission ................................................5-14 Automatic transmission operation ..............................5-14
Good driving practices ................................................5-20
Battery........................................................................\
....7-36 Battery recharging ......................................................7-37
For best battery service ..............................................7-36
Recharging battery ......................................................7-37
Reset items ..................................................................7-38
Before driving ..................................................................5-5 Before entering vehicle ................................................5-5
Before starting ..............................................................5-5
Necessary inspections ..................................................5-5
A
B