2020 KIA SEDONA light
[x] Cancel search: lightPage 442 of 604

5113
Driving your vehicle
Use approved window washer
anti-freeze in system
To keep the water in the window
washer system from freezing, add an
approved window washer anti-freeze
solution in accordance with instruc-
tions on the container. Window wash-
er anti-freeze is available from an
authorized Kia dealer and most auto
parts outlets. Do not use engine
coolant or other types of anti-freeze
as these may damage the paint finish.
Don’t let your parking brake
freeze
Under some conditions your parking
brake can freeze in the engaged
position. This is most likely to happen
when there is an accumulation of
snow or ice around or near the rear
brakes or if the brakes are wet. If
there is a risk the parking brake may
freeze, apply it only temporarily while
you put the gear shift lever in P
(Park, Automatic Transmission) and
block the rear wheels so the vehicle
cannot roll. Then release the parking
brake.
Don't let ice and snow accu-
mulate underneath
Under some conditions, snow and
ice can build up under the fenders
and interfere with the steering. When
driving in severe winter conditions
where this may happen, you should
periodically check underneath the
vehicle to be sure the movement of
the front wheels and the steering
components are not obstructed.
Carry emergency equipment
Depending on the severity of the
weather, you should carry appropri-
ate emergency equipment. Some of
the items you may want to carry
include tow straps or chains, flash-
light, emergency flares, sand, shov-
el, jumper cables, window scraper,
gloves, ground cloth, coveralls, blan-
ket, etc.
Page 445 of 604

Driving your vehicle
116
5
Trailer brakes
If your trailer is equipped with a brak-
ing system, make sure it conforms to
your state’s regulations and that it is
properly installed and operating cor-
rectly.
If your trailer weight exceeds the
maximum allowed weight without
trailer brakes, then the trailer will also
require its own brakes as well. Be
sure to read and follow the instruc-
tions for the trailer brakes so you’ll be
able to install, adjust and maintain
them properly.
Don’t tap into or modify your vehi-
cle's brake system.
Driving with a trailer
Towing a trailer requires a certain
amount of experience. Before setting
out for the open road, you must get to
know your trailer. Acquaint yourself
with the feel of handling and braking
with the added weight of the trailer.
And always keep in mind that the
vehicle you are driving is now a good
deal longer and not nearly so respon-
sive as your vehicle is by itself.
Before you start, check the trailer
hitch and platform, safety chains,
electrical connector(s), lights, tires
and mirror adjustment. If the trailer
has electric brakes, start your vehicle
and trailer moving and then apply the
trailer brake controller by hand to be
sure the brakes are working. This lets
you check your electrical connection
at the same time.
During your trip, check occasionally
to be sure that the load is secure,
and that the lights and any trailer
brakes are still working.WARNING- Trailer brakes
Do not use a trailer with its own
brakes unless you are absolute-
ly certain that you have proper-
ly set up the brake system. This
is not a task for amateurs. Use
an experienced, competent
trailer shop for this work.
Page 446 of 604

5117
Driving your vehicle
Following distance
Stay at least twice as far behind the
vehicle ahead as you would when
driving your vehicle without a trailer.
This can help you avoid situations
that require heavy braking and sud-
den turns.
Passing
You’ll need more passing distance
up ahead when you’re towing a trail-
er. And, because of the increased
vehicle length, you’ll need to go
much farther beyond the passed
vehicle before you can return to your
lane. Due to the added load to the
engine when going uphill the vehicle
may also take longer to pass than it
would on flat ground.
Backing up
Hold the bottom of the steering
wheel with one hand. Then, to move
the trailer to the left, just move your
hand to the left. To move the trailer to
the right, move your hand to the
right. Always back up slowly and, if
possible, have someone guide you.
Making turns
When you’re turning with a trailer,
make wider turns than normal. Do
this so your trailer won’t strike soft
shoulders, curbs, road signs, trees,
or other objects near the edge of the
road. Avoid jerky or sudden maneu-
vers. Signal well in advance before
turning or lane changes.
Turn signals when towing a trailer
When you tow a trailer, your vehicle
has to have a different turn signal
flasher and extra wiring. The green
arrows on your instrument panel will
flash whenever you signal a turn or
lane change. Properly connected,
the trailer lights will also flash to alert
other drivers you’re about to turn,
change lanes, or stop.
When towing a trailer, the green
arrows on your instrument panel will
flash for turns even if the bulbs on the
trailer are burned out. Thus, you may
think drivers behind you are seeing
your signals when, in fact, they are
not. It’s important to check occasion-
ally to be sure the trailer bulbs are still
working. You must also check the
lights every time you disconnect and
then reconnect the wires.
Do not connect a trailer lighting sys-
tem directly to your vehicle’s lighting
system. Use only an approved trailer
wiring harness.
An authorized Kia dealer can assist
you in installing the wiring harness.
Page 460 of 604

What to do in an emergency
26
ROAD WARNING
Hazard warning flasher
The hazard warning flasher serves
as a warning to other drivers to exer-
cise extreme caution when
approaching, overtaking, or passing
your vehicle.It should be used whenever emer-
gency repairs are being made or
when the vehicle is stopped near the
edge of a roadway.
Depress the flasher switch with the
ignition switch in any position. The
flasher switch is located in the center
facia panel. All turn signal lights will
flash simultaneously.
• The hazard warning flasher oper-
ates whether your vehicle is run-
ning or not.
The turn signals do not work when the hazard flasher is on.
Care must be taken when using the hazard warning flasher while
the vehicle is being towed.
OYP064001N
OYP064014K
■ Type A
■Type B
Page 461 of 604

63
What to do in an emergency
If the engine stalls at a cross-
road or crossing
If the engine stalls at a crossroad or
crossing, set the shift lever in the N
(Neutral) position and then push the
vehicle to a safe place.
If you have a flat tire while
driving
If a tire goes flat while you are driv-
ing:
1. Take your foot off the acceleratorpedal and let the vehicle slow
down while driving straight ahead.
Do not apply the brakes immedi-
ately or attempt to pull off the road
as this may cause a loss of con-
trol. When the vehicle has slowed
to such a speed that it is safe to do
so, brake carefully and pull off the
road. Drive off the road as far as
possible and park on a firm level
ground. If you are on a divided
highway, do not park in the median
area between the two traffic lanes. 2. When the vehicle is stopped, turn
on your emergency hazard flash-
ers, set the parking brake and put
the automatic transmission in P
(Park).
3. Have all passengers get out of the vehicle. Be sure they all get out on
the side of the vehicle that is away
from traffic.
4. When changing a flat tire, follow the instruction provided later in
this section.
If the engine stalls while driving
1. Reduce your speed gradually,keeping a straight line. Move cau-
tiously off the road to a safe place.
2. Turn on your emergency flashers.
3. Try to start the engine again. If your vehicle will not start, contact
an authorized Kia dealer or seek
other qualified assistance.
✽ ✽NOTICE
If there was a check engine light and
loss of power or stall and if safe to do
so wait at least 10 seconds to restart
the vehicle after it stalls. This may
reset the car so it will no longer run
at low power (limp home) condition.
IN CASE OF AN EMERGENCY WHILE DRIVING
Page 462 of 604

What to do in an emergency
46
IF THE ENGINE WILL NOT START
If engine doesn't turn over or
turns over slowly
1. If your vehicle has an automatictransmission, be sure the shift
lever is in N (Neutral) or P (Park)
and the emergency brake is set.
2. Check the battery connections to be sure they are clean and tight.
3. Turn on the interior light. If the light dims or goes out when you oper-
ate the starter, the battery is dis-
charged.
4. Check the starter connections to be sure they are securely tight-
ened.
5. Do not push or pull the vehicle to start it. See instructions for "Jump
starting".
If engine turns over normally
but does not start
1. Check the fuel level.
2. With the ignition switch in theLOCK position, check all connec-
tors at the ignition coils and spark
plugs. Reconnect any that may be
disconnected or loose.
3. Check the fuel line in the engine compartment.
4. If the engine still does not start, call an authorized Kia dealer or
seek other qualified assistance.
WARNING- Push /
Pull start
Do not push or pull the vehicle
to start it. Push or pull starting
may cause the catalytic con-
verter to overload and create a
fire hazard.
Page 473 of 604

615
What to do in an emergency
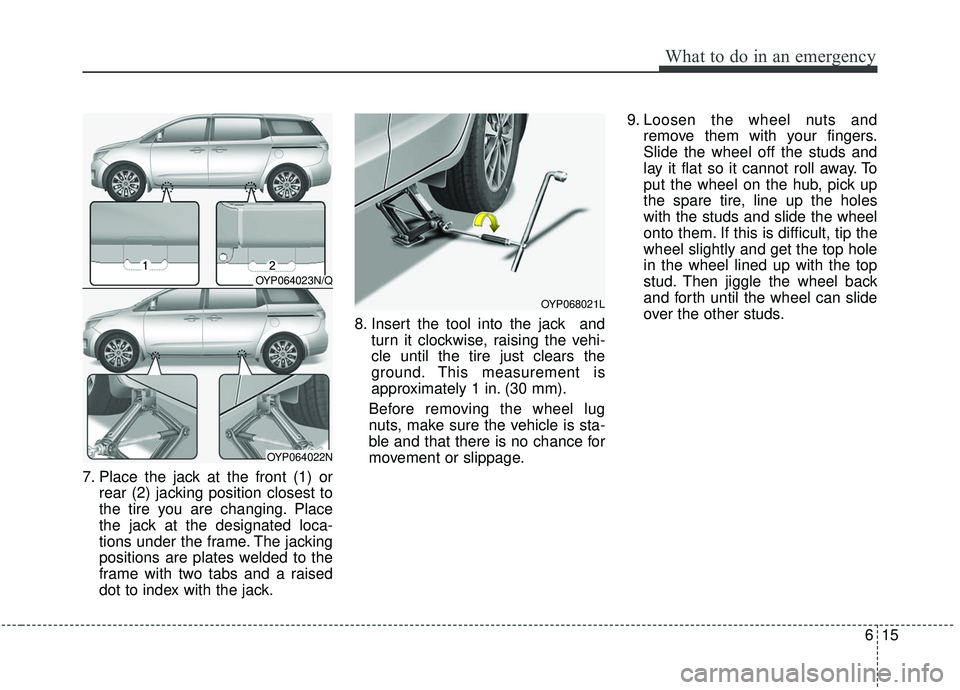
7. Place the jack at the front (1) orrear (2) jacking position closest to
the tire you are changing. Place
the jack at the designated loca-
tions under the frame. The jacking
positions are plates welded to the
frame with two tabs and a raised
dot to index with the jack. 8. Insert the tool into the jack and
turn it clockwise, raising the vehi-
cle until the tire just clears the
ground. This measurement is
approximately 1 in. (30 mm).
Before removing the wheel lug
nuts, make sure the vehicle is sta-
ble and that there is no chance for
movement or slippage. 9. Loosen the wheel nuts and
remove them with your fingers.
Slide the wheel off the studs and
lay it flat so it cannot roll away. To
put the wheel on the hub, pick up
the spare tire, line up the holes
with the studs and slide the wheel
onto them. If this is difficult, tip the
wheel slightly and get the top hole
in the wheel lined up with the top
stud. Then jiggle the wheel back
and forth until the wheel can slide
over the other studs.
OYP064023N/Q
OYP064022N
OYP068021L
Page 485 of 604

. . . . . . . . . . . . . . . . . . . . . . . . . . . . . . . 7-51
. . . . . . . . . . . . . . . . . . . . . . . . . . . . . . . . 7-51
. . . . . . . . . . . . . . . . . . . . . . . . . . . . . . . . . . . 7-\
51
. . . . . . . . . . . . . . . . . . . . . . . . . . . . . . 7-51
Fuses . . . . . . . . . . . . . . . . . . . . . . . . . . . . . . . . . . . . \
7-53
. . . . . . . . . . . . . . . . . . . 7-55
Light bulbs . . . . . . . . . . . . . . . . . . . . . . . . . . . . . . . 7-65
. . . . . . . . . . . . . . . . . . . 7-65
. . . . . . . . . . . . . . . . . . . . . 7-68
. . . . . . . . . . . . . . . . . . . . . . 7-69
(Headlamp Type A) . . . . . . . . . . . . . . . . . . . . . . . . . . 7-69
(Headlamp Type A) . . . . . . . . . . . . . . . . . . . . . . . . . . 7-70
(Headlamp Type A) . . . . . . . . . . . . . . . . . . . . . . . . . . 7-72
(Headlamp Type A) . . . . . . . . . . . . . . . . . . . . . . . . . . 7-72
(Headlamp Type A) . . . . . . . . . . . . . . . . . . . . . . . . . . 7-73
(Headlamp Type B) . . . . . . . . . . . . . . . . . . . . . . . . . . 7-73
(Headlamp Type B) . . . . . . . . . . . . . . . . . . . . . . . . . . 7-74
. . 7-74
. . . . . . . . . . . . . . . 7-75
(Rear combination lamp Type A) . . . . . . . . . . . . . . 7-75
(Rear combination lamp Type A) . . . . . . . . . . . . . . 7-77
(Rear combination lamp Type A) . . . . . . . . . . . . . . 7-78
(Rear combination lamp Type A) . . . . . . . . . . . . . . 7-79
lamp Type A) . . . . . . . . . . . . . . . . . . . . . . . . . . . . . . . 7-80
(Rear combination lamp Type B) . . . . . . . . . . . . . . 7-81
(Rear combination lamp Type B) . . . . . . . . . . . . . . 7-81
(Rear combination lamp Type B) . . . . . . . . . . . . . . 7-82
(Rear combination lamp Type B) . . . . . . . . . . . . . . 7-83
replacement . . . . . . . . . . . . . . . . . . . . . . . . . . . . . . . . 7-84
. . . . . . . . . . . . 7-84
7