Page 132 of 604

423
Features of your vehicle
This system is designed to provide
protection from unauthorized entry
into the vehicle. This system is oper-
ated in three stages: the first is the
"Armed" stage, the second is the
"Theft-alarm" stage, and the third is
the "Disarmed" stage. If triggered,
the system provides an audible
alarm with blinking of the hazard
warning lights.
Armed stage
Park the vehicle and stop the engine.
Arm the system as described below.
1. Remove the ignition key from theignition switch and exit the vehicle.
2. Make sure that all doors (and lift- gate) and engine hood are closed
and latched.
3. Lock the doors using the transmit- ter of the keyless entry system (or
smart key) or ignition key.
After completion of the steps above,
the hazard warning lights will blink
(for smart key, the chime also
sounds) once to indicate that the
system is armed. If any door (or liftgate) or engine
hood remains open, the hazard
warning lights and the chime will not
operate and the theft-alarm will not
arm. If all doors (and liftgate) and
engine hood are closed after the lock
button is pressed, the hazard warn-
ing lights blink once.
The system can also be armed by
locking the doors with the key from
the front doors; however, the hazard
warning lights will not blink using this
method.
✽ ✽
NOTICE
The theft-alarm system can be deac-
tivated by an authorized Kia dealer.
If you want this feature, consult an
authorized Kia dealer.
THEFT-ALARM SYSTEM
Armed
stage
Theft-alarm stageDisarmedstage
Page 133 of 604

Features of your vehicle
24
4
Do not arm the system until all
passengers have left the vehicle. If
the system is armed while a pas-
senger(s) remains in the vehicle,
the alarm may be activated when
the remaining passenger(s) leave
the vehicle. If any door (or liftgate)
or engine hood is opened within
30 seconds after the system
enters the armed stage, the sys-
tem is disarmed to prevent an
unnecessary alarm.Theft-alarm stage
The alarm will be activated if any of
the following occurs while the system
is armed.
A front or rear door is opened with-
out using the ignition key or trans-
mitter (or smart key).
The liftgate is opened without using the transmitter (or smart key).
The engine hood is opened.
The hazard warning lights will blink
and the alarm will sound for around
30 seconds, and then stop for 10
seconds. This pattern will repeat
twice unless the system is dis-
armed. To turn off the system, unlock
the doors with the ignition key or
transmitter (or smart key).
Disarmed stage
The system will be disarmed when
The doors (and liftgate) are unlocked with the transmitter (or
smart key) or the ignition key.
The power sliding door out handle is pulled while the power door
ON/OFF button is ON (not
depressed).
After depressing the unlock button,
the hazard warning lights will blink
and the chime will sound twice (in
smart key) to indicate that the sys-
tem is disarmed.
After depressing the unlock button, if
any door (or liftgate) is not opened
within 30 seconds, the system will be
rearmed.
Page 153 of 604

Features of your vehicle
44
4
When the power liftgate is operat-
ed with the main or sub control but-
ton or transmitter, the chime
sounds and hazard warning lights
flash 2 times.
When the power door ON/OFF but-ton is ON (not depressed), do as
follows to open or close the power
liftgate:
- Pushing the sub control button onthe bottom of the liftgate will close
the power liftgate automatically.
- Pressing and pulling up the lift- gate handle slightly will open the
power liftgate automatically when
the liftgate is unlocked. When the power door ON/OFF but-
ton is OFF (depressed), the power
liftgate cannot be controlled with
the sub control buttons or liftgate
handle.
However, the liftgate may be
opened manually by pulling the
exterior handle and lifting the lift-
gate upward. The liftgate may be
manually closed by pushing the lift-
gate downward.
Do not drive the vehicle until the power liftgate completely closed.
The power liftgate may not close
completely if the vehicle is started
during automatic closing.
✽ ✽ NOTICE
The button on the liftgate will not
illuminated and operated when the
power door ON/OFF button is OFF
(depressed).
OYP048446
Page 154 of 604

445
Features of your vehicle
✽ ✽NOTICE
If the power liftgate does not operate
normally, first check the following
condition before using the power
liftgate.
• Make sure the shift lever is in P
(Park).
• Make sure the Power Liftgate Off switch is not pressed.
If any of the power liftgate buttons
are pressed while the power liftgate
is in operation, the power liftgate
will stop. If any button is pressed
again the power liftgate will reverse
direction.
• Even though the Power door
ON/OFF button is in the OFF
(depressed) position, if the liftgate
is manually closed to the second-
ary latch position, the liftgate will
be electrically moved to the fully
latched position. Make sure that
face, arms, hands, and other
obstructions are safely out of the
way before operating the liftgate.
The chime will sound and the haz- ard warning flasher will blink 10
times if you drive with the liftgate
closed but not fully secured. Stop
your vehicle immediately at a safe
place to check if your liftgate is
securely locked.
If the power liftgate is not closed and latched completely after power
closing operation, the chime will
sound and hazard warning lights
will blink 10 times. Stop the driving
immediately and close the liftgate
securely at the safe place. If the power liftgate is operated
while the liftgate is in the partially
opened position (more than
9degrees), the liftgate will stop the
operation. If you operate the power
liftgate again, the power liftgate will
be operate in the opposite direction.
If the power liftgate is operated while the liftgate is in the partially
closed position (less than
degrees), the liftgate will open fully.
If the power liftgate is operated while the liftgate is in the partially opened
position (less than 9degrees), the
liftgate will stop at approximately
9degree open position.
Page 158 of 604
449
Features of your vehicle
1. Setting
To activate the Smart Liftgate, go to
User Settings Mode and select
Smart Liftgate on the LCD display.❈ ❈
For more information, refer to
the “LCD Display” section in
this chapter.
2. Detect and Alert
If you are positioned in the detecting
area (50 ~ 100 cm (20 ~ 40 inches)
behind the vehicle) carrying a smart
key, the hazard warning lights will
blink and chime will sound for about
3 seconds to alert you the smart key
has been detected and the liftgate
will open.✽ ✽NOTICE
Do not approach the detecting area
if you do not want the liftgate to
open. If you have unintentionally
entered the detecting area and the
hazard warning lights and chime
starts to operate, leave the detecting
area with the smart key. The liftgate
will stay closed.
OYP048029
Page 159 of 604
Features of your vehicle
50
4
3. Automatic opening
The hazard warning lights will blink
and chime will sound 2 times and
then the liftgate will open. Make sure you close the liftgate
before driving your vehicle.
Make sure there are no people or
objects around the liftgate before
opening or closing the liftgate. Make
sure objects in the liftgate do not
come out when opening the liftgate
on a slope. It may cause serious
injury. Make sure to deactivate the
Smart Liftgate when washing your
vehicle. Otherwise, the liftgate may
open inadvertently.
CAUTION
-
Liftgate lift
Make certain that you close the
liftgate before driving your vehi-cle. Possible damage may occurto the liftgate lift cylinders andattached hardware if the liftgateis not closed prior to driving.
OYP048030
WARNING
The key should be kept out of
reach of children. Children may
inadvertently open the Smart
Liftgate while playing around
the rear area of the vehicle.
Page 182 of 604

473
Features of your vehicle
✽ ✽NOTICE
The following symptoms may occur
during normal vehicle operation:
• The EPS warning light does not
illuminate.
• The steering gets heavy immedi- ately after turning the ignition
switch on. This happens as the sys-
tem performs the EPS system
diagnostics. When the diagnostics
are completed, the steering wheel
will return to its normal condition.
• A click noise may be heard from the EPS relay after the ignition
switch is turned to the ON or
LOCK position.
• Motor noise may be heard when the vehicle is at a stop or at a low
driving speed.
• The steering effort increases if the steering wheel is rotated continu-
ously when the vehicle is not in
motion. However, after a few min-
utes, it will return to its normal
conditions.
• When you operate the steering wheel in low temperature, abnor-
mal noise could occur. If tempera-
ture rises, the noise will disappear.
This is a normal condition.
If the Electric Power Steering System
does not operate normally, the warn-
ing light will illuminate on the instru-
ment cluster. The steering wheel may
become difficult to control or operate
abnormally. Take your vehicle to an
authorized Kia dealer and have the
vehicle checked as soon as possible.Tilt and telescopic steering
Tilt and telescopic steering allows
you to adjust the steering wheel
before you drive. You can also raise it
to give your legs more room when
you exit and enter the vehicle.
The steering wheel should be posi-
tioned so that it is comfortable for
you to drive, while permitting you to
see the instrument panel warning
lights and gauges.
WARNING
Never adjust the angle of the
steering wheel while driving.
You may lose steering control
and cause severe personal
injury, death or accidents.
Page 185 of 604

Features of your vehicle
76
4
MIRRORS
Inside rearview mirror
Adjust the rearview mirror so that the
center view through the rear window
is seen. Make this adjustment before
you start driving.
Do not place objects in the rear seat or
cargo area which would interfere with
your vision through the rear window.
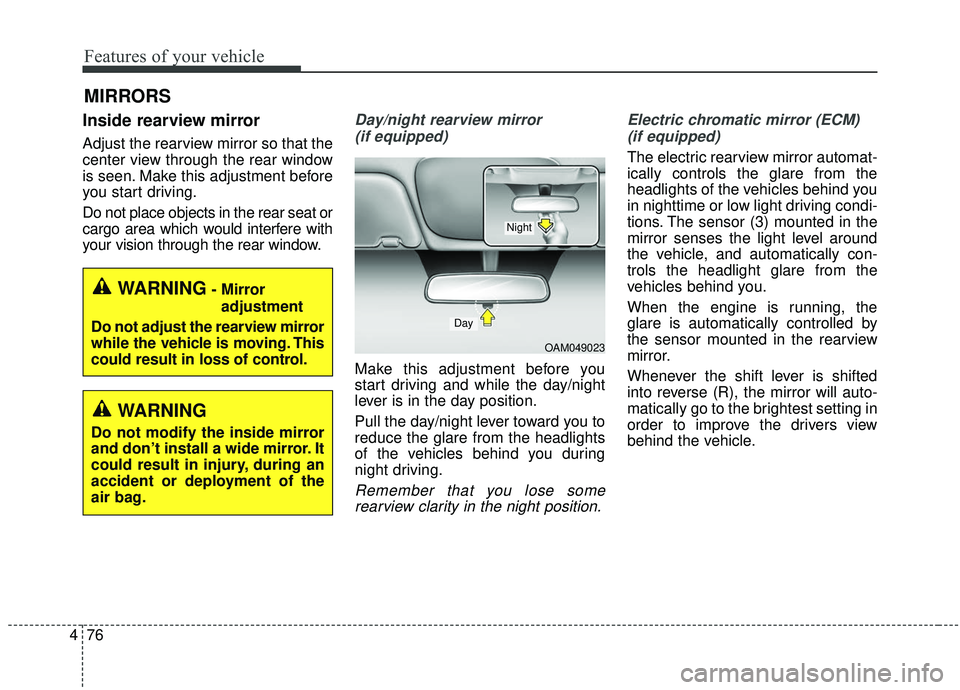
Day/night rearview mirror
(if equipped)
Make this adjustment before you
start driving and while the day/night
lever is in the day position.
Pull the day/night lever toward you to
reduce the glare from the headlights
of the vehicles behind you during
night driving.
Remember that you lose somerearview clarity in the night position. Electric chromatic mirror (ECM)
(if equipped)
The electric rearview mirror automat-
ically controls the glare from the
headlights of the vehicles behind you
in nighttime or low light driving condi-
tions. The sensor (3) mounted in the
mirror senses the light level around
the vehicle, and automatically con-
trols the headlight glare from the
vehicles behind you.
When the engine is running, the
glare is automatically controlled by
the sensor mounted in the rearview
mirror.
Whenever the shift lever is shifted
into reverse (R), the mirror will auto-
matically go to the brightest setting in
order to improve the drivers view
behind the vehicle.
WARNING- Mirror adjustment
Do not adjust the rearview mirror
while the vehicle is moving. This
could result in loss of control.
WARNING
Do not modify the inside mirror
and don’t install a wide mirror. It
could result in injury, during an
accident or deployment of the
air bag.
OAM049023
Day
Night