Page 33 of 54

PUSH
POWER FILE
TUNE ENTER
VOL
PASSENGER AIR BAG OFF PASSENGERRADIOMEDIA SEEKTRACK NAV
MAP SETUP
AUDIO SYSTEMS
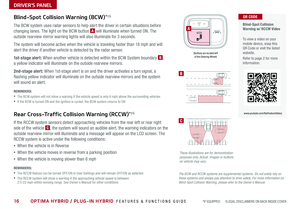
UVO link with Navigation*†1,13
FM/AM/SiriusXM®/Media (USB, iPod®, AUX, Bluetooth® Audio, My Music)
Press to Power ON/OFF . Rotate to adjust Volume
Press to enter Map menu
Press to select FM/AM/SiriusXM® modes
Press and hold to reset the system settings
Press to select MEDIA mode
Press to display SE TUP/ Settings mode
Press to enter NAV menu
Rotate to change Radio/SiriusXM® Station/Media tracks/ files
For further UVO link with Navigation operations, refer to the Car Infotainment System User’s Manual. For other audio system information, refer to pages 28-30.
These illustrations are for demonstration purposes only. Actual features on vehicle may vary.
Press briefly to do the following:• FM/AM mode: Play the previous/next frequency • SiriusXM® mode: Change the channel • MEDIA mode: Change the track, file or title (except for AUX )Press and hold to the do the following (over 0.8 seconds):• FM/AM mode: Move quickly through all of the frequencies . When released, the system seeks the next available frequency• MEDIA mode: Rewinds or fast forwards the track or file (except for AUX and Bluetooth® Audio)
Your vehicle’s audio system may differ from that in the illustrations.
REMINDER: Driving while distracted is dangerous and should be avoided . Drivers should remain attentive to driving and always exercise caution when using the steering-wheel-mounted controls while driving . To help reduce driver distraction, some audio system functionalities have been modified while the vehicle is in Drive, Reverse or moved out of Park .
•At any time, you can interrupt the Voice Command Feedback by pressing the TALK button on the steering wheel
•Prolonged use of the navigation system in ACC mode may drain the vehicle’s battery . A warning screen may appear periodically to remind users that the navigation system should be operated when the engine is running to prevent battery discharge
QUICK TIPS
UVO link with Navigation Videos
To view a video on your mobile device, snap this QR Code or visit the listed website . Refer to page 2 for more information .
QR CODE
www.youtube.com/KiaFeatureVideos
A programmable key to provide quick access to one of several available system features
Sound Settings: To adjust the audio system sound settings:
1 . Press the SETUP key on the audio control unit or the onscreen MENU button, when in MEDIA mode2 . Select the onscreen SOUND button 3 . Select the menu item (Position, Volume, Tone, Priority, Navigation, Advanced, Default)4 . Use the onscreen buttons to adjust settings
Radio Presets: You can listen to FM, AM and SiriusXM® radio and save frequently used stations .How to Save a Preset: Press and hold the desired slot . This saves the current station in the selected slot in FM, AM or SiriusXM®
Smart Favorites: For the first ten favorite SiriusXM® channels, you may play live or repeat from the beginning of a song or a program segment . In Radio mode, choose SiriusXM®, then select any of the first six favorites . During song or program play, tap the Skip Backward icon to start from the beginning of the song or program . Tap the Play Live icon to return to the live broadcast .
Custom Button : A programmable key to provide quick access to one of several available system features .
To Program the Custom Button: Press and hold the Custom button . Select one of the available features you would like the Custom button to open .
31ALWAYS CHECK THE OWNER’S MANUAL FOR COMPLETE OPER ATING INFORMATION AND SAFET Y WARNINGS . *IF EQUIPPED †LEGAL DISCL AIMERS ON BACK INSIDE COVER
Page 34 of 54

32OPTIMA HYBRID / PLUG-IN HYBRID FEATURES & FUNCTIONS GUIDE*IF EQUIPPED
These illustrations are for demonstration purposes only. Actual features on vehicle may vary.
Wireless Charging Video
To view a video on your mobile device, snap this QR Code or visit the listed website .
Refer to page 2 for more information .
www.youtube.com/KiaFeatureVideos
QR CODE
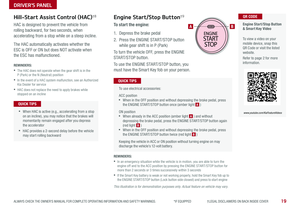
(Located in front of Gear Shift)
Wireless Smartphone Charging System*
1 . Slide open tray cover
2 . Place compatible smartphone on the center of the charging pad
3 . All doors must be closed
4 . Indicator light D may change to amber once the wireless charging begins
5 . Once charging is complete, the amber light may change to green
REMINDERS:
•
The smartphone must be a compatible phone with QI function available
•
Avoid placing other metal items in the bin while charging as to not impede the charging area
•
This vehicle is equipped with wireless charging technology which allows for a device to be charged using inductive charging; however, device compatibility varies . See your Owner’s Manual for more detailed information and the back page for legal disclaimers
•
Inductive charging systems are less ef ficient than conventional charging through cable . As a result, higher device operating temperatures may be experienced during use
•
Charging Performance – Your device’s position on the wireless charging system can affect charging performance . Other factors that may affect the charging rate include foreign objects, such as coins or pens, and phone case thickness
•If any door is opened, charging will be disabled (excluding trunk)
•Wireless charging must be enabled in user settings
•For wireless charging to occur, all doors (excluding trunk) must be closed & the Smart Key Fob must be detected inside the vehicle
•For best results, place smartphone on the center of the charging pad
• If wireless charging does not work, move smartphone around the pad until the charging indicator turns amber . Avoid placing other metal items in the bin while charging as to not impede the charging area
QUICK TIPS
D
CENTER PANEL
Page 35 of 54

Digital Clock
Clock Setup:
Press the SETUP key on the head unit . Then
press the onscreen Clock icon to enter clock
settings . Follow the onscreen options to adjust
the clock settings .
Press the onscreen return icon to save changes .
QUICK TIP
Aux/Multimedia USB/iPod®†12 Port & Power Outlets
• The power outlets are inactive when ignition is in the OFF position
• The Multimedia USB port is located next to the Power Outlets .
• The USB Charge port does not support data transfer C
QUICK TIPSREMINDERS:
• Daylight Savings must be enabled or disabled in the Clock Settings screen
• To access manual date and time setting, turn GPS time OFF in the Clock Settings (systems with navigation only)
REMINDERS:
• Using the power outlet (accessory plug) for prolonged periods of time with the engine off could cause the 12-volt battery to discharge
• Kia recommends that you only use USB cables made by your device’s manufacturer . Third-party USB cables may cause damage to your device
USB Charger Ports*
The USB Charger Ports C are located inside
the Center Console and on the rear of the
Center Console .
Aux/Multimedia USB Port A
Use the Aux port to connect audio devices and the
Multimedia USB port to connect USB audio devices,
smartphones and iPod® devices .
Power Outlets B
Use the power outlet for mobile phones and other
devices designed to operate on a 12V (180W max)
power outlet .
(Rear Center Console shown)
(Located in Center Console in front of Gear Shift)
CENTER PANEL
BBA
These illustrations are for demonstration purposes only. Actual features on vehicle may vary.
C
12V180W
(Rear of Center Console shown)
For more information on the Aux/Multimedia USB/iPod® Port & Power Outlets, refer to the Owner's Manual.
C
33ALWAYS CHECK THE OWNER’S MANUAL FOR COMPLETE OPER ATING INFORMATION AND SAFET Y WARNINGS . *IF EQUIPPED †LEGAL DISCL AIMERS ON BACK INSIDE COVER
Page 36 of 54

34*IF EQUIPPED OPTIMA HYBRID / PLUG-IN HYBRID FEATURES & FUNCTIONS GUIDE
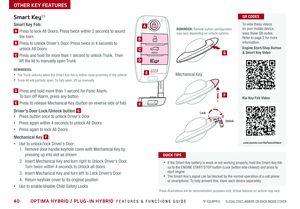
Defrost Outside Windshield:
1 . Set Temperature to Hot
2 .
Press the Front Defrost button
Defog Inside Windshield:
1 . Set Fan Speed to desired position
2 . Set desired Temperature
3 . Press the Front Defrost button
Auto Defog System:
Auto Defog is set ON by default . To cancel Auto
Defog, press the Front Defrost button FRONT for three
seconds, when the ignition is in on (ADS OFF icon
will illuminate) . To turn Auto Defog on again, press
the Front Defrost button FRONT for three seconds .
Climate Control display
Fan Speed Control buttons
Driver OnlyFan Control
Rear Windshield Defroster
Front Windshield Defroster
System OFF button
Mode Selection button
Air Conditioning On/Off button
Dual Temperature Control knob
Recirculated Air button
ECON (Economy Air Conditioning) button
Temperature Control knob
Automatic Climate Control button Dual Climate Control button
A/C
OFFDRIVER
ONLY
MODE ECON
REA RFRON T
Automatic Climate Control* (UVO link)
Climate Control Auto Function
1 . Press AUTO to select Full Auto Operation . The Auto setting
automatically controls the airflow modes, fan speeds, air intake
and air conditioning according to the temperature setting selected
2 . Set desired Temperature
3 . Press SYNC to synchronize driver and passenger temperature
Air Flow Modes:
To select Air Flow Modes,
press the Mode selection
buttons:
REMINDERS:
•
Auto A /C mode can automatically engage Recirculated Air
•
Pressing any button during AUTO operation will deactivate the AUTO function and switch to manual mode, except for Temperature Control
•
When in AUTO mode, Air Flow mode and Fan Speed do not display on the Climate Control Display
•
Warm air may flow in through vents if Recirculated Air button is not pressed ON (LED lit)
•Defrost mode [~] activates A /C and opens Fresh Air Vent to help dehumidify the air and improve Defroster performance •During Auto Operation, the A /C indicator will NOT illuminate . The fan speed, air intake, air flow and air conditioning may automatically be engaged at any time to reach desired temperature and reduce humidity •Keep inside glass as clean as possible to reduce window fogging
QUICK TIPS
Face-Level
Bi-Level
F lo o r- L evel
Floor/Defrost-Level
Your Automatic Climate Control system may differ from those in the illustrations. See your Owner’s Manual for more details.
CENTER PANEL
Auto Defog System Video
To view a video on your mobile device, snap this QR Code or visit the listed website .
Refer to page 2 for more information .
www.youtube.com/KiaFeatureVideos
QR CODE
Page 37 of 54

35ALWAYS CHECK THE OWNER’S MANUAL FOR COMPLETE OPER ATING INFORMATION AND SAFET Y WARNINGS . *IF EQUIPPED
CLIMATE
A/C
OFFDRIVER
ONLY
MODE ECON
REA RFRON T
CLIMA TE
A/C
OFFDRIVER
ONLY
MODE ECON
REA RFRON T
Fan Speed Control buttons
Temperature Control knobDriver OnlyFan Control
System OFF button
Mode Selection button
Air Conditioning On/Off button
Dual ClimateControl button
ECON (Economy Air Conditioning) button
Automatic Climate Control button Dual Temperature Control knob
Climate information screen selection button
Rear Windshield Defroster
Front Windshield Defroster
Recirculated Air button
Automatic Climate Control* (UVO link with Navigation)
Climate Control Auto Function
1 . Press AUTO to select Full Auto Operation . The Auto setting
automatically controls the airflow modes, fan speeds, air intake
and air conditioning according to the temperature setting selected
2 . Set desired Temperature
3 . Press SYNC to synchronize driver and passenger temperature
Defrost Outside Windshield:
1 .
Set Fan Speed to the highest
position
2 . Set Temperature to Hot
3 .
Press the Front Defrost button
Defog Inside Windshield:
1 . Set Fan Speed to desired position
2 . Set desired Temperature
3 . Press the Front Defrost button
Your Automatic Climate Control system may differ from those in the illustrations. See your Owner’s Manual for more details.
REMINDERS:
•AUTO A /C Mode can automatically engage Recirculated Air
•
Pressing any button during AUTO operation will deactivate the AUTO function and switch to manual mode, except for Temperature Control
•
When in AUTO mode, Air Flow mode and Fan Speed do not display on the Climate Control Display
•
Warm air may flow in through vents if Recirculated Air button is not pressed ON (LED lit)
•Defrost mode activates A /C and opens Fresh Air Vent to help dehumidify the air and improve Defroster performance •During Auto Operation, the A /C indicator will NOT illuminate . The fan speed, air intake, air flow and air conditioning may automatically be engaged at any time to reach desired temperature and reduce humidity •Keep inside glass as clean as possible to reduce window fogging
QUICK TIPS
CENTER PANEL
Air Flow Modes:
To select Air Flow Modes,
press the Mode selection
buttons:
Face-Level
Bi-Level
F lo o r- L evel
Floor/Defrost-Level
Auto Defog System Video
To view a video on your mobile device, snap this QR Code or visit the listed website .
Refer to page 2 for more information .
www.youtube.com/KiaFeatureVideos
QR CODE
Page 38 of 54

36OPTIMA HYBRID / PLUG-IN HYBRID FEATURES & FUNCTIONS GUIDE*IF EQUIPPED †LEGAL DISCL AIMERS ON BACK INSIDE COVER
To view these videos on your mobile device, snap these QR codes . Refer to page 2 for more information .
Sportmatic® Shifting Video
Heated and Ventilated Seats Video
QR CODES
www.youtube.com/KiaFeatureVideos
Yellow Color: WarmingBlue Color: Ventilating
Automatic Gear Shift with Sportmatic®†21 Shifting
P: Park
R: Reverse
N: Neutral
D: Drive
[+]: Manual Mode Upshift
[–]: Manual Mode Downshift
Manual Mode: To enter Manual mode, move shift lever from D to left gate . To shift
while in Manual mode, move shift lever up [+] to upshift or down [–] to downshift .
Seat Warmers*†19
Press button once for high setting (2 LEDs lit), again for low setting
(1 LED lit) and again to turn OFF .
Seat Warmers†19/Ventilated Seats* A
Seat Warmers:
• Press top of button for high setting (3 LEDs lit)
• Press button twice for medium setting (2 LEDs lit)
• Press a third time for low setting (1 LED lit) and again to turn OFF
Ventilated Seats:
• Press bottom of button once for high setting (3 LEDs lit)
• Press twice for medium setting (2 LEDs lit)
• Press a third time for low setting (1 LED lit)
and again to turn OFF
•With the seat warmer switch in the ON position, the heating system in the seat turns OFF or ON automatically depending on the seat temperature •System is OFF by default
QUICK TIPS
•Press brake pedal and depress release button to move gearshift from N to P, N to R or from P to any gear •Manual mode downshifts are made automatically when the vehicle slows down . When the vehicle stops, 1st gear is automatically selected
QUICK TIPS
SHIFTLOCK
RELEASE
CENTER PANEL
A
REMINDER: Use extreme caution when using the seat warmers to avoid burns . Refer to the Owner’s Manual for more information .These illustrations are for demonstration purposes only. Actual features on vehicle may vary.
Page 39 of 54

37ALWAYS CHECK THE OWNER’S MANUAL FOR COMPLETE OPER ATING INFORMATION AND SAFET Y WARNINGS . *IF EQUIPPED
Auto Hold*
Auto Hold temporarily maintains the vehicle
at a standstill even if the brake pedal is
released . Auto Hold can be turned ON/OFF
using the AUTO HOLD switch B on the
center panel . Before Auto Hold will operate,
the driver’s door, engine hood and trunk
must be closed, and the driver’s seat belt
must be fastened .
The Auto Hold indicator has four states:
White: Standby - With vehicle in Park
and at a standstill, and AUTO HOLD switch
B turned ON, the indicator will illuminate
white . While driving the vehicle (vehicle is
not at a standstill), the Auto Hold indicator
will remain white .
Green: Engaged - When coming to a
complete stop and depressing the brake
pedal, the Auto Hold indicator changes from white to green .
OFF (not illuminated) - The indicator will turn OFF when the AUTO
HOLD switch B is turned OFF .
Yellow: Malfunction - When the indicator is illuminated yellow, there
may be a system malfunction . Take your vehicle to a local Kia dealer .
Electric Parking Brake (EPB)*
The Electric Parking Brake (EPB) system utilizes
an electric motor to engage the parking brake .
Applying the Parking Brake
Depress the brake pedal and pull up the EPB
switch A . Ensure that the indicator light
is illuminated on the instrument cluster .
Releasing the Parking Brake
The EPB will automatically release when the
shifter is placed in Reverse or Drive .
To release EPB manually, depress the brake pedal, then press the EPB
switch A down, with the ignition switch in the ON position . Ensure that
the indicator light i s O F F .
Electric Parking Brake Video
To view a video on your mobile device, snap this QR Code or visit the listed website .
Refer to page 2 for more information .
QR CODE
www.youtube.com/KiaFeatureVideos
A
B
(Located on Center Panel)
REMINDERS:
•
As a bulb check, the EPB malfunction indicator will illuminate for approximately 3 seconds when the ignition switch is turned ON
•
If the warning light does not illuminate temporarily, or continues to remain lit, take your vehicle to an authorized Kia dealer and have the system checked
•The EPB should not be operated while the vehicle is moving
•
A click or electric brake motor sound may be heard while operating or releasing the EPB, but these conditions are normal and indicate that the EPB is functioning properly
REMINDERS:
•
Do not solely rely on the Auto Hold system to keep the vehicle stopped . Always pay attention to traf fic and road conditions, and be prepared to depress the brakes
• To reduce the risk of an accident, do not activate Auto Hold while driving downhill, backing up or parking your vehicle
•When leaving your keys with parking lot attendants or valet, make sure to inform them how to operate the EPB
•If parked on a steep incline, pull up the EPB switch for more than 3 seconds for a firmer EPB application
•Pull up and hold EPB switch a second time to increase brake pressure if parked on a decline or incline
QUICK TIPS
CENTER PANEL
Refer to page 4 for location of Instrument Cluster indicators.
This illustration is for demonstration purposes only. Actual feature on vehicle may vary.
Page 40 of 54

38OPTIMA HYBRID / PLUG-IN HYBRID FEATURES & FUNCTIONS GUIDE*IF EQUIPPED †LEGAL DISCL AIMERS ON BACK INSIDE COVER
Driver Position Memory System*
To store a seating position into memory, first place the shifter into P (Park) while the ignition switch is ON .
Then:
1 . Adjust the driver’s seat
2 . Press the SET button A on the control panel . System will beep once
3 . Press one of the memory buttons B within 5 seconds . The system will beep twice when memory has
been stored
4 . “Driver (1 or 2) set is memorized” will appear on the instrument cluster LCD screen
C
Front Seat Headrest Adjustment†1 0
To raise headrest: Pull headrest up .
To lower headrest: Press lock C, then press the headrest down .
SET
1
2
A
B
SEATING
REMINDER: Do not operate the vehicle with the headrests removed . Headrests can provide critical neck and head support in an accident .
This illustration is for demonstration purposes only. Actual feature on vehicle may vary.
These illustrations are for demonstration purposes only. Actual features on vehicle may vary.
REMINDER: Do not attempt to operate the driver position memory system while the vehicle is moving . This could result in loss of control of the vehicle .