Page 449 of 591

What to do in an emergency
30
6
9. Connect between compressor and
the vehicle power outlet using the
cable and connectors (4).
✽ ✽NOTICE
Only use the front passenger side
power outlet.
10. With the engine start/stop button
position on: switch on the com-
pressor and let it run for approxi-
mately 5~7 minutes to fill the
sealant up to proper pressure
(refer to the "Tires and wheels" in
chapter 8). Be careful not to over-
inflate the tire and stay away from
the tire when filling it. When the
tire and wheel are damaged, do
not use Tire Mobility Kit for your
safety. 11. Switch off the compressor.
12. Detach the hose from the sealant
bottle connector and from the tire
valve.
Return the Tire Mobility Kit to its stor-
age location in the vehicle.
OJFA066038
WARNING
Do not attempt to drive your
vehicle if the tire pressure is
below 29 psi (200 kPa). This
could result in an accident due
to sudden tire failure.
WARNING
Carbon monoxide poisoning
and suffocation is possible if the
engine is left running in a poorly
ventilated or unventilated loca-
tion (such as inside a building).
JFa PE USA 6.qxp 5/15/2019 3:18 PM Page 30
Page 450 of 591

631
What to do in an emergency
Distributing the sealant
13. Immediately drive approximately4~6 miles (7~10 km or, about 10
min) to evenly distribute the
sealant in the tire.
When you use the Tire Mobility Kit,
the tire pressure sensors and wheel
may be stained by sealant. Therefore,
remove the tire pressure sensors and
wheel stained by sealant and have
your vehicle inspected by an author-
ized Kia dealer.
Checking the tire inflation
pressure
1.After driving approximately 4~6 miles (7~10 km or about 10 min-
utes), stop at a suitable location.
2.Connect the filling hose (3) of the compressor (clip mounted side)
directly and then connect the filling
hose (3) (opposite side) to the tire
valve.
3.Connect between compressor and the vehicle power outlet using the
cable and connectors.
4.Adjust the tire inflation pressure to 29 psi (200 kPa). With the ignition
switched on, proceed as follows.
- To increase the inflation pres-sure: Switch on the compressor,
position I. To check the current
inflation pressure setting, briefly
switch off the compressor. - To reduce the inflation pres-
sure: Press the button (9) on the
compressor.
CAUTION - Tire pressure
sensor
When you use the Tire MobilityKit including sealant notapproved by Kia, the tire pres-sure sensors may be damagedby sealant. The sealant on thetire pressure sensor and wheelshould be removed when youreplace the tire with a new oneand inspect the tire pressuresensors at an authorized dealer.
WARNING
Do not let the compressor run
for more than 10 minutes, other-
wise the device will overheat
and may be damaged.
JFa PE USA 6.qxp 5/15/2019 3:18 PM Page 31
Page 451 of 591
What to do in an emergency
32
6
Technical Data
System voltage: DC 12 V
Working voltage: DC 10 - 15 V
Amperage rating: max. 15 A ± 1A (at
DC 12V operation)
Suitable for use at temperatures: -22 ~ +158°F (-30 ~ +70°C)
Max. working pressure: 87 psi (6 bar)
Size
Compressor: 6.3 x 5.9 x 2.2 in. (161 x 150 x 55.8 mm)
Sealant bottle: 4.1 x 3.3 ø in. (104 x 85 ø mm)
Compressor weight: 1.77 lbs ± 0.07 lbs (805g ± 30g)
Sealant volume: 18.3 cu. in. (300 ml) ❈
Sealant and spare parts can be
obtained and replaced at an
authorized vehicle or tire dealer.
Empty sealant bottles may be dis-
posed of at home. Liquid residue
from the sealant should be dis-
posed of by your vehicle or tire
dealer or in accordance with local
waste disposal regulations.
JFa PE USA 6.qxp 5/15/2019 3:18 PM Page 32
Page 452 of 591

633
What to do in an emergency
TOWING
Towing service
If emergency towing is necessary,
we recommend having it done by an
authorized Kia dealer or a commer-
cial tow-truck service. Proper lifting
and towing procedures are neces-
sary to prevent damage to the vehi-
cle. The use of wheel dollies or
flatbed is recommended.It is acceptable to tow the vehicle
with the rear wheels on the ground
(without dollies) and the front wheels
off the ground.
If any of the loaded wheels or sus-
pension components are damaged
or the vehicle is being towed with the
front wheels on the ground, use a
towing dolly under the front wheels.
When being towed by a commercial
tow truck and wheel dollies are not
used, the front of the vehicle should
always be lifted, not the rear.
✽ ✽
NOTICE
If the EPB does not release normal-
ly, take your vehicle to an author-
ized Kia dealer by loading the vehi-
cle on a flatbed tow truck and have
the system checked.
OMC045012 dolly
dolly
WARNING - Side and
curtain Air bag
If your vehicle is equipped with
side and curtain air bag, set the
ignition switch to LOCK or ACC
position when the vehicle is
being towed.
The side and curtain air bag
may deploy when the ignition is
ON, and the rollover sensor
detects the situation as a
rollover.
JFa PE USA 6.qxp 5/15/2019 3:18 PM Page 33
Page 453 of 591
What to do in an emergency
34
6
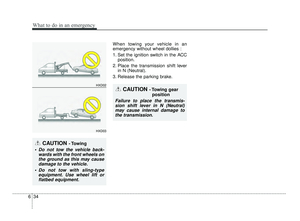
When towing your vehicle in an
emergency without wheel dollies :
1. Set the ignition switch in the ACC
position.
2. Place the transmission shift lever in N (Neutral).
3. Release the parking brake.
CAUTION - Towing gear position
Failure to place the transmis-sion shift lever in N (Neutral)may cause internal damage tothe transmission.
CAUTION - Towing
Do not tow the vehicle back- wards with the front wheels onthe ground as this may causedamage to the vehicle.
Do not tow with sling-type equipment. Use wheel lift orflatbed equipment.
HXD02
HXD03
JFa PE USA 6.qxp 5/15/2019 3:18 PM Page 34
Page 454 of 591

Maintenance
Engine compartment . . . . . . . . . . . . . . . . . . . . . . . . 7-4
Maintenance services . . . . . . . . . . . . . . . . . . . . . . . . 7-6
• Owner’s responsibility . . . . . . . . . . . . . . . . . . . . . . . . . 7-6
• Owner maintenance precautions . . . . . . . . . . . . . . . . . 7-7
Owner maintenance . . . . . . . . . . . . . . . . . . . . . . . . . 7-8
• Owner maintenance schedule. . . . . . . . . . . . . . . . . . . . 7-8
Scheduled maintenance service. . . . . . . . . . . . . . . 7-10
Explanation of scheduled maintenance items . . . 7-22
• Engine oil and filter. . . . . . . . . . . . . . . . . . . . . . . . . . . 7-22
• Drive belts . . . . . . . . . . . . . . . . . . . . . . . . . . . . . . . . . . 7-22\
• Fuel filter (for gasoline) . . . . . . . . . . . . . . . . . . . . . . . 7-22
• Fuel lines, fuel hoses and connections . . . . . . . . . . . . 7-22
• Vapor hose and fuel filler cap . . . . . . . . . . . . . . . . . . 7-22
• Vacuum crankcase ventilation hoses . . . . . . . . . . . . . 7-23
• Air cleaner filter . . . . . . . . . . . . . . . . . . . . . . . . . . . . . 7-23
• Spark plugs . . . . . . . . . . . . . . . . . . . . . . . . . . . . . . . . . 7-23
• Valve clearance . . . . . . . . . . . . . . . . . . . . . . . . . . . . . . 7-23
• Cooling system . . . . . . . . . . . . . . . . . . . . . . . . . . . . . . . 7-23
• Coolant . . . . . . . . . . . . . . . . . . . . . . . . . . . . . . . . . . . . \
. 7-23
• Automatic transmission fluid . . . . . . . . . . . . . . . . . . . 7-23
• Dual clutch transmission Fluid . . . . . . . . . . . . . . . . . 7-24
• Brake hoses and lines . . . . . . . . . . . . . . . . . . . . . . . . . 7-24
• Brake fluid . . . . . . . . . . . . . . . . . . . . . . . . . . . . . . . . . . 7-24\
• Parking brake . . . . . . . . . . . . . . . . . . . . . . . . . . . . . . . 7-25
• Brake discs, pads, calipers and rotors. . . . . . . . . . . . 7-25
• Exhaust pipe and muffler . . . . . . . . . . . . . . . . . . . . . . 7-25
• Suspension mounting bolts . . . . . . . . . . . . . . . . . . . . . 7-25
• Steering gear box, linkage &
boots/lower arm ball joint . . . . . . . . . . . . . . . . . . . . 7-25
• Drive shafts and boots. . . . . . . . . . . . . . . . . . . . . . . . . 7-25
• Air conditioning refrigerant . . . . . . . . . . . . . . . . . . . . 7-25Checking fluid levels . . . . . . . . . . . . . . . . . . . . . . . 7-25
Engine oil. . . . . . . . . . . . . . . . . . . . . . . . . . . . . . . . . 7-26
• Checking the engine oil level . . . . . . . . . . . . . . . . . . . 7-26
• Changing the engine oil and filter . . . . . . . . . . . . . . . 7-27
Engine coolant . . . . . . . . . . . . . . . . . . . . . . . . . . . . 7-28
• Checking the coolant level . . . . . . . . . . . . . . . . . . . . . 7-28
• Changing the coolant . . . . . . . . . . . . . . . . . . . . . . . . . 7-30
Brake fluid . . . . . . . . . . . . . . . . . . . . . . . . . . . . . . . 7-31
• Checking the brake fluid level . . . . . . . . . . . . . . . . . . 7-31
Washer fluid . . . . . . . . . . . . . . . . . . . . . . . . . . . . . . 7-32
• Checking the washer fluid level . . . . . . . . . . . . . . . . . 7-32
Parking brake . . . . . . . . . . . . . . . . . . . . . . . . . . . . . 7-33
• Checking the parking brake. . . . . . . . . . . . . . . . . . . . 7-33
Air cleaner. . . . . . . . . . . . . . . . . . . . . . . . . . . . . . . . 7-34
• Filter replacement . . . . . . . . . . . . . . . . . . . . . . . . . . . . 7-34
7
JFa PE USA 7.qxp 5/15/2019 3:12 PM Page 1
Page 455 of 591

Climate control air filter . . . . . . . . . . . . . . . . . . . . 7-36
• Filter inspection . . . . . . . . . . . . . . . . . . . . . . . . . . . . . . 7-36
Wiper blades . . . . . . . . . . . . . . . . . . . . . . . . . . . . . . 7-38
• Blade inspection . . . . . . . . . . . . . . . . . . . . . . . . . . . . . . 7-38
• Blade replacement . . . . . . . . . . . . . . . . . . . . . . . . . . . . 7-38
Battery . . . . . . . . . . . . . . . . . . . . . . . . . . . . . . . . . . . 7-\
42
• For best battery service . . . . . . . . . . . . . . . . . . . . . . . 7-42
• Recharging the battery . . . . . . . . . . . . . . . . . . . . . . . . 7-43
• Reset items . . . . . . . . . . . . . . . . . . . . . . . . . . . . . . . . . . 7-44\
Tires and wheels . . . . . . . . . . . . . . . . . . . . . . . . . . . 7-45
• Tire care . . . . . . . . . . . . . . . . . . . . . . . . . . . . . . . . . . . . \
7-45
• Recommended cold tire inflation pressures . . . . . . . 7-45
• Tire pressure . . . . . . . . . . . . . . . . . . . . . . . . . . . . . . . . 7-46
• Checking tire inflation pressure. . . . . . . . . . . . . . . . . 7-46
• Tire rotation . . . . . . . . . . . . . . . . . . . . . . . . . . . . . . . . . 7-47
• Wheel alignment and tire balance . . . . . . . . . . . . . . . 7-48
• Tire replacement . . . . . . . . . . . . . . . . . . . . . . . . . . . . . 7-49
• Wheel replacement . . . . . . . . . . . . . . . . . . . . . . . . . . . 7-50
• Tire traction . . . . . . . . . . . . . . . . . . . . . . . . . . . . . . . . . 7-50
• Tire maintenance . . . . . . . . . . . . . . . . . . . . . . . . . . . . . 7-50
• Tire sidewall labeling . . . . . . . . . . . . . . . . . . . . . . . . . 7-50
• All season tires . . . . . . . . . . . . . . . . . . . . . . . . . . . . . . . 7-57
• Summer tires . . . . . . . . . . . . . . . . . . . . . . . . . . . . . . . . 7-57
• Snow tires . . . . . . . . . . . . . . . . . . . . . . . . . . . . . . . . . . . 7-\
57
• Tire chains . . . . . . . . . . . . . . . . . . . . . . . . . . . . . . . . . . 7-58\
• Radial-ply tires . . . . . . . . . . . . . . . . . . . . . . . . . . . . . . 7-58
• Low aspect ratio tire . . . . . . . . . . . . . . . . . . . . . . . . . . 7-59
Fuses . . . . . . . . . . . . . . . . . . . . . . . . . . . . . . . . . . . . \
7-60
• Inner panel fuse replacement . . . . . . . . . . . . . . . . . . . 7-62
• Engine compartment fuse replacement. . . . . . . . . . . 7-64
• Fuse/relay panel description. . . . . . . . . . . . . . . . . . . . 7-66
Light bulbs . . . . . . . . . . . . . . . . . . . . . . . . . . . . . . . 7-76
• Bulb replacement precaution . . . . . . . . . . . . . . . . . . . 7-76
• Light bulb position (Front). . . . . . . . . . . . . . . . . . . . . 7-78
• Light bulb position (Rear) . . . . . . . . . . . . . . . . . . . . . 7-79
• Light bulb position (Side) . . . . . . . . . . . . . . . . . . . . . . 7-80
• Headlamp (Low beam) bulb replacement
(Headlamp Type A) . . . . . . . . . . . . . . . . . . . . . . . . . . 7-80
• Headlamp (High beam) bulb replacement (Headlamp Type A) . . . . . . . . . . . . . . . . . . . . . . . . . . 7-81
• Front turn signal lamp bulb replacement (Headlamp Type A) . . . . . . . . . . . . . . . . . . . . . . . . . . 7-82
• Headlamp (Low/High beam) (LED type) bulb replacement (Headlamp Type B) . . . . . . . . . . 7-82
• Position lamp / Day time running lamp (LED type) replacement (Headlamp Type A, B) . . . . . . . . . . . . 7-83
• Front fog lamp bulb replacement . . . . . . . . . . . . . . . 7-83
• Side repeater lamp (LED type) bulb replacement . . 7-84
• Rear turn signal lamp bulb replacement . . . . . . . . . 7-84
• Stop and tail lamp bulb replacement . . . . . . . . . . . . 7-85
7
JFa PE USA 7.qxp 5/15/2019 3:12 PM Page 2
Page 456 of 591

• Stop and tail lamp (LED type) bulb replacement . . 7-87
• Back-up lamp bulb replacement . . . . . . . . . . . . . . . . 7-87
• Tail lamp bulb replacement . . . . . . . . . . . . . . . . . . . . 7-88
• License plate lamp bulb replacement . . . . . . . . . . . . 7-89
• High mounted stop lamp (LED type)bulb replacement . . . . . . . . . . . . . . . . . . . . . . . . . . . . 7-90
• Map lamp bulb replacement . . . . . . . . . . . . . . . . . . . 7-90
• Vanity mirror lamp bulb replacement . . . . . . . . . . . 7-91
• Room lamp bulb replacement . . . . . . . . . . . . . . . . . . 7-91
• Personal lamp (LED type) bulb replacement . . . . . . 7-92
• Glove box lamp bulb replacement . . . . . . . . . . . . . . . 7-92
• Trunk lamp bulb replacement . . . . . . . . . . . . . . . . . . 7-93
Appearance care . . . . . . . . . . . . . . . . . . . . . . . . . . . 7-94
• Exterior care . . . . . . . . . . . . . . . . . . . . . . . . . . . . . . . . 7-94
• Interior care . . . . . . . . . . . . . . . . . . . . . . . . . . . . . . . . . 7-99
Emission control system . . . . . . . . . . . . . . . . . . . 7-102
• Crankcase emission control system . . . . . . . . . . . . . 7-102
• Evaporative emission control (including ORVR: Onboard Refueling Vapor Recovery) system . . . . 7-102
• Exhaust emission control system . . . . . . . . . . . . . . . 7-103
California perchlorate notice . . . . . . . . . . . . . . . 7-105
7
JFa PE USA 7.qxp 5/15/2019 3:12 PM Page 3