2020 KIA NIRO EV change time
[x] Cancel search: change timePage 2 of 54

GETTING TO KNOW YOUR NIRO EV
Welcome to the Kia Family!
Your new Kia vehicle has been designed, engineered and manufactured to provide you with years of comfortable and dependable driving.
Kia is committed to quality, innovation, safety and — above all — your satisfaction.
Using This Guide
The information contained in this guide is a brief overview that will help you become familiar with the operation and features of your new Kia vehicle. The flipbook format facilitates information access, while the detailed illustrations help to ensure the instructions are easy to follow.
This Features & Functions Guide, and the specific operational and safety information it provides, is not a substitute for your Owner’s Manual. In the interest of your safety and that of the vehicle’s occupants, and to help you avoid risks that may result in death or serious injury, Kia reminds you to carefully read your Owner’s Manual in order to fully familiarize yourself with the important information and safety warnings it contains.
While Kia endeavors to ensure that the information contained in this guide is accurate at the time of printing, Kia may change vehicle specifications without notice in advance or after the fact, and assumes no liability in connection with such changes.
www.kia.com
Consumer - Roadside Assistance†16 1-800-333-4KIA (4542)
See Back Pages for Vehicle Maintenance Schedule Always check the Owner’s Manual for complete operating information and safety warnings.
†LEGAL DISCL AIMERS ON BACK INSIDE COVER
Page 9 of 54

7*IF EQUIPPED ALWAYS CHECK THE OWNER’S MANUAL FOR COMPLETE OPER ATING INFORMATION AND SAFET Y WARNINGS .
Trip Modes / Trip Computer
The Trip Computer is a driver information system that displays information
related to driving, such as Average and Instant accumulated info, drive
info, driving style and energy flow . It appears on the display when the
Engine Start /Stop button is in the ON position .
To cycle through the cluster modes, press the Mode button A .
When in the Trip Computer mode , press the Select /Reset (OK ) button
B to cycle through the screens . When displaying ACCUMUL ATED INFO or
DRIVE INFO screens, press and hold the OK button B to reset to zero .
LCD Instrument Cluster Modes
Press Mode button A to scroll through different LCD Instrument Cluster
Modes .
Trip Computer Mode: Displays driving information for
consumption info, accumulated info, drive info, driving style
and energy flow
Turn-by-Turn Mode*: Displays the route guidance, destination info
Driving Assist: Displays Lane Safety, Driver Attention Warning
(DAW ) and TPMS
User Settings Mode: Change settings for driver assistance, doors,
lights, sound, convenience, service interval, other, reset
Master Warning Mode: Informs and only appears when vehicle
systems such as Forward Collision Assist (FCA), Blind-Spot
Collision Warning (BCW ), Smart Cruise Control (SCC), High Beam
Assist (HBA) or others have malfunctioned
Your vehicle’s steering wheel buttons may differ from those in the illustrations.
Driving while distracted is dangerous and should be avoided. Drivers should remain attentive to driving and always exercise caution when using the steering-wheel-mounted controls while driving.
REMINDERS:
•
Appearance of Trip Computer display may differ as equipped
•
All stored driving information (except Odometer and Range) is reset if the battery is disconnected
DRIVING STYLE• Economical %• Normal %• Aggressive %
CONSUMPTION INFO• Average Energy Consumption• Instant Energy Consumption
ACCUMULATED INFO• Tripmeter• Average Energy Consumption• Timer
DRIVE INFO• Tripmeter• Average Energy Consumption• Timer
ENERGY FLOW
Accumulated Info
T rip
Average
Ti mer 247.5
15.7
17:42mi
MPG
h
(Buttons located on Steering Wheel – Type A shown)
MODE
RES
CRUISE
CAN CELOKSET
MODE
RES
CRUISE
CAN CELOKSET
MODE
A
B
INSTRUMENT CLUSTER
Page 15 of 54

13*IF EQUIPPED ALWAYS CHECK THE OWNER’S MANUAL FOR COMPLETE OPER ATING INFORMATION AND SAFET Y WARNINGS .
See Owner’s Manual for more detailed information on screens.
These illustrations are for demonstration purposes only. Some items may appear different or vary in illustrations.
EV Mode - UVO link with Navigation* (Continued)
Electricity Use – Displays current energy
consumption for each system of the vehicle .
ECO Driving – Displays ECO level information and
ECO driving history .
Charge Management – Allows you to select the time
and date you wish to reserve for automatic charging
and automatic climate control .
EV Settings – Allows the user to change the Winter
mode, warning and EV route settings .
3:00PM
Instant
Cumulative(Ignition on - Now)Driving
256 kw
--- % 83 % 17 %--- %
0.00 kw
0.54 kw0.20 kw
Climate
ElectronicsBattery care
Electricity Use
3:00
Nov. 27PM
Charge Management
Charging
and ClimateNext Departure
Jul 9 (Mon) 3:30 PM
Scheduled Charging
Scheduled Charging is not set.
Scheduled ClimateClimate is not set.
Charging
Location
Charging
Current
Max %
Charge
3:00PM
EV settings
Winter mode Range warning
Warning
EV Route
The range warning is displayed if the distance to
the destination exceeds the available vehicle range.
3:00PM
ECO driving
Eco contrib. Carbon dioxide reduction
Reduced 2.0 lb compared to the carbon
dioxide emitted when driving a gasoline
vehicle in the same segment.
EV Economy
History
CO22.0 lb(2 mi)
ELECTRIC VEHICLE (EV) FEATURES
Page 18 of 54
16*IF EQUIPPED NIRO EV FEATURES & FUNCTIONS GUIDE
ELECTRIC VEHICLE (EV) FEATURES
AUTO
OFF
AUTO
OFF
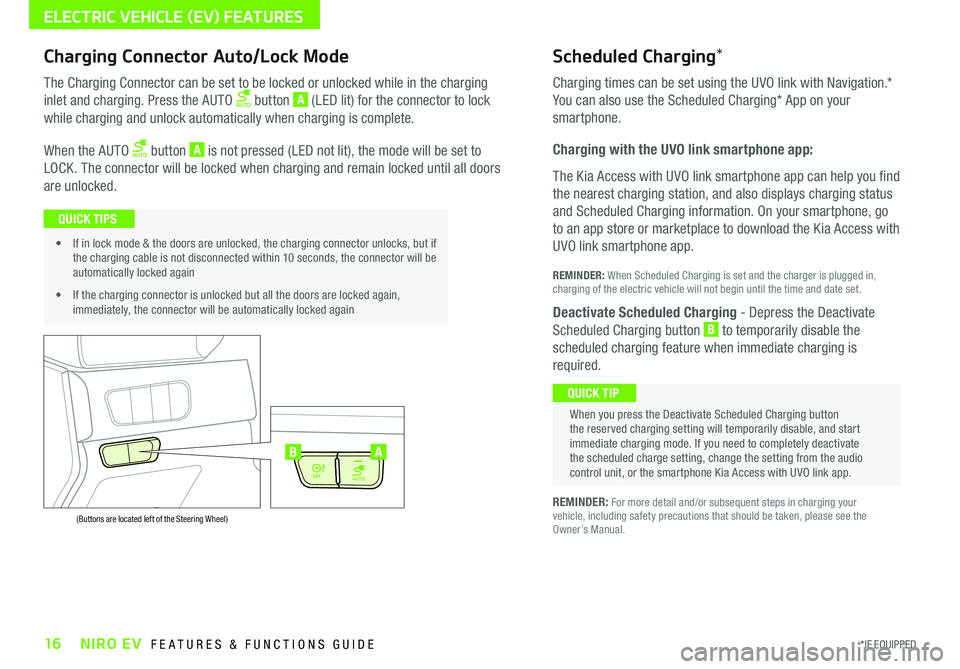
(Buttons are located left of the Steering Wheel)
AB
Scheduled Charging*Charging Connector Auto/Lock Mode
Charging times can be set using the UVO link with Navigation
.*
You can also use the Scheduled Charging* App on your
smartphone .
Charging with the UVO link smartphone app:
The Kia Access with UVO link smartphone app can help you find
the nearest charging station, and also displays charging status
and Scheduled Charging information . On your smartphone, go
to an app store or marketplace to download the Kia Access with
UVO link smartphone app .
REMINDER: When Scheduled Charging is set and the charger is plugged in, charging of the electric vehicle will not begin until the time and date set .
Deactivate Scheduled Charging - Depress the Deactivate
Scheduled Charging button B to temporarily disable the
scheduled charging feature when immediate charging is
required .
The Charging Connector can be set to be locked or unlocked while in the charging
inlet and charging . Press the AUTO button A (LED lit) for the connector to lock
while charging and unlock automatically when charging is complete .
When the AUTO button A is not pressed (LED not lit), the mode will be set to
LOCK . The connector will be locked when charging and remain locked until all doors
are unlocked .
REMINDER: For more detail and/or subsequent steps in charging your vehicle, including safety precautions that should be taken, please see the Owner’s Manual .
When you press the Deactivate Scheduled Charging button the reserved charging setting will temporarily disable, and start immediate charging mode . If you need to completely deactivate the scheduled charge setting, change the setting from the audio control unit, or the smartphone Kia Access with UVO link app .
QUICK TIP
• If in lock mode & the doors are unlocked, the charging connector unlocks, but if the charging cable is not disconnected within 10 seconds, the connector will be automatically locked again
• If the charging connector is unlocked but all the doors are locked again, immediately, the connector will be automatically locked again
QUICK TIPS
Page 19 of 54
17*IF EQUIPPED ALWAYS CHECK THE OWNER’S MANUAL FOR COMPLETE OPER ATING INFORMATION AND SAFET Y WARNINGS .
ELECTRIC VEHICLE (EV) FEATURES
Regenerative Braking with Paddle Shifters
The regenerative braking system charges the battery when
coasting or when you use the brakes to stop the vehicle .
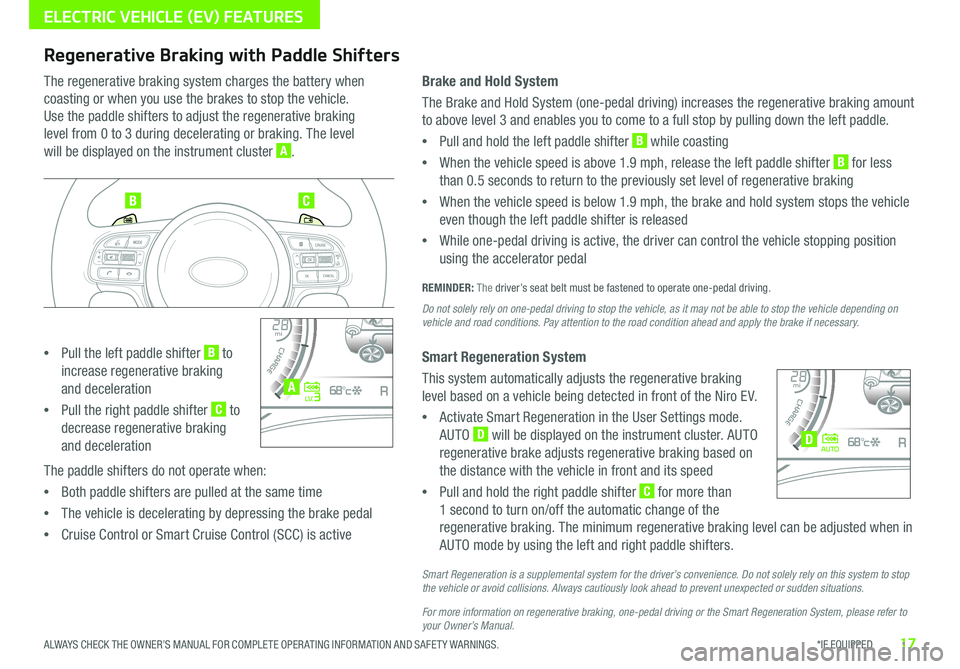
Use the paddle shifters to adjust the regenerative braking
level from 0 to 3 during decelerating or braking . The level
will be displayed on the instrument cluster A .
•Pull the left paddle shifter B to
increase regenerative braking
and deceleration
•Pull the right paddle shifter C to
decrease regenerative braking
and deceleration
The paddle shifters do not operate when:
•Both paddle shifters are pulled at the same time
•The vehicle is decelerating by depressing the brake pedal
•Cruise Control or Smart Cruise Control (SCC) is active
Brake and Hold System
The Brake and Hold System (one-pedal driving) increases the regenerative braking amount
to above level 3 and enables you to come to a full stop by pulling down the left paddle .
•Pull and hold the left paddle shifter B while coasting
•When the vehicle speed is above 1 .9 mph, release the left paddle shifter B for less
than 0 .5 seconds to return to the previously set level of regenerative braking
•When the vehicle speed is below 1 .9 mph, the brake and hold system stops the vehicle
even though the left paddle shifter is released
•While one-pedal driving is active, the driver can control the vehicle stopping position
using the accelerator pedal
REMINDER: The driver’s seat belt must be fastened to operate one-pedal driving .
Do not solely rely on one-pedal driving to stop the vehicle, as it may not be able to stop the vehicle depending on vehicle and road conditions. Pay attention to the road condition ahead and apply the brake if necessary.
Smart Regeneration System
This system automatically adjusts the regenerative braking
level based on a vehicle being detected in front of the Niro EV .
•Activate Smart Regeneration in the User Settings mode .
AUTO D will be displayed on the instrument cluster . AUTO
regenerative brake adjusts regenerative braking based on
the distance with the vehicle in front and its speed
•Pull and hold the right paddle shifter C for more than
1 second to turn on/off the automatic change of the
regenerative braking . The minimum regenerative braking level can be adjusted when in
AUTO mode by using the left and right paddle shifters .
Smart Regeneration is a supplemental system for the driver’s convenience. Do not solely rely on this system to stop the vehicle or avoid collisions. Always cautiously look ahead to prevent unexpected or sudden situations.
For more information on regenerative braking, one-pedal driving or the Smart Regeneration System, please refer to your Owner’s Manual.
BC
4010 0
60
80160
60140
80 120
100
kmmi
mi
RANGE
68
°c
CRUISE 60 mi/hECO
44444 mi
150
240
km/h
MPH
electric
L V .3RN D
L H
40
10 0
60
80160
60140
80 120
100
kmmi
mi
RANGE
68
°c
CRUISE 60 mi/hECO
44444 mi
150
240
km/h
MPH
electric
AUTORN D
L H
A
D
Page 26 of 54
24*IF EQUIPPED NIRO EV FEATURES & FUNCTIONS GUIDE
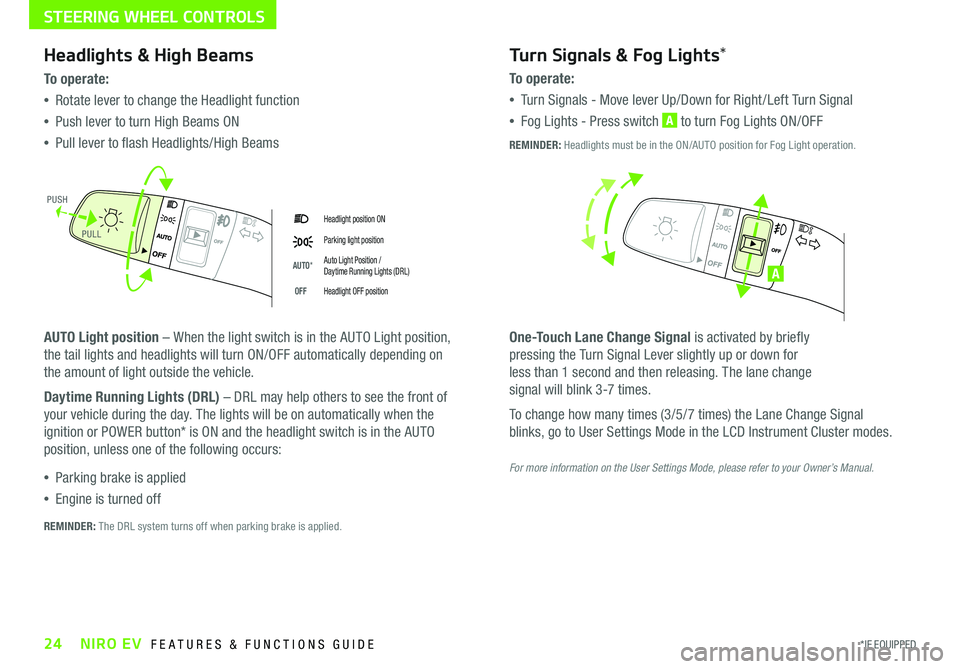
Headlight position ON
Parking light position
AUTO*Auto Light Position / Daytime Running Lights (DRL)
OFFHeadlight OFF position
Headlights & High Beams
To o p e rate:
•Rotate lever to change the Headlight function
•Push lever to turn High Beams ON
•Pull lever to flash Headlights/High Beams
AUTO Light position – When the light switch is in the AUTO Light position,
the tail lights and headlights will turn ON/OFF automatically depending on
the amount of light outside the vehicle .
Daytime Running Lights (DRL) – DRL may help others to see the front of
your vehicle during the day . The lights will be on automatically when the
ignition or POWER button* is ON and the headlight switch is in the AUTO
position, unless one of the following occurs:
•Parking brake is applied
•Engine is turned off
Turn Signals & Fog Lights*
To o p e r a t e :
•Tu r n Signals - Move lever Up/Down for Right /Left Turn Signal
•Fog Lights - Press switch A to turn Fog Lights ON/OFF
One-Touch Lane Change Signal is activated by briefly
pressing the Turn Signal Lever slightly up or down for
less than 1 second and then releasing . The lane change
signal will blink 3-7 times .
To change how many times (3/5/7 times) the Lane Change Signal
blinks, go to User Settings Mode in the LCD Instrument Cluster modes .
REMINDER: The DRL system turns off when parking brake is applied .
A
REMINDER: Headlights must be in the ON/AUTO position for Fog Light operation .
PUSH
PULL
For more information on the User Settings Mode, please refer to your Owner’s Manual.
STEERING WHEEL CONTROLS
Page 29 of 54
27ALWAYS CHECK THE OWNER’S MANUAL FOR COMPLETE OPER ATING INFORMATION AND SAFET Y WARNINGS . *IF EQUIPPED †LEGAL DISCL AIMERS ON BACK INSIDE COVER
Bluetooth® Wireless Technology†6,20
Pairing a Phone
For instructions on how to pair a phone, refer to the Car Multimedia
System User's Manual or your vehicle’s Quick Start Guide .
How to Place a Call
•Option 1: Press the Receive/Place Call button C (displays the phone
screen with call history)
•Option 2: Press the Talk button B . Then say the command “Call
{name}” or “Dial {number}” followed by contact name or number
Voice Recognition Tips Video To view a video on your mobile device, snap this QR Code or visit the listed website .
Refer to page 2 for more information .
QR CODE
During the pairing process, be sure to accept the connection requests on the phone for contacts download and to allow acceptance of all future Bluetooth® connection requests .
QUICK TIP
When using the voice command feature, wait for the system BEEP before speaking the command .
QUICK TIP
www.youtube.com/KiaFeatureVideos
Voice Recognition and Phone Contact Tips
To help optimize the Bluetooth® Wireless
Technology Voice Recognition system, below
are some tips and reminders . Improve the
performance by making a few simple changes
to your phone contacts, listed below . To help
optimize the Bluetooth® Wireless Technology Voice
Recognition system, see other tips and reminders
under Quick Tips:
•Use full names (first and last names) vs . short
or single-syllable names (e .g ., “John Smith” vs .
“Dad," “Smith Residence” vs . “Home”)
•Avoid using special characters, emojis or
hyphenated names (e .g ., @, &, #, /, -, *, +, etc . )
•Avoid using acronyms (e .g ., “In Case of
Emergency” vs . “ICE”) or words with all
capital letters
•Spell words completely, no abbreviations
(e .g ., “Doctor Smith” vs . “Dr . Smith”)
• When placing a call, speak in a natural, moderate tone, with clear pronunciation . The system may have trouble recognizing commands if you speak too softly or too loudly
• Always wait for the beep before speaking any commands
• Close windows and turn off A /C – Open windows, weather (wind/rain), or an A /C fan operating at higher speeds can interfere with Voice Recognition
• Press the talk button and say “Help” to get a list of available commands
QUICK TIPS
STEERING WHEEL CONTROLS
Page 31 of 54
29ALWAYS CHECK THE OWNER’S MANUAL FOR COMPLETE OPER ATING INFORMATION AND SAFET Y WARNINGS . *IF EQUIPPED †LEGAL DISCL AIMERS ON BACK INSIDE COVER
(Type B shown)
(Distances are approximate and vary depending on vehicle speed)
STEERING WHEEL CONTROLS
Smart Cruise Control with Stop & Go Video
To view a video on your mobile device, snap this QR Code or visit the listed website . Refer to page 2 for more information .
www.youtube.com/KiaFeatureVideos
QR CODE
Smart Cruise Control
canceled
F
E
H
17 2 f t13 0 f t
82ft
10 6 f tC
A
B
DG
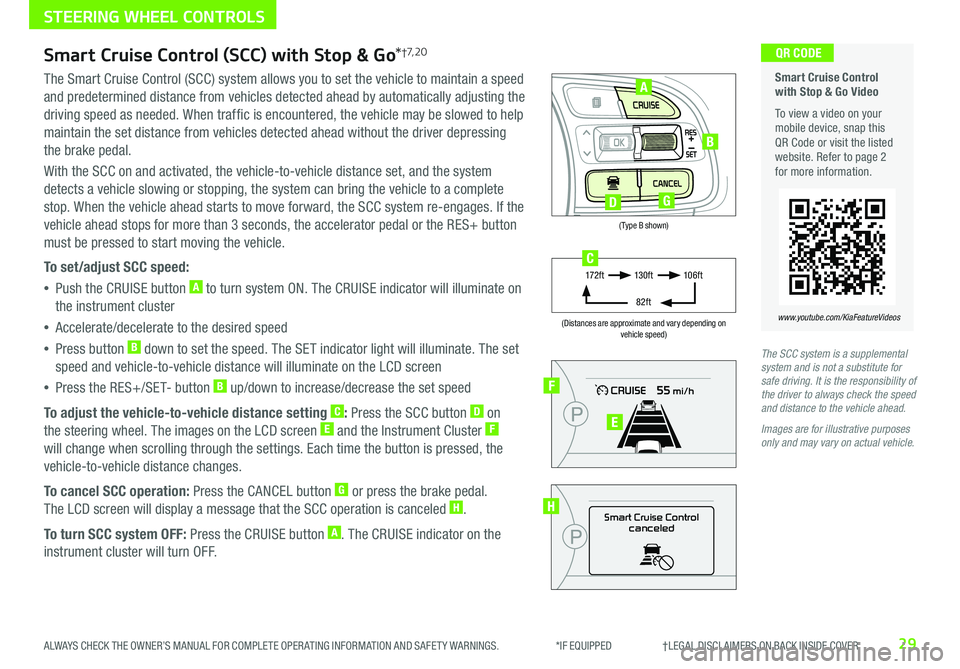
Smart Cruise Control (SCC) with Stop & Go*†7, 2 0
The Smart Cruise Control (SCC) system allows you to set the vehicle to maintain a speed
and predetermined distance from vehicles detected ahead by automatically adjusting the
driving speed as needed . When traffic is encountered, the vehicle may be slowed to help
maintain the set distance from vehicles detected ahead without the driver depressing
the brake pedal .
With the SCC on and activated, the vehicle-to-vehicle distance set, and the system
detects a vehicle slowing or stopping, the system can bring the vehicle to a complete
stop . When the vehicle ahead starts to move forward, the SCC system re-engages . If the
vehicle ahead stops for more than 3 seconds, the accelerator pedal or the RES+ button
must be pressed to start moving the vehicle .
To set/adjust SCC speed:
•Push the CRUISE button A to turn system ON . The CRUISE indicator will illuminate on
the instrument cluster
•Accelerate/decelerate to the desired speed
•Press button B down to set the speed . The SET indicator light will illuminate . The set
speed and vehicle-to-vehicle distance will illuminate on the LCD screen
•Press the RES+/SET- button B up/down to increase/decrease the set speed
To adjust the vehicle-to-vehicle distance setting C: Press the SCC button D on
the steering wheel . The images on the LCD screen E and the Instrument Cluster F
will change when scrolling through the settings . Each time the button is pressed, the
vehicle-to-vehicle distance changes .
To cancel SCC operation: Press the CANCEL button G or press the brake pedal .
The LCD screen will display a message that the SCC operation is canceled H .
To turn SCC system OFF: Press the CRUISE button A . The CRUISE indicator on the
instrument cluster will turn OFF .
The SCC system is a supplemental system and is not a substitute for safe driving. It is the responsibility of the driver to always check the speed and distance to the vehicle ahead.
Images are for illustrative purposes only and may vary on actual vehicle.