2020 KIA NIRO EV auto hold
[x] Cancel search: auto holdPage 12 of 54

10*IF EQUIPPED NIRO EV FEATURES & FUNCTIONS GUIDE
Service Interval Mode
To enter Service Interval mode, press the Mode
button A, User Settings , then scroll to Service
Interval Mode and press the OK button B .
The system will display the number of miles
remaining until next service is due, as well
as type of service .
When service is required, the
following will be displayed:
Service Required
To reset the Service Interval
mode system, press and
hold the OK button B for
more than 1 second .
To turn Service In OFF,
go to User Settings .
Service Interval Setting
To set the service interval
when in User Settings mode:
•Press the OK button B
up/down and scroll to Service Interval .
Press the OK button B to enter
•Press the OK button B up/down and toggle to
ON, then press the OK button B again . Then
press the OK button B to scroll and select the
desired miles or months for your next service
•Press the OK button B again
User Settings
To enter the User Settings mode in the LCD Instrument Cluster Modes,
press the Mode button A when the vehicle is at a standstill, Rotary Dial
Shifter Knob in Park while the Engine Start /Stop button is in the ON position .
Then select User Settings by pressing the Move/Reset (OK ) button .
You can navigate the selections on the display by pressing the OK
button B up/down, and then selecting the item by pressing the OK
button B again .
Driving Assistance*:
•Lane Safety
•Driver Attention Warning (DAW )*
•Smart Cruise Control (SCC) Reaction
•Leading Vehicle Departure Alert*
•Lane Follow Assist
•Forward Collision-Avoidance Assist (FCA)*
•Forward Collision Warning (FCW )*
•Blind-Spot Collision Warning (BCW )
•Rear Cross-Traffic Collision Warning (RCCW )*
To view a video on your mobile device, snap these QR Codes or visit the listed website .
Refer to page 2 for more information .
LCD Display Video
LCD Display: Maintenance Video
QR CODES
www.youtube.com/KiaFeatureVideos
(Buttons located on Steering Wheel – Type B)
MODE
RES
CRUISE
CAN CELOKSET
MODE
RES
CRUISE
CAN CELOKSET
MODE
A
B
Service in
Off
Service Required
0000mi.
0000mi.
Door:
•Automatically Lock
•Automatically Unlock
•Two Press Unlock
Lights:
•One Touch Turn Signal
•Ambient Light
Brightness
•Ambient Light Color
•Headlamp Delay*
Sound:
•Parking Distance
Warning-Forward
Volume*
Convenience:
•Seat Easy Access*
•Utility Mode
•Welcome Mirror/Light
•Wireless Charging
System*
•Wiper/Lights Display*
•Auto Rear Wiper
•Smart Regeneration
•Icy Road Warning
Service Interval:
•Enable Service Interval
•Adjust Interval
•Reset
Other features:
•Aux . Battery Saver+
•Energy Consumption
Reset
•Temperature Unit
•Tire Pressure Unit
•Instrument Cluster
Layout*
Reset
•Choosing reset will
restore defaults for all
User Settings menus
INSTRUMENT CLUSTER
Page 13 of 54

11*IF EQUIPPED ALWAYS CHECK THE OWNER’S MANUAL FOR COMPLETE OPER ATING INFORMATION AND SAFET Y WARNINGS .
mi
To help reduce energy consumption:
•Drive at a moderate speed, accelerating smoothly and at a moderate rate
•Keep tires inflated to the recommended pressure and wheels aligned properly
QUICK TIP
For more information on Driving Modes, refer to your Owner’s Manual or contact your local dealership.
Drive Modes
Niro EV is equipped with four distinct and customizable driving modes . Press
the Drive Mode button A to select the desired mode .
•ECO+ – This super power-saving mode is designed to help maximize
battery energy . Press and hold the Drive Mode button A to select the
ECO+ mode
•ECO – This mode can help enhance efficiency by managing battery usage
•NORMAL – This mode balances drivability and efficiency
•SPORT – This mode provides enhanced acceleration and dynamic
drivability
An indicator in the instrument cluster will illuminate to show which drive
mode you have selected (no indicator will appear for the NORMAL mode) .
Smart ECO pedal guide – When ECO mode is selected, the
instrument cluster will show 3 efficiency zones to keep you
informed of your power usage with accelerator pedal input .
B Variable ECO zone
C Variable power zone
D Regeneration/charge zone
N
P
PRELEASE
AUTO
HOLD
D
R
DRIVE
MODEA
(Button located at right below Rotary Dial Shifter Knob)
D
C
B
ELECTRIC VEHICLE (EV) FEATURES
Power Range
Regen Range
Variable ECO Range
Accelerator pedal input*
Page 17 of 54
15*IF EQUIPPED ALWAYS CHECK THE OWNER’S MANUAL FOR COMPLETE OPER ATING INFORMATION AND SAFET Y WARNINGS .
ELECTRIC VEHICLE (EV) FEATURES
Zero Emission
POWER
CHARGE
FAULT
Zero Emission
POWER
CHARGE
FAULT
Zero Emission
POWER
CHARGE
FAULT
Zero Emission
POWER
CHARGE
FAULT
( Trickle / normal charge shown)
Charging Your Electric Vehicle (Continued)
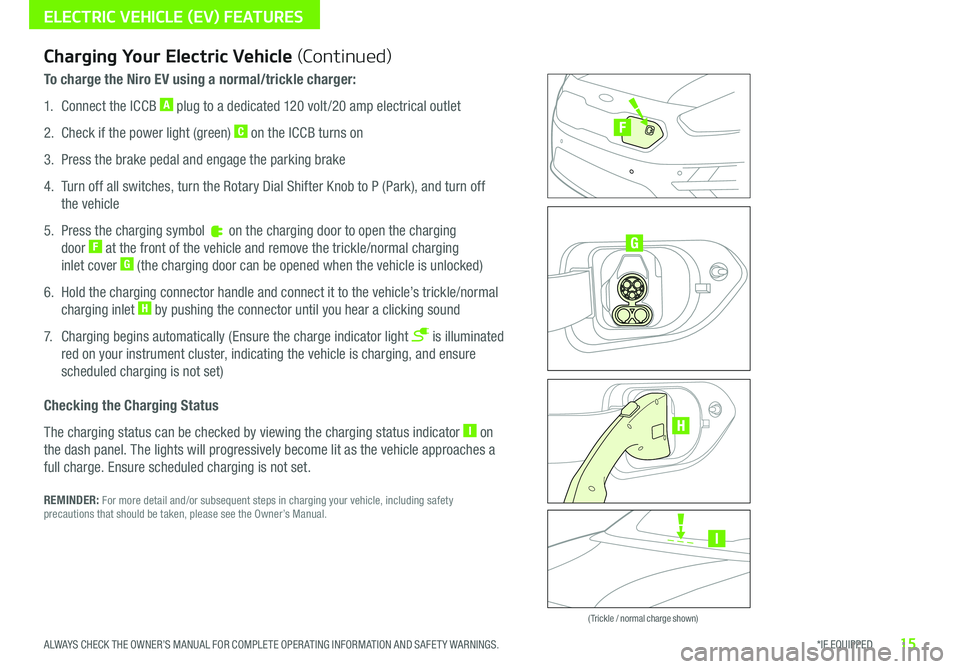
To charge the Niro EV using a normal/trickle charger:
1 . Connect the ICCB A plug to a dedicated 120 volt /20 amp electrical outlet
2 . Check if the power light (green) C on the ICCB turns on
3 . Press the brake pedal and engage the parking brake
4 . Turn off all switches, turn the Rotary Dial Shifter Knob to P (Park), and turn off
the vehicle
5 . Press the charging symbol on the charging door to open the charging
door F at the front of the vehicle and remove the trickle/normal charging
inlet cover G (the charging door can be opened when the vehicle is unlocked)
6 . Hold the charging connector handle and connect it to the vehicle’s trickle/normal
charging inlet H by pushing the connector until you hear a clicking sound
7 . Charging begins automatically (Ensure the charge indicator light is illuminated
red on your instrument cluster, indicating the vehicle is charging, and ensure
scheduled charging is not set)
Checking the Charging Status
The charging status can be checked by viewing the charging status indicator I on
the dash panel . The lights will progressively become lit as the vehicle approaches a
full charge . Ensure scheduled charging is not set .
REMINDER: For more detail and/or subsequent steps in charging your vehicle, including safety precautions that should be taken, please see the Owner’s Manual .
I
G
F
H
Page 19 of 54
17*IF EQUIPPED ALWAYS CHECK THE OWNER’S MANUAL FOR COMPLETE OPER ATING INFORMATION AND SAFET Y WARNINGS .
ELECTRIC VEHICLE (EV) FEATURES
Regenerative Braking with Paddle Shifters
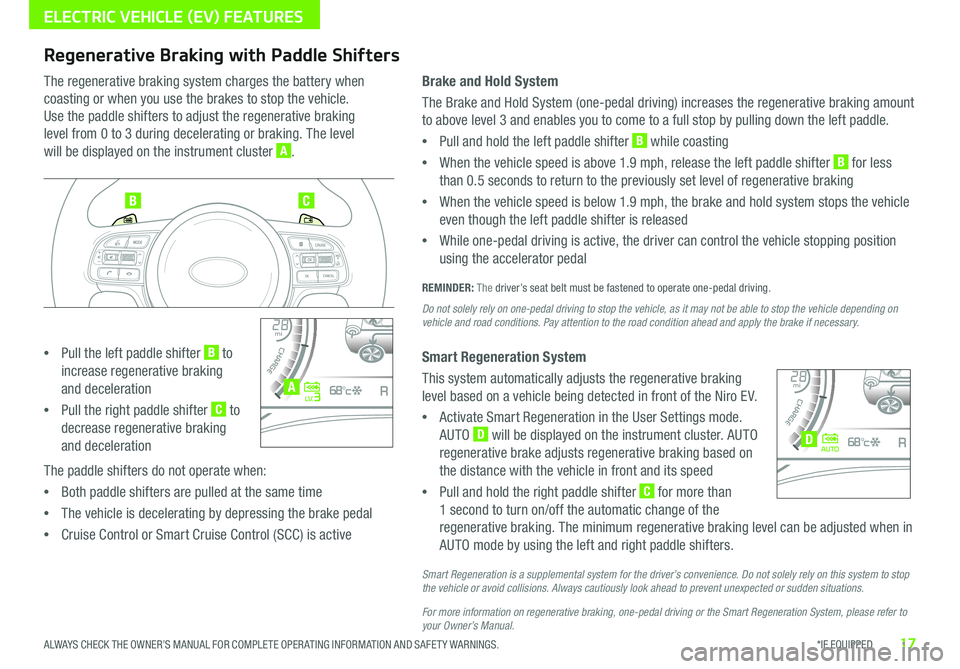
The regenerative braking system charges the battery when
coasting or when you use the brakes to stop the vehicle .
Use the paddle shifters to adjust the regenerative braking
level from 0 to 3 during decelerating or braking . The level
will be displayed on the instrument cluster A .
•Pull the left paddle shifter B to
increase regenerative braking
and deceleration
•Pull the right paddle shifter C to
decrease regenerative braking
and deceleration
The paddle shifters do not operate when:
•Both paddle shifters are pulled at the same time
•The vehicle is decelerating by depressing the brake pedal
•Cruise Control or Smart Cruise Control (SCC) is active
Brake and Hold System
The Brake and Hold System (one-pedal driving) increases the regenerative braking amount
to above level 3 and enables you to come to a full stop by pulling down the left paddle .
•Pull and hold the left paddle shifter B while coasting
•When the vehicle speed is above 1 .9 mph, release the left paddle shifter B for less
than 0 .5 seconds to return to the previously set level of regenerative braking
•When the vehicle speed is below 1 .9 mph, the brake and hold system stops the vehicle
even though the left paddle shifter is released
•While one-pedal driving is active, the driver can control the vehicle stopping position
using the accelerator pedal
REMINDER: The driver’s seat belt must be fastened to operate one-pedal driving .
Do not solely rely on one-pedal driving to stop the vehicle, as it may not be able to stop the vehicle depending on vehicle and road conditions. Pay attention to the road condition ahead and apply the brake if necessary.
Smart Regeneration System
This system automatically adjusts the regenerative braking
level based on a vehicle being detected in front of the Niro EV .
•Activate Smart Regeneration in the User Settings mode .
AUTO D will be displayed on the instrument cluster . AUTO
regenerative brake adjusts regenerative braking based on
the distance with the vehicle in front and its speed
•Pull and hold the right paddle shifter C for more than
1 second to turn on/off the automatic change of the
regenerative braking . The minimum regenerative braking level can be adjusted when in
AUTO mode by using the left and right paddle shifters .
Smart Regeneration is a supplemental system for the driver’s convenience. Do not solely rely on this system to stop the vehicle or avoid collisions. Always cautiously look ahead to prevent unexpected or sudden situations.
For more information on regenerative braking, one-pedal driving or the Smart Regeneration System, please refer to your Owner’s Manual.
BC
4010 0
60
80160
60140
80 120
100
kmmi
mi
RANGE
68
°c
CRUISE 60 mi/hECO
44444 mi
150
240
km/h
MPH
electric
L V .3RN D
L H
40
10 0
60
80160
60140
80 120
100
kmmi
mi
RANGE
68
°c
CRUISE 60 mi/hECO
44444 mi
150
240
km/h
MPH
electric
AUTORN D
L H
A
D
Page 23 of 54
21ALWAYS CHECK THE OWNER’S MANUAL FOR COMPLETE OPER ATING INFORMATION AND SAFET Y WARNINGS . *IF EQUIPPED †LEGAL DISCL AIMERS ON BACK INSIDE COVER
Electronic Stability Control (ESC)†9
The ESC system is designed to help stabilize the vehicle during certain
cornering maneuvers . It is a good idea to keep ESC turned ON whenever
possible .
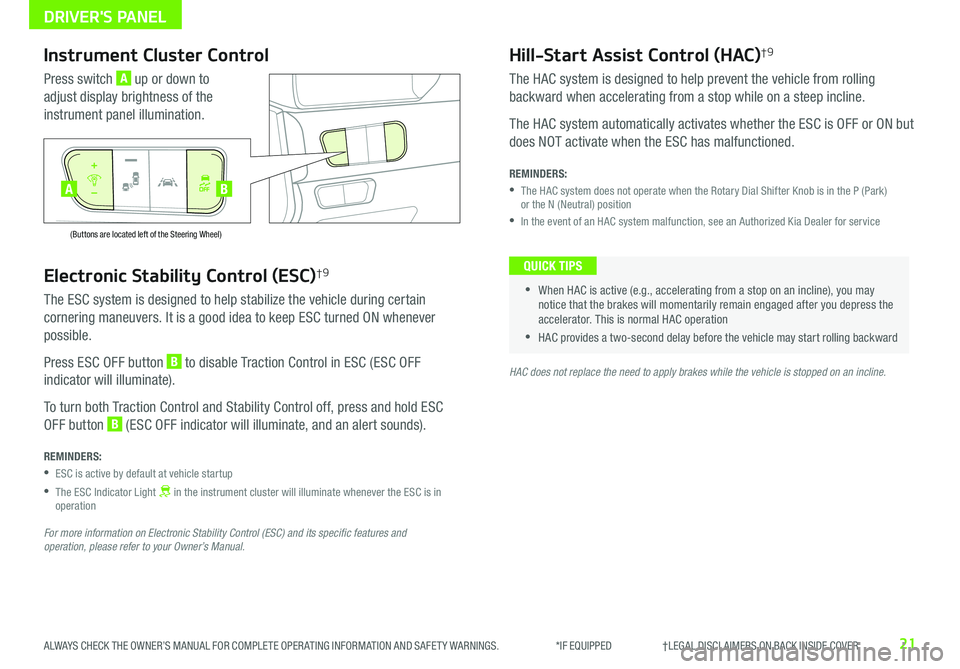
Press ESC OFF button B to disable Traction Control in ESC (ESC OFF
indicator will illuminate) .
To turn both Traction Control and Stability Control off, press and hold ESC
OFF button B (ESC OFF indicator will illuminate, and an alert sounds) .
REMINDERS:
•ESC is active by default at vehicle startup
•
The ESC Indicator Light in the instrument cluster will illuminate whenever the ESC is in operation
For more information on Electronic Stability Control (ESC) and its specific features and operation, please refer to your Owner’s Manual.
HAC does not replace the need to apply brakes while the vehicle is stopped on an incline.
Instrument Cluster Control
Press switch A up or down to
adjust display brightness of the
instrument panel illumination .
Hill-Start Assist Control (HAC)†9
The HAC system is designed to help prevent the vehicle from rolling
backward when accelerating from a stop while on a steep incline .
The HAC system automatically activates whether the ESC is OFF or ON but
does NOT activate when the ESC has malfunctioned .
REMINDERS:
•
The HAC system does not operate when the Rotary Dial Shifter Knob is in the P (Park) or the N (Neutral) position
•In the event of an HAC system malfunction, see an Authorized Kia Dealer for service
•
•When HAC is active (e .g ., accelerating from a stop on an incline), you may notice that the brakes will momentarily remain engaged after you depress the accelerator . This is normal HAC operation
•HAC provides a two-second delay before the vehicle may start rolling backward
QUICK TIPS
AUTO
OFF
(Buttons are located left of the Steering Wheel)
AUTO
OFF
BA
DRIVER'S PANEL
Page 30 of 54
28NIRO EV FEATURES & FUNCTIONS GUIDE*IF EQUIPPED †LEGAL DISCL AIMERS ON BACK INSIDE COVER
Audio Controls†19
AD
E
F
CB
Standard Cruise Control†2 0
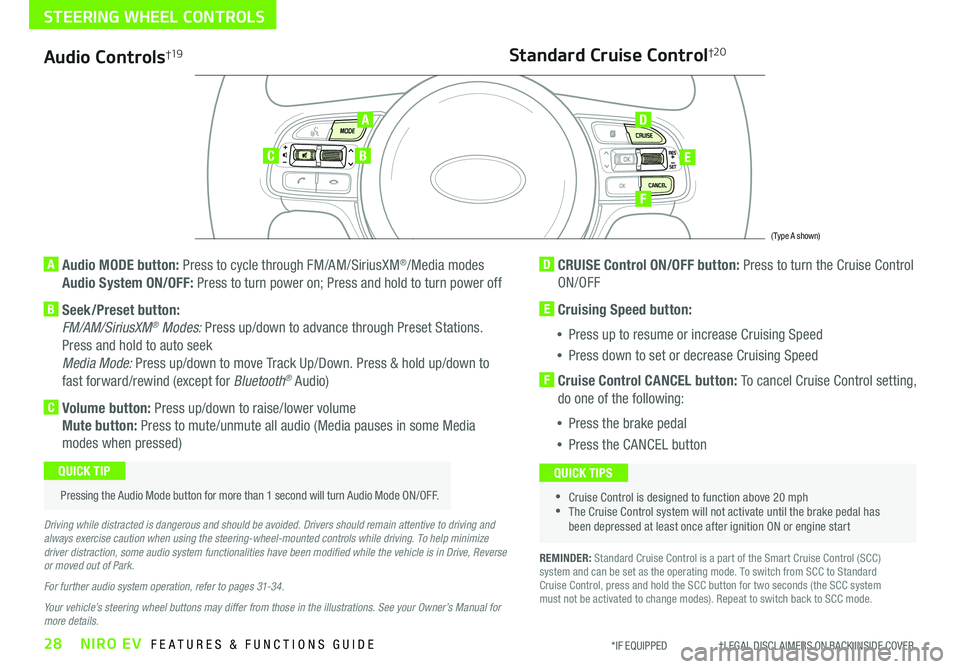
A Audio MODE button: Press to cycle through FM/AM/SiriusXM®/Media modes
Audio System ON/OFF: Press to turn power on; Press and hold to turn power off
B Seek/Preset button:
FM/AM/SiriusXM® Modes: Press up/down to advance through Preset Stations .
Press and hold to auto seek
Media Mode: Press up/down to move Track Up/Down . Press & hold up/down to
fast forward/rewind (except for Bluetooth® Audio)
C Volume button: Press up/down to raise/lower volume
Mute button: Press to mute/unmute all audio (Media pauses in some Media
modes when pressed)
D CRUISE Control ON/OFF button: Press to turn the Cruise Control
ON/OFF
E Cruising Speed button:
•Press up to resume or increase Cruising Speed
•Press down to set or decrease Cruising Speed
F Cruise Control CANCEL button: To cancel Cruise Control setting,
do one of the following:
•Press the brake pedal
•Press the CANCEL button
•Cruise Control is designed to function above 20 mph •The Cruise Control system will not activate until the brake pedal has been depressed at least once after ignition ON or engine start
QUICK TIPS
Driving while distracted is dangerous and should be avoided. Drivers should remain attentive to driving and always exercise caution when using the steering-wheel-mounted controls while driving. To help minimize driver distraction, some audio system functionalities have been modified while the vehicle is in Drive, Reverse or moved out of Park.
For further audio system operation, refer to pages 31-34.
Your vehicle’s steering wheel buttons may differ from those in the illustrations. See your Owner’s Manual for more details.
Pressing the Audio Mode button for more than 1 second will turn Audio Mode ON/OFF .
QUICK TIP
(Type A shown)
REMINDER: Standard Cruise Control is a part of the Smart Cruise Control (SCC) system and can be set as the operating mode . To switch from SCC to Standard Cruise Control, press and hold the SCC button for two seconds (the SCC system must not be activated to change modes) . Repeat to switch back to SCC mode .
STEERING WHEEL CONTROLS
Page 32 of 54
B
C
A
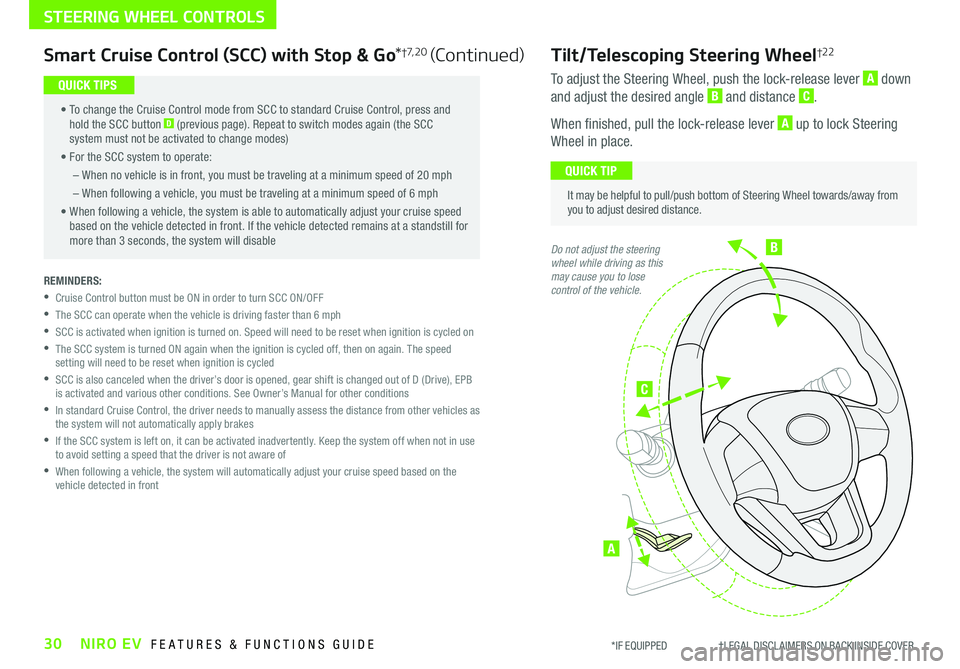
Tilt/Telescoping Steering Wheel†2 2
To adjust the Steering Wheel, push the lock-release lever A down
and adjust the desired angle B and distance C .
When finished, pull the lock-release lever A up to lock Steering
Wheel in place .
It may be helpful to pull/push bottom of Steering Wheel towards/away from you to adjust desired distance .
QUICK TIP
Do not adjust the steering wheel while driving as this may cause you to lose control of the vehicle.
30NIRO EV FEATURES & FUNCTIONS GUIDE*IF EQUIPPED †LEGAL DISCL AIMERS ON BACK INSIDE COVER
STEERING WHEEL CONTROLS
Smart Cruise Control (SCC) with Stop & Go*†7, 2 0 (Continued)
• To change the Cruise Control mode from SCC to standard Cruise Control, press and hold the SCC button D (previous page) . Repeat to switch modes again (the SCC system must not be activated to change modes)
• For the SCC system to operate:
– When no vehicle is in front, you must be traveling at a minimum speed of 20 mph
– When following a vehicle, you must be traveling at a minimum speed of 6 mph
• When following a vehicle, the system is able to automatically adjust your cruise speed based on the vehicle detected in front . If the vehicle detected remains at a standstill for more than 3 seconds, the system will disable
QUICK TIPS
REMINDERS:
•
Cruise Control button must be ON in order to turn SCC ON/OFF
•The SCC can operate when the vehicle is driving faster than 6 mph
•
SCC is activated when ignition is turned on . Speed will need to be reset when ignition is cycled on
•
The SCC system is turned ON again when the ignition is cycled off, then on again . The speed setting will need to be reset when ignition is cycled
•
SCC is also canceled when the driver’s door is opened, gear shift is changed out of D (Drive), EPB is activated and various other conditions . See Owner’s Manual for other conditions
•
In standard Cruise Control, the driver needs to manually assess the distance from other vehicles as the system will not automatically apply brakes
•
If the SCC system is left on, it can be activated inadvertently . Keep the system off when not in use to avoid setting a speed that the driver is not aware of
•
When following a vehicle, the system will automatically adjust your cruise speed based on the vehicle detected in front
Page 35 of 54

33ALWAYS CHECK THE OWNER’S MANUAL FOR COMPLETE OPER ATING INFORMATION AND SAFET Y WARNINGS . *IF EQUIPPED †LEGAL DISCL AIMERS ON BACK INSIDE COVER
AUDIO SYSTEMS
UVO link Videos To view a video on your mobile device, snap this QR Code or visit the listed website . Refer to page 2 for more information .
QR CODE
www.youtube.com/KiaFeatureVideos
UVO link*†1 – FM/AM/SiriusXM® †19/Media (USB, Bluetooth® Audio, My Music)
•The volume level for each source (FM, AM, USB, etc .) will revert to the previously set volume for that source
•Navigation may be available when connected to Android Auto or Apple CarPlay supported smartphones
•When using the voice command feature, wait for the system to BEEP before speaking the command
•At any time, you can interrupt Command Feedback by pressing the TALK button
•Prolonged use of the audio system in ACC mode may drain the vehicle’s 12V battery
•A warning screen may appear periodically to remind users that the audio system should be operated when the engine is running to prevent 12V battery discharge
QUICK TIPS
Sound Settings
To adjust the audio system sound settings:
1 . Press the SETUP key on the audio head unit
2 . Select the onscreen SOUND button, or SOUND SET TINGS
3 . Select the menu item (Position, Tone, Priority, Advanced, Default)
4 . Use the onscreen buttons to adjust settings . Press the return button to save settings
Radio Presets: You can listen to FM, AM and SiriusXM® radio and save frequently used stations
How to Save a Preset: Press and hold the desired slot . This saves the current station in the selected slot
SiriusXM® Smart Favorites: For the first ten favorite SiriusXM® channels, you may play live or repeat from the beginning of a song or a program segment . In Radio mode, choose SiriusXM®,
then select any of the first six favorites . During song or program play, tap the Skip Backward icon to start from the beginning of the song or program . Tap the Play Live icon to return to the live broadcast
Custom Key H: A programmable key to provide quick access to one of several available system features
To program the Custom Key: Press the SETUP key, then press and hold the Custom Key H. Select one of the available features you would like the Custom Key to open
Your audio system may differ from those in the illustrations. For further UVO link operation, refer to the Car Multimedia System User's Manual. For further audio system operation, refer to pages 31-34.
Driving while distracted is dangerous and should be avoided. Drivers should remain attentive to driving and always exercise caution when using the audio system controls while driving. To help minimize driver distraction, some audio system functionalities have been modified while the vehicle is in Drive, Reverse or moved out of Park.
Press to select PHONE mode
Return to HOME screen
REMINDER: To help minimize driver distraction, some audio system functionalities have been restricted while the vehicle is in Drive, Reverse or moved out of Park .
Press briefly to do the following:• FM/AM mode: Play the previous/next frequency• SiriusXM®* mode: Change the channel .• MEDIA mode: Change the track, file or titlePress and hold to do the following (over 0 .8 seconds):• FM/AM mode: Move quickly through all of the frequencies When released, the system seeks the next available frequency• MEDIA mode: Rewinds or fast forwards the track or file (except for Bluetooth® Audio)Press to Power ON/OFF . Rotate to adjust Volume
Press to select Custom key
Press to select FM/AM/SiriusXM®* modes
Press to select MEDIA mode
Press to display SE TUP/Settings mode
In Radio/SiriusXM®/Media modes, rotate knob to search for stations/ channels/tracks/songs/files