Page 49 of 332

WARNING!
Ignoring the Air Bag Warning Light in your
instrument panel could mean you won’t have
the air bags to protect you in a collision. If the
light does not come on as a bulb check when
the ignition is first turned on, stays on after
you start the vehicle, or if it comes on as you
drive, have an authorized dealer service the
air bag system immediately.
Maintaining Your Air Bag System
WARNING!
•Modifications to any part of the air bag
system could cause it to fail when you
need it. You could be injured if the air bag
system is not there to protect you. Do not
modify the components or wiring, including
adding any kind of badges or stickers to
the steering wheel hub trim cover or the
upper right side of the instrument panel.
(Continued)
WARNING!(Continued)
Do not modify the front bumper, vehicle
body structure, or add aftermarket side
steps or running boards.
•It is dangerous to try to repair any part of
the air bag system yourself. Be sure to tell
anyone who works on your vehicle that it
has an air bag system.
•
Do not attempt to modify any part of your air
bag system. The air bag may inflate acciden-
tally or may not function properly if modifica-
tions are made. Take your vehicle to an
authorized dealer for any air bag system
service. If your seat, including your trim
cover and cushion, needs to be serviced in
any way (including removal or loosening/
tightening of seat attachment bolts), take the
vehicle to your authorized dealer. Only
manufacturer approved seat accessories
may be used. If it is necessary to modify the
air bag system for persons with disabilities,
contact your authorized dealer.
Event Data Recorder (EDR)
This vehicle is equipped with an event data
recorder (EDR). The main purpose of an EDR is
to record, in certain crash or near crash-like
situations, such as an air bag deployment or
hitting a road obstacle, data that will assist in
understanding how a vehicle’s systems per-
formed. The EDR is designed to record data
related to vehicle dynamics and safety systems
for a short period of time, typically 30 seconds
or less. The EDR in this vehicle is designed to
record such data as:
•How various systems in your vehicle were
operating;
•Whether or not the driver and passenger
safety belts were buckled/fastened;
•How far (if at all) the driver was depressing
the accelerator and/or brake pedal; and,
•How fast the vehicle was traveling.
These data can help provide a better under-
standing of the circumstances in which crashes
and injuries occur.
45
Page 50 of 332

NOTE:
EDR data are recorded by your vehicle only
if a non-trivial crash situation occurs; no
data are recorded by the EDR under normal
driving conditions and no personal data
(e.g., name, gender, age, and crash location)
are recorded. However, other parties, such
as law enforcement, could combine the EDR
data with the type of personally identifying
data routinely acquired during a crash in-
vestigation.
To read data recorded by an EDR, special
equipment is required, and access to the ve-
hicle or the EDR is needed. In addition to the
vehicle manufacturer, other parties, such as law
enforcement, that have the special equipment,
can read the information if they have access to
the vehicle or the EDR.Child Restraints — Carrying
Children Safely
Everyone in your vehicle needs to be buckled
up at all times, including babies and children.
EC directive 2003/20/EC requires proper use of
restraints in all EC countries.
Children less than 1.5 meters tall and 12 years
or younger should ride properly buckled up in a
rear seat, if available. According to crash statis-
tics, children are safer when properly restrained
in the rear seats rather than in the front.
WARNING!
In a collision, an unrestrained child can be-
come a projectile inside the vehicle. The
force required to hold even an infant on your
lap could become so great that you could not
hold the child, no matter how strong you are.
The child and others could be badly injured.
Any child riding in your vehicle should be in a
proper restraint for the child’s size.
There are different sizes and types of restraints
for children from newborn size to the child
almost large enough for an adult safety belt.
Children should ride rearward facing as long as
possible; this is the most protected position for a
child in the event of a crash. Always check the
child seat Owner’s Manual to make sure you
have the correct seat for your child. Carefully
read and follow all the instructions and warnings
in the child restraint Owner’s Manual and on all
the labels attached to the child restraint.
46
Page 51 of 332

In Europe, children restraint systems are de-
fined by regulation ECE-R44, which divides
them into five weight groups:
Restraint Group Weight Group
Group 0 up to 10 kg
Group 0+ up to 13 kg
Group 1 9-18 kg
Group 2 15-25 kg
Group 3 22-36 kg
Check the label of your child restraint. All ap-
proved child restraints must include type-
approval data and the control mark on its label.
The label must be permanently secured to the
child restraint system. You should not remove
this label from the child restraint.
WARNING!
Extreme Hazard! Do not place a rear-facing
child restraint in front of an active air bag.
(Continued)
WARNING!(Continued)
Refer to visor mounted labels for information.
Deployment of the air bag in an accident
could cause fatal injuries to the baby regard-
less of the severity of the collision. It is
advisable to always carry children in a child
restraint system on the rear seat, which is
the most protected position in the event of a
collision.
“Universal” Child Restraint Systems
The figures in the following sections are ex-
amples of each type of universal child restraint
system. Typical installations are shown. Always
install your child restraint system according to
the child restraint manufacturer’s instructions,
which must be included with this type of re-
straint system.
See the section “Installing Child Restraints Us-
ing the Vehicle Seat Belt” for the steps to
properly lock the seat belt over the child re-
straint.Child restraint systems with ISOFIX anchor-
ages are available for installing the child re-
straint system to the vehicle without using the
vehicle’s seat belts.
Group 0 And 0+
Safety experts recommend that children ride
rearward facing in the vehicle as long as pos-
sible. Infants up to 13 kg must be restrained in
a rear-facing seat like the child seat shown in
fig. A. This type of child restraint supports the
Fig. A
47
Page 52 of 332

child’s head and does not induce stress on the
neck in the event of sudden decelerations or a
crash.
The rear-facing child restraint is restrained by
the vehicle’s seat belts, as shown in fig. A. The
child seat restrains the child with its own har-
ness.
WARNING!
•Never place a rear-facing child restraint in
front of an air bag. A deploying passenger
Advanced Front Air Bag can cause death
or serious injury to a child 12 years or
younger, including a child in a rear-facing
child restraint.
•Only use a rear-facing child restraint in a
vehicle with a rear seat.Group 1
Children who weigh between 9 kg and 18 kg
may be carried in a Group 1, forward facing seat
like the one in fig. B. This type of child restraint
is for older children who are too big for a Group
0 or 0+ child restraint.Group 2
Children who weigh between 15 kg and 25 kg
and who are too big for the Group 1 child
restraint may use a Group 2 child restraint
system.
As shown in fig. C, the Group 2 child restraint
system positions the child correctly with respect
to the seat belt so that the shoulder belt crosses
the child’s chest and not the neck, and the lap
belt is snug on the pelvis and not the abdomen.
Fig. BFig. C
48
Page 53 of 332

Group 3
Children who weigh between 22 kg and 36 kg
and who are tall enough to use the adult shoul-
der belt may use a Group 3 child restraint.
Group 3 child restraints position the lap belt on
the child’s pelvis. The child must be tall enough
that the shoulder belt crosses the child’s chest
and not their neck.Fig. D shows an example of a Group 3 child
restraint system correctly positioning the child
on the rear seat.
WARNING!
•Improper installation can lead to failure of
an infant or child restraint. It could come
loose in a collision. The child could be
badly injured or killed. Follow the child
restraint manufacturer’s directions exactly
when installing an infant or child restraint.
•After a child restraint is installed in the
vehicle, do not move the vehicle seat
forward or rearward because it can loosen
the child restraint attachments. Remove
the child restraint before adjusting the ve-
hicle seat position. When the vehicle seat
has been adjusted, reinstall the child re-
straint.
(Continued)
WARNING!(Continued)
•When your child restraint is not in use,
secure it in the vehicle with the seat belt or
ISOFIX anchorages, or remove it from the
vehicle. Do not leave it loose in the vehicle.
In a sudden stop or accident, it could strike
the occupants or seatbacks and cause
serious personal injury.
Suitability Of Passenger Seats For
Universal Child Restraint System Use
According to the European Directive 2000/3/
EC, the suitability of each passenger seat posi-
tion for the installation of Universal Child Re-
straint Systems is shown in the following table:
Fig. D
49
Page 54 of 332

Universal Child Seating Position Chart
Group Mass Front Passenger Rear Center Rear Outboard
Group 0, 0+ up to 13 kg X U U
Group 1 9-18 kg X U U
Group 2 15-25 k X U U
Group 3 22-36 kg X U U
Key of letters used in the table above:
•U = Suitable for “universal” category re-
straints approved for use in this mass group.
•X = Seat position not suitable for children in
this mass group.
Seat Belts For Older Children
Children over 1.50 m in height can wear seat
belts instead of using child restraints.
Use this simple 5-step test to decide whether
the seat belt properly fits the child or if they
should still use a Group 2 or Group 3 child
restraint to improve the fit of the seat belt:
1. Can the child sit all the way back against the
back of the vehicle seat?2. Do the child’s knees bend comfortably over
the front of the vehicle seat – while they are
still sitting all the way back?
3. Does the shoulder belt cross the child’s
shoulder between their neck and arm?
4. Is the lap part of the belt as low as possible,
touching the child’s thighs and not their
stomach?
5. Can the child stay seated like this for the
whole trip?If the answer to any of these questions was
“no,” then the child still needs to use a Group 2
or 3 child restraint in this vehicle. If the child is
using the lap/shoulder belt, check belt fit peri-
odically and make sure the seat belt buckle is
latched. A child’s squirming or slouching can
move the belt out of position. If the shoulder belt
contacts the face or neck, move the child closer
to the center of the vehicle, or use a booster
seat to position the seat belt on the child
correctly.
50
Page 55 of 332

WARNING!
Never allow a child to put the shoulder belt
under an arm or behind their back. In a
crash, the shoulder belt will not protect a
child properly, which may result in serious
injury or death. A child must always wear
both the lap and shoulder portions of the seat
belt correctly.
ISOFIX Restraint SystemYour vehicle is equipped with the child restraint
anchorage system called ISOFIX. This system
allows ISOFIX equipped child seats to be in-
stalled without using the vehicle’s seat belts.
The ISOFIX system has two lower anchorages
located at the back of the seat cushion where it
meets the seatback and a top tether anchorage
located behind the seating position.
An example of a Universal ISOFIX child re-
straint system for weight group 1 is shown in
Fig. E. ISOFIX child restraints are also available
in the other weight groups.
Locating ISOFIX Anchorages
The lower anchorages are round
bars that are found at the rear of
the seat cushion where it meets the
seatback. They are just visible
when you lean into the rear seat to
install the child restraint. You will
easily feel them if you run your finger along the
gap between the seatback and seat cushion.Locating Tether Anchorages
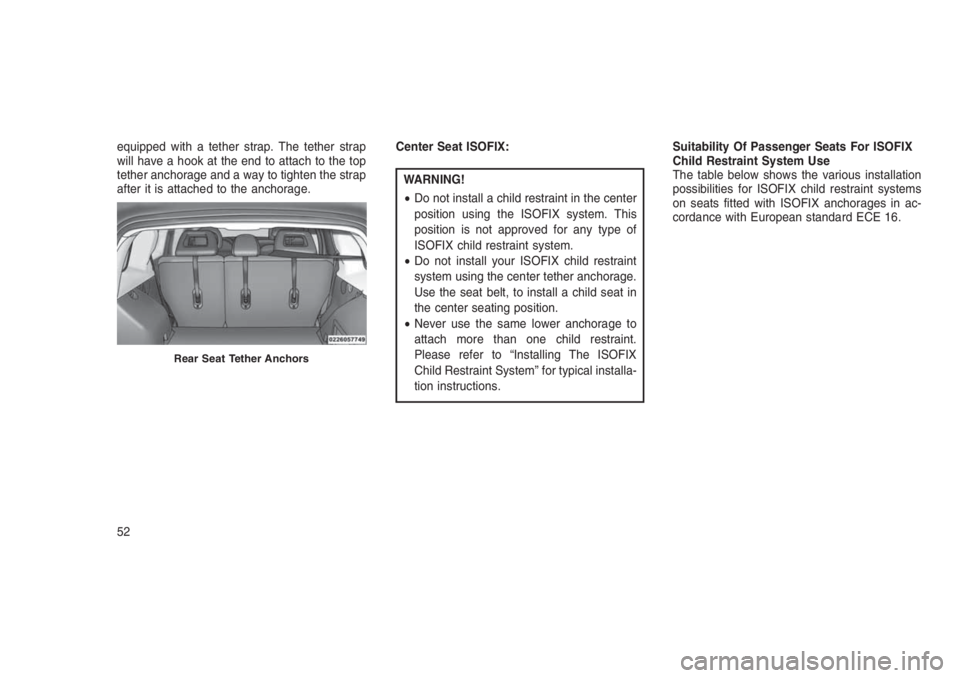
There are tether strap anchorages
behind each rear seating position
located on the back of the seat.
ISOFIX child restraint systems will be equipped
with a rigid bar on each side. Each will have a
connector to attach to the lower anchorage and
a way to tighten the connection to the anchor-
age. Forward-facing child restraints and some
rear-facing child restraints may also be
Fig. E
Rear Seat ISOFIX Anchorages
51
Page 56 of 332

equipped with a tether strap. The tether strap
will have a hook at the end to attach to the top
tether anchorage and a way to tighten the strap
after it is attached to the anchorage.Center Seat ISOFIX:
WARNING!
•Do not install a child restraint in the center
position using the ISOFIX system. This
position is not approved for any type of
ISOFIX child restraint system.
•Do not install your ISOFIX child restraint
system using the center tether anchorage.
Use the seat belt, to install a child seat in
the center seating position.
•Never use the same lower anchorage to
attach more than one child restraint.
Please refer to “Installing The ISOFIX
Child Restraint System” for typical installa-
tion instructions.Suitability Of Passenger Seats For ISOFIX
Child Restraint System Use
The table below shows the various installation
possibilities for ISOFIX child restraint systems
on seats fitted with ISOFIX anchorages in ac-
cordance with European standard ECE 16.
Rear Seat Tether Anchors
52