2020 INFINITI QX80 stop start
[x] Cancel search: stop startPage 16 of 276

2. Getting started
The screen may become distorted by strong
magnetic fields.
Maintenance of display:
CAUTION
.To clean the display, stop the vehicle
in a safe location.
. Clean the display with the ignition
switch in the “OFF” position. If the
display is cleaned while the ignition
switch is in the “ON” position, unin-
tentional operation may occur.
. To clean the display, never use a
rough cloth, alcohol, benzine, thinner
and any kind of solvent or paper towel
with a chemical cleaning agent. They
will scratch or deteriorate the panel.
. Do not splash any liquid such as water
or car fragrance on the display. Con-
tact with liquid will cause the system
to malfunction.
. When cleaning the display, use the
dedicated cleaning cloth.
. Before cleaning, wipe away any sand or
dust from the surface of the display and shake out the exclusive cloth in order to
prevent damaging the display.
. If the display is heavily soiled, moisten
the dedicated cleaning cloth and then
clean the display. If the exclusive cloth is
moistened, be sure to dry it out suffi-
ciently before storing it. Color may be
transferred to objects that it comes in
contact with.
. The dedicated cleaning cloth retains its
cleaning properties even if it is washed
repeatedly.
. When washing the exclusive cloth, be
sure to rinse it thoroughly so that no
detergent remains.
. When ironing the exclusive cloth, iron
using a low temperature setting 176 to
248 °F (80 to 120°C).
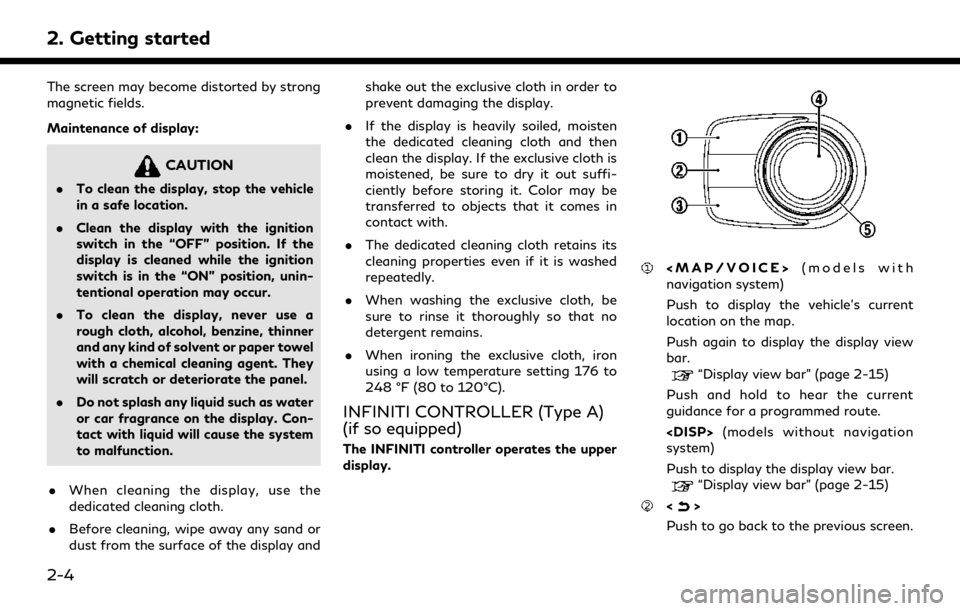
INFINITI CONTROLLER (Type A)
(if so equipped)
The INFINITI controller operates the upper
display.
Page 22 of 276

2. Getting started
STARTING SYSTEM
The system starts when the ignition switch is
placed in the ACC or ON position.
START-UP SCREEN (if so
equipped)
The start-up screen is displayed when the
ignition switch is placed in the ACC or ON
position.
After an animated start-up screen is dis-
played, a message screen will be displayed.
Touch [OK] after reading and agreeing to
the message displayed on the screen. If you
do not agree to the message, some of the
functions on the system will be disabled.
NOTE:
Do not keep the system running with the
engine stopped. Doing so may discharge the
vehicle battery. When you use the system,
always keep the engine running.
INFO:
Once you select [Decline] on the start-up
screen, the [OK]/[Decline] screen will not be
displayed for 30 days.
LOG-IN SCREEN (if so equipped)
Three unique users can be recognized by the
vehicle, with personal settings linked to the
Intelligent Key assigned to each user. When
[Welcome Message] is ON, a welcome
message screen is displayed with the de-
tected user’s name each time the system
starts.
“Setting INFINITI InTuition feature”
(page 5-33)
When an Intelligent Key is used for the first
time, the vehicle will prompt the user to
create a new registration with a guidance on
the lower display.
“User registration” (page 5-31)
1. The system starts when the ignition switch is placed in the “ON” position. A
welcome message screen is displayed.
2. Check the message that is displayed on the screen. If the name shown in the
welcome message is incorrect, touch to
select the preferred user. Touching [
]
or [INFINITI InTuition] on the MENU
screen can also change the user.
“How to view and operate MENU
screen” (page 2-18)
TOUCH PANEL OPERATION
Basic touch panel operation methods are
explained here.
. Touch
Example
Select and execute the selected key on
the screen.
2-10
Page 68 of 276
![INFINITI QX80 2020 Infiniti Connection 3. Audio system
[Start Tune Scan]While the audio system is on, all songs playing on the preset channels are recorded. Up to one hour of music is
recorded for each preset channel.
Touch to scan play th INFINITI QX80 2020 Infiniti Connection 3. Audio system
[Start Tune Scan]While the audio system is on, all songs playing on the preset channels are recorded. Up to one hour of music is
recorded for each preset channel.
Touch to scan play th](/manual-img/42/35001/w960_35001-67.png)
3. Audio system
[Start Tune Scan]While the audio system is on, all songs playing on the preset channels are recorded. Up to one hour of music is
recorded for each preset channel.
Touch to scan play the recorded songs for a few seconds (oldest song is played first).
Touch [Play] to stop scanning and select currently played song to replay.
Touch [
]/[] to skip to the next or previous song.
Touch [Abort] to cancel the scanning.
[Favorite Artists: History] Touch to display the favorite artist alert history.
[Favorite Songs: History] Touch to display the favorite song alert history.
[Sports Flash: History] Touch to display the sports flash alert history.
[Edit Favorite Artists] Turn on/off the notification for favorite artists. Touching [Turn All Alerts ON]/[Turn All Alerts OFF] can turn on/off for all artist at once. Touching [
] can delete a stored favorite artist and [Delete All Favorites] deletes
all stored artists.
[Edit Favorite Songs] Turn on/off the notification for favorite songs. Touching [Turn All Alerts ON]/[Turn All Alerts OFF] can turn on/off for all song at once. Touching [
] can delete a stored favorite song and [Delete All Favorites] deletes
all stored songs.
[Edit Sports Flash Teams] Turn on/off the notification for a favorite team. Touching [Turn All Alerts ON]/[Turn All Alerts OFF] can turn on/off for all team at once. Touching [
] can delete a stored favorite team. [Add Team] can add a new
favorite team to the list.
[Edit Favorite TWN City] Touch to select a city from the list. Traffic & Weather Now (TWN) provides the traffic and weather information for the selected city and nearby area by touching the Traffic & Weather Now indicator on the
SiriusXM® screen.
[Notification Settings] Touch to turn on/off the notifications for Artists, Songs, and Sports Flash. Turning on [Alerts on Non-Audio Screens] can also display the notification on menu screens other than the
audio screen.
[Customize Channel List] Touch to customize the channel list. Only the selected channels will be tuned in to when you seek or scan the channels. You can select each item or select [Disable All Channels]/[Enable All Channels]. You can also turn
on/off [Mature Channels].
3-20
Page 103 of 276
![INFINITI QX80 2020 Infiniti Connection [] Touch to stop playing.
[
] Touch to skip the next file. Touch and hold to fast-forward the file.
OPERATING TIPS
.The rear USB and the rear HDMI (rear
media interface) cannot be played on the
front INFINITI QX80 2020 Infiniti Connection [] Touch to stop playing.
[
] Touch to skip the next file. Touch and hold to fast-forward the file.
OPERATING TIPS
.The rear USB and the rear HDMI (rear
media interface) cannot be played on the
front](/manual-img/42/35001/w960_35001-102.png)
[] Touch to stop playing.
[
] Touch to skip the next file. Touch and hold to fast-forward the file.
OPERATING TIPS
.The rear USB and the rear HDMI (rear
media interface) cannot be played on the
front screen.
. Devices connected to the USB connec-
tion port for the front display cannot be
played on the rear displays.
. When connecting a device to the USB
connection port for the first time, the
system structures the file list and this
could slow down the operation speed.
This is not a malfunction.
. The operation speed of the system could
slow down when the left and right
displays play different files from the
same device connected to the USB
connection port. This is not a malfunc-
tion.
. Images from devices connected to the
USB connection port may not be dis-
played in an adequate ratio depending on
the resolution. To correct the ratio,
adjust the aspect using the remote controller.
“System settings” (page 3-52)
. If a computer with an HDMI output
terminal is connected to the HDMI input
terminal, the computer may not auto-
matically shift to the output mode. To
view images on the rear displays, operate
the computer and change the mode to
the output mode according to the com-
puter owner’s manual.
. Depending on the USB memory device,
the image may not start playing upon
activation or connection of the device to
the USB connection port. In that case,
remove and reinsert the USB memory
device into the port.
Multiple source display
It is possible to play different sources on
each display.
Refer to the following table of example
combinations. Playback combinations by media:
Rear Dis-
play (L)
Rear Dis-
play (R) Availability of play-
back on the left and
right displays
HDMI HDMI Simultaneous play- back
USB HDMI Individual playback
HDMI USB Individual playback
USB USB Individual playback*
* When playing a USB memory device simultaneously on the left and right
displays, playback may be limited by
the image quality (resolution) of the
data. Refer to the following examples
of combinations. However, when the
system is under a heavy load, there are
some combinations that cannot be
played.
Combinations according to USB memory
device image quality:
Rear Dis-
play (L) Rear Dis-
play (R) Availability of in-
dividual playback
on the left and
right displays
3. Audio system
3-55
Page 108 of 276

4. Hands-Free Phone
BLUETOOTH® HANDS-FREE
PHONE SYSTEM
WARNING
.Use a phone after stopping your
vehicle in a safe location. If you have
to use a phone while driving, exercise
extreme caution at all times so full
attention may be given to vehicle
operation.
. If you find yourself unable to devote
full attention to vehicle operation
while talking on the phone, pull off
the road to a safe location and stop
your vehicle before doing so.
CAUTION
To avoid draining the vehicle battery, use
a phone only after starting the engine.
Your vehicle is equipped with Bluetooth®
Hands-Free Phone System. If you are an
owner of a compatible Bluetooth® enabled
cellular phone, you can set up the wireless
connection between your cellular phone and
the in-vehicle phone module. With Blue- tooth® wireless technology, you can make
or receive a telephone call with your cellular
phone in your pocket.
Once a cellular phone is connected to the in-
vehicle phone module, the procedures for
connecting the phone does not need to be
performed again. Your phone will automati-
cally re-connect to the in-vehicle phone
module when the ignition switch is placed
in the ACC or ON position with the selected
cellular phone turned on and carried in the
vehicle.
You can register up to 6 different Blue-
tooth® devices in the in-vehicle phone
module. However, you can talk on only one
cellular phone at a time.
The Voice Recognition System supports
phone and text message commands, so
dialing a phone number using your voice is
possible.“7. Voice recognition”
Before using the Bluetooth® Hands-Free
Phone System, refer to the following notes. . Wireless LAN (Wi-Fi) and the Blue-
tooth® functions share the same fre-
quency band (2.4 GHz). Using the
Bluetooth® and the wireless LAN func-
tions at the same time may slow down or disconnect the communication and cause
undesired noise. It is recommended that
you turn off the wireless LAN (Wi-Fi) (if
so equipped) when using the Bluetooth®
functions.
. Set up the wireless connection between
a compatible cellular phone and the in-
vehicle phone module before using the
Bluetooth® Hands-Free Phone System.
. Some Bluetooth® enabled cellular
phones may not be recognized by the
in-vehicle phone module. Visit the web-
site below for a recommended phone list.
www.infinitiusa.com/bluetooth/
. When Apple CarPlay® or Android Auto
is active, Apple CarPlay® or Android
Auto will take the place of your Blue-
tooth® Hands-Free Phone functionality.
. You will not be able to use a hands-free
phone under the following conditions:
— Your vehicle is outside of the tele- phone service area.
— Your vehicle is in an area where it is difficult to receive radio waves; such
as in a tunnel, in an underground
parking garage, behind a tall building
or in a mountainous area.
4-2
Page 140 of 276

5. Information and vehicle settings
provided with your iPhone®.
1. Connect the iPhone® to the USB con-nection port.
“USB (Universal Serial Bus) connec-
tion ports and AUX (auxiliary) input
jack” (page 2-8)
“USB connection ports” (page 2-9)
2. Depending on the setting, a Startup Information screen will appear on the
upper display. Touch [Yes] to use Apple
CarPlay®.
3. Apple CarPlay® starts and the Apple CarPlay® screen appear on the upper
display.
4. If a notification appears on the iPhone®, select whether or not to use the wireless
connection. Once you enable wireless
Apple CarPlay® (if so equipped) on the
notification, Apple CarPlay® will be
automatically started wirelessly from
next time.
Connecting wirelessly (if so
equipped)
1. Connect the iPhone® to the in-vehiclesystem via Bluetooth®.
“Setting devices” (page 2-28)
INFO:
If no Bluetooth® device is connected and
Apple CarPlay® or Android Auto is not
active, pushing and holding <
>on
the steering wheel can display the
Connections screen.
2. Depending on the setting, a Startup Information screen will appear on the
upper display. Touch [Yes] to use Apple
CarPlay®.
3. A notification will appear on the iPhone®. Select to use the wireless
connection.
INFO:
If you select not to use the wireless
connection, the iPhone® will be con-
nected as a Bluetooth® device.
4. Wireless Apple CarPlay® will be started and the Apple CarPlay® screen appear
on the upper display.
INFO:
If the Wi-Fi connection is off on the Wi-Fi
setting screen, a notification will appear on
the upper display. Touch [Yes] to use wire-
less Apple CarPlay®.
“Wi-Fi Setting” (page 2-30)
Operating tips
. If you do not wish to display the Startup
Information screen each time you acti-
vate Apple CarPlay®, turn on [Don’t Ask
Anymore] on the Startup Information
screen. The Startup Information screen
will not be displayed from the next Apple
CarPlay® activation. The Startup Infor-
mation screen can be set to appear again
in the Apple CarPlay® setting menu.
“Apple CarPlay® settings”
(page 5-23)
. The system update or the map update
will be stopped while using wireless
Apple CarPlay® (if so equipped).
. The connection with the other Blue-
tooth® device may be disconnected
when wireless Apple CarPlay® (if so
equipped) is activated.
. Once the wireless connection has been
established, Apple CarPlay® will be
automatically connected wirelessly next
time.
. Wireless Apple CarPlay® (if so equipped)
uses the Wi-Fi network. After connect-
ing the in-vehicle system to the Wi-Fi
5-20
Page 144 of 276

5. Information and vehicle settings
Apple CarPlay® SYSTEM LIMITA-
TIONS
For all features of Apple CarPlay® to
operate correctly, it is necessary to have a
compatible iPhone®, a cellular connection
and a data plan.
When Apple CarPlay® is operating, system
performance is affected by the strength of
the cellular connection or performance of
the phone itself. If performance of the
system decreases:. Disconnect and reconnect your phone
. Cycle phone power off/on to restart
Changing government regulations may also
affect operation of Apple CarPlay®.
Android AutoTM
WARNING
. Stop your vehicle in a safe location
and apply the parking brake before
connecting your Android
TMphone to
the vehicle or operating your con-
nected Android phone for setup.
. If you are unable to devote full
attention to vehicle operation while
using Android Auto, pull off the road
to a safe location and stop your
vehicle.
You can use Android Auto by connecting a
compatible Android phone to your vehicle
via a USB cable. It is also recommended to
use the Android phone OEM cable that is
compatible with your phone.
With Android Auto, your in-vehicle system
can be used as a display and a controller for
some of the Android phone functions. Voice
control of some of the Android phone
functions is also possible with Android Auto.
Visit www.android.com/auto for informa-
tion about the functions that are available
and details about Google’s privacy policy. Certain vehicle information (e.g. location and
speed) may be shared with your device while
Android Auto is in use. Carrier charges may
apply to use Android Auto.
COMPATIBILITY
Only Android 5.0 (Lollipop) or later versions
are compatible with Android Auto. Refer to
the Android Auto website for more informa-
tion.
INFO:
. Download the Android Auto App from
Google Play
TMto Android phone in
advance.
. For best results, always update your
device to the latest Android software
and Android Auto App version. When
you connect the Android phone to the in-
vehicle system, it will automatically up-
date the Android software and Android
Auto App version.
. Android Auto will take the place of your
Bluetooth® audio and Bluetooth®
Hands-Free Phone functionality.
. When setting a route with the navigation
system (if so equipped), if you set a
destination with Android Auto, the route
5-24
Page 186 of 276
![INFINITI QX80 2020 Infiniti Connection 6. Navigation (if so equipped)
5. Touch [Start] to start the route gui-dance.
ROUTE OPTIONS MENU
WARNING
Always stop the vehicle in a safe location
before modifying the route conditions.
Modifying the INFINITI QX80 2020 Infiniti Connection 6. Navigation (if so equipped)
5. Touch [Start] to start the route gui-dance.
ROUTE OPTIONS MENU
WARNING
Always stop the vehicle in a safe location
before modifying the route conditions.
Modifying the](/manual-img/42/35001/w960_35001-185.png)
6. Navigation (if so equipped)
5. Touch [Start] to start the route gui-dance.
ROUTE OPTIONS MENU
WARNING
Always stop the vehicle in a safe location
before modifying the route conditions.
Modifying the route conditions while
driving may cause an accident.
During route guidance, the route conditions
can be modified and the route information
can be confirmed. Set route conditions
according to your personal preference.
Push