2020 INFINITI QX80 ECU
[x] Cancel search: ECUPage 22 of 276

2. Getting started
STARTING SYSTEM
The system starts when the ignition switch is
placed in the ACC or ON position.
START-UP SCREEN (if so
equipped)
The start-up screen is displayed when the
ignition switch is placed in the ACC or ON
position.
After an animated start-up screen is dis-
played, a message screen will be displayed.
Touch [OK] after reading and agreeing to
the message displayed on the screen. If you
do not agree to the message, some of the
functions on the system will be disabled.
NOTE:
Do not keep the system running with the
engine stopped. Doing so may discharge the
vehicle battery. When you use the system,
always keep the engine running.
INFO:
Once you select [Decline] on the start-up
screen, the [OK]/[Decline] screen will not be
displayed for 30 days.
LOG-IN SCREEN (if so equipped)
Three unique users can be recognized by the
vehicle, with personal settings linked to the
Intelligent Key assigned to each user. When
[Welcome Message] is ON, a welcome
message screen is displayed with the de-
tected user’s name each time the system
starts.
“Setting INFINITI InTuition feature”
(page 5-33)
When an Intelligent Key is used for the first
time, the vehicle will prompt the user to
create a new registration with a guidance on
the lower display.
“User registration” (page 5-31)
1. The system starts when the ignition switch is placed in the “ON” position. A
welcome message screen is displayed.
2. Check the message that is displayed on the screen. If the name shown in the
welcome message is incorrect, touch to
select the preferred user. Touching [
]
or [INFINITI InTuition] on the MENU
screen can also change the user.
“How to view and operate MENU
screen” (page 2-18)
TOUCH PANEL OPERATION
Basic touch panel operation methods are
explained here.
. Touch
Example
Select and execute the selected key on
the screen.
2-10
Page 43 of 276
![INFINITI QX80 2020 Infiniti Connection INFO:
. Enter the password correctly, including
capitalization.
. Touching the [
] will display the net-
work information. Turning [Connect
Automatically] on will automatically con-
nect the vehicle t INFINITI QX80 2020 Infiniti Connection INFO:
. Enter the password correctly, including
capitalization.
. Touching the [
] will display the net-
work information. Turning [Connect
Automatically] on will automatically con-
nect the vehicle t](/manual-img/42/35001/w960_35001-42.png)
INFO:
. Enter the password correctly, including
capitalization.
. Touching the [
] will display the net-
work information. Turning [Connect
Automatically] on will automatically con-
nect the vehicle to the network if the
network is available.
. The system can connect to only WPA2
security network (not connect WEP,
WPA1 network).
. Wi-Fi networks that require a web
browser cannot be accessed through this
units.
Wi-Fi settings:
The Wi-Fi settings can be changed accord-
ing to your preference.
1. Push
Page 95 of 276

Push to go back to the previous screen.
Keypad:
Push the keys below for operations
(USB only).
Key Operations
<
>Push to play or pause the
movie.
<
> Push to stop playing the mo-
vie.
<
> Push to select the next chap-
ter. Push and hold to fast-
forward the movie.
<
> Push once to return to the
beginning of the current
chapter. Push again to select
the previous chapter. Push and
hold to rewind the current
movie.
<
> Not available.
<
> Not available.
Push to turn on all of the in-vehicle
speakers.
Volume control button <>/<>:
Push to adjust the speaker volume.
Slide the switch to the side correspond-
ing to the screen you wish to operate (L
or R).
Push to display the operation screen for
the source that is being played.
“Menus” (page 3-51)
Push to execute the selected item.
Push to display the Mobile Entertain-
ment System settings.
“Setting and information”
(page 3-52)
Push to turn on the sound from the
headphones and turn off the speakers.
<>:
Push to turn on the backlighting of the
remote controller buttons. Battery replacement:
CAUTION
.
An improperly disposed battery can
harm the environment. Always con-
firm local regulations for battery
disposal.
. When changing the batteries, do not
let dust or oil get on the components.
NOTE:
Change the batteries of the remote con-
troller when it does not function properly.
3. Audio system
3-47
Page 96 of 276

3. Audio system
To replace the battery:
1. Open the lid as illustrated above.
2. Replace both batteries with new ones.
.Recommended battery: Size AA x 2
.Be careful not to touch the batteryterminal.
.Make sure that the +and 7ends on
the batteries match the markings in-
side the compartment.
3. Close the lid securely.
.If you will not be using the remote controller for long periods of time,
remove the batteries.
.Replacement of the batteries is
needed when the remote controller
only functions at extremely close
distances to the Mobile Entertain-
ment System or when it does not
function at all.
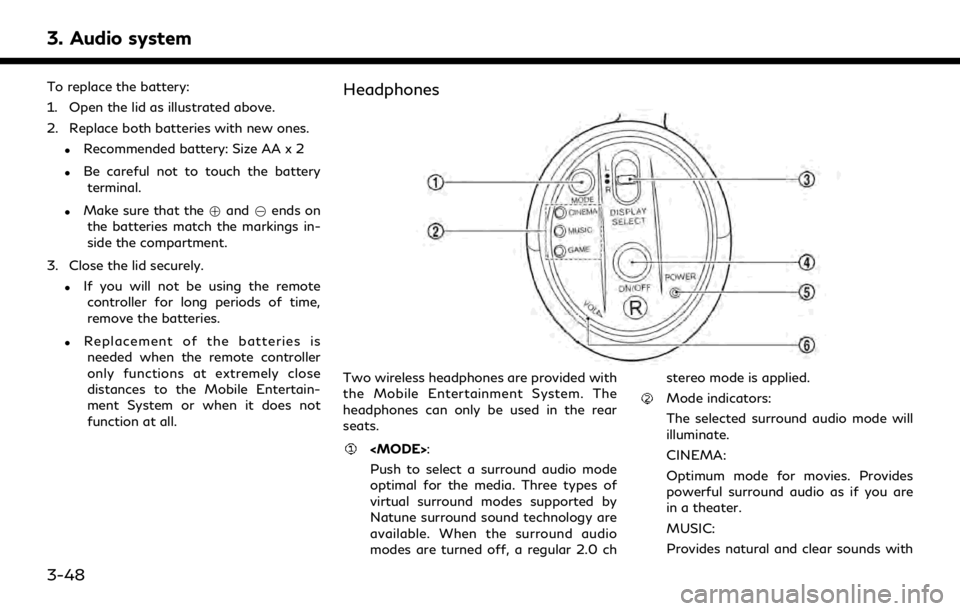
Headphones
Two wireless headphones are provided with
the Mobile Entertainment System. The
headphones can only be used in the rear
seats.
Push to select a surround audio mode
optimal for the media. Three types of
virtual surround modes supported by
Natune surround sound technology are
available. When the surround audio
modes are turned off, a regular 2.0 ch stereo mode is applied.
Mode indicators:
The selected surround audio mode will
illuminate.
CINEMA:
Optimum mode for movies. Provides
powerful surround audio as if you are
in a theater.
MUSIC:
Provides natural and clear sounds with
3-48
Page 98 of 276

3. Audio system
2. Replace both batteries with new ones.
.Recommended battery: Size AAA x 2
.Be careful not to touch the batteryterminal.
.Make sure that the +and 7ends on
the batteries match the markings in-
side the compartment.
3. Close the lid securely.
Audio jacks for wired headphones
Commercially available headphones can also
be used by connecting them to the head-
phone jacks
located at the rear of the
center console box.
To adjust the volume of the wired head-
phone, push
on the corresponding
side (left/right) to pull out the knob which can be rotated to turn up or down the
volume.
Push
back in when it is not in use.
REAR MEDIA INTERFACE
USB connection portand HDMI portare located at the rear of the center console
box.
Only the compatible devices connected to
the rear media interface can be played on the
rear displays.
Turn off the power of the portable device
before connecting to the port.
NOTE:
Do not apply strong pressure to any
portable device (such as a USB memory
device) or cable that is connected to the
USB connection port or the HDMI port. It
could damage the device and the ports.
ACTIVATING REAR DISPLAYS
CAUTION
. The glass on the display screens may
break if hit with a hard or sharp
object. If the glass breaks, do not
touch the liquid crystalline material. In
case of contact with skin, wash im-
mediately with soap and water.
3-50
Page 125 of 276

UPDATING SYSTEM SOFTWARE
(if so equipped)
WARNING
TO AVOID RISK OF DEATH OR SER-
IOUS PERSONAL INJURY WHEN UP-
DATING THE SYSTEM SOFTWARE:
If you choose to park the vehicle within
range of a Wi-Fi connection (if so
equipped), park the vehicle in a secure,
safe well-ventilated location that is open
to the air. During the update process, if
you choose to park your vehicle, it should
be kept in a well ventilated area to avoid
exposure to carbon monoxide. Do not
breathe exhaust gases; they contain
colorless and odorless carbon monoxide.
Carbon monoxide is dangerous. It can
cause unconsciousness or death.
1.Apply the parking brake.
2. Remain with the vehicle while the
update is in process.
3. Do not allow children, pets or people
who may need assistance to remain in
the vehicle while the software is
updating.
NOTE:
The vehicle is not required to be parked
during the software update process. If the
vehicle disconnects from the Wi-Fi connec-
tion (if so equipped), it will resume when the
vehicle reconnects to a known Wi-Fi con-
nection.
INFO:
. The system prioritizes Wi-Fi connection
over TCU (Telematics Control Unit)
when Wi-Fi network connection is avail-
able.
. You will be charged separately when the
network communication is made via
smartphones.
. The download data size of software
updates can vary between 80 MB to
300 MB. If you use your smartphone as
a Wi-Fi connection, you may incur data
charges from your phone carrier. Please
connect to a secure WPA2 Wi-Fi net-
work to avoid potential phone carrier
data charges.
How to update from the pop-up
screen
When both of the following conditions are
met, the system informs the driver with a
pop-up on the screen when system software
update is available.
. [Auto] is selected under [Update Meth-
od].
“How to update from the system
menu” (page 5-6)
. Wi-Fi or TCU (Telematics Control Unit)
network connection is available.
“Wi-Fi Setting” (page 2-30)“INFINITI InTouchTMServices set-
tings” (page 5-15)
1. When the pop-up appears and prompts the driver to perform the system soft-
ware update, operate the system ac-
cording to the guides shown on the
screen to download the updates. An-
other pop-up will appear when down-
loading is complete.
2. After the system software update is complete, place the ignition switch in
the OFF position and leave the system
for 20 minutes without operating the
switches on the control panel and the
5. Information and vehicle settings
5-5
Page 218 of 276

6. Navigation (if so equipped)
— Even if the ferry preference is set toOFF, a route that uses a ferry line
may be suggested.
HOW TO UPDATE MAP DATA
WARNING
TO AVOID RISK OF DEATH OR SER-
IOUS PERSONAL INJURY WHEN UP-
DATING THE MAP SOFTWARE:
If you choose to park the vehicle within
range of a TCU (Telematics Control Unit)
or a Wi-Fi connection (if so equipped),
park the vehicle in a secure, safe well-
ventilated location that is open to the air.
During the update process, if you choose
to park your vehicle, it should be kept in a
well ventilated area to avoid exposure to
carbon monoxide. Do not breathe ex-
haust gases; they contain colorless and
odorless carbon monoxide. Carbon mon-
oxide is dangerous. It can cause uncon-
sciousness or death.
1.Apply the parking brake.
2. Remain with the vehicle while the
update is in process.
3. Do not allow children, pets or people
who may need assistance to remain in the vehicle while the software is
updating.
NOTE:
The vehicle is not required to be parked
during the map update process. If the
vehicle disconnects from the Wi-Fi connec-
tion (if so equipped), it will resume when the
vehicle reconnects to a known Wi-Fi con-
nection.
Navigation map data can be updated via
USB memory device, Wi-Fi (if so equipped)
or TCU (Telematics Control Unit).
Updating with USB memory
The navigation map data can be updated
with the latest information by downloading
a new map database to a USB memory
device and installing it in the vehicle.
For map update, use the USB memory with
the following specifications:
Supported media: USB2.0
Supported file system: FAT32
1. Push
2. Touch [Information] and then touch [System Information]. 3. Touch [Map Update].
4. Touch [Update by USB device].
5. Touch [Save Map Information to USB].
6. Insert blank USB memory device into the
USB connection port.
“USB (Universal Serial Bus) connec-
tion ports and AUX (auxiliary) input
jack” (page 2-8)
“USB connection ports” (page 2-9)
INFO:
If data is in the USB memory, it may be
deleted.
7. Touch [Start].
8. Touch [OK] after saving the map infor- mation to USB.
9. Access to the designated website with your personal computer. Download and
install the map update tool in your
personal computer. (Consult an INFINITI
retailer for details.)
10. Download the updated data and store it in the USB memory with the map update
tool.
11. Push
6-62
Page 224 of 276

7. Voice recognition
VOICE RECOGNITION
USING VOICE RECOGNITION
SYSTEM
Initialization
When the ignition switch is in the ON or ACC
position, voice recognition is initialized.
When the initialization is complete, the
system is ready to accept voice commands.
If <
>on the steering wheel is pushed
before the initialization completes, the
display will show a message to wait until
the system is ready.
BEFORE STARTING
To get the best recognition performance
from voice recognition, observe the follow-
ing items.
. The interior of the vehicle should be as
quiet as possible. Close the windows to
eliminate the surrounding noises (traffic
noise, vibration sounds, etc.), which may
prevent the system from correctly re-
cognizing the voice commands.
. Wait until the tone sounds before speak-
ing a command. .
Speak in a natural conversational voice
without pausing between words.
. The system cannot recognize voice com-
mands spoken from passenger seats.
GIVING VOICE COMMANDS
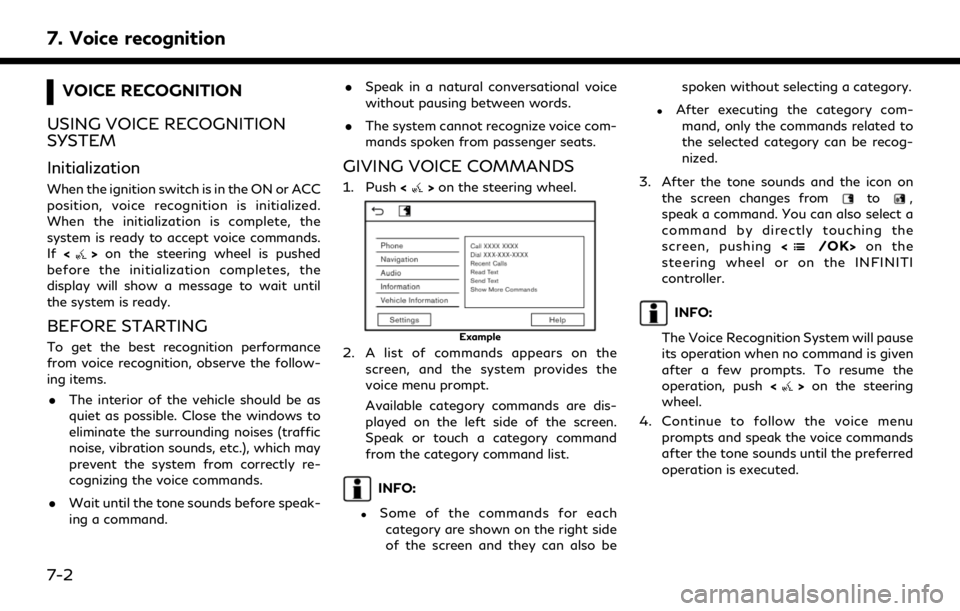
1. Push <>on the steering wheel.
Example
2. A list of commands appears on the
screen, and the system provides the
voice menu prompt.
Available category commands are dis-
played on the left side of the screen.
Speak or touch a category command
from the category command list.
INFO:
.Some of the commands for eachcategory are shown on the right side
of the screen and they can also be spoken without selecting a category.
.After executing the category com-
mand, only the commands related to
the selected category can be recog-
nized.
3. After the tone sounds and the icon on the screen changes from
to,
speak a command. You can also select a
command by directly touching the
screen, pushing <
/OK>on the
steering wheel or on the INFINITI
controller.
INFO:
The Voice Recognition System will pause
its operation when no command is given
after a few prompts. To resume the
operation, push <
>on the steering
wheel.
4. Continue to follow the voice menu prompts and speak the voice commands
after the tone sounds until the preferred
operation is executed.
7-2