Page 23 of 276
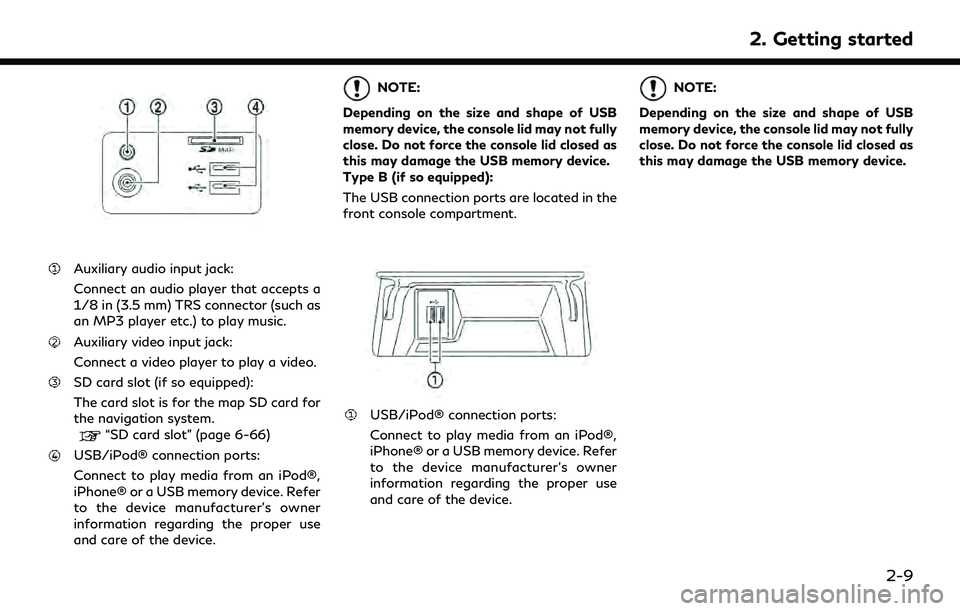
Auxiliary audio input jack:
Connect an audio player that accepts a
1/8 in (3.5 mm) TRS connector (such as
an MP3 player etc.) to play music.
Auxiliary video input jack:
Connect a video player to play a video.
SD card slot (if so equipped):
The card slot is for the map SD card for
the navigation system.
“SD card slot” (page 6-66)
USB/iPod® connection ports:
Connect to play media from an iPod®,
iPhone® or a USB memory device. Refer
to the device manufacturer’s owner
information regarding the proper use
and care of the device.
NOTE:
Depending on the size and shape of USB
memory device, the console lid may not fully
close. Do not force the console lid closed as
this may damage the USB memory device.
Type B (if so equipped):
The USB connection ports are located in the
front console compartment.
USB/iPod® connection ports:
Connect to play media from an iPod®,
iPhone® or a USB memory device. Refer
to the device manufacturer’s owner
information regarding the proper use
and care of the device.
NOTE:
Depending on the size and shape of USB
memory device, the console lid may not fully
close. Do not force the console lid closed as
this may damage the USB memory device.
2. Getting started
2-9
Page 24 of 276
2. Getting started
DISPLAYING OPERATION
SCREEN
CONTROL PANEL OPERATION
(models with control panel)
Push the buttons on the control panel to
display each operation screen.
“Control buttons and touch screen dis-
play” (page 2-2)
. (if so equipped):
Push to display the Navigation menu
screen. The available functions will vary
based on the current navigation settings.
“Destination screen” (page 6-17)
“Route menu screen” (page 6-37)
. :
Push to display the Apps screen.
“INFINITI InTouchTMApps”
(page 5-29)
. :
Push to display the Information menu
screen.
“Information menu” (page 5-2)
. :
Push to display the Settings menu
screen.
“Settings menu” (page 2-19) .
<
>(if so equipped):
Push to display the Phone screen.
“4. Bluetooth® Hands-Free Phone”
MENU BUTTON OPERATION
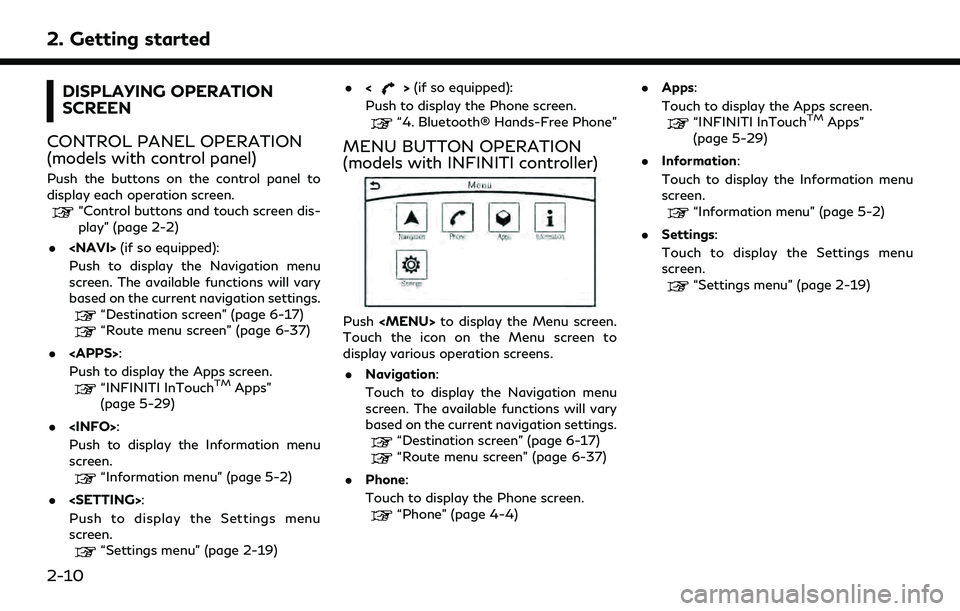
(models with INFINITI controller)
Push
Page 26 of 276
![INFINITI QX60 2020 Infiniti Connection 2. Getting started
Models with navigation system:
More various operations are possible for a
map screen.
“Map operation” (page 6-4)
OPERATING MENU SCREEN
Touch [<] to scroll to the previous page.
INFINITI QX60 2020 Infiniti Connection 2. Getting started
Models with navigation system:
More various operations are possible for a
map screen.
“Map operation” (page 6-4)
OPERATING MENU SCREEN
Touch [<] to scroll to the previous page.](/manual-img/42/35140/w960_35140-25.png)
2. Getting started
Models with navigation system:
More various operations are possible for a
map screen.
“Map operation” (page 6-4)
OPERATING MENU SCREEN
Touch [<] to scroll to the previous page.
Touch the preferred icon to execute a
function and display the next screen.
Indicates the position of the currently
displayed page out of the total number
of available pages.
Touch [>] to scroll to the next page.
A swipe gesture can also be used to move
quickly between pages.
SCROLLING LIST OR MESSAGE
Drag the scroll bar up or down to scroll
the message or list up or down.
Touch the preferred item.
If a listed item name is not completely
displayed (due to length), touch [ >]to
display the hidden part of the name.
Touch []or[] to scroll the
message or list one item at a time.
Touch [
]or[] to skip to the next
or previous page.
SELECTING ITEM
When an item is touched, it is executed and
the next screen is displayed.
Touch [
] to return to the previous screen.
ADJUSTING SETTINGS
Level of volume, brightness, etc. can be
adjusted.
Touch the adjustment keys, such as [+]/[-],
[L]/[R], etc., to adjust each item. Each time a
key is touched, the indicator moves along the
2-12
Page 27 of 276
bar.SYSTEM STATUS SCREEN
By pushing, the current status of
the system can be displayed.
“Control buttons and touch screen
display” (page 2-2)
“Audio main buttons (Type B)”
(page 3-15)
INFO:
There are different status screens displayed
depending on various factors, such as the
currently active mode, whether a destination
(models with navigation system) has been
set or not, etc.
Touching [<]/[ >] can switch air conditioner
status screen and navigation route
information screen (models with navigation
system). Models with navigation system:
When no route is set, a compass and the
direction of travel are displayed instead of
the route information.
2. Getting started
2-13
Page 28 of 276
![INFINITI QX60 2020 Infiniti Connection 2. Getting started
SHORTCUT MENU
DISPLAYING SHORTCUT MENU
SCREEN (models with navigation
system)
Models with INFINITI controller:
To display the shortcut menu, push <
/OK>or touch [] while the current INFINITI QX60 2020 Infiniti Connection 2. Getting started
SHORTCUT MENU
DISPLAYING SHORTCUT MENU
SCREEN (models with navigation
system)
Models with INFINITI controller:
To display the shortcut menu, push <
/OK>or touch [] while the current](/manual-img/42/35140/w960_35140-27.png)
2. Getting started
SHORTCUT MENU
DISPLAYING SHORTCUT MENU
SCREEN (models with navigation
system)
Models with INFINITI controller:
To display the shortcut menu, push <
/OK>or touch [] while the current
location map screen is displayed.
Models with control panel:
To display the shortcut menu, push
or touch [
] while the current
location map screen is displayed.
Available items
. [Audio Source]
. [Audio List] .
[Call History]
. [Phonebook]
. [Cancel Route]
. [Nearby Places]
. [Store Location]
. [View Settings]
. [Select Add/Edit]
. (Blank)
DISPLAYING SHORTCUT MENU
SCREEN (models without naviga-
tion system)
Models with INFINITI controller:
To display the shortcut menu, push <
/OK>on the INFINITI controller while the
climate or status screen is displayed.
Models with control panel:
To display the shortcut menu, push
or touch [
] while the climate
or status screen is displayed.
Available items
. [Audio Source]
. [Audio List]
. [Call History]
. [Phonebook]
. [Select Add/Edit]
. (Blank)
EDIT SHORTCUT MENU
The items on the shortcut menu can be
customized to your preference.
The following procedure can be used to edit
or sort the shortcut menu.
1. Select [Select Add/Edit] to register a
new item to the menu, or to change an
existing menu item.
2-14
Page 30 of 276
2. Getting started
DISPLAY VIEW BAR (models
with navigation system)
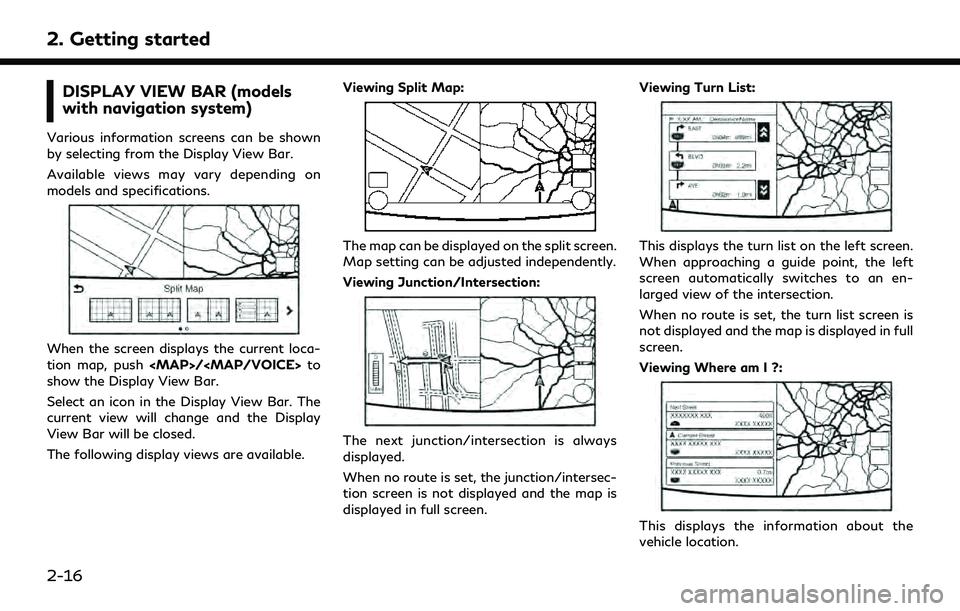
Various information screens can be shown
by selecting from the Display View Bar.
Available views may vary depending on
models and specifications.
When the screen displays the current loca-
tion map, push
Page 31 of 276
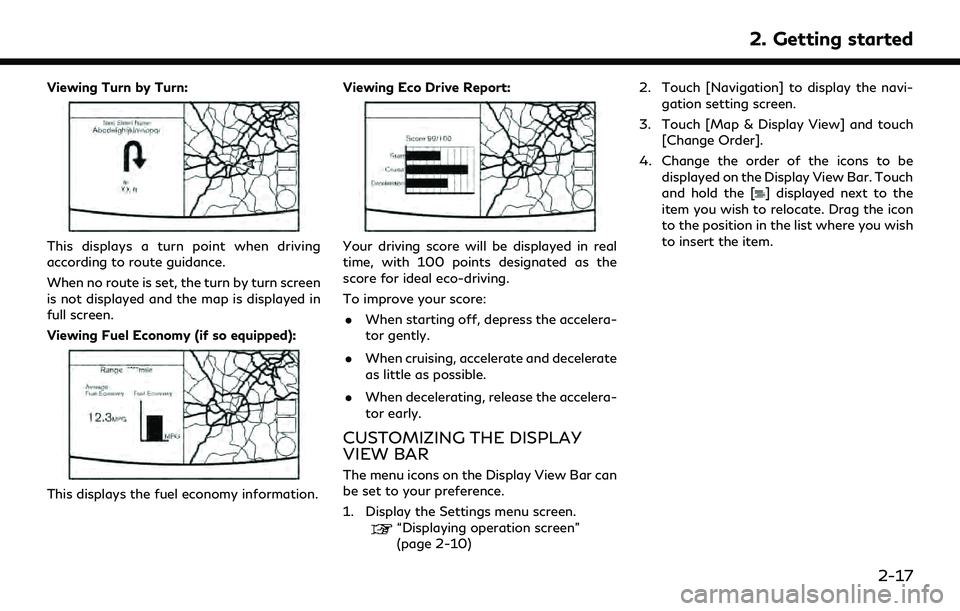
Viewing Turn by Turn:
This displays a turn point when driving
according to route guidance.
When no route is set, the turn by turn screen
is not displayed and the map is displayed in
full screen.
Viewing Fuel Economy (if so equipped):
This displays the fuel economy information.Viewing Eco Drive Report:
Your driving score will be displayed in real
time, with 100 points designated as the
score for ideal eco-driving.
To improve your score:
. When starting off, depress the accelera-
tor gently.
. When cruising, accelerate and decelerate
as little as possible.
. When decelerating, release the accelera-
tor early.
CUSTOMIZING THE DISPLAY
VIEW BAR
The menu icons on the Display View Bar can
be set to your preference.
1. Display the Settings menu screen.
“Displaying operation screen”
(page 2-10) 2. Touch [Navigation] to display the navi-
gation setting screen.
3. Touch [Map & Display View] and touch [Change Order].
4. Change the order of the icons to be displayed on the Display View Bar. Touch
and hold the [
] displayed next to the
item you wish to relocate. Drag the icon
to the position in the list where you wish
to insert the item.
2. Getting started
2-17
Page 33 of 276
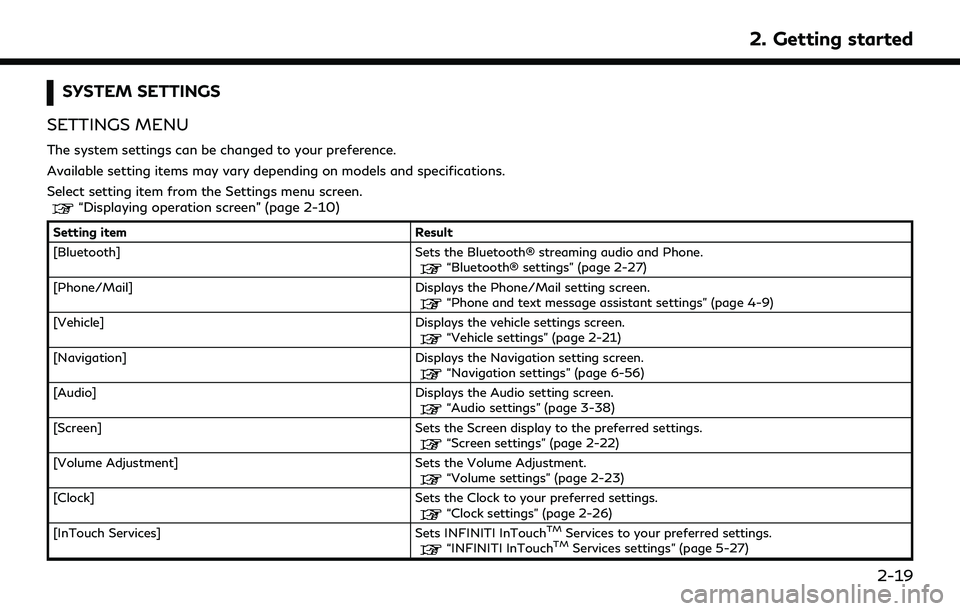
SYSTEM SETTINGS
SETTINGS MENU
The system settings can be changed to your preference.
Available setting items may vary depending on models and specifications.
Select setting item from the Settings menu screen.
“Displaying operation screen” (page 2-10)
Setting item Result
[Bluetooth] Sets the Bluetooth® streaming audio and Phone.
“Bluetooth® settings” (page 2-27)
[Phone/Mail] Displays the Phone/Mail setting screen.
“Phone and text message assistant settings” (page 4-9)
[Vehicle] Displays the vehicle settings screen.
“Vehicle settings” (page 2-21)
[Navigation] Displays the Navigation setting screen.
“Navigation settings” (page 6-56)
[Audio] Displays the Audio setting screen.
“Audio settings” (page 3-38)
[Screen] Sets the Screen display to the preferred settings.
“Screen settings” (page 2-22)
[Volume Adjustment] Sets the Volume Adjustment.
“Volume settings” (page 2-23)
[Clock] Sets the Clock to your preferred settings.
“Clock settings” (page 2-26)
[InTouch Services] Sets INFINITI InTouchTMServices to your preferred settings.“INFINITI InTouchTMServices settings” (page 5-27)
2. Getting started
2-19